English
|
29
Installation Procedure
Installation Procedure
1. To prevent a short circuit, remove the key from the
ignition and disconnect the
-
battery.
2. Make the proper input and output wire
connections for each unit.
3. Connect the wiring harness wires in the following
order: ground, battery, ignition.
4. Connect the wiring harness connector to the unit.
5. Install the unit in your car.
6. Reconnect the
-
battery.
2
WARNING
If you connect the ignition wire (red) and the battery wire
(yellow) to the car chassis (ground), you may cause a short
circuit, that in turn may start a fire. Always connect those
wires to the power source running through the fuse box.
¤
• Do not install the controller and display unit on the surface
where your vision is blocked and driving interfered.
• Before installation, check that no fuel tank, pipe, nor wire
exists at backside of the mounting surface, to prevent
screws from penetrating into such component.
• Mounting and wiring this product requires skills and
experience. For safety’s sake, leave the mounting and wiring
work to professionals.
• Make sure to ground the unit to a negative 12V DC power
supply.
• Do not install the unit in a spot exposed to direct sunlight
or excessive heat or humidity. Also avoid places with too
much dust or the possibility of water splashing.
• Do not use your own screws. Use only the screws provided.
If you use the wrong screws, you could damage the unit.
• If your car’s ignition does not have an ACC position, connect
the ignition wires to a power source that can be turned on
and off with the ignition key. If you connect the ignition
wire to a power source with a constant voltage supply, as
with battery wires, the battery may die.
• If the fuse blows, first make sure the wires aren’t touching
to cause a short circuit, then replace the old fuse with one
with the same rating.
• Insulate unconnected wires with vinyl tape or other similar
material. To prevent a short circuit, do not remove the caps
on the ends of the unconnected wires or the terminals.
• After the unit is installed, check whether the brake lamps,
blinkers, wipers, etc. on the car are working properly.
Installation for Display Unit
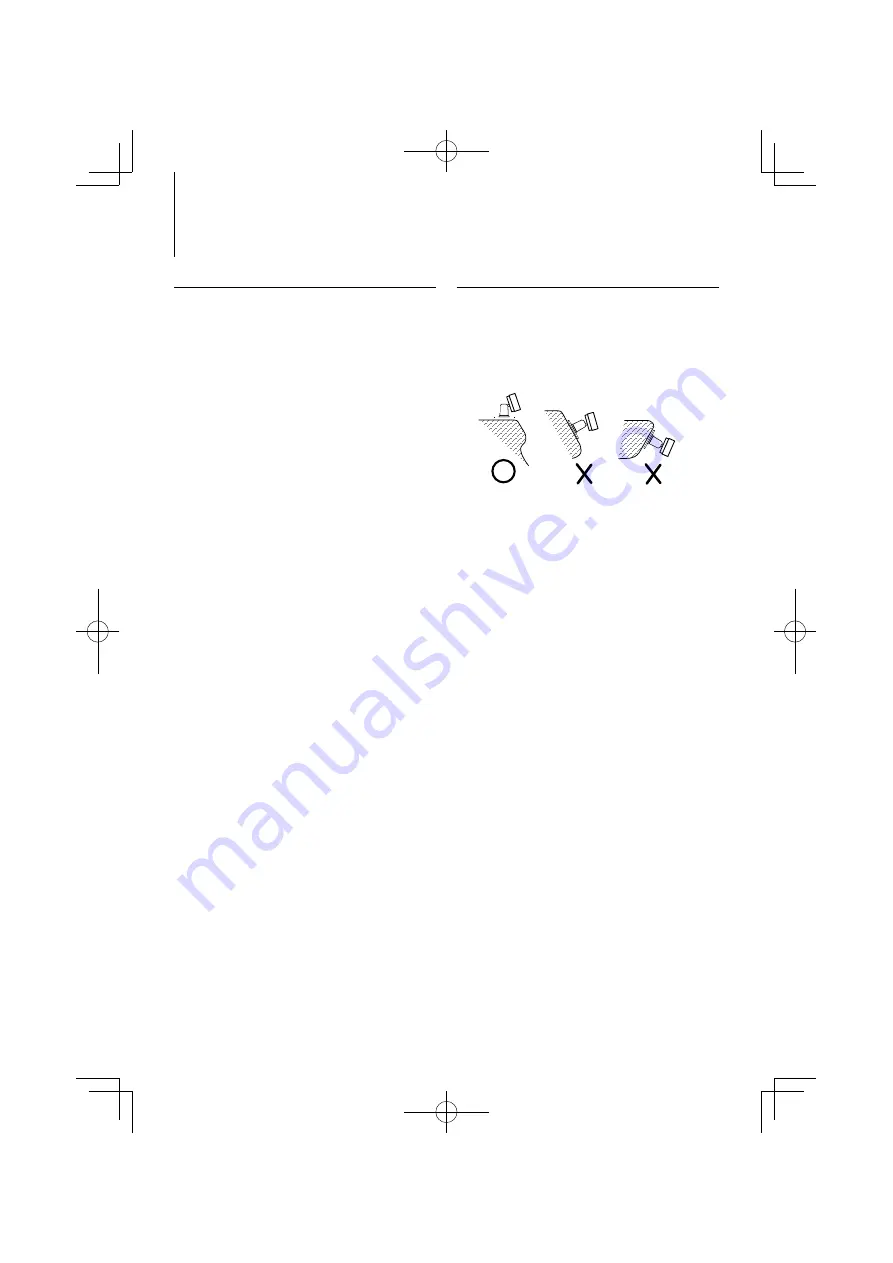
Installation location and cleaning
Select for installation a location where the stand can
be placed completely horizontal shown in Figure
A
.
Do not install in locations where the entire support is
at a diagonal such as in Figure
B
or where the display
unit is facing down such as in Figure
C
.
A
B
C
¤
• Thoroughly wipe away and dust or grease from the
installation location using a cloth which has been soaked in
a neutral cleaning agent and wrung out. Attach the stand
after allowing the installation location to dry.
• Do not attach the double-sided tape more than once or
touch the adhesive with your fingers as this will weaken its
adhesive strength.
• If the temperature of the surface of the installation location
is low, warm it up using a heater or other means before
attaching the stand. Low temperature may weaken the
adhesive strength of the tape.
• The supplied stand is specially intended for this product. Do
not use it with another display.
B64-4455-00̲00̲KOS-A210̲E.indd 29
B64-4455-00̲00̲KOS-A210̲E.indd 29
09.2.18 2:28:01 PM
09.2.18 2:28:01 PM
130.com.ua
Autogood products internet store http://130.com.ua


