background image

6

ENGLISH

Data Size: 

B6L (182 mm x 128 mm)

Book Size: 

B6L (182 mm x 128 mm)

Default: 

[XX]

 [DISPLAY]

[EASY MENU]

When entering 

[FUNCTION]

...

[ON]

[ZONE 1]

 illumination changes to white color. ;

[OFF]

[ZONE 1]

 illumination remains as 

[COLOR SELECT]

 color. 

(Page 24)
• 

[ZONE 2]

 illumination changes to light blue color when you enter 

[FUNCTION]

, irregardless of the 

[EASY MENU]

 setting.

•  Refer to the illustration on page 24 for zone identification.

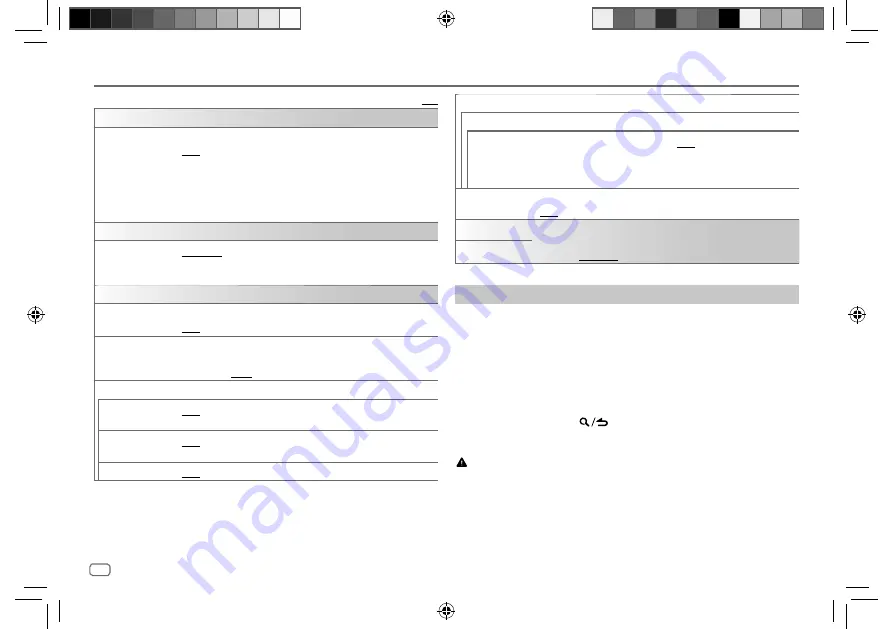
[TUNER SETTING]

 [PRESET  TYPE]

[NORMAL]

: Memorizes one station for each preset button in each band 

(FM1/FM2/FM3/AM/SW1/SW2). ; 

[MIX]

: Memorizes one station for 

each preset button, regardless of the selected band.

[SYSTEM]

[KEY BEEP]

(Applicable only if 

[X’OVER]

 is set to 

[2WAY]

.)

[ON]

: Activates the keypress tone. ; 

[OFF]

: Deactivates.

[TDF ALARM]

(Applicable only if 

[X’OVER]

 is set to 

[2WAY]

.)

[ON]

: Activates the alarm if you forget to detach the faceplate when ACC 

is set to OFF. ; 

[OFF]

: Deactivates.

 [SOURCE  SELECT]

[SPOTIFY SRC]

[ON]

: Enables SPOTIFY/SPOTIFY BT in source selection. ; 

[OFF]

: Disables. 

(Page 11)

[BT AUDIO SRC]

[ON]

: Enables BT AUDIO in source selection. ; 

[OFF]

: Disables. 

(Page 19)

[BUILT-IN AUX]

[ON]

: Enables AUX in source selection. ; 

[OFF]

: Disables. (Page 12)

[F/W UPDATE]

[UPDATE SYSTEM]

[F/W UP xxxx]

[YES]

: Starts upgrading the firmware. ; 

[NO]

: Cancels (upgrading is not 

activated).
For details on how to update the firmware, visit 
<www.kenwood.com/cs/ce/>.

 [FACTORY  RESET]

[YES]

: Resets the settings to default (except the stored station). ; 

[NO]

: Cancels.

 [ENGLISH]

Select the display language for 

[FUNCTION]

 menu and music information 

if applicable.
By default, 

[ENGLISH]

 is selected.

[TURKCE]

 Change the crossover type

Press 

B

 SRC repeatedly to enter STANDBY.

Press and hold number buttons 4 and 5 to enter crossover select.


The current crossover type appears.

Turn the volume knob to select “2WAY” or “3WAY”, then press the 
knob.

Turn the volume knob to select “YES” or “NO”, then press the knob.


The selected crossover type appears.

•  To cancel, press and hold 

.

•  To adjust the selected crossover settings, see page 21.

 CAUTION

Select a crossover type according to how the speakers are connected. 
(Page 28, 29)

If you select a wrong type:
•  The speakers may damage.
•  The output sound level may be extremely high or low.

 Getting  Started

JS_KWD_KMM_BT306_MN_EN.indd   6

JS_KWD_KMM_BT306_MN_EN.indd   6

6/20/2019   10:36:57 AM

6/20/2019   10:36:57 AM

Summary of Contents for KMM-BT306

Page 1: ...m Book Size B6L 182 mm x 128 mm B5A 3147 10 MN 2019 JVCKENWOOD Corporation KMM BT306 DIGITAL MEDIA RECEIVER INSTRUCTION MANUAL JS_KWD_KMM_BT306_MN_C indd 1 JS_KWD_KMM_BT306_MN_C indd 1 10 21 2019 10 21 45 AM 10 21 2019 10 21 45 AM ...

Page 2: ...ing 31 Specifications 33 This symbol on the product means there are important operating and maintenance instructions in this manual Be sure to carefully read instructions in this manual How to read this manual The displays and faceplates shown in this manual are examples used to provide clear explanations of the operations For this reason they may be different from the actual displays or faceplate...

Page 3: ...e driving Make sure all important data has been backed up We shall bear no responsibility for any loss of recorded data Never put or leave any metallic objects such as coins or metal tools inside the unit to prevent a short circuit USB rating is indicated on the main unit To view detach the faceplate Page 4 Depending on the types of cars the antenna will automatically extend when you turn on the u...

Page 4: ...ource Press BSRC repeatedly Press BSRC then turn the volume knob within 2 seconds Press SRC repeatedly Change the display information Press DISP repeatedly Page 30 Not available Remote control RC 406 Attach Detach Faceplate Remote sensor Do not expose to bright sunlight Pull out the insulation sheet when using for the first time How to replace the battery Only for illustration purpose How to reset...

Page 5: ...n the volume knob to make the settings then press the knob Set the time in the order of Hour Minute 5 Turn the volume knob to select CLOCK FORMAT then press the knob 6 Turn the volume knob to select 12H or 24H then press the knob To set the date 7 Turn the volume knob to select DATE FORMAT then press the knob 8 Turn the volume knob to select DD MM YY or MM DD YY then press the knob 9 Turn the volu...

Page 6: ...FF Disables Page 19 BUILT IN AUX ON Enables AUX in source selection OFF Disables Page 12 F W UPDATE UPDATE SYSTEM F W UP xxxx YES Starts upgrading the firmware NO Cancels upgrading is not activated For details on how to update the firmware visit www kenwood com cs ce FACTORY RESET YES Resets the settings to default except the stored station NO Cancels ENGLISH Select the display language for FUNCTI...

Page 7: ...see the following table then press the knob 3 Repeat step 2 until the desired item is selected activated or follow the instructions stated on the selected item 4 Press and hold to exit To return to the previous setting item press Default XX TUNER SETTING SEEK MODE Selects the searching method for S T buttons when pressed AUTO1 Automatically search for a station AUTO2 Search for a preset station MA...

Page 8: ...ion alarm or news bulletin is turned on Available Program Type for PTY SEARCH SPEECH NEWS AFFAIRS INFO information SPORT EDUCATE DRAMA CULTURE SCIENCE VARIED WEATHER FINANCE CHILDREN SOCIAL RELIGION PHONE IN TRAVEL LEISURE DOCUMENT MUSIC POP M music ROCK M music EASY M music LIGHT M music CLASSICS OTHER M music JAZZ COUNTRY NATION M music OLDIES FOLK M music The unit will search for the Program Ty...

Page 9: ...d drive of a multiple drive device You can also select the music drive from the FUNCTION menu 1 Press the volume knob to enter FUNCTION 2 Turn the volume knob to select USB then press the knob 3 Turn the volume knob to select MUSIC DRIVE then press the knob 4 Turn the volume knob to select DRIVE CHANGE then press the knob The next drive DRIVE 1 to DRIVE 4 is selected automatically and playback sta...

Page 10: ...5 Not applicable for BT AUDIO source To return to the previous setting item press To cancel press and hold USB iPod To cancel press or DIRECT Not available if Random Play is selected Not applicable for iPod USB source Select a file to play From a folder or list For iPod applicable only when MODE OFF is selected Page 9 1 Press 2 Turn the volume knob to select a folder list then press the knob 3 Tur...

Page 11: ...cast starts automatically To On the faceplate On the remote control Play back pause Press 6 IW Press ENT IW Skip a track Press S 3 T Press S 3 T Select thumbs up or thumbs down 4 Press 2 1 Press FM AM Start radio Press and hold 5 Not available Repeat play 5 Press 4 repeatedly REPEAT ALL REPEAT ONE 3 REPEAT OFF Not available Random play 5 Press 3 repeatedly 3 SHUFFLE ON SHUFFLE OFF Not available 1 ...

Page 12: ...X in SOURCE SELECT Page 6 Start listening 1 Connect a portable audio player commercially available Portable audio player 3 5 mm stereo mini plug with L shaped connector commercially available Auxiliary input jack 2 Press BSRC repeatedly to select AUX 3 Turn on the portable audio player and start playback Set the name of the external device While listening to a portable audio player connected to th...

Page 13: ...d hold to exit To return to the previous setting item press Default XX REMOTE APP SELECT Selects the device IOS or ANDROID to use the application IOS YES Selects iPhone iPod touch to use the application via Bluetooth or connected via USB input terminal NO Cancels If IOS is selected select iPod BT source or iPod USB source if your iPhone iPod touch is connected via USB input terminal to activate th...

Page 14: ... connected at any time To connect or disconnect the registered device see PHONE SELECT or AUDIO SELECT in BT MODE Page 18 However while in BT AUDIO source you can connect to five Bluetooth audio devices and switch between these five devices Page 19 Some Bluetooth devices may not automatically connect to the unit after pairing Connect the device to the unit manually Refer to the instruction manual ...

Page 15: ... disconnected The following operations may differ or be unavailable depending on the connected phone To On the faceplate On the remote control First incoming call Answer a call Press or the volume knob or one of the number buttons 1 to 6 Press Reject a call Press Press End a call Press Press While talking on the first incoming call Answer another incoming call and hold the current call Press Press...

Page 16: ...e the volume to 15 3 Operations may vary according to the connected Bluetooth device Improve the voice quality While talking on the phone 1 Press the volume knob to enter FUNCTION 2 Turn the volume knob to select an item see the following table then press the knob 3 Repeat step 2 until the desired item is selected or activated 4 Press and hold to exit To return to the previous setting item press D...

Page 17: ... you want to call or the voice command to control the phone functions See also the following Make a call using voice recognition LOW MID FULL Shows the strength of the battery NO SIGNAL LOW MID MAX Shows the strength of the current received signal Functionality depends on the type of the phone used Make a call using voice recognition 1 Press and hold to activate the voice recognition of the connec...

Page 18: ...d or follow the instructions stated on the selected item 4 Press and hold to exit To return to the previous setting item press Default XX BT MODE PHONE SELECT Selects the phone or audio device to connect or disconnect appears in front of the device name when connected appears in front of the current playback audio device You can connect a maximum of two Bluetooth phones and one Bluetooth audio dev...

Page 19: ... Press 3 to select RANDOM OFF Select a file from a folder list Refer to Select a file to play on page 10 Switch between connected Bluetooth audio devices Press 5 Pressing the Play key on the connected device itself also causes switching of sound output from the device Depending on the connected device some devices may not support this feature Operations and display indications may differ according...

Page 20: ...fore making an adjustment select the source you want to adjust BASS EXTEND ON Turns on the extended bass OFF Cancels 100HZ 160HZ 250HZ 400HZ 630HZ 1KHZ 1 6KHZ 2 5KHZ 4KHZ 6 3KHZ 10KHZ 16KHZ Adjusts the level to memorize for each source Before making an adjustment select the source you want to adjust 100HZ LEVEL 9 to LEVEL 9 Default LEVEL 1 160HZ LEVEL 9 to LEVEL 9 LEVEL 0 250HZ LEVEL 9 to LEVEL 9 ...

Page 21: ... the following Crossover settings By default 2 way crossover type is selected X OVER DTA SETTINGS For settings see Digital Time Alignment settings on page 23 CAR SETTINGS SUB W LEVEL is selectable only when SUBWOOFER SET is set to ON Page 20 Audio Settings Crossover settings Below are the available setting items for 2 way crossover and 3 way crossover SPEAKER SIZE Selects according to the connecte...

Page 22: ...EAR HPF R HPF FRQ Configure the settings for the rear speakers similarly to the front speakers R HPF SLOPE R HPF GAIN SUBWOOFER LPF SW LPF FRQ 30HZ 40HZ 50HZ 60HZ 70HZ 80HZ 90HZ 100HZ 120HZ 150HZ 180HZ 220HZ 250HZ THROUGH SW LPF SLOPE 6DB 12DB 18DB 24DB SW LPF PHASE REVERSE 180 NORMAL 0 SW LPF GAIN 8 to 0 SUBWOOFER of SPEAKER SIZE and SUBWOOFER LPF of X OVER is selectable only when SUBWOOFER SET i...

Page 23: ...te Before making an adjustment select the speaker you want to adjust GAIN 8DB to 0DB Fine adjust the output volume of the selected speaker Before making an adjustment select the speaker you want to adjust DTA RESET YES Resets the settings DISTANCE and GAIN of the selected POSITION to default NO Cancels CAR SETTINGS Identify your car type and rear speaker location in order to make the adjustment fo...

Page 24: ... 2 Measure the distances from the reference point to the speakers 3 Calculate the distance between the furthest speaker subwoofer on the illustration and other speakers 4 Sets the DISTANCE calculated in step 3 for individual speakers 5 Adjusts GAIN for individual speakers Example When FRONT ALL is selected as the listening position Display Settings Zone identification for color settings and bright...

Page 25: ...or for the selected zone Default VARIABLE SCAN To make your own color select CUSTOM R G B The color you have made will be stored in CUSTOM R G B 1 Press the volume knob to enter the detailed color adjustment 2 Press S T to select the color R G B to adjust 3 Turn the volume knob to adjust the level 0 to 9 then press the knob DIMMER Dims the illumination ON Dimmer is turned on OFF Dimmer is turned o...

Page 26: ...cuit To prevent short circuit Insulate unconnected wires with vinyl tape Be sure to ground this unit to the car s chassis again after installation Secure the wires with cable clamps and wrap vinyl tape around the wires that comes into contact with metal parts to protect the wires CAUTION Install this unit in the console of your vehicle Do not touch the metal parts of this unit during and shortly a...

Page 27: ...ng sleeve 1 Remove the mounting sleeve and trim plate from the unit 2 Align the holes in the unit on both sides with the vehicle mounting bracket and secure the unit with screws supplied Use only the specified screws Using wrong screws might damage the unit Do the required wiring Page 28 Bend the appropriate tabs to hold the sleeve firmly in place Hook on the top side Orientate the trim plate as i...

Page 28: ...fuse box Ignition switch To front speaker left For 3 way crossover Mid range speaker left To rear speaker left For 3 way crossover Tweeter left To front speaker right For 3 way crossover Mid range speaker right To rear speaker right For 3 way crossover Tweeter right Car fuse box Blue White Power control wire Antenna control wire 12 V 350 mA Fuse 10 A Antenna terminal IMPORTANT We recommend install...

Page 29: ...his unit For detailed information and notes about the playable audio files visit www kenwood com cs ce audiofile About USB devices You cannot connect a USB device via a USB hub Connecting a cable whose total length is longer than 5 m may result in abnormal playback This unit cannot recognize a USB device whose rating is other than 5 V and exceeds 1 5 A Connector on the reverse side of the faceplat...

Page 30: ...DIO Song title Artist Album title Artist Playing time Date back to the beginning AUX Source name Date back to the beginning About iPod iPhone Made for iPod touch 6th generation iPhone 5S 6 6 Plus 6S 6S Plus SE 7 7 Plus 8 8 Plus X XS XS MAX XR iOS 12 1 or later It is not possible to browse video files on the Videos menu in MODE OFF The song order displayed on the selection menu of this unit may dif...

Page 31: ...e Symptom Remedy USB iPod UNSUPPORTED DEVICE appears Check whether the connected USB device is compatible with this unit and ensure the file systems are in supported formats Page 29 Reattach the USB device UNRESPONSIVE DEVICE appears Make sure the USB device is not malfunction and reattach the USB device USB HUB IS NOT SUPPORTED appears This unit cannot support a USB device connected via a USB hub...

Page 32: ...he connected phones might not support phone switching feature The Bluetooth connection between the Bluetooth device and the unit is unstable Delete the unused registered Bluetooth device from the unit Page 18 Symptom Remedy USB iPod MEMORY FULL You have reached the maximum storage limit of your iPod iPhone Spotify DISCONNECTED USB is disconnected from the head unit Please make sure the device is c...

Page 33: ... Maximum Supply Current DC 5 V 1 5 A Frequency Response 1 dB 20 Hz 20 kHz Signal to Noise Ratio 98 dB 1 kHz Dynamic Range 93 dB USB Channel Separation 92 dB MP3 Decode Compliant with MPEG 1 2 Audio Layer 3 WMA Decode Compliant with Windows Media Audio AAC Decode AAC LC aac m4a files WAV Decode Linear PCM FLAC Decode FLAC file Up to 96 kHz 24 bit Bluetooth Version Bluetooth 4 2 Frequency Range 2 40...

Page 34: ...potify logo are among the registered trademarks of Spotify AB The Bluetooth word mark and logos are registered trademarks owned by Bluetooth SIG Inc and any use of such marks by JVCKENWOOD Corporation is under license Other trademarks and trade names are those of their respective owners Specifications Audio Maximum Output Power 50 W 4 Full Bandwidth Power at less than 1 THD 22 W 4 Speaker Impedanc...

Page 35: ...ition that no original copies or related materials continue in the possession of the User and that the User shall cause the transferee to comply with this Software License Agreement 2 The User shall not carry out reverse engineering disassembling decompiling or any other code analysis works in connection with the Licensed Software Article 4 Right pertaining to the Licensed Software Any and all cop...

Page 36: ... jurisdiction of the Tokyo District Court for its first instance Important Notice concerning the Software jansson Copyright c 2009 2012 Petri Lehtinen petri digip org Permission is hereby granted free of charge to any person obtaining a copy of this software and associated documentation files the Software to deal in the Software without restriction including without limitation the rights to use co...

Page 37: ...p www aarongifford com Copyright c 2000 2001 Aaron D Gifford All rights reserved You may obtain a copy of the license at https opensource org licenses BSD 3 Clause THE SOFTWARE IS PROVIDED AS IS WITHOUT WARRANTY OF ANY KIND EXPRESS OR IMPLIED INCLUDING BUT NOT LIMITED TO THE WARRANTIES OF MERCHANTABILITY FITNESS FOR A PARTICULAR PURPOSE AND NONINFRINGEMENT IN NO EVENT SHALL THE AUTHORS OR COPYRIGH...

Page 38: ...entation and or software T Kernel 2 0 This product uses the source code of T Kernel 2 0 under T License 2 0 granted by T Engine Forum www tron org BSD 3 Clause Copyright c 2000 2001 Aaron D Gifford All rights reserved You may obtain a copy of the license at https opensource org licenses BSD 3 Clause THE SOFTWARE IS PROVIDED AS IS WITHOUT WARRANTY OF ANY KIND EXPRESS OR IMPLIED INCLUDING BUT NOT LI...

Page 39: ...e registered trademarks owned by Bluetooth SIG Inc and any use of such marks by JVCKENWOOD Corporation is under license Other trademarks and trade names are those of their respective owners ﺍﻟﻤﻮﺍﺻﻔﺎﺕ ﺻﻮﺕ ﺍﻟﻘﺼﻮﻯ ﺍﻟﺨﺮﺝ ﻗﺪﺭﺓ 4 ﻭﺍﻁ 50 ﺍﻟﻜﺎﻣﻞ ﺍﻟﺒﺚ ﻧﻄﺎﻕ ﺳﻌﺔ ﻗﺪﺭﺓ ﺗﺸﺘﺖ ﺇﺟﻤﺎﻟﻲ 1 ﻣﻦ ﺃﻗﻞ ﻋﻨﺪ ﺍﻟﺼﻮﺕ 4 ﻭﺍﻁ 22 ﺍﻟﺴﻤﺎﻋﺎﺕ ﻣﻌﺎﻭﻗﺔ ﺃﻭﻡ 8 ﺃﻭﻡ 4 ﺍﻟﺼﻮﺗﻴﺔ ﺍﻟﺘﺎﺛﻴﺮﺍﺕ ﺩﻳﺴﻴﺒﻞ 9 ﻫﺮﺗﺰ 62 5 1 ﺍﻟﻤﻮﺟﺔ ﺩﻳﺴﻴﺒﻞ 9 ﻫﺮﺗﺰ 100 2 ﺍﻟﻤﻮﺟﺔ ﺩﻳ...

Page 40: ...ﻋﺔ ﻋﺎﻟﻲ USB 2 0 USB 1 1 ﺍﻟﻤﻠﻔﺎﺕ ﻧﻈﺎﻡ FAT12 16 32 ﺑﺎﻟﺘﻴﺎﺭ ﻟﻺﻣﺪﺍﺩ ﺍﻷﻗﺼﻰ ﺍﻟﺤﺪ ﺃﻣﺒﻴﺮ 1 5 ﻓﻮﻟﺖ 5 ﻣﺒﺎﺷﺮ ﺗﻴﺎﺭ ﺩﻳﺴﻴﺒﻞ 1 ﺍﻟﺘﺮﺩﺩ ﺍﺳﺘﺠﺎﺑﺔ ﻫﺮﺗﺰ ﻛﻴﻠﻮ 20 ﻫﺮﺗﺰ 20 ﺍﻟﻀﻮﺿﺎﺀ ﺇﻟﻰ ﺍﻹﺷﺎﺭﺓ ﻧﺴﺒﺔ ﻫﺮﺗﺰ ﻛﻴﻠﻮ 1 ﺩﻳﺴﻴﺒﻞ 98 ﺍﻟﺪﻳﻨﺎﻣﻴﻜﻲ ﺍﻟﻤﺠﺎﻝ ﺩﻳﺴﻴﺒﻞ 93 USB ﺍﻟﻘﻨﻮﺍﺕ ﻓﺼﻞ ﺩﻳﺴﻴﺒﻞ 92 MP3 ﺷﻔﺮﺓ ﻓﻚ MPEG 1 2 Audio Layer 3 ﻣﻊ ﻣﺘﻮﺍﻓﻖ WMA ﺷﻔﺮﺓ ﻓﻚ Windows Media Audio ﻣﻊ ﻣﺘﻮﺍﻓﻖ AAC ﺷﻔﺮﺓ ﻓﻚ m4a aac AAC LC ﻣﻠﻔﺎﺕ WAV ﺷﻔﺮﺓ ﻓﻚ ﺧﻄﻲ PCM FLAC ﺷﻔﺮﺓ ﻓﻚ...

Page 41: ...ﻠﺔ ﺣﻞ ﻳﺘﻢ ﻟﻢ SWITCHING NG ﺍﻟﻬﺎﺗﻒ ﺗﺤﻮﻳﻞ ﻣﻴﺰﺓ ﺍﻟﻤﺘﺼﻠﺔ ﺍﻟﻬﻮﺍﺗﻒ ﺗﺪﻋﻢ ﻻ ﻗﺪ ﺟﻬﺎﺯ ﺑﻴﻦ Bluetooth ﺍﺗﺼﺎﻝ ﻏﻴﺮ ﻭﺍﻟﻮﺣﺪﺓ Bluetooth ﻣﺴﺘﻘﺮ ﺍﻟﻤﺴﺘﺨﺪﻡ ﻏﻴﺮ ﺍﻟﻤﺴﺠﻞ Bluetooth ﺟﻬﺎﺯ ﺑﺤﺬﻑ ﻗﻢ 18 ﺻﻔﺤﺔ ﺍﻟﻮﺣﺪﺓ ﻣﻦ ﺍﻻﻋﺮﺍﺽ ﺍﻷﻋﻄﺎﻝ ﻣﻌﺎﻟﺠﺔ iPod USB MEMORY FULL iPod ﺟﻬﺎﺯ ﻓﻲ ﻟﻠﺘﺨﺰﻳﻦ ﺍﻻﻗﺼﻰ ﺍﻟﺤﺪ ﺍﻟﻰ ﻭﺻﻠﺖ ﻟﻘﺪ ﺑﻚ ﺍﻟﺨﺎﺹ iPhone Spotify DISCONNECTED ﺍﻟﺘﺄﻛﺪ ﻳﺮﺟﻰ ﺍﻟﺮﺋﻴﺴﻴﺔ ﺍﻟﻮﺣﺪﺓ ﻣﻦ ﻣﻔﺼﻮﻝ USB ﺟﻬﺎﺯ USB ﻋﺒﺮ ﺻﺤﻴﺢ ﺑﺸﻜﻞ ﻣﻮﺻﻮﻝ ﺍﻟﺠﻬﺎﺯ ﺍﻥ ﻣﻦ CONNECTIN...

Page 42: ...ﺽ ﺍﻷﻋﻄﺎﻝ ﻣﻌﺎﻟﺠﺔ iPod USB UNSUPPORTED ﺗﻈﻬﺮ DEVICE ﻫﺬﻩ ﻣﻊ ﺎ ﹰ ﻘ ﻣﺘﻮﺍﻓ ﺍﻟﻤﻮﺻﻞ USB ﺟﻬﺎﺯ ﻛﺎﻥ ﺇﺫﺍ ﻣﺎ ﺗﺤﻘﻖ ﺑﺘﻨﺴﻴﻘﺎﺕ ﺍﻟﻤﻠﻒ ﺍﻧﻈﻤﺔ ﺗﻜﻮﻥ ﺃﻥ ﻣﻦ ﻭﺗﺄﻛﺪ ﺍﻟﻮﺣﺪﺓ 29 ﺻﻔﺤﺔ ﻣﺪﻋﻮﻣﺔ ﺍﻟﺠﻬﺎﺯ USB ﺗﻮﺻﻴﻞ ﺃﻋﺪ UNRESPONSIVE ﺗﻈﻬﺮ DEVICE USB ﺟﻬﺎﺯ ﺗﻮﺻﻴﻞ ﻭﺃﻋﺪ USB ﺟﻬﺎﺯ ﻋﻄﻞ ﻋﺪﻡ ﻣﻦ ﺗﺄﻛﺪ USB HUB IS NOT ﻳﻈﻬﺮ SUPPORTED ﻋﻦ ﻣﻮﺻﻮﻝ USB ﺟﻬﺎﺯ ﺩﻋﻢ ﺗﺴﺘﻄﻴﻊ ﻻ ﺍﻟﻮﺣﺪﺓ ﻫﺬﻩ USB ﻣﺮﻛﺰﻱ ﻣﺠﻤﻊ ﻃﺮﻳﻖ ﺍﻟﻰ ﺍﻟﻤﺼﺪﺭ ﻳﺘﻐﻴﺮ ﻻ ﺟﻬﺎﺯ ﺗﻮﺻﻴﻞ ﻋﻨﺪ USB ﺍﻟﻰ ﺍﻻﺳﺘﻤﺎﻉ ﺍﺛﻨﺎﺀ U...

Page 43: ...ﺘﺸﻐﻴﻞ BT AUDIO ﺍﻟﺘﺎﺭﻳﺦ ﺍﻟﺘﺸﻐﻴﻞ ﻭﻗﺖ ﺍﻟﻔﻨﺎﻥ ﺍﻻﻟﺒﻮﻡ ﺍﺳﻢ ﺍﻟﻔﻨﺎﻥ ﺍﻻﻏﻨﻴﺔ ﻋﻨﻮﺍﻥ ﻟﻠﺒﺪﺍﻳﺔ ﻋﻮﺩﺓ AUX ﻟﻠﺒﺪﺍﻳﺔ ﻋﻮﺩﺓ ﺍﻟﺘﺎﺭﻳﺦ ﺍﻟﻤﺼﺪﺭ ﺍﺳﻢ iPhone iPod ﺟﻬﺎﺯ ﺣﻮﻝ Made for 6th generation iPod touch XS MAX XS X 8 Plus 8 7 Plus 7 SE 6S Plus 6S 6 Plus 6 iPhone 5S ﺍﺣﺪﺙ ﺍﻭ iOS 12 1 ﺍﻻﺻﺪﺍﺭ XR MODE OFF ﻭﺿﻊ ﻓﻲ Videos ﻗﺎﺋﻤﺔ ﻣﻦ ﺍﻟﻔﻴﺪﻳﻮ ﻣﻠﻔﺎﺕ ﺍﺳﺘﻌﺮﺍﺽ ﻳﻤﻜﻦ ﻻ ﻓﻲ ﺍﻟﺘﺮﺗﻴﺐ ﻋﻦ ﺍﻟﻮﺣﺪﺓ ﻫﺬﻩ ﻓﻲ ﺍﻻﺧﺘﻴﺎﺭ ﻗﺎﺋﻤﺔ ﻓﻲ ﺍﻟﻤﻌﺮﻭﺿﺔ ﺍﻷﻏﺎﻧﻲ ﺗﺮﺗﻴﺐ ﻳﺨﺘﻠ...

Page 44: ... ﻻ ﻗﻢ ﻟﻠﺘﺸﻐﻴﻞ ﺍﻟﻘﺎﺑﻠﺔ ﺍﻟﺼﻮﺕ ﻣﻠﻔﺎﺕ ﺑﺨﺼﻮﺹ ﻭﻣﻼﺣﻈﺎﺕ ﻣﻔﺼﻠﺔ ﻣﻌﻠﻮﻣﺎﺕ ﻋﻠﻰ ﻟﻠﺤﺼﻮﻝ www kenwood com cs ce audiofile ﺑﺰﻳﺎﺭﺓ USB ﺃﺟﻬﺰﺓ ﺣﻮﻝ USB ﻣﺮﻛﺰﻱ ﻣﺠﻤﻊ ﻃﺮﻳﻖ ﻋﻦ USB ﺟﻬﺎﺯ ﺗﻮﺻﻴﻞ ﻳﻤﻜﻨﻚ ﻻ ﻃﺒﻴﻌﻴﺔ ﻏﻴﺮ ﻣﺸﺎﻛﻞ ﻇﻬﻮﺭ ﻓﻲ ﻣﺘﺮ 5 ﻋﻠﻰ ﺍﻹﺟﻤﺎﻟﻲ ﻃﻮﻟﻪ ﻳﺰﻳﺪ ﻛﺎﺑﻞ ﺗﻮﺻﻴﻞ ﻳﺘﺴﺒﺐ ﻗﺪ ﺍﻟﺘﺸﻐﻴﻞ ﻓﻲ ﺃﻣﺒﻴﺮ 1 5 ﻭﻳﺘﺠﺎﻭﺯ ﻓﻮﻟﺖ 5 ﻣﻌﺪﻟﻪ ﻳﻜﻮﻥ USB ﺟﻬﺎﺯ ﻋﻠﻰ ﺍﻟﺘﻌﺮﻑ ﻟﻠﻮﺣﺪﺓ ﻳﻤﻜﻦ ﻻ ﺍﻟﺠﺎﻧﺐ ﻓﻲ ﺍﻟﻤﻮﺻﻞ ﺍﻟﺠﻬﺎﺯ ﻭﺍﺟﻬﺔ ﻣﻦ ﺍﻟﺨﻠﻔﻲ ﺍﻟﺘﻮﺻﻴﻞ ﺍﻟﺘﺮﻛﻴﺐ ﺧﺎﺭﺟﻴﺔ ﻣﻜﻮﻧﺎﺕ ﺗﻮﺻﻴ...

Page 45: ...ﺍﻻﺷﺘﻌﺎﻝ ﻣﻔﺘﺎﺡ ﻟﻠﺘﻌﺪﻳﺔ ﺍﻟﻴﺴﺮﻯ ﺍﻷﻣﺎﻣﻴﺔ ﺍﻟﺴﻤﺎﻋﺔ ﺇﻟﻰ ﺍﻟﻴﺴﺮﻯ ﺍﻟﻨﻄﺎﻕ ﻣﺘﻮﺳﻄﺔ ﺳﻤﺎﻋﺔ ﻗﻨﻮﺍﺕ 3 ﺍﻟﻴﺴﺮﻯ ﺍﻟﺨﻠﻔﻴﺔ ﺍﻟﺴﻤﺎﻋﺔ ﺇﻟﻰ ﺍﻟﻴﺴﺮﻯ ﺍﻟﺼﻮﺕ ﻣﻜﺒﺮ ﻗﻨﻮﺍﺕ 3 ﻟﻠﺘﻌﺪﻳﺔ ﻟﻠﺘﻌﺪﻳﺔ ﺍﻟﻴﻤﻨﻰ ﺍﻷﻣﺎﻣﻴﺔ ﺍﻟﺴﻤﺎﻋﺔ ﺇﻟﻰ ﺍﻟﻴﻤﻨﻰ ﺍﻟﻨﻄﺎﻕ ﻣﺘﻮﺳﻄﺔ ﺳﻤﺎﻋﺔ ﻗﻨﻮﺍﺕ 3 ﺍﻟﻴﻤﻨﻰ ﺍﻟﺨﻠﻔﻴﺔ ﺍﻟﺴﻤﺎﻋﺔ ﺇﻟﻰ ﺍﻟﻴﻤﻨﻰ ﺍﻟﺼﻮﺕ ﻣﻜﺒﺮ ﻗﻨﻮﺍﺕ 3 ﻟﻠﺘﻌﺪﻳﺔ ﺻﻨﺪﻭﻕ ﻓﻴﻮﺯﺍﺕ ﺍﻟﺴﻴﺎﺭﺓ ﺃﺑﻴﺾ ﺃﺯﺭﻕ ﺍﻟﻜﻬﺮﺑﺎﺀ ﻓﻲ ﺍﻟﺘﺤﻜﻢ ﺳﻠﻚ ﺍﻟﻬﻮﺍﺋﻲ ﻓﻲ ﺍﻟﺘﺤﻜﻢ ﺳﻠﻚ ﻣﻴﻠﻠﻲ 350 ﻓﻮﻟﺖ 12 ﺍﻣﺒﻴﺮ ﺃﻣﺒﻴﺮ 10 ﻛﻬﺮﺑﺎﺋﻴﺔ ﺻﻤﺎﻣﺔ ...

Page 46: ...ﻴﺐ ﺍﻟﻮﺣﺪﺓ ﻣﻦ ﺍﻟﺘﻬﻴﺌﺔ ﻭﻟﻮﺣﺔ ﺍﻟﺘﺮﻛﻴﺐ ﺇﻃﺎﺭ ﺍﻧﺰﻉ 1 ﺭﻑ ﻣﻊ ﺍﻟﺠﺎﻧﺒﻴﻦ ﻛﻼ ﻓﻲ ﺍﻟﺠﻬﺎﺯ ﻓﻲ ﺍﻟﻤﻮﺟﻮﺩﺓ ﺍﻟﺘﺠﺎﻭﻳﻒ ﺑﻤﺤﺎﺫﺍﺓ ﻗﻢ 2 ﻣﺮﻓﻖ ﺍﻟﺒﺮﺍﻏﻲ ﺑﺎﺳﺘﺨﺪﺍﻡ ﺍﻟﺠﻬﺎﺯ ﺑﺘﺜﺒﻴﺖ ﻭﻗﻢ ﺑﺎﻟﺴﻴﺎﺭﺓ ﺍﻟﺘﺮﻛﻴﺐ ﺎ ﹰ ﺗﻠﻔ ﺍﻟﺼﺤﻴﺤﺔ ﻏﻴﺮ ﺍﻟﺒﺮﺍﻏﻲ ﺍﺳﺘﺨﺪﺍﻡ ﻳﺴﺒﺐ ﻓﻘﺪ ﻓﻘﻂ ﺍﻟﻤﺤﺪﺩﺓ ﺍﻟﺒﺮﺍﻏﻲ ﺍﺳﺘﺨﺪﻡ ﻟﻠﺠﻬﺎﺯ ﺍﻟﻤﻄﻠﻮﺑﺔ ﺍﻷﺳﻼﻙ ﺑﺘﻮﺻﻴﻞ ﻗﻢ 28 ﺻﻔﺤﺔ ﺗﻤﺴﻚ ﻛﻲ ﺍﻟﺼﺤﻴﺤﺔ ﺍﻷﻟﺴﻨﺔ ﺍﺛﻦ ﺑﺈﺣﻜﺎﻡ ﻣﻮﺿﻌﻬﺎ ﻓﻲ ﺑﺎﻟﺠﻠﺒﺎﺕ ﻓﻲ ﺍﻟﺨﻄﺎﻑ ﺍﻟﻌﻠﻮﻱ ﺍﻟﺠﺎﻧﺐ ﻟﻮﺣﺔ ﺗﻮﺟﻴﻪ ﻳﺘﻢ ﺍﻷﻣﺎﻣﻴﺔ ﺍﻟﺰﻳﻨﺔ ﻣﻮﺿﺢ ﻫﻮ ﻛﻤﺎ ﺍﻟﺘ...

Page 47: ...ﻠﻚ ﻛﻬﺮﺑﺎﺋﻲ ﺗﻤﺎﺱ ﺣﺪﻭﺙ ﻟﺘﻔﺎﺩﻱ ﺍﻟﻔﻴﻨﻴﻞ ﻣﻦ ﺷﺮﻳﻂ ﺑﻮﺍﺳﻄﺔ ﺍﻟﻤﻮﺻﻠﺔ ﻏﻴﺮ ﺍﻷﺳﻼﻙ ﺑﻌﺰﻝ ﻗﻢ ﺍﻟﺘﺮﻛﻴﺐ ﺑﻌﺪ ﺛﺎﻧﻴﺔ ﻣﺮﺓ ﺍﻟﺴﻴﺎﺭﺓ ﺷﺎﺳﻴﻪ ﻣﻊ ﺍﻟﻮﺣﺪﺓ ﺗﺄﺭﻳﺾ ﻣﻦ ﺗﺄﻛﺪ ﺍﻟﺘﻲ ﺍﻻﺳﻼﻙ ﺣﻮﻝ ﺍﻟﻔﻴﻨﻴﻞ ﻣﻦ ﺷﺮﻳﻂ ﻭﻟﻒ ﺍﻟﻜﺎﺑﻞ ﻣﺸﺎﺑﻚ ﺑﻮﺍﺳﻄﺔ ﺍﻻﺳﻼﻙ ﺑﺘﺄﻣﻴﻦ ﻗﻢ ﺍﻻﺳﻼﻙ ﻟﺤﻤﺎﻳﺔ ﺍﻟﻤﻌﺪﻧﻴﺔ ﺍﻻﺟﺰﺍﺀ ﻣﻊ ﺗﺘﻼﻣﺲ ﺗﻨﺒﻴﻪ ﺍﻟﻮﺣﺪﺓ ﻫﺬﻩ ﻣﻦ ﺍﻟﻤﻌﺪﻧﻴﺔ ﺍﻷﺟﺰﺍﺀ ﺗﻠﻤﺲ ﻭﻻ ﺑﺴﻴﺎﺭﺗﻚ ﺍﻷﺟﻬﺰﺓ ﺣﺎﻣﻞ ﻓﻲ ﺍﻟﻮﺣﺪﺓ ﻫﺬﻩ ﺭﻛﺐ ﻟﻠﻮﺣﺪﺓ ﺍﻟﻤﻌﺪﻧﻴﺔ ﺍﻷﺟﺰﺍﺀ ﺗﻜﻮﻥ ﺣﻴﺚ ﻗﺼﻴﺮﺓ ﺑﻔﺘﺮﺓ ﺍﺳﺘﺨﺪﺍﻣﻬﺎ ﺑﻌﺪ ﺃﻭ ﺍﺳﺘﺨﺪﺍﻣﻬﺎ ﺃ...

Page 48: ...ﻘﺔ ﺍﺧﺘﺮ 1 ﺍﻟﻤﺤﺪﺩﺓ ﻟﻠﻤﻨﻄﻘﺔ ﺍﻹﻋﺪﺍﺩ ﻣﺴﺒﻖ ﺎ ﹰ ﻧ ﻟﻮ ﺣﺪﺩ 2 VARIABLE SCAN ﺍﻓﺘﺮﺍﺿﻲ ﺍﻟﺬﻱ ﺍﻟﻠﻮﻥ ﺗﺨﺰﻳﻦ ﺳﻴﺘﻢ CUSTOM R G B ﺍﺧﺘﺮ ﺑﻚ ﺍﻟﺨﺎﺹ ﺍﻟﻠﻮﻥ ﻻﻧﺸﺎﺀ CUSTOM R G B ﻓﻲ ﺑﺈﻧﺸﺎﺀﻩ ﻗﻤﺖ ﺑﺎﻟﺘﻔﺼﻴﻞ ﺍﻟﻠﻮﻥ ﺿﺒﻂ ﻭﺿﻊ ﺍﻟﻰ ﻟﻠﺪﺧﻮﻝ ﺍﻟﺼﻮﺕ ﻣﺴﺘﻮﻯ ﻗﺮﺹ ﺍﺿﻐﻂ 1 ﺃﺧﻀﺮ ﺃﺣﻤﺮ B G R ﺍﻟﻠﻮﻥ ﻟﺘﺤﺪﻳﺪ S T ﻋﻠﻰ ﺍﺿﻐﻂ 2 ﻟﻠﻀﺒﻂ ﺑﻨﻲ ﺛﻢ 9 ﺇﻟﻰ 0 ﻣﻦ ﺍﻟﻤﺴﺘﻮﻯ ﻟﻀﺒﻂ ﺍﻟﺼﻮﺕ ﻣﺴﺘﻮﻯ ﻗﺮﺹ ﺃﺩﺭ 3 ﺍﻟﻘﺮﺹ ﻋﻠﻰ ﺍﺿﻐﻂ DIMMER ﺍﻟﺘﻮﺿﻴﺤﻲ ﺍﻟﺮﺳﻢ ﺑﺘﻌﺘﻴﻢ ﻗﻢ ﻣﻀﺎﺀ ﺍﻟﻤﻌﺘﻢ ON ﻣﻄﻔﺊ ﺍﻟﻤﻌﺘﻢ OF...

Page 49: ...ﻭﺍﻟﻴﺴﺎﺭ ﺍﻟﻰ ﺍﻟﻤﺮﺟﻌﻴﺔ ﺍﻟﻨﻘﻄﺔ ﻣﻦ ﺍﻟﻤﺴﺎﻓﺎﺕ ﺑﻘﻴﺎﺱ ﻗﻢ 2 ﺍﻟﺴﻤﺎﻋﺎﺕ ﻣﻀﺨﻢ ﺳﻤﺎﻋﺔ ﺍﺑﻌﺪ ﺑﻴﻦ ﺍﻟﻤﺴﺎﻓﺔ ﺍﺣﺴﺐ 3 ﻭﺍﻟﺴﻤﺎﻋﺎﺕ ﺍﻟﺘﻮﺿﻴﺤﻲ ﺍﻟﺸﻜﻞ ﻓﻲ ﺍﻟﺼﻮﺕ ﺍﻻﺧﺮﻯ 3 ﺍﻟﺨﻄﻮﺓ ﻓﻲ ﺍﻟﻤﺤﺴﻮﺏ DISTANCE ﺍﺿﺒﻂ 4 ﺣﺪﺓ ﻋﻠﻰ ﺳﻤﺎﻋﺔ ﻟﻜﻞ ﺣﺪﺓ ﻋﻠﻰ ﺳﻤﺎﻋﺔ ﻟﻜﻞ GAIN ﺍﺿﺒﻂ 5 ﻛﻤﻮﺿﻊ ﻣﻀﺒﻮﻁ FRONT ALL ﻳﻜﻮﻥ ﻋﻨﺪﻣﺎ ﻣﺜﺎﻝ ﺍﺳﺘﻤﺎﻉ ﺍﻟﺸﺎﺷﺔ ﺇﻋﺪﺍﺩﺍﺕ ﺍﻟﺴﻄﻮﻉ ﻭﺇﻋﺪﺍﺩﺍﺕ ﺍﻟﻠﻮﻥ ﻹﻋﺪﺍﺩﺍﺕ ﻣﻨﻄﻘﺔ ﺗﺤﺪﻳﺪ ﺍﻟﻤﻌﺘﻢ ﺗﻬﻴﺌﺔ ﺍﻟﻤﻌﺘﻢ ﺇﻳﻘﺎﻑ ﺃﻭ ﻟﺘﺸﻐﻴﻞ DISP ﻋﻠﻰ ﺍﻻﺳﺘﻤﺮﺍﺭ ﻣﻊ ﺍﺿﻐﻂ DIMMER ﺍﻹﻋﺪﺍﺩ ﻣﻌﻠ...

Page 50: ...ﺤﺔ DISTANCE ﻟﻠﺘﻌﻮﻳﺾ ﺩﻗﻴﻖ ﺑﺸﻜﻞ ﺍﻟﻤﺴﺎﻓﺔ ﺍﺿﺒﻂ 610CM ﺇﻟﻰ 0CM ﺿﺒﻄﻬﺎ ﺗﺮﻳﺪ ﺍﻟﺘﻲ ﺍﻟﺴﻤﺎﻋﺔ ﺍﺧﺘﺮ ﺍﻟﻀﺒﻂ ﻋﻤﻞ ﻗﺒﻞ GAIN ﺩﻗﻴﻖ ﺑﺸﻜﻞ ﺍﻟﺨﺮﺝ ﺻﻮﺕ ﻣﺴﺘﻮﻯ ﺍﺿﺒﻂ 0DB ﺇﻟﻰ 8DB ﺍﻟﻤﺨﺘﺎﺭﺓ ﻟﻠﺴﻤﺎﻋﺔ ﺿﺒﻄﻬﺎ ﺗﺮﻳﺪ ﺍﻟﺘﻲ ﺍﻟﺴﻤﺎﻋﺔ ﺍﺧﺘﺮ ﺍﻟﻀﺒﻂ ﻋﻤﻞ ﻗﺒﻞ DTA RESET ﻟﻠﺒﻨﺪ GAIN ﻭ DISTANCE ﺍﻻﻋﺪﺍﺩﺍﺕ ﺿﺒﻂ ﻳﻌﻴﺪ YES ﺍﻟﻐﺎﺀ NO ﺍﻻﻓﺘﺮﺍﺿﻲ ﺍﻹﻋﺪﺍﺩ ﺍﻟﻰ ﺍﻟﻤﺨﺘﺎﺭ POSITION CAR SETTINGS ﺍﻟﻀﺒﻂ ﺍﺟﺮﺍﺀ ﺍﺟﻞ ﻣﻦ ﺍﻟﺨﻠﻔﻴﺔ ﺍﻟﺴﻤﺎﻋﺔ ﻭﻣﻜﺎﻥ ﺳﻴﺎﺭﺗﻚ ﻧﻮﻉ ﺣﺪﺩ DTA SETTINGS ﻟﻠﺒﻨﺪ CART...

Page 51: ...R HPF FRQ ﺑﺸﻜﻞ ﺍﻟﺨﻠﻔﻴﺔ ﺍﻟﺴﻤﺎﻋﺎﺕ ﺇﻋﺪﺍﺩﺍﺕ ﺑﺘﻜﻮﻳﻦ ﻗﻢ ﺍﻻﻣﺎﻣﻴﺔ ﻟﻠﺴﻤﺎﻋﺎﺕ ﻣﺸﺎﺑﻪ R HPF SLOPE R HPF GAIN SUBWOOFER LPF SW LPF FRQ 80HZ 70HZ 60HZ 50HZ 40HZ 30HZ 180HZ 150HZ 120HZ 100HZ 90HZ THROUGH 250HZ 220HZ SW LPF SLOPE 24DB 18DB 12DB 6DB SW LPF PHASE 0 NORMAL 180 REVERSE SW LPF GAIN 0 ﺇﻟﻰ 8 ﺍﻟﺨﺎﺹ SUBWOOFER LPF ﺍﻭ SPEAKER SIZE ﺑﺎﻟﺒﻨﺪ ﺍﻟﺨﺎﺹ SUBWOOFER ﺗﺤﺪﻳﺪ ﻳﻤﻜﻦ 20 ﺻﻔﺤﺔ ON ﺍﻟﻰ SUBWOOFER SET ﺿﺒﻂ ﻳﺘﻢ ﻋﻨﺪﻣﺎ ﻓ...

Page 52: ...ﺪﺍﺩﺍﺕ ﻳﻠﻲ ﻣﺎ ﺭﺍﺟﻊ ﻗﻨﻮﺍﺕ 3 ﺑﻘﻨﺎﺗﻴﻦ ﺍﻟﺘﻌﺪﻳﺔ ﻧﻮﻉ ﺍﺧﺘﻴﺎﺭ ﺗﻢ ﺍﺍﻓﺘﺮﺍﺿﻴﺔ ﺍﻟﺘﻬﻴﺌﺔ ﻓﻲ X OVER DTA SETTINGS ﻓﻲ ﺍﻟﺮﻗﻤﻲ ﺍﻟﻮﻗﺖ ﻣﺤﺎﺫﺍﺓ ﺇﻋﺪﺍﺩﺍﺕ ﺭﺍﺟﻊ ﺍﻹﻋﺪﺍﺩﺍﺕ ﺑﺨﺼﻮﺹ 23 ﺻﻔﺤﺔ CAR SETTINGS ON ﻋﻠﻰ SUBWOOFER SET ﺿﺒﻂ ﺣﺎﻟﺔ ﻓﻲ ﻓﻘﻂ SUB W LEVEL ﺗﺤﺪﻳﺪ ﻳﻤﻜﻦ 20 ﺻﻔﺤﺔ ﺍﻟﺼﻮﺕ ﺇﻋﺪﺍﺩﺍﺕ ﺍﻟﺘﻌﺪﻳﺔ ﺇﻋﺪﺍﺩﺍﺕ ﻗﻨﻮﺍﺕ 3 ﺑﻌﺪﻳﺔ ﺃﻭ ﺑﻘﺎﺗﻴﻦ ﻟﻠﺘﻌﺪﻳﺔ ﺍﻟﻤﺘﺎﺣﺔ ﺍﻹﻋﺪﺍﺩ ﺑﻨﻮﺩ ﻳﻠﻲ ﻓﻴﻤﺎ SPEAKER SIZE ﺍﻻﻓﻀﻞ ﺍﻻﺩﺍﺀ ﻟﻀﻤﺎﻥ ﺍﻟﻤﻮﺻﻮﻟﺔ ﺍﻟﺴﻤﺎﻋﺔ ﻟﺤﺠﻢ ﻭﻓﻘﺎ ﻳﺨﺘﺎﺭ ﺍﻟﻤﺨﺘﺎﺭﺓ...

Page 53: ...ﻯ ﺿﺒﻄﻪ ﺗﺮﻳﺪ ﺍﻟﺬﻱ ﺍﻟﻤﺼﺪﺭ ﺍﺧﺘﺮ ﺍﻟﻀﺒﻂ ﻋﻤﻞ ﻗﺒﻞ BASS EXTEND ﺍﻟﻤﻤﺘﺪ ﺍﻟﺠﻬﻴﺮ ﺍﻟﺼﻮﺕ ﺑﺘﺸﻐﻴﻞ ﻳﻘﻮﻡ ON ﺍﻟﻐﺎﺀ OFF 160HZ 100HZ 400HZ 250HZ 1KHZ 630HZ 2 5KHZ 1 6KHZ 6 3KHZ 4KHZ 16KHZ 10KHZ ﻣﺼﺪﺭ ﻛﻞ ﻟﺤﻔﻆ ﺍﻟﻤﺴﺘﻮﻯ ﺿﺒﻂ ﺿﺒﻄﻪ ﺗﺮﻳﺪ ﺍﻟﺬﻱ ﺍﻟﻤﺼﺪﺭ ﺍﺧﺘﺮ ﺍﻟﻀﺒﻂ ﻋﻤﻞ ﻗﺒﻞ LEVEL 1 ﺍﻓﺘﺮﺍﺿﻲ LEVEL 9 ﺇﻟﻰ LEVEL 9 100HZ LEVEL 0 LEVEL 9 ﺇﻟﻰ LEVEL 9 160HZ LEVEL 1 LEVEL 9 ﺇﻟﻰ LEVEL 9 250HZ LEVEL 2 LEVEL 9 ﺇﻟﻰ LEVEL 9 400HZ LEVEL 3 LEVEL 9 ﺇ...

Page 54: ...ﺮﺗﻴﺐ ﺍﻟﺘﺸﻐﻴﻞ ALL RANDOM ﻟﺘﺤﺪﻳﺪ 3 ﻋﻠﻰ ﺑﺎﺳﺘﻤﺮﺍﺭ ﺍﺿﻐﻂ GROUP RANDOM ﺃﻭ RANDOM OFF ﻻﺧﺘﻴﺎﺭ 3 ﺍﺿﻐﻂ ﻗﺎﺋﻤﺔ ﻣﺠﻠﺪ ﻣﻦ ﻣﻠﻒ ﺍﺧﺘﺮ 10 ﺻﻔﺤﺔ ﻓﻲ ﻟﺘﺸﻐﻴﻠﻪ ﻣﻠﻒ ﺍﻳﺨﺘﺎﺭ ﺭﺍﺟﻊ Bluetooth ﺻﻮﺕ ﺍﺟﻬﺰﺓ ﺑﻴﻦ ﻳﺤﻮﻝ ﺍﻟﻤﻮﺻﻮﻟﺔ 5 ﺍﺿﻐﻂ ﺍﻟﻤﻮﺻﻮﻝ ﺍﻟﺠﻬﺎﺯ ﻋﻠﻰ ﻋﺮﺽ Play ﺍﻟﻤﻔﺘﺎﺡ ﺿﻐﻂ ﻣﻦ ﺍﻟﺼﻮﺕ ﺍﺧﺮﺍﺝ ﺗﺤﻮﻳﻞ ﻓﻲ ﺍﻳﻀﺎ ﻳﺘﺴﺒﺐ ﻧﻔﺴﻪ ﺍﻟﺠﻬﺎﺯ ﺍﻟﻤﻴﺰﺓ ﻫﺬﻩ ﺗﺪﻋﻢ ﻻ ﻗﺪ ﺍﻻﺟﻬﺰﺓ ﺑﻌﺾ ﻓﺈﻥ ﺍﻟﻤﻮﺻﻮﻝ ﺍﻟﺠﻬﺎﺯ ﻋﻠﻰ ﺍﻋﺘﻤﺎﺩﺍ ﺍﻟﻤﺘﺼﻞ ﺑﺎﻟﺠﻬﺎﺯ ﺗﻮﺍﻓﺮﻫﺎ ﺣﺴﺐ ﺍﻟﺸﺎﺷﺔ ﻭﻣﺆﺷﺮﺍﺕ ﺍﻟﻌﻤﻠﻴﺎﺕ ﺗﺨﺘﻠ...

Page 55: ...ﻳﺘﻢ ﺍﻥ ﺍﻟﻰ 2 ﺍﻟﺨﻄﻮﺓ ﻛﺮﺭ 3 ﺍﻟﻤﺨﺘﺎﺭ ﺑﺎﻟﺒﻨﺪ ﺍﻟﻤﺘﻌﻠﻘﺔ ﺍﻹﻧﻬﺎﺀ ﺃﺟﻞ ﻣﻦ ﺍﻻﺳﺘﻤﺮﺍﺭ ﻣﻊ ﺍﺿﻐﻂ 4 ﻋﻠﻰ ﺍﺿﻐﻂ ﺍﻟﺴﺎﺑﻖ ﺍﻹﻋﺪﺍﺩ ﻋﻨﺼﺮ ﺇﻟﻰ ﻟﻠﺮﺟﻮﻉ XX ﺍﻓﺘﺮﺍﺿﻲ BT MODE PHONE SELECT ﺍﻻﺗﺼﺎﻝ ﻗﻄﻊ ﺃﻭ ﺍﻻﺗﺼﺎﻝ ﺃﺟﻞ ﻣﻦ ﺍﻟﺼﻮﺕ ﺟﻬﺎﺯ ﺃﻭ ﺍﻟﻬﺎﺗﻒ ﺣﺪﺩ ﻣﻮﺻﻮﻻ ﻳﻜﻮﻥ ﻋﻨﺪﻣﺎ ﺍﻟﺠﻬﺎﺯ ﺍﺳﻢ ﺃﻣﺎﻡ ﺍﻟﻤﺆﺷﺮ ﻳﻈﻬﺮ ﺣﺎﻟﻴﺎ ﺍﻟﻤﺴﺘﺨﺪﻡ ﺍﻟﺼﻮﺕ ﺟﻬﺎﺯ ﻣﻘﺪﻣﺔ ﻓﻲ ﻳﻈﻬﺮ ﻛﺤﺪ ﻭﺍﺣﺪ Bluetooth ﺻﻮﺕ ﻭﺟﻬﺎﺯ Bluetooth ﻫﺎﺗﻔﻲ ﺗﻮﺻﻴﻞ ﻳﻤﻜﻦ ﻣﺮﺓ ﻛﻞ ﻓﻲ ﺃﻗﺼﻰ AUDIO SELECT DEVICE DELETE ﻋﻠﻰ ﺍﺿﻐﻂ ﺛ...

Page 56: ...ﺃﻭ ﺑﻬﺎ ﺍﻻﺗﺼﺎﻝ ﺗﺮﻳﺪ ﺍﻟﺘﻲ ﺍﻻﺗﺼﺎﻝ ﺟﻬﺔ ﺍﺳﻢ ﺑﻨﻄﻖ ﻗﻢ ﻣﻴﺰﺓ ﺑﻮﺍﺳﻄﺔ ﻣﻜﺎﻟﻤﺔ ﺍﺟﺮﺍﺀ ﺍﻳﻀﺎ ﺭﺍﺟﻊ ﺍﻟﻬﺎﺗﻒ ﻭﻇﺎﺋﻒ ﻓﻲ ﻟﻠﺘﺤﻜﻢ ﺍﻟﺘﺎﻟﻲ ﺍﻟﺼﻮﺕ ﻋﻠﻰ ﺍﻟﺘﻌﺮﻑ ﺍﻟﺒﻄﺎﺭﻳﺔ ﻗﻮﺓ ﻳﻌﺮﺽ FULL MID LOW ﹰ ﺎ ﺣﺎﻟﻴ ﺍﺳﺘﻘﺒﺎﻟﻬﺎ ﻳﺘﻢ ﺍﻟﺘﻲ ﺍﻹﺷﺎﺭﺓ ﻗﻮﺓ ﻳﻌﺮﺽ MAX MID LOW NO SIGNAL ﺍﻟﻤﺴﺘﺨﺪﻡ ﺍﻟﻬﺎﺗﻒ ﻧﻮﻉ ﻋﻠﻰ ﺍﻟﻮﻇﺎﺋﻒ ﺗﺘﻮﻗﻒ ﺍﻟﺼﻮﺕ ﻋﻠﻰ ﺍﻟﺘﻌﺮﻑ ﻣﻴﺰﺓ ﺑﻮﺍﺳﻄﺔ ﻣﻜﺎﻟﻤﺔ ﺍﺟﺮﺍﺀ ﻋﻠﻰ ﺍﻟﺘﻌﺮﻑ ﻣﻴﺰﺓ ﻟﺘﻨﺸﻴﻂ ﻋﻠﻰ ﺑﺎﻟﻀﻐﻂ ﺍﻻﺳﺘﻤﺮﺍﺭ ﻣﻊ ﺍﺿﻐﻂ 1 ﺍﻟﻤﻮﺻﻮﻝ ﻟﻠﻬﺎﺗﻒ ﺍﻟﺼﻮﺕ ﺍﻟﺼﻮﺗﻲ ﺍﻷﻣﺮ ﺃﻭ ﺑﻬﺎ ﺍ...

Page 57: ...ﻠﻴﺔ ﺗﺆﺛﺮ ﻟﻦ 1 ﻣﺮﺣﻠﺔ 15 ﺑﻤﻘﺪﺍﺭ ﺍﻟﺼﻮﺕ ﻣﺴﺘﻮﻯ ﻟﺰﻳﺎﺩﺓ VOL ﻋﻠﻰ ﺑﺎﻟﻀﻐﻂ ﺍﻻﺳﺘﻤﺮﺍﺭ ﻣﻊ ﺍﺿﻐﻂ 2 ﻣﺴﺘﻤﺮ ﺑﺸﻜﻞ ﺍﻟﻤﺘﺼﻞ Bluetooth ﺟﻬﺎﺯ ﺣﺴﺐ ﺍﻟﻌﻤﻠﻴﺎﺕ ﺗﺨﺘﻠﻒ ﻗﺪ 3 ﺍﻟﺼﻮﺕ ﺟﻮﺩﺓ ﺗﺤﺴﻴﻦ ﺍﻟﻬﺎﺗﻒ ﻓﻲ ﺍﻟﺘﺤﺪﺙ ﺃﺛﻨﺎﺀ FUNCTION ﺇﻟﻰ ﻟﻠﺪﺧﻮﻝ ﺍﻟﺼﻮﺕ ﻣﺴﺘﻮﻯ ﻗﺮﺹ ﻋﻠﻰ ﺍﺿﻐﻂ 1 ﺍﺿﻐﻂ ﺛﻢ ﺍﻟﺘﺎﻟﻲ ﺍﻟﺠﺪﻭﻝ ﺭﺍﺟﻊ ﺑﻨﺪ ﻟﺘﺤﺪﻳﺪ ﺍﻟﺼﻮﺕ ﻣﺴﺘﻮﻯ ﻗﺮﺹ ﺃﺩﺭ 2 ﺍﻟﻘﺮﺹ ﺗﻨﺸﻴﻄﻪ ﺃﻭ ﺍﻟﻤﻄﻠﻮﺏ ﺍﻟﻌﻨﺼﺮ ﺗﺤﺪﻳﺪ ﻳﺘﻢ ﺣﺘﻰ 2 ﺍﻟﺨﻄﻮﺓ ﻛﺮﺭ 3 ﺍﻹﻧﻬﺎﺀ ﺃﺟﻞ ﻣﻦ ﺍﻻﺳﺘﻤﺮﺍﺭ ﻣﻊ ﺍﺿﻐﻂ 4 ﻋﻠﻰ ﺍﺿﻐﻂ ﺍﻟﺴﺎﺑﻖ ﺍﻹﻋﺪ...

Page 58: ...ﺎﺗﻒ ﻭﻓﻘﺎ ﻣﺘﺎﺣﺔ ﻏﻴﺮ ﺗﻜﻮﻥ ﺍﻭ ﺍﻟﺘﺎﻟﻴﺔ ﺍﻟﺘﺸﻐﻴﻞ ﻋﻤﻠﻴﺎﺕ ﺗﺨﺘﻠﻒ ﻗﺪ ﺇﻟﻰ ﺍﻟﺤﻤﺎﻳﺔ ﻏﻄﺎﺀ ﻋﻠﻰ ﺍﻟﺘﺤﻜﻢ ﻭﺣﺪﺓ ﻋﻠﻰ ﺑﻌﺪ ﻋﻦ ﻭﺍﺭﺩﺓ ﻣﻜﺎﻟﻤﺔ ﺍﻭﻝ ﻣﻜﺎﻟﻤﺔ ﻋﻠﻰ ﺍﻻﺟﺎﺑﺔ ﻣﺴﺘﻮﻯ ﺯﺭ ﺍﻭ ﺍﺿﻐﻂ ﺍﻻﺭﻗﺎﻡ ﺍﺯﺭﺍﺭ ﺍﺣﺪ ﺍﻭ ﺍﻟﺼﻮﺕ 6 ﺇﻟﻰ 1 ﺍﺿﻐﻂ ﻣﻜﺎﻟﻤﺔ ﺭﻓﺾ ﺍﺿﻐﻂ ﺍﺿﻐﻂ ﻣﻜﺎﻟﻤﺔ ﺇﻧﻬﺎﺀ ﺍﺿﻐﻂ ﺍﺿﻐﻂ ﻭﺍﺭﺩﺓ ﻣﻜﺎﻟﻤﺔ ﺍﻭﻝ ﻋﻠﻰ ﺍﻟﺮﺩ ﺍﺛﻨﺎﺀ ﺍﻟﻮﺍﺭﺩﺓ ﺍﻟﻤﻜﺎﻟﻤﺔ ﻋﻠﻰ ﺍﻻﺟﺎﺑﺔ ﺍﻟﻤﻜﺎﻟﻤﺔ ﻗﻄﻊ ﺩﻭﻥ ﺍﻻﺧﺮﻯ ﺍﻟﺤﺎﻟﻴﺔ ﺍﺿﻐﻂ ﺍﺿﻐﻂ ﺍﻻﺧﺮﻯ ﺍﻟﻮﺍﺭﺩﺓ ﺍﻟﻤﻜﺎﻟﻨﺔ ﺭﻓﺾ ﺍﺿﻐﻂ ﺍﺿﻐﻂ ﻓﻌﺎﻟﺘﻴﻦ ﻣﻜﺎﻟﻤﺘﻴﻦ ﻟﺪﻳﻚ ﺗﻜ...

Page 59: ...ﻮﺻﻴﻞ ﻳﻤﻜﻦ ﺍﻟﺒﻨﺪ ﻓﻲ AUDIO SELECT ﺍﻭ PHONE SELECT ﺭﺍﺟﻊ ﺍﻟﻤﺴﺠﻞ ﺍﻟﺠﻬﺎﺯ ﻓﺼﻞ ﺍﻭ ﻟﺘﻮﺻﻴﻞ 18 ﺻﻔﺤﺔ BT MODE ﺻﻮﺕ ﺍﺟﻬﺰﺓ ﺧﻤﺲ ﺍﻟﻰ ﺍﻟﺘﻮﺻﻴﻞ ﻳﻤﻜﻦ BT AUDIO ﺍﻟﻤﺼﺪﺭ ﺍﺳﺘﺨﺪﺍﻡ ﺍﺛﻨﺎﺀ ﻟﻜﻦ 19 ﺻﻔﺤﺔ ﺍﻟﺨﻤﺴﺔ ﺍﻻﺟﻬﺰﺓ ﺗﻠﻚ ﺑﻴﻦ ﻭﺍﻟﺘﺤﻮﻳﻞ Bluetooth ﺍﻟﺠﻬﺎﺯ ﺑﺘﻮﺻﻴﻞ ﻗﻢ ﺍﻹﻗﺮﺍﻥ ﺑﻌﺪ ﺎ ﹰ ﺗﻠﻘﺎﺋﻴ ﺑﺎﻟﻮﺣﺪﺓ Bluetooth ﺃﺟﻬﺰﺓ ﺑﻌﺾ ﺗﺘﺼﻞ ﻻ ﻗﺪ ﺎ ﹰ ﻳﺪﻭﻳ ﺑﺎﻟﻮﺣﺪﺓ ﺍﻟﻤﻌﻠﻮﻣﺎﺕ ﻣﻦ ﻟﻤﺰﻳﺪ Bluetooth ﺑﺠﻬﺎﺯ ﺍﻟﺨﺎﺹ ﺍﻟﺘﻌﻠﻴﻤﺎﺕ ﺩﻟﻴﻞ ﺍﻧﻈﺮ ﻻ ﻗﺪ ﺍﻟﻤﺤﻤﻮﻝ ﻟﻬﺎﺗﻔﻚ ﺍﻟﺜﺎﺑﺘﺔ ﺍﻟﺒﺮﺍﻣ...

Page 60: ... ﺍﻟﻘﺮﺹ ﺗﻨﺸﻴﻄﻪ ﺃﻭ ﺍﻟﻤﻄﻠﻮﺏ ﺍﻟﻌﻨﺼﺮ ﺗﺤﺪﻳﺪ ﻳﺘﻢ ﺣﺘﻰ 2 ﺍﻟﺨﻄﻮﺓ ﻛﺮﺭ 3 ﺍﻹﻧﻬﺎﺀ ﺃﺟﻞ ﻣﻦ ﺍﻻﺳﺘﻤﺮﺍﺭ ﻣﻊ ﺍﺿﻐﻂ 4 ﻋﻠﻰ ﺍﺿﻐﻂ ﺍﻟﺴﺎﺑﻖ ﺍﻹﻋﺪﺍﺩ ﻋﻨﺼﺮ ﺇﻟﻰ ﻟﻠﺮﺟﻮﻉ XX ﺍﻓﺘﺮﺍﺿﻲ REMOTE APP SELECT ﺍﻟﺘﻄﺒﻴﻖ ﻻﺳﺘﺨﺪﺍﻡ ANDROID ﺍﻭ IOS ﺍﻟﺠﻬﺎﺯ ﺍﺧﺘﺮ IOS ﺍﻭ Bluetooth ﻋﺒﺮ ﺍﻟﺘﻄﺒﻴﻖ ﻻﺳﺘﺨﺪﺍﻡ iPod touch iPhone ﺟﻬﺎﺯ ﻳﺨﺘﺎﺭ YES ﺍﻟﻐﺎﺀ NO USB ﺍﻻﺩﺧﺎﻝ ﻃﺮﻑ ﻋﺒﺮ ﺍﻟﻤﻮﺻﻮﻝ ﺗﻢ ﺍﺫﺍ iPod USB ﺍﻟﻤﺼﺪﺭ ﺃﻭ iPod BT ﺍﻟﻤﺼﺪﺭ ﺍﺧﺘﺮ IOS ﺍﺧﺘﻴﺎﺭ ﺗﻢ ﺍﺫﺍ ﺍﻟﺘﻄﺒﻴﻖ ﻟﺘﻔﻌﻴﻞ USB ﺍﻻﺩﺧﺎﻝ...

Page 61: ...E SELECT ﻓﻲ BUILT IN AUX ﻟـ ON ﺍﻻﺳﺘﻤﺎﻉ ﺑﺪﺀ ﻟﻠﺸﺮﺍﺀ ﻣﺘﺎﺡ ﺍﻟﻤﺤﻤﻮﻝ ﺍﻟﺼﻮﺕ ﻣﺸﻐﻞ ﺑﺠﻬﺎﺯ ﺍﻻﺗﺼﺎﻝ 1 ﻣﺤﻤﻮﻝ ﺻﻮﺕ ﻣﺸﻐﻞ ﻣﻊ ﻣﻢ 3 5 ﺍﻟﻤﺠﺴﻢ ﻟﻠﺼﻮﺕ ﺻﻐﻴﺮ ﻗﺎﺑﺲ ﻟﻠﺸﺮﺍﺀ ﻣﺘﺎﺡ L ﺣﺮﻑ ﺷﻜﻞ ﻋﻠﻰ ﻣﻮﺻﻞ ﺍﻹﺿﺎﻓﻲ ﺍﻟﺠﻬﺎﺯ ﺗﻮﺻﻴﻞ ﻣﻘﺒﺲ AUX ﻻﺧﺘﻴﺎﺭ ﻣﺘﻜﺮﺭ ﺑﺸﻜﻞ BSRC ﺍﺿﻐﻂ 2 ﺍﻟﺘﺸﻐﻴﻞ ﻭﺑﺪﺀ ﺍﻟﻤﺤﻤﻮﻝ ﺍﻟﺼﻮﺕ ﻣﺸﻐﻞ ﺟﻬﺎﺯ ﺑﺘﺸﻐﻴﻞ ﻗﻢ 3 ﺍﻟﺨﺎﺭﺟﻲ ﺍﻟﺠﻬﺎﺯ ﺍﺳﻢ ﻳﻀﺒﻂ ﺑﺎﻟﺠﻬﺎﺯ ﻣﺘﺼﻞ ﻣﺤﻤﻮﻝ ﺻﻮﺕ ﻣﺸﻐﻞ ﺇﻟﻰ ﺍﻻﺳﺘﻤﺎﻉ ﺃﺛﻨﺎﺀ FUNCTION ﺇﻟﻰ ﻟﻠﺪﺧﻮﻝ ﺍﻟﺼﻮﺕ ﻣﺴﺘﻮﻯ ﻗﺮﺹ ﻋﻠﻰ ﺍﺿﻐﻂ 1 ﺍﻟﻘﺮﺹ ﻋ...

Page 62: ... ﺑﻌﺪ ﻋﻦ ﺍﻟﻤﺆﻗﺖ ﺍﻹﻳﻘﺎﻑ ﺍﻟﺘﺸﻐﻴﻞ 6 IW ﺍﺿﻐﻂ ENT IW ﺍﺿﻐﻂ ﻣﺴﺎﺭ ﺗﺨﻄﻲ 3 S T ﺍﺿﻐﻂ ﺍﺿﻐﻂ 3 S T ﻋﺪﻡ ﺃﻭ ﺍﻟﺮﺿﺎ ﻋﻼﻣﺔ ﺍﺧﺘﺮ 4 ﺍﻟﺮﺿﺎ 2 1 ﺍﺿﻐﻂ FM AM ﺍﺿﻐﻂ ﺍﻟﺮﺍﺩﻳﻮ ﺗﺸﻐﻴﻞ ﺑﺪﺀ 5 ﻋﻠﻰ ﺍﻻﺳﺘﻤﺮﺍﺭ ﻣﻊ ﺍﺿﻐﻂ ﻣﺘﺎﺡ ﻏﻴﺮ 5 ﺍﻟﺘﺸﻐﻴﻞ ﺗﻜﺮﺍﺭ ﺑﺘﻜﺮﺍﺭ 4 ﺍﺿﻐﻂ 3 REPEAT ONE REPEAT ALL REPEAT OFF ﻣﺘﺎﺡ ﻏﻴﺮ ﺑﺘﺮﺗﻴﺐ ﺍﻟﺘﺸﻐﻴﻞ 5 ﻋﺸﻮﺍﺋﻲ 3 ﺑﺘﻜﺮﺍﺭ 3 ﺍﺿﻐﻂ SHUFFLE OFF SHUFFLE ON ﻣﺘﺎﺡ ﻏﻴﺮ ﺍﻻﺿﺎﺀﺓ ﻧﻮﻉ KCA iP103 1 ﺍﺳﺘﺨﺪﺍﻣﻪ ﻋﺪﻡ ﻋﻨﺪ ﺍﻟﺴﻴﺎﺭﺓ ﺑﺪﺍﺧﻞ ﺍﻟﻜﺎﺑﻞ ﺗﺘﺮﻙ ﻻ 2...

Page 63: ... ﺍﻟﻰ ﻟﻠﺮﺟﻮﻉ BT AUDIO ﺻﻮﺕ ﻟﻤﺼﺪﺭ ﻋﻠﻰ ﺍﺿﻐﻂ ﺍﻟﺴﺎﺑﻖ ﺍﻹﻋﺪﺍﺩ ﻋﻨﺼﺮ ﺇﻟﻰ ﻟﻠﺮﺟﻮﻉ ﻋﻠﻰ ﺍﻻﺳﺘﻤﺮﺍﺭ ﻣﻊ ﺍﺿﻐﻂ ﻟﻺﻟﻐﺎﺀ iPod USB DIRECT ﺃﻭ ﻋﻠﻰ ﺍﺿﻐﻂ ﻟﻺﻟﻐﺎﺀ ﺍﻟﻌﺸﻮﺍﺋﻲ ﺍﻟﺘﺸﻐﻴﻞ ﺗﺤﺪﻳﺪ ﺣﺎﻟﺔ ﻓﻲ ﻣﺘﺎﺡ ﻏﻴﺮ iPod USB ﻟﻤﺼﺪﺭ ﻟﻠﺘﻄﺒﻴﻖ ﻗﺎﺑﻞ ﻏﻴﺮ ﻟﺘﺸﻐﻴﻠﻪ ﻣﻠﻒ ﺍﻳﺨﺘﺎﺭ ﻗﺎﺋﻤﺔ ﺍﻭ ﻣﺠﻠﺪ ﻣﻦ 9 ﺻﻔﺤﺔ MODE OFF ﺍﺧﺘﻴﺎﺭ ﻋﻨﺪ ﻓﻘﻂ ﻟﻠﺘﻄﺒﻴﻖ ﻗﺎﺑﻞ iPod ﻟﺠﻬﺎﺯ ﺑﺎﻟﻨﺴﺒﺔ ﺍﺿﻐﻂ 1 ﺍﻟﻤﻘﺒﺾ ﺍﺿﻐﻂ ﺛﻢ ﻗﺎﺋﻤﺔ ﻣﺠﻠﺪ ﻻﺧﺘﻴﺎﺭ ﺍﻟﺼﻮﺕ ﻣﺴﺘﻮﻯ ﻣﻘﺒﺾ ﺍﺩﺭ 2 ﺍﻟﻤﻘﺒﺾ ﺍﺿﻐﻂ ﺛﻢ ﻣﻠﻒ ﻻﺧﺘﻴﺎﺭ ﺍﻟﺼﻮﺕ ﻣ...

Page 64: ...ﺍﻟﻮﺳﺎﺋﻂ ﻣﺘﻌﺪﺩ ﻟﺠﻬﺎﺯ ﺍﻟﻤﺨﺘﺎﺭ ﺍﻟﻤﺸﻐﻞ FUNCTION ﺍﻟﻘﺎﺋﻤﺔ ﻣﻦ ﺍﻟﻤﻮﺳﻴﻘﻰ ﻣﺸﻐﻞ ﺍﺧﺘﻴﺎﺭ ﻳﻤﻜﻦ ﻛﻤﺎ FUNCTION ﺇﻟﻰ ﻟﻠﺪﺧﻮﻝ ﺍﻟﺼﻮﺕ ﻣﺴﺘﻮﻯ ﻗﺮﺹ ﻋﻠﻰ ﺍﺿﻐﻂ 1 ﺍﻟﻘﺮﺹ ﻋﻠﻰ ﺍﺿﻐﻂ ﺛﻢ USB ﻟﺘﺤﺪﻳﺪ ﺍﻟﺼﻮﺕ ﻣﺴﺘﻮﻯ ﻗﺮﺹ ﺃﺩﺭ 2 ﺍﻟﻘﺮﺹ ﻋﻠﻰ ﺍﺿﻐﻂ ﺛﻢ MUSIC DRIVE ﻟﺘﺤﺪﻳﺪ ﺍﻟﺼﻮﺕ ﻣﺴﺘﻮﻯ ﻗﺮﺹ ﺃﺩﺭ 3 ﻋﻠﻰ ﺍﺿﻐﻂ ﺛﻢ DRIVE CHANGE ﻟﺘﺤﺪﻳﺪ ﺍﻟﺼﻮﺕ ﻣﺴﺘﻮﻯ ﻗﺮﺹ ﺃﺩﺭ 4 ﺍﻟﻘﺮﺹ ﺍﻟﺘﺸﻐﻴﻞ ﻭﻳﺒﺪﺃ ﹰ ﺎ ﺗﻠﻘﺎﺋﻴ DRIVE 4 ﺇﻟﻰ DRIVE 1 ﺍﻟﺘﺎﻟﻲ ﺍﻟﻤﺸﻐﻞ ﺍﺧﺘﻴﺎﺭ ﻳﺘﻢ ﺍﻟﺘﺎﻟﻴﺔ ﺍﻷﻗﺮﺍﺹ ﻟﺘﺤﺪﻳﺪ 4 ﺇﻟﻰ ...

Page 65: ...ﺮﺍﺕ ﺃﻭ ﺍﻟﻤﻨﺒﻪ ﺃﻭ ﺍﻟﻤﺮﻭﺭ PTY SEARCH ﻟﻮﺿﻊ ﺍﻟﻤﺘﺎﺡ ﺍﻟﺒﺮﻧﺎﻣﺞ ﻧﻮﻉ DRAMA EDUCATE SPORT INFO ﻣﻌﻠﻮﻣﺎﺕ AFFAIRS NEWS SPEECH CHILDREN FINANCE WEATHER VARIED SCIENCE CULTURE DOCUMENT LEISURE TRAVEL PHONE IN RELIGION SOCIAL EASY M ﻣﻮﺳﻴﻘﻰ ROCK M ﻣﻮﺳﻴﻘﻰ POP M ﻣﻮﺳﻴﻘﻰ MUSIC JAZZ OTHER M ﻣﻮﺳﻴﻘﻰ CLASSICS LIGHT M ﻣﻮﺳﻴﻘﻰ FOLK M ﻣﻮﺳﻴﻘﻰ OLDIES NATION M ﻣﻮﺳﻴﻘﻰ COUNTRY ﺗﺤﺪﻳﺪﻩ ﺗﻢ ﺇﺫﺍ MUSIC ﺃﻭ SPEECH ﺗﺤﺖ ﺍﻟﻤﺼﻨﻒ ﺍﻟﺒﺮﻧﺎﻣﺞ ﻧﻮﻉ ...

Page 66: ... ﻗﺮﺹ ﻋﻠﻰ ﺍﺿﻐﻂ 1 ﺍﺿﻐﻂ ﺛﻢ ﺍﻟﺘﺎﻟﻲ ﺍﻟﺠﺪﻭﻝ ﺭﺍﺟﻊ ﺑﻨﺪ ﻟﺘﺤﺪﻳﺪ ﺍﻟﺼﻮﺕ ﻣﺴﺘﻮﻯ ﻗﺮﺹ ﺃﺩﺭ 2 ﺍﻟﻘﺮﺹ ﺍﻟﺘﻌﻠﻴﻤﺎﺕ ﺍﺗﺒﻊ ﺍﻭ ﺍﻟﻤﺮﻏﻮﺏ ﺍﻟﺒﻨﺪ ﺍﺧﺘﻴﺎﺭ ﻳﺘﻢ ﺍﻥ ﺍﻟﻰ 2 ﺍﻟﺨﻄﻮﺓ ﻛﺮﺭ 3 ﺍﻟﻤﺨﺘﺎﺭ ﺑﺎﻟﺒﻨﺪ ﺍﻟﻤﺘﻌﻠﻘﺔ ﺍﻹﻧﻬﺎﺀ ﺃﺟﻞ ﻣﻦ ﺍﻻﺳﺘﻤﺮﺍﺭ ﻣﻊ ﺍﺿﻐﻂ 4 ﻋﻠﻰ ﺍﺿﻐﻂ ﺍﻟﺴﺎﺑﻖ ﺍﻹﻋﺪﺍﺩ ﻋﻨﺼﺮ ﺇﻟﻰ ﻟﻠﺮﺟﻮﻉ XX ﺍﻓﺘﺮﺍﺿﻲ TUNER SETTING SEEK MODE ﺿﻐﻄﻬﺎ ﻋﻨﺪ S T ﻻﺯﺭﺍﺭ ﺍﻟﺒﺤﺚ ﻃﺮﻳﻘﺔ ﻳﺤﺪﺩ ﻣﺤﻄﺔ ﻋﻦ ﺍﻟﺒﺤﺚ AUTO2 ﻣﺤﻄﺔ ﻋﻦ ﹰ ﺎ ﺗﻠﻘﺎﺋﻴ ﻳﺒﺤﺚ AUTO1 ﻣﺤﻄﺔ ﻋﻦ ﺎ ﹰ ﻳﺪﻭﻳ ﻳﺒﺤﺚ MANUAL ﻣﺴﺒﻘﺎ ...

Page 67: ... ﺻﻔﺤﺔ BUILT IN AUX 12 ﺻﻔﺤﺔ ﻣﻌﻄﻞ OFF ﺍﻟﻤﺼﺪﺭ ﺗﺤﺪﻳﺪ ﻓﻲ AUX ﺗﻤﻜﻴﻦ ON F W UPDATE UPDATE SYSTEM F W UP xxxx ﻏﻴﺮ ﺍﻟﺘﺮﻗﻴﺔ ﻳﻠﻐﻲ NO ﺍﻟﺜﺎﺑﺖ ﺍﻟﺒﺮﻧﺎﻣﺞ ﺗﺮﻗﻴﺔ ﻳﺒﺪﺃ YES ﻣﻨﺸﻄﺔ ﺑﺰﻳﺎﺭﺓ ﻗﻢ ﺍﻟﺜﺎﺑﺖ ﺍﻟﺒﺮﻧﺎﻣﺞ ﺗﺤﺪﻳﺚ ﻛﻴﻔﻴﺔ ﺣﻮﻝ ﺗﻔﺎﺻﻴﻞ ﻋﻠﻰ ﻟﻠﺤﺼﻮﻝ www kenwood com cs ce FACTORY RESET ﺍﻟﻤﺤﻄﺎﺕ ﺑﺎﺳﺘﺜﻨﺎﺀ ﺍﻻﻓﺘﺮﺍﺿﻴﺔ ﺍﻹﻋﺪﺍﺩﺍﺕ ﺍﻟﻰ ﺍﻹﻋﺪﺍﺩﺍﺕ ﻳﻌﻴﺪ YES ﺍﻟﻐﺎﺀ NO ﺍﻟﻤﺨﺰﻧﺔ ENGLISH ﺇﺫﺍ ﺍﻟﻤﻮﺳﻴﻘﻰ ﻭﻟﻤﻌﻠﻮﻣﺎﺕ FUNCTION ﻟﻠﻘﺎﺋﻤﺔ ﺍﻟﻌﺮﺽ ﻟﻐﺔ ﺍﺧﺘﺮ ﻟﻠﺘﻄﺒﻴﻖ...

Page 68: ...ﻂ ﺛﻢ ﺍﻹﻋﺪﺍﺩﺍﺕ ﻟﺘﺤﺪﻳﺪ ﺍﻟﺼﻮﺕ ﻣﺴﺘﻮﻯ ﻗﺮﺹ ﺃﺩﺭ 4 ﺩﻗﻴﻘﺔ ﺳﺎﻋﺔ ﺑﺎﻟﺘﺮﺗﻴﺐ ﺍﻟﻮﻗﺖ ﺍﺿﺒﻂ ﻋﻠﻰ ﺍﺿﻐﻂ ﺛﻢ CLOCK FORMAT ﻟﺘﺤﺪﻳﺪ ﺍﻟﺼﻮﺕ ﻣﺴﺘﻮﻯ ﻗﺮﺹ ﺃﺩﺭ 5 ﺍﻟﻘﺮﺹ ﺍﻟﻘﺮﺹ ﻋﻠﻰ ﺍﺿﻐﻂ ﺛﻢ 24H ﺃﻭ 12H ﻟﺘﺤﺪﻳﺪ ﺍﻟﺼﻮﺕ ﻣﺴﺘﻮﻯ ﻗﺮﺹ ﺃﺩﺭ 6 ﺍﻟﺘﺎﺭﻳﺦ ﻟﻀﺒﻂ ﺍﻟﻘﺮﺹ ﻋﻠﻰ ﺍﺿﻐﻂ ﺛﻢ DATE FORMAT ﻟﺘﺤﺪﻳﺪ ﺍﻟﺼﻮﺕ ﻣﺴﺘﻮﻯ ﻗﺮﺹ ﺃﺩﺭ 7 ﺍﺿﻐﻂ ﺛﻢ MM DD YY ﺃﻭ DD MM YY ﻟﺘﺤﺪﻳﺪ ﺍﻟﺼﻮﺕ ﻣﺴﺘﻮﻯ ﻗﺮﺹ ﺃﺩﺭ 8 ﺍﻟﻘﺮﺹ ﻋﻠﻰ ﺍﻟﻘﺮﺹ ﻋﻠﻰ ﺍﺿﻐﻂ ﺛﻢ DATE SET ﻟﺘﺤﺪﻳﺪ ﺍﻟﺼﻮﺕ ﻣﺴﺘﻮﻯ ﻗﺮﺹ ﺃﺩﺭ 9 ﺍﻟﻘﺮﺹ ﻋﻠﻰ ﺍﺿ...

Page 69: ...T ﺍﺿﻐﻂ ﺍﻟﺠﻬﺎﺯ ﺗﺸﻐﻴﻞ ﻟﻮﻗﻒ ﺃﺧﺮﻯ ﻣﺮﺓ ﺍﺿﻐﻂ ﺍﻟﺘﺸﻐﻴﻞ ﻣﺼﺪﺭ ﺗﺤﺪﻳﺪ ﺑﺘﻜﺮﺍﺭ BSRC ﺍﺿﻐﻂ ﺛﺎﻧﻴﺘﻴﻦ ﺧﻼﻝ ﺍﻟﺼﻮﺕ ﻣﺴﺘﻮﻯ ﻗﺮﺹ ﺃﺩﺭ ﺛﻢ BSRC ﻋﻠﻰ ﺍﺿﻐﻂ ﺑﺘﻜﺮﺍﺭ SRC ﺍﺿﻐﻂ ﺍﻟﺸﺎﺷﺔ ﻣﻌﻠﻮﻣﺎﺕ ﺗﻐﻴﻴﺮ 30 ﺻﻔﺤﺔ ﺑﺘﻜﺮﺍﺭ DISP ﺍﺿﻐﻂ ﻣﺘﺎﺡ ﻏﻴﺮ RC 406 ﺍﻟﺘﺤﻜﻢ ﺭﻳﻤﻮﺕ ﺗﻮﺻﻴﻞ ﻓﺼﻞ ﺍﻟﺠﻬﺎﺯ ﻭﺍﺟﻬﺔ ﺗﺠﻨﺐ ﺑﻌﺪ ﻋﻦ ﺍﻟﺘﺤﻜﻢ ﺣﺴﺎﺱ ﺍﻟﺴﺎﻃﻊ ﺍﻟﺸﻤﺲ ﻟﻀﻮﺀ ﺍﻟﺘﻌﺮﻳﺾ ﻏﻄﺎﺀ ﺑﺴﺤﺐ ﻗﻢ ﻋﻨﺪ ﺍﻟﻜﻬﺮﺑﺎﺀ ﻋﺎﺯﻝ ﻣﺮﺓ ﻷﻭﻝ ﺍﻻﺳﺘﺨﺪﺍﻡ ﺍﻟﺒﻄﺎﺭﻳﺔ ﺍﺳﺘﺒﺪﺍﻝ ﻳﻤﻜﻦ ﻛﻴﻒ ﺍﻟﺘﻮﺿﻴﺢ ﻟﻐﺮﺽ ﻓﻘﻂ ﺍﻟﻀﺒﻂ ﺇﻋﺎﺩﺓ ﻳﻤﻜﻦ ﻛﻴﻒ ...

Page 70: ... ﺍﻟﻘﻴﺎﺩﺓ ﻳﻌﻴﻖ ﺍﻥ ﺍﻟﻤﺤﺘﻤﻞ ﻣﻦ ﻛﺎﻥ ﺇﺫﺍ ﺍﻟﺨﺎﺭﺟﻲ ﺍﻟﺠﻬﺎﺯ ﺍﺳﺘﺨﺪﺍﻡ ﺗﺠﻨﺐ ﺃﻳﺔ ﻧﺘﺤﻤﻞ ﺃﻻ ﻳﺠﺐ ﻟﻬﺎ ﺍﺣﺘﻴﺎﻃﻲ ﻧﺴﺦ ﻋﻤﻞ ﺗﻢ ﻗﺪ ﺍﻟﻬﺎﻣﺔ ﺍﻟﺒﻴﺎﻧﺎﺕ ﺟﻤﻴﻊ ﺃﻥ ﻣﻦ ﺗﺄﻛﺪ ﺗﺴﺠﻴﻠﻬﺎ ﺗﻢ ﺍﻟﺘﻲ ﻟﻠﺒﻴﺎﻧﺎﺕ ﺧﺴﺎﺭﺓ ﺃﻳﺔ ﻋﻦ ﻣﺴﺆﻭﻟﻴﺔ ﻟﻤﻨﻊ ﺍﻟﻮﺣﺪﺓ ﺩﺍﺧﻞ ﺍﻟﻤﻌﺪﻧﻴﺔ ﺍﻷﺩﻭﺍﺕ ﺃﻭ ﺍﻟﻌﻤﻼﺕ ﻣﺜﻞ ﻣﻌﺪﻧﻴﺔ ﺃﺟﺴﺎﻡ ﺃﻱ ﺗﺘﺮﻙ ﺃﻭ ﺗﻀﻊ ﻻ ﺍﻟﺘﻴﺎﺭ ﺍﻧﻘﻄﺎﻉ ﺣﺪﻭﺙ 4 ﺻﻔﺤﺔ ﺍﻟﻮﺍﺟﻬﺔ ﻟﻮﺣﺔ ﺍﻓﺼﻞ ﻟﻤﺸﺎﻫﺪﺗﻪ ﺍﻟﺮﺋﻴﺴﻴﺔ ﺍﻟﻮﺣﺪﺓ ﻋﻠﻰ ﻣﻮﺿﺢ USB ﺗﺼﻨﻴﻒ ﺳﻠﻚ ﻳﻜﻮﻥ ﻋﻨﺪﻣﺎ ﺍﻟﺠﻬﺎﺯ ﺗﺸﻐﻴﻞ ﻋﻨﺪ ﺗﻠﻘﺎﺋﻴﺎ ﺍﻟﻬﻮﺍﺋﻲ ﺗﻤ...

Page 71: ...ﺷﺔ ﻣﻌﻠﻮﻣﺎﺕ ﺗﻐﻴﻴﺮ 31 ﻭﺍﻻﺻﻼﺡ ﺍﻻﻋﻄﺎﻝ ﻋﻦ ﺍﻟﺒﺤﺚ 33 ﺍﻟﻤﻮﺍﺻﻔﺎﺕ ﻫﺬﺍ ﻓﻲ ﻣﻬﻤﺔ ﻭﺻﻴﺎﻧﺔ ﺗﺸﻐﻴﻞ ﺗﻌﻠﻴﻤﺎﺕ ﻭﺟﻮﺩ ﻳﻌﻨﻲ ﺍﻟﻤﻨﺘﺞ ﻓﻲ ﺍﻟﺮﻣﺰ ﻫﺬﺍ ﺍﻟﺪﻟﻴﻞ ﺑﻌﻨﺎﻳﺔ ﺍﻟﺪﻟﻴﻞ ﻫﺬﺍ ﻓﻲ ﺍﻟﺘﻌﻠﻴﻤﺎﺕ ﻗﺮﺍﺀﺓ ﻣﻦ ﺗﺄﻛﺪ ﺍﻟﺪﻟﻴﻞ ﻫﺬﺍ ﺗﻘﺮﺃ ﻛﻴﻒ ﻟﺘﻘﺪﻳﻢ ﺗﺴﺘﺨﺪﻡ ﺃﻣﺜﻠﺔ ﻣﺠﺮﺩ ﻫﻲ ﺍﻟﺪﻟﻴﻞ ﻫﺬﺍ ﻓﻲ ﺍﻟﻤﻌﺮﻭﺿﺔ ﺍﻟﺠﻬﺎﺯ ﻭﻭﺍﺟﻬﺎﺕ ﺍﻟﺸﺎﺷﺎﺕ ﻭﺍﺟﻬﺎﺕ ﺍﻭ ﺍﻟﺸﺎﺷﺎﺕ ﻋﻦ ﺗﺨﺘﻠﻒ ﻗﺪ ﺍﻟﺴﺒﺐ ﻭﻟﻬﺬﺍ ﺍﻟﺘﺸﻐﻴﻞ ﻟﻌﻤﻠﻴﺎﺕ ﻭﺍﺿﺤﺔ ﺷﺮﻭﺣﺎﺕ ﺍﻟﻔﻌﻠﻴﺔ ﺍﻟﺠﻬﺎﺯ ﺍﻟﻠﻮﺣﺔ ﻋﻠﻰ ﻣﺘﻮﺍﺟﺪ ﺍﻷﺯﺭﺍﺭ ﺍﺳﺘﺨﺪﺍﻡ ﺃﻥ ﺭﺋﻴﺴﻲ ﺑﺸﻜﻞ ﺍﻟ...

Page 72: ...ize B6L 182 mm x 128 mm Book Size B6L 182 mm x 128 mm KMM BT306 ﺍﻟﺮﻗﻤﻴﺔ ﺍﻟﻮﺳﺎﺋﻂ ﺍﺳﺘﻘﺒﺎﻝ ﺟﻬﺎﺯ ﺍﻟﺘﻌﻠﻴﻤﺎﺕ ﺩﻟﻴﻞ JS_KWD_KMM_BT306_MN_C indd 2 JS_KWD_KMM_BT306_MN_C indd 2 7 11 2019 3 30 17 PM 7 11 2019 3 30 17 PM ...

Reviews: