background image

21

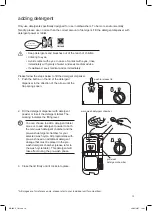
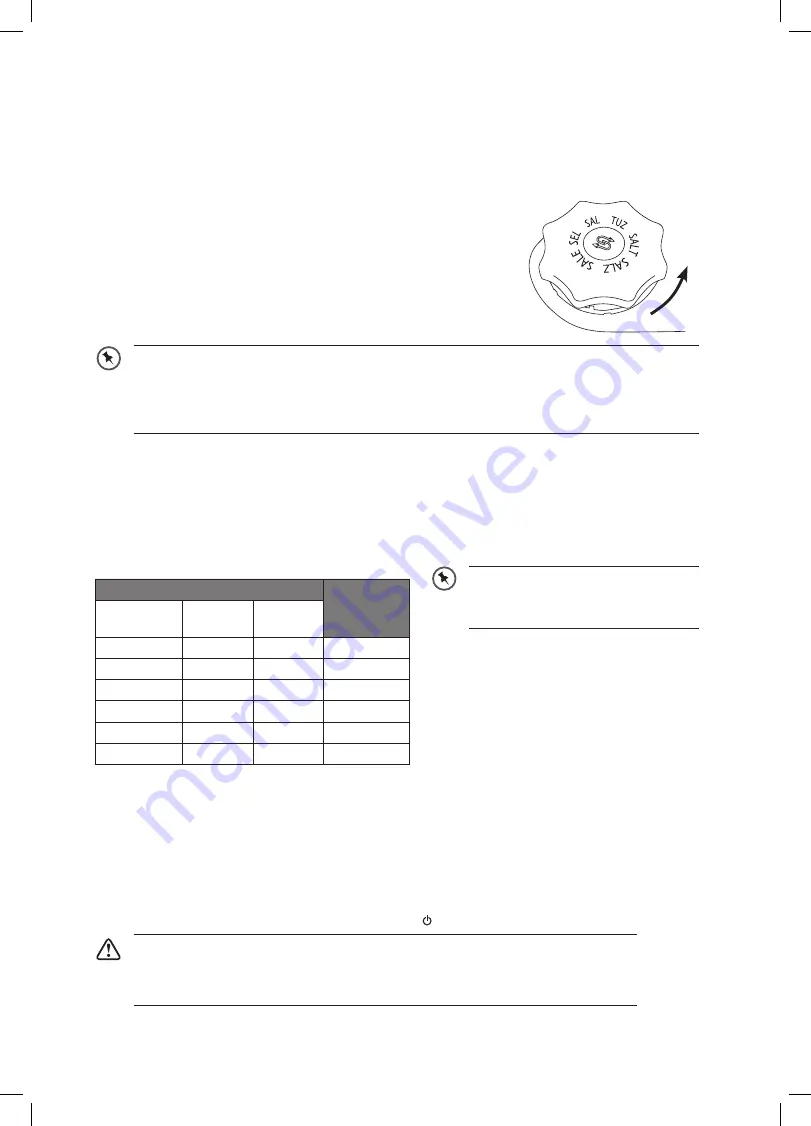
adding salt

If you live in a hard water area deposits may form on your dishes and utensils. Using salt softens 

the water and reduces the formation of deposits.
Please follow the steps below to fill the salt reservoir. The water hardness level will also need to be set.
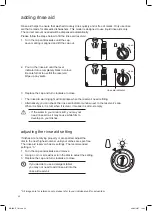
1.  Remove the lower basket and turn the reservoir cap anticlockwise.
2.  Pour in approximately 1 kg of dishwasher salt.
3.  Fill the reservoir with water until it overflows (first use only).
4.  Clean any excess salt from around the reservoir opening  

and then screw the cap on again firmly.

5.  Run the “Rinse” programme P8 immediately (without any 

crockery in the dishwasher) to remove any traces of salt from 

the compartment.

•  The salt low warning indicator on the control panel will illuminate when the reservoir is 

running out of salt and requires refilling.

•  Once refilled, the salt low warning indicator will cease to illuminate within a few days, 

depending on how quickly the salt dissolves.

* All images are for reference only; please refer to your individual unit for actual item.

adjusting salt consumption

Salt consumption must be adjusted to correspond to the water hardness level in your area. If you don’t 

know how hard the water in your home is, please ask the company that supplies water in your area.
It is recommended that adjustments should be made in accordance with the following chart.

water hardness

set 

hardness 

level

Germany˚dh France ˚fh

Britain 

˚Clark

0-5

0-9

0-6

1

6-11

10-20

7-14

2

12-17

21-30

15-21

3

18-22

31-40

22-28

4

23-31

41-55

29-39

5

32-50

56-90

40-63

6

To adjust your dishwasher for the local water hardness, please follow these steps and refer to the 

table above.
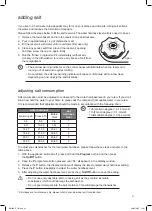
1.  With the appliance switched off, press and hold the 

Program

 button and then press  

the 

On/Off

 button.

2.  Keep the 

P

 programme button pressed until “SL” disappears in the display window.

3.  Release the 

P

 button, the display window will display the latest entered water hardness setting.

4.  Press the 

P

 button repeatedly to adjust the water hardness level.

5.  After adjusting the water hardness level, press the 

 On/Off

 button to save the setting.

1˚dh (German degree) = 0.18 mmol/l

1˚fh (French degree) = 0.1 mmol/l

1˚Clark (British degree) = 0.142 mmol/l

•  Do not use everyday table salt or cooking salt as they contain insoluble 

substances which could damage the dishwasher.

•  Do not pour detergent into the salt container. This will damage the dishwasher.

open

KID60S17_IB.indd   21

30/05/2017   12:41

Summary of Contents for KID60S17

Page 1: ...Integrated Dishwasher KID60S17 installation instructions manual Aesthetic door not included KID60S17_IB indd 1 30 05 2017 12 41 ...

Page 2: ...KID60S17_IB indd 2 30 05 2017 12 41 ...

Page 3: ...usting the rinse aid setting 20 adding salt 21 adjusting salt consumption 21 loading the dishwasher 22 before loading the dishwasher 22 upper basket 23 adjusting the upper basket 23 loading the upper basket 23 hinged cup rack 24 hinged spikes 24 lower basket 25 loading the lower basket 25 cutlery basket 25 loading the cutlery basket 25 wash cycle table 26 using the dishwasher 27 changing the progr...

Page 4: ...g system 30 spray arms 31 frost precaution 32 moving the dishwasher 32 maintenance for a prolonged period of non operation 32 hints and tips 33 fault codes 33 technical problems 33 general problems 34 disposal of the dishwasher 35 disposal of packing material 35 product fiche and specifications 36 KID60S17_IB indd 4 30 05 2017 12 41 ...

Page 5: ...estic use The company responsible for this product DSG Retail Limited will not accept any liability if the appliance is subject to improper use or failure to comply with these instructions This appliance is intended to be used in households and similar places such as Staff kitchen areas in shops offices and other work places By clients in motels hotels and Bed Breakfast establishments For the dime...

Page 6: ...iring with at least 3mm contact separation in all poles Keep children away from detergents and rinse aids These may cause chemical burns in the mouth throat and eyes or asphyxiation Keep children away from the dishwasher when the door is open The door should not be left in the open position since this could present a tripping hazard For energy saving always remember to switch the dishwasher off wh...

Page 7: ...liance is equipped with a mains cable having an equipment earthing conductor and an earthing plug The plug must be plugged into an appropriate mains socket that is installed and earthed in accordance with local standards and requirements KID60S17_IB indd 7 30 05 2017 12 41 ...

Page 8: ...derstand all the operational features it offers Read all the safety instructions carefully before use and keep this installation instruction manual for future reference If items are missing or damaged please contact Partmaster UK only Tel 0344 800 3456 for assistance the main unit fitting s iron for bench X 2 instruction manual x 1 door template x 1 fitting screw for wood X 2 condensation strip X ...

Page 9: ...nstallation 2 Ensure there is sufficient clearance on each side of the unit to allow slight sideways movement for servicing when required Good levelling is essential for correct closure and sealing of the door When the unit is correctly levelled the door should not catch the inner liner on either side of the cabinet The adjustable feet may be loosened or tightened in order to obtain the optimum le...

Page 10: ...Do not connect the unit to the mains socket before installation Ensure you are not installing the unit right in front of the mains socket This is to avoid potential damage to the back of the unit Ensure the surface is clean prior to sticking the condensation strip to the underside of the worktop Leave some space Stick the Condensation Strip under the worktop where you want to install the dishwashe...

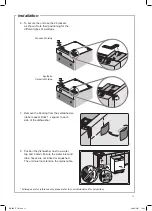
Page 11: ...from the self adhesive rubber spacer Stick 1 x spacer to each side of the dishwasher 20 20 20 20 8 Position the dishwasher next to a water tap and a drain Ensure the water inlet and drain hoses are not kinked or squashed The unit must not stand on the mains cable All images are for reference only please refer to your individual unit for actual item KID60S17_IB indd 11 30 05 2017 12 41 ...

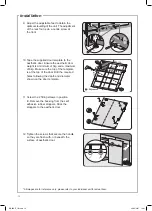
Page 12: ...sure the top of the template is at the top of the door Drill the required holes following the depth and diameter shown on the door template 12 Tighten the screws that secure the handle so they are flush with or beneath the surface of aesthetic door 11 Screw the 2 fitting screws in position III Remove the backing from the self adhesive rubber stoppers Stick the stoppers to the aesthetic door All im...

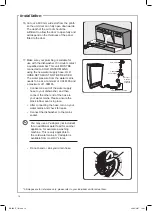
Page 13: ... loosen or tighten the tension of the unit s door 15 For Wooden Worktops Tighten the screw into the top bracket to fix it to the wooden worktop For Synthetic Ceramic Worktops Tighten the screw into the side bracket to fix it to the synthetic ceramic worktop All images are for reference only please refer to your individual unit for actual item KID60S17_IB indd 13 30 05 2017 12 41 ...

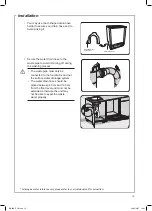
Page 14: ...d check for leaks Connect the dishwasher to the mains socket water mains Y Adaptor not included Connect to another appliance if required safety water supply hose 16 Cut out a 600 mm wide slot from the plinth so the unit door can fully open downwards The depth of the cut out should be sufficient to allow the door to open fully and will depend on the thickness of the panel fitted to the door Do not ...

Page 15: ... holder water drain hose The waste pipe must only be connected to the foul drains and not the surface water drainage system The water drain hose should be placed between 40 cm and 100 cm from the floor level and must not be extended otherwise the unit may not be able to expel the waste water properly All images are for reference only please refer to your individual unit for actual item KID60S17_IB...

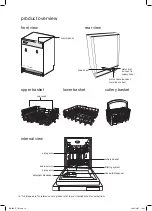
Page 16: ... inlet connect to supply hose drain hose mains cable connect to mains socket spray arm rinse aid dispenser spray arm salt reservoir detergent dispenser cutlery basket filtering system cup racks All images are for reference only please refer to your individual unit for actual item KID60S17_IB indd 16 30 05 2017 12 41 ...

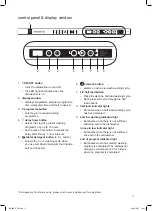
Page 17: ...prewash button selects an extra pre wash washing cycle 7 1 2 half load button Press to select the half load washing cycle Each press will cycle through the half load options 8 half load indicator lights illuminate when a half load washing cycle has been selected 9 salt low warning indicator light illuminates when there is not sufficient softening salt in the dishwasher rinse aid low indicator ligh...

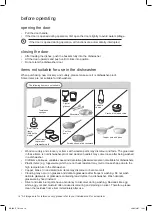
Page 18: ...r and aluminium parts have a tendency to discolour during washing Residues like egg white egg yolk and mustard often cause discolouring and staining on silver Therefore please clean the residues from silver immediately after use The following items are not suitable Towels and sponges Small plastic items Milk bottle nipple Plastic items that are not dishwasher safe Cast iron pans Scratched non stic...

Page 19: ...ush to release lid Keep detergents and bleaches out of the reach of children Irritating to eyes Avoid contact with eyes In case of contact with eyes rinse immediately with plenty of water and seek medical advice If swallowed seek medical advice immediately You can choose to add a detergent tablet alone or to add detergent powder to both the main wash detergent chamber and the pre wash detergent ch...

Page 20: ...id reservoir 1 Turn the cap anticlockwise until the cap open marking is aligned and lift the cap out 2 Pour in the rinse aid until the level indicator turns completely black in colour Be careful not to overfill the reservoir Wipe up any spills 3 Replace the cap and turn clockwise to close The rinse aid warning light will illuminate when the reservoir need refilling Alternatively you can check the ...

Page 21: ...ond to the water hardness level in your area If you don t know how hard the water in your home is please ask the company that supplies water in your area It is recommended that adjustments should be made in accordance with the following chart water hardness set hardness level Germany dh France fh Britain Clark 0 5 0 9 0 6 1 6 11 10 20 7 14 2 12 17 21 30 15 21 3 18 22 31 40 22 28 4 23 31 41 55 29 3...

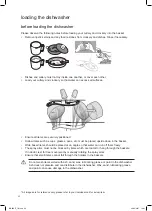
Page 22: ...are securely positioned Hollow items such as cups glasses pans etc must be placed upside down in the basket Wide based items should be placed at an angle so that water can run off them freely The spray arms must not be blocked by items which are too tall or hang through the baskets If in doubt test for free movement by manually rotating the spray arms Ensure that small items cannot fall through th...

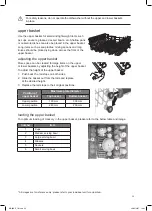
Page 23: ...of the upper basket To adjust the height of the upper basket 1 Push back the rail stops on both sides 2 Slide the basket out from the rails and replace at the desired height 3 Replace the rail stops to their original positions Position of upper basket Maximum plate diameter Top basket Bottom basket Upper position 190 mm 300 mm Lower position 240 mm 250 mm For safety reasons do not operate the dish...

Page 24: ... you can lean tall glasses against them To prevent water dripping from the upper basket onto the dishes in the lower basket we recommend that you empty the lower basket first raise upwards clips up onto frame hinged spikes The spikes on the upper basket are used for holding plates and platters They can be lowered to make more room for large items fold down spikes KID60S17_IB indd 24 30 05 2017 12 ...

Page 25: ... lids at the sides of the basket to avoid blocking the rotation of the spray arms Loading large items is not the most efficient way to use your dishwasher For optimum loading see above Do not let any items extend through the bottom of the baskets To avoid the risk of injury load knives and forks with handles upwards Do not hold them by the sharp edge The cutlery basket comes with covers which are ...

Page 26: ...ntensive main wash 25g 64 92 0 81 0 96 10 6 17 7 P4 Hygiene Densely soiled dishes waiting for a long time or requiring hygienic wash Pre wash Wash 60 C Cold Rinse Hot Rinse Dry pre wash 5g main wash 25g 123 1 55 15 P5 55 60 C Soups sauces pasta eggs pilaf potato and oven dishes fried foods Pre wash Wash 60 C Cold Rinse Hot Rinse Dry pre wash 5g main wash 25g 55 1 07 11 P6 Eco Coffee milk tea cold ...

Page 27: ...e unit has dispensed the detergent or detergent tablet This will depend on how long the washing cycle was running for The last selected programme will appear on the window display 2 If the detergent dispenser lid is opened we suggest that you allow the wash cycle to finish 3 If the detergent dispenser lid is still closed press and hold down the P button for 3 seconds to cancel the programme End of...

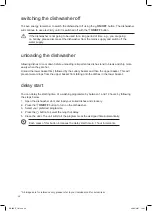
Page 28: ...ollowed by the cutlery basket and then the upper basket This will prevent water drops from the upper basket from falling onto the dishes in the lower basket delay start You can delay the starting time of a washing programme by between 1 and 19 hours by following the steps below 1 Open the dishwasher door and load your soiled dishes and crockery 2 Press the ON OFF button to turn on the dishwasher 3...

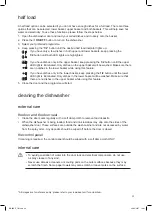
Page 29: ... dishes only in the upper basket keep pressing the 1 2 button until the upper LED light is illuminated Only dishes on the upper basket will be washed Make sure there are no dishes in the lower basket while using this feature If you have dishes only in the lower basket keep pressing the 1 2 button until the lower LED light is illuminated Only dishes in the lower basket will be washed Make sure that...

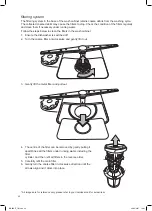
Page 30: ...ched off 2 Turn the coarse filter anti clockwise and gently lift it out All images are for reference only please refer to your individual unit for actual item 3 Gently lift the metal filter and pull out 4 The centre of the filter can be removed by gently pulling it apart Rinse all the filters under running water including the filter cylinder and then refit all filters in the reverse order 5 Carefu...

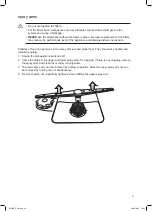
Page 31: ...y pulling it upwards while the upper spray arm nut can be removed by turning the nut anticlockwise 4 Be sure that the nut is perfectly tightened when refitting the upper spray arm Do not over tighten the filters Put the filters back in sequence securely otherwise coarse debris could get into the system and cause a blockage NEVER use the dishwasher without the filters in place Improper replacement ...

Page 32: ...nstance due to moving house you are advised to 1 Disconnect the dishwasher from the mains 2 Disconnect the unit from the water inlet and drain Use a suitable receptacle to catch the water 3 Remove the unit from the current location with the hoses discharged 4 Pull the unit out together with the hoses maintenance for a prolonged period of non operation If you are not going to use the unit for a pro...

Page 33: ...aulty heater sensor Contact service F7 Overheating temperature in the machine is too high Contact service F8 Heater error Contact service F9 Divisor position error Contact service FE Faulty electronic card Contact service Repairs should only be carried out by a qualified technician in strict accordance with current local and national safety regulations Unauthorised or incorrect repairs could cause...

Page 34: ...ry in the dishwasher until you hear the audible sound White residue is visible on cutlery and crockery clouding occurs on glassware film can be wiped off Not enough rinse aid was used Replenish the reservoir adjust the rinse aid dispenser dial to a higher setting or change the brand of rinse aid There is not enough salt in the salt reservoir Fill the salt reservoir The salt reservoir cap has not b...

Page 35: ...ice Disposing of a household appliance separately avoids possible negative consequences for the environment and health deriving from an inappropriate disposal and enables the constituent materials to be recovered to obtain significant savings in energy and resources As a reminder of the need to dispose of household appliances separately the product is marked with a crossed out wheeled dustbin Plea...

Page 36: ...Hz Energy Efficiency Class 1 A Annual Energy Consumption 258 kWh Energy Consumption 0 90 kWh Off Mode Power Consumption 0 5 W Left on Mode Power Consumption 1 00 W Annual Water Consumption 2520 litres Drying Efficiency Class A Standard Programme Name ECO 50 C Programme Time for Standard Cycle 162 min Noise Level 52 dB A Mounting Built in Features and specifications are subject to change without pr...

Page 37: ...ciency class A on a scale from G least efficient to A most efficient 4 The Eco 50 C is the standard cleaning cycle to which the information in the label and the fiche relates This programme is suitable to clean normally soiled tableware and it is the most efficient programme in terms of combined energy and water consumption The above values have been measured in accordance with standards under spe...

Page 38: ...KID60S17_IB indd 38 30 05 2017 12 41 ...

Page 39: ...KID60S17_IB indd 39 30 05 2017 12 41 ...

Page 40: ...ime of disposal will help conserve natural resources and ensure that it is recycled in a manner that protects human health and the environment For more information about where you can drop off your waste for recycling please contact your local authority or where you purchased your product Manufactured for DSG Retail Limited under Licence from Fisher Paykel Appliances Italy SpA DSG Retail Limited i...

Reviews: