background image

13

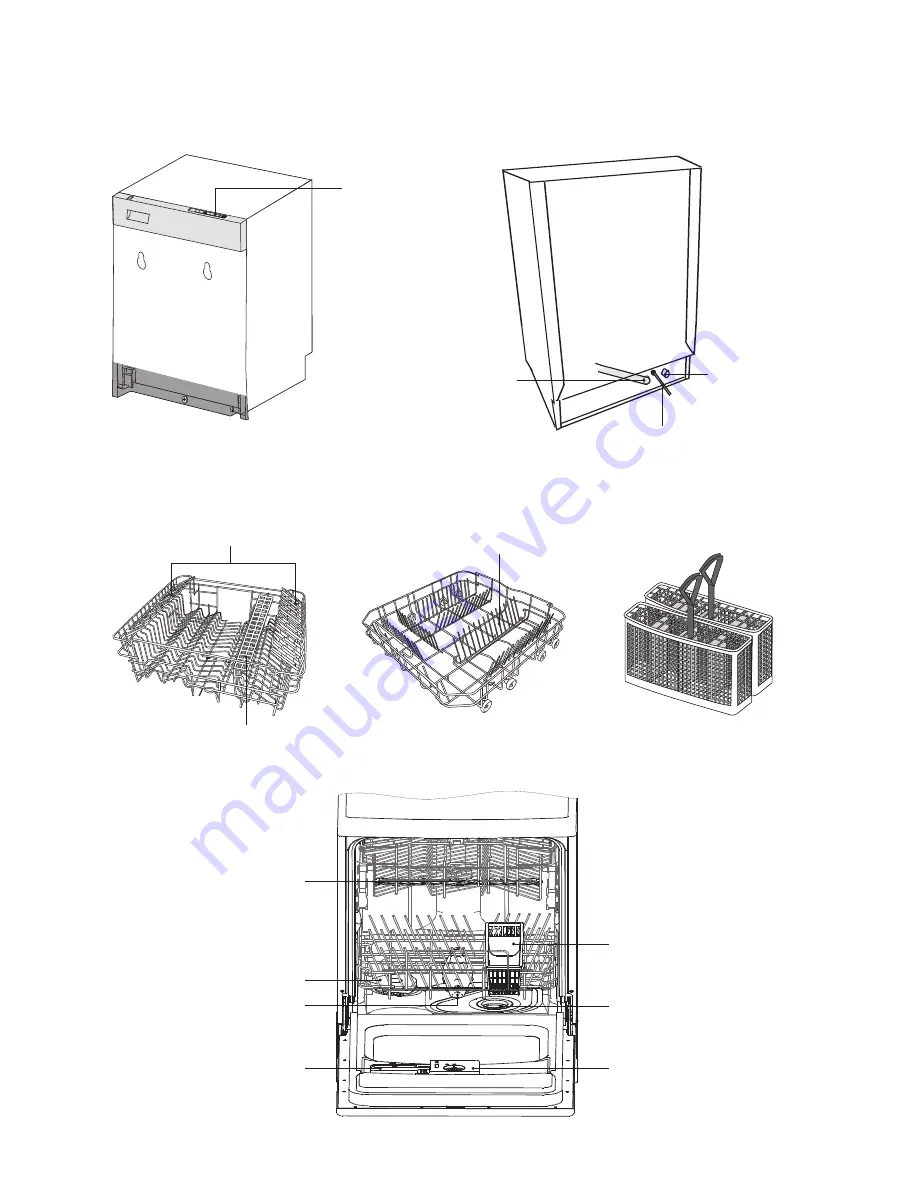
product overview

front view

upper basket

internal view

rear view

lower basket

cutlery basket

control panel

water inlet 

(connect to 

supply hose)

drain hose

mains cable (connect 

to mains socket)

spikes

spray arm

cutlery basket

filtering system

rinse aid dispenser

spray arm

salt reservoir

detergent dispenser

cup racks

spoon rack

* All images are for reference only; please refer to your individual unit for actual item.

Summary of Contents for KID60B12

Page 1: ...Integrated Dishwasher KID60B12 installation instructions manual Aesthetic door not included ...

Page 2: ......

Page 3: ...id 17 adjusting the rinse aid reservoir 17 adding salt 18 adjusting salt consumption 19 loading the dishwasher 20 before loading the dishwasher 20 upper basket 21 adjusting the upper basket 21 loading the upper basket for 15 place settings 21 hinged cup rack 22 spoon rack 22 lower basket 23 hinged spikes 23 loading the lower basket for 15 place setting 23 cutlery basket 23 loading the cutlery bask...

Page 4: ...anel 28 internal care 29 filtering system 29 spray arms 29 frost precaution 30 moving the dishwasher 30 maintenance for a prolonged period of non operation 30 hints and tips 31 fault code 31 technical problems 32 disposal of the dishwasher 33 disposal of packing material 33 specifications 34 safety warnings 35 ...

Page 5: ... it offers Read all the safety instructions carefully before use and keep this installation instruction manual for future reference If items are missing or damaged please contact Partmaster UK only Tel 0844 800 3456 for assistance the main unit fitting s iron for bench X 2 P N 37008517 Left 37008516 Right instruction manual x 1 P N 52067948 door template x 1 P N 52014426 fitting screw for wood X 2...

Page 6: ...arage or outdoor installation 2 Ensure there is sufficient clearance on each side of the unit to allow slight sideways movement for servicing when required Good levelling is essential for correct closure and sealing of the door When the unit is correctly levelled the door should not catch the inner liner on either side of the cabinet The adjustable feet may be loosened or tightened in order to obt...

Page 7: ...densation strip 3 Do not connect the unit to the mains socket before installation Ensure you are not installing the unit right in front of the mains socket This is to avoid potential damage to the back of the unit Ensure the surface is clean prior to sticking the condensation strip to the underside of the worktop Leave some space Stick the Condensation Strip under the worktop where you want to ins...

Page 8: ...emove the backing from the self adhesive rubber spacer Stick 1 x spacer to each side of the dishwasher 20 20 20 20 8 Position the dishwasher next to a water tap and a drain Ensure the water inlet and drain hoses are not kinked or squashed The unit must not stand on the mains cable All images are for reference only please refer to your individual unit for actual item ...

Page 9: ...ximum of 8kg Make sure the top of the template is at the top of the door Drill the required holes following the depth and diameter shown on the door template 12 Tighten the screws that secure the handle so they are flush with or beneath the surface of aesthetic door 11 Screw the 2 fitting screws in position III Remove the backing from the self adhesive rubber stoppers Stick the stoppers to the aes...

Page 10: ... tighten the tension of the unit s door 15 For Wooden Worktops Tighten the screw into the top bracket to fix it to the wooden worktop For Synthetic Ceramic Worktops Tighten the screw into the side bracket to fix it to the synthetic ceramic worktop All images are for reference only please refer to your individual unit for actual item ...

Page 11: ...your water mains and check for leaks Connect the dishwasher to the mains socket water mains Y Adaptor not included Connect to another appliance if required safety water supply hose 16 Cut out a 600 mm wide slot from the plinth so the unit door can fully open downwards The depth of the cut out should be sufficient to allow the door to open fully and will depend on the thickness of the panel fitted ...

Page 12: ...U shaped drain hose holder water drain hose The waste pipe must only be connected to the foul drains and not the surface water drainage system The water drain hose should be placed between 40 cm and 100 cm from the floor level and must not be extended otherwise the unit may not be able to expel the waste water properly All images are for reference only please refer to your individual unit for actu...

Page 13: ...nel water inlet connect to supply hose drain hose mains cable connect to mains socket spikes spray arm cutlery basket filtering system rinse aid dispenser spray arm salt reservoir detergent dispenser cup racks spoon rack All images are for reference only please refer to your individual unit for actual item ...

Page 14: ... control panel display window 1 2 3 4 5 6 7 8 6 prewash button selects an extra pre wash washing cycle 7 1 2 half load button Press to select the half load washing cycle Each press will cycle through the half load options half load indicator light illuminates when the half load washing cycle is selected 8 salt low warning indicator light illuminates when the softening salt in the dishwasher is not...

Page 15: ...nd instead Silver and aluminium parts have a tendency to discolour during washing Residues like egg white egg yolk and mustard often cause discolouring and staining on silver Therefore please clean the residues from silver immediately after use The following items are not suitable Towels and sponges Small plastic items Milk bottle nipple Plastic items that are not dishwasher safe Cast iron pans Sc...

Page 16: ...hat it clicks into place push up from the right side pre wash detergent chamber main wash detergent chamber or Keep detergents and bleaches out of the reach of children Irritating to eyes Avoid contact with eyes In case of contact with eyes rinse immediately with plenty of water and seek medical advice If swallowed seek medical advice immediately You can choose to add a detergent tablet alone or t...

Page 17: ...aster after it has been washed Only pour rinse aid that is for domestic dishwashers into the reservoir This model is designed to use liquid rinse aids only Please follow the steps below to pour the rinse aid into the storage reservoir The amount will dispense automatically 1 Turn the cap and open as indicated 2 When the cap open marking is aligned you may lift the cap up 3 Pour the rinse aid in un...

Page 18: ...the reservoir with water until it overflows first use only 4 Clean any excess salt from around the reservoir opening and then screw the cap on again firmly 5 Run the Rinse programme P8 immediately without any crockery in the dishwasher to remove any traces of salt from the compartment OPEN open open open The salt low warning indicator on the control panel will illuminate when the reservoir is runn...

Page 19: ...the steps below and refer to the above table 1 After resetting the dishwasher press and hold the Program button and then press the On Off button 2 Keep the P programme button pressed until SL disappears from the display window 3 Release the P button the display window will display the latest entered water hardness setting 4 Press the P button repeatedly to adjust the water hardness level 5 After a...

Page 20: ...ust be placed upside down in the basket Wide based items should be placed at an angle so that water can run off them freely The spray arms must not be blocked by items which are too tall or hang through the baskets If in doubt test for free movement by manually rotating the spray arms Ensure that small items cannot fall through the holders in the baskets Do not wash items soiled with ash sand wax ...

Page 21: ...ift slide the basket out from the rail loading the upper basket for 15 place settings For optimum loading of crockery in the upper basket please refer to the below table and image number item 1 Cups 2 Medium serving bowl 3 Large serving bowl 4 Glasses 5 Saucers 6 Small serving bowl 7 Serving spoons 8 Teaspoons 9 Dessert spoons For safety reasons do not operate the dishwasher without the upper and ...

Page 22: ... first and then the upper basket raise upwards spoon rack As well as holding your cutlery the cutlery rack can be positioned to support tall glasses to reduce the risk of them knocking against each other during the wash cycle You can adjust the cutlery rack to support tall glasses OR OR fold backwards The cultery rack can also be folded forwards or backwards to make more room for large items fold ...

Page 23: ...ou adjust the height of the cutlery basket handle and place the basket in the upper basket IN 3 4 1 2 3 3 5 3 4 1 2 3 3 5 lower basket We recommend that large items and the most difficult to clean items are placed in the lower basket such as plates serving platters saucepans serving bowls pots pans lids etc We recommend placing serving dishes and lids at the side of the basket to avoid blocking th...

Page 24: ...basket comes with covers They are designed so you can load cutlery into the appropriate slots If you use the basket without the covers washing results may be reduced Please ensure the covers are securely fixed to the basket before operation To comply with Standards of Performance all cutlery must be loaded according to the instructions in this manual 1 1 1 1 1 1 1 1 1 1 1 1 1 1 1 2 2 2 2 2 2 2 2 2...

Page 25: ...0 81 0 96 10 6 17 7 P4 Hygiene Densely soiled dishes waiting for a long time or requiring hygienic wash Pre wash Wash 60 C Cold Rinse Hot Rinse Dry pre wash 5g main wash 25g 119 1 55 15 P5 55 60 C Soups sauces pasta eggs pilaf potato and oven dishes fried foods Pre wash Wash 60 C Cold Rinse Hot Rinse Dry pre wash 5g main wash 25g 55 1 07 11 P6 Economic reference Coffee milk tea cold meats moist ve...

Page 26: ... the detergent or detergent tablet This will depend on how long the washing cycle was running for The last selected programme will appear on the window display 2 If the detergent dispenser lid is opened we suggest that you allow the wash cycle to finish 3 If the detergent dispenser lid is still closed press and hold down the P button for 3 seconds to cancel the programme End of program indicator f...

Page 27: ...door fully after switching off it will allow the dishes to cool down much faster delay start The starting time of a washing programme can be delayed and adjusted Please follow the steps below 1 Open the dishwasher door and load your soiled dishes and crockery 2 Press the ON OFF button to turn on the dishwasher 3 Select your preferred programme 4 Press the button 5 Set the required delay start time...

Page 28: ...es in which both LED lights are highlighted If you have dishes only in the upper basket press the 1 2 button and select the programmes in which the upper LED light is illuminated Only dishes on the upper basket will be washed Make sure there are no dishes in the lower basket while using this feature If you have dishes only in the lower basket press the 1 2 button and select the programmes in which...

Page 29: ...on of the filters regularly and clean them if necessary under running water Follow the steps below to clean the filters in the wash cabinet 1 Ensure the dishwasher is switched off 2 Turn the coarse filter anti clockwise and gently lift it out 3 Gently lift the main filter and the fine filter with care 4 Rinse all the filters under running water including the filter cylinder and then refit all filt...

Page 30: ...house you are advised to 1 Disconnect the dishwasher from the mains 2 Disconnect the unit from the water inlet and drain Use a suitable receptacle to catch the water 3 Remove the unit from the current location with the hoses discharged 4 Pull the unit out together with the hoses maintenance for a prolonged period of non operation If you are not going to use the unit for a prolonged period of time ...

Page 31: ... no water cut Close the water input tap separate the water input hose from the tap and clean the filter at the connection end of the hose Restart your machine contact the service if the error resumes F6 Faulty heater sensor Contact the service F7 Overheating error temperature in the machine is too high Contact the service F8 Heater error Contact the service F9 Divisor position error Contact the se...

Page 32: ...Smearing appears on glassware and cutlery The rinse aid dosage is set too high Adjust the dial of the rinse aid dispenser to a lower setting Dishes cutlery and glasses are not dry The amount of rinse aid may be insufficient or the rinse aid reservoir is almost empty Replenish the reservoir adjust the rinse aid dispenser dial to a higher setting or change the brand of rinse aid Crockery was taken o...

Page 33: ...ves in Make appropriate arrangements for the disposal of the dishwasher At the end of its working life the product must not be disposed of as urban waste It must be taken to a special local authority differentiated waste collection centre or to a dealer providing this service Disposing of a household appliance separately avoids possible negative consequences for the environment and health deriving...

Page 34: ...est efficiency to D lowest efficiency 2 Based on 280 standard cleaning cycles using cold water fill and the consumption of the low power modes Actual energy consumption will depend on how the appliance is used 3 A most efficient to G least efficient 4 This is the programme used for the Energy label information and is suitable for cleaning normally soiled tableware It is the most efficient programm...

Page 35: ...r service representative if you are in doubt whether the appliance is properly earthed or the plug does not fit correctly Never modify the plug provided with the appliance proper use Do not sit or stand on the door or dish rack Do not touch the heating element during or immediately after use Do not operate your dishwasher unless all enclosure panels are properly in place Open the door very careful...

Page 36: ...t be replaced by the manufacturer or its service agent in order to avoid a hazard Remove the door to the washing compartment when removing an old dishwasher from service or discarding it During installation the mains cable must not be excessively or dangerously bent or flattened Do not tamper with controls The appliance is to be connected to the water mains using new hose sets The maximum number o...

Page 37: ......

Page 38: ...sories With over 1 million spares and accessories available we can deliver direct to your door the very next day Visit www partmaster co uk or call 0844 800 3456 UK customers only Calls charged at National Rate DSG Retail Ltd Maylands Avenue Hemel Hempstead Herts HP2 7TG England This symbol on the product or in the instructions means that your electrical and electronic equipment should be disposed...

Reviews: