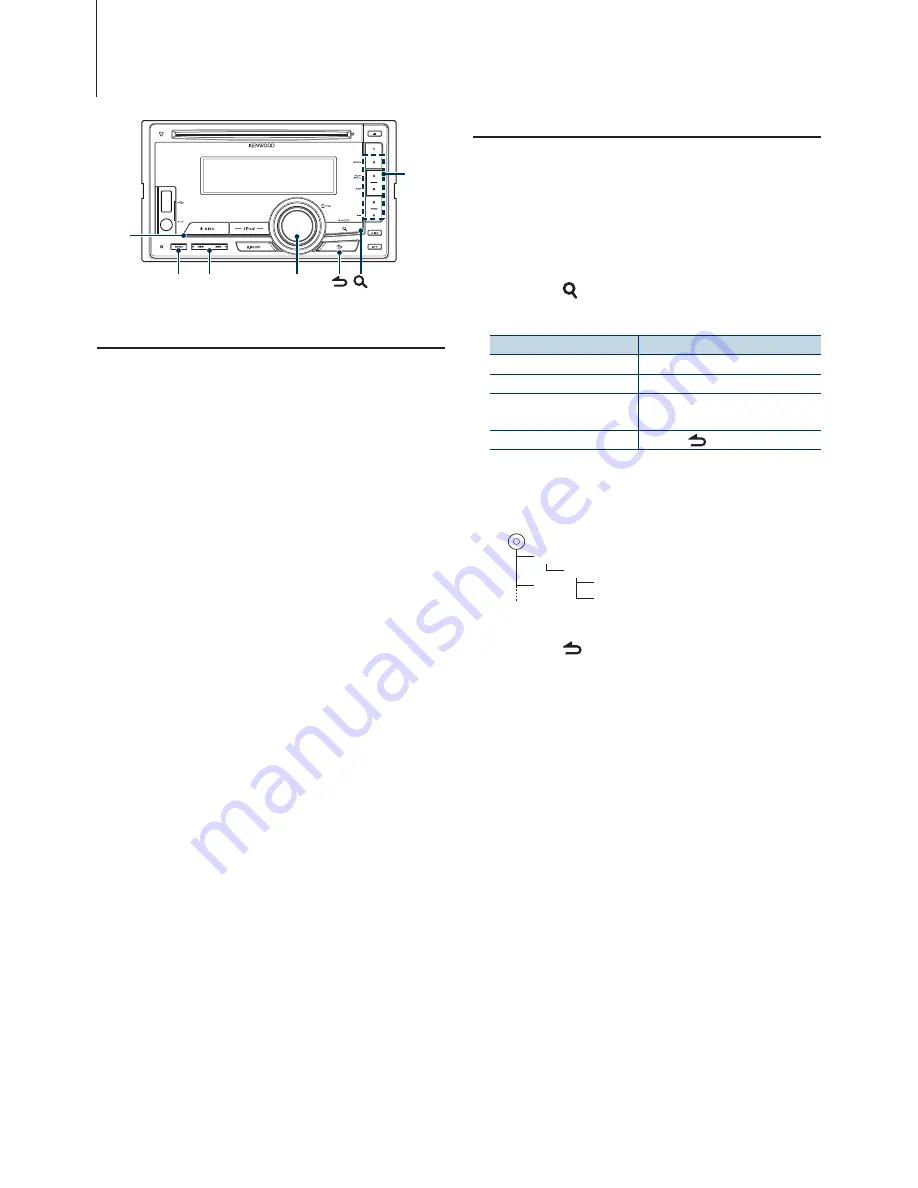
Kenwood DPX308U Quick Start Manual Download Page 32

16


|


DPX308U

USB device Operation

Basic Operation

Playing USB device

•  Connect a USB device

When connected, the source is switched 
automatically and a song starts playing.

•  Select USB source

Press the [SRC] button. 

Select the “USB” display.

• 

CA-U1EX (optional accessory) is recommended to connect 
a USB device.

Moving to the next folder

Press the [BAND] button.

• 

The Music Editor media does not allow you to select a 
folder.

Song Select

Press the [

4

] or [

¢

] button.

Fast Forwards or Fast Backwards

Hold down the [

4

] or [

¢

] button.

• 

No sound is output while playing Audio file.

Pause and Play

Press the [6] button to pause or resume 
playback.

Remove USB device

Select a source other than the USB

Press the [SRC] button.

Remove the USB device.

• 

Removing the USB device with it selected as a source can 
damage the data stored in the USB device.  

File Search

Selecting the file you want to listen to from the 
device being played now.

Select USB source

Press the [SRC] button. 

Select the “USB” display.

Enter Music search mode

Press the [   ] button.

Select a file

Operation type

Operation

Move between items

Turn the [VOL] knob.

Select an item

Press the [VOL] knob.

Skip Search (Function of Music 

Editor media)

Press the [

4

] or [

¢

] button.

Return to previous item

Press the [

] button.


For example: Searching for 

¡"

Turn the [VOL] knob and press it when the 
desired item is displayed.  
Select “Music” > 

1

 > 

2

 > 

¡"

¡!

1

2

¡"
¡#

Cancelling Music search mode

Press the [   ] button for at least 1 second.

• 

Set the ratio with “Skip Search” in 

<USB Setting> (page 17)

.  

SRC

VOL

BAND

4 ¢

2 – 6

Summary of Contents for DPX308U

Page 1: ...anual Familiarity with installation and operation procedures will help you obtain the best performance from your new CD Receiver For your records Record the serial number found on the back of the unit in the spaces designated on the warranty card and in the space provided below Refer to the model and serial numbers whenever you call upon your Kenwood dealer for information or service on the produc...

Page 2: ...prevent injury or fire take the following precautions Stop the car before operating the unit To prevent a short circuit never put or leave any metallic objects such as coins or metal tools inside the unit CAUTION Adjust the volume so that you can hear sounds outside the car Driving with the volume too high may cause an accident Wipe off the dirt on the panel with a dry silicon or soft cloth Failur...

Page 3: ...iscs with coloring on the recording surface or discs that are dirty Recordable Rewritable disc that has not been finalized For the finalization process refer to your disc writing software and your disc recorder instruction manual 8 cm 3 inch disc Attempt to insert using an adapter can cause malfunction Handling discs Do not touch the recording surface of the disc Do not stick tape etc on the disc ...

Page 4: ...approx 15 seconds 2 Turn the VOL knob to select YES and then press the VOL knob The demonstration mode can also be canceled in the Function setting mode Refer to Demonstration mode Setting page 29 of Instruction manual 4 I Quick Start Guide Adjusting the Clock 1 Press the 8 80051 button for at least 1 second 2 Turn the VOL knob to adjust the hour and then press the VOL knob 3 Turn the VOL knob to ...

Page 5: ...e sound volume Attenuator Press the All button Turning the volume down quickly USB terminal USB device or iPod can be connected CA U1EX or KCA iP10l iP102 optional accessory is recommended to connect a USB device or iPod Auxiliary input Portable audio device can be connected with the stereo mini plug 3 5 mm 0 Display selection Each time you press the DISP button another display mode will be select...

Page 6: ...ontaining songs tracks or files Pause and play Press the 6 button to pause or resume playing a song track or file 6 I Quick Start Guide Music Search Searching for the song you want to play 1 Press the Q button 2 Search for music Movement between items Turn the VOL knob Selection ofitem Press the VOL knob Return to previous item Press the J button To cancel the music search operation of Audio file ...

Page 7: ... BAND button to change the band in the order of FM 1 FM2 FM3 AM Selecting a Station Press the or button to select the station you want to listen to Station preset memory Keep pressing the button 1 to 6 to which you want to assign the selected station for at least 2 seconds Recalling the stations in the memory Press the button 1 to 6 corresponding to the station you want to listen to English I 7 ...

Page 8: ...www kenwood com cs ce audiofilel iPod iPhone that can be connected to this unit Made for iPod touch 4th generation iPod touch 3rd generation iPod touch 2nd generation iPod touch 1 st generation iPod classic iPod with video iPod nano 6th generation iPod nano 5th generation iPod nano 4th generation iPod nano 3rd generation iPod nano 2nd generation iPod nano 1 st generation iPhone 4 iPhone 3GS iPhone...

Page 9: ... sure the wires are not touching to cause a short circuit then replace the old fuse with one with the same rating o When only two speakers are being connected to the system connect the connectors either to both the front output terminals or to both the rear output terminals do not mix front and rear For example if you connect the ffi connector of the left speaker to a front output terminal do not ...

Page 10: ...8 Gray To front rig ht speaker8 _G_r ay _B_la_ck J Green To rear left speaker 8 Green Black Pur 2le To rear right speaker8 Purple Black Ignition key switch Car fuse box Main fuse Car fuse box ACC Red Ignition wire D lf Yellow Battery wire o f Black Ground wire e To car chassis Battery 10 I Quick Start Guide ...

Page 11: ...l terminal of the motor antenna or to the power terminal for the booster amplifier of the film type or short pole type antenna I Max 300mA 12V DC Brown Mute control wire I MUTE r Orangel White Dimmer control wire IILLUMI rT Connect to the terminal that is grounded when either the telephone rings or during conversation To connect the Kenwood navigation system consult your navigation manual To car l...

Page 12: ...ry cut out to the unit Accessory For TOYOTAI SCION 1 Refer to the section Removing the hard rubber frame page 14 and then remove the hard rubber frame 2 Cut out accessory as illustrated Cutting line Accessory Accessory Cut out to meet the shape of the opening in the vehicle For General Motors 1 Refer to the section Removing the hard rubber frame page 14 and then remove the hard rubber frame 2 Cut ...

Page 13: ... place If the unit is unstable it may malfunction for example the sound may skip Installing in Japanese Made Cars and General Motors Cars Install onto the car bracket using the supplied screws M5 x 6 mm M5 x 7 mm The holes of the car bracket to use will differ depending on the car model Car Bracket p I p Accessory M5 x 7 mm or Accessory M5 x 6 mm English I 13 ...

Page 14: ... the upper two locations 14 I Quick Start Guide Removing the Unit 1 Remove the hard rubber frame by referring to the removal procedure in the section Removing the Hard Rubber Frame 2 Insert the two removal tools deeply into the slots on each side as shown 3 Lower the removal tool toward the bottom and pull out the unit halfway while pressing towards the inside Be careful to avoid injury from the c...

Page 15: ...operation of this device or its compliance with safety and regulatory standards Please note that the use of this accessory with iPod or iPhone may affect wireless performance iPhone iPod iPod classic iPod nano and iPod touch are trademarks of Apple Inc registered in the U S and other countries Adobe Reader is a trademark of Adobe Systems Incorporated FCC NOTE This equipment has been tested and fou...

Page 16: ... KENWOOD ...

Page 17: ...tion and operation procedures will help you obtain the best performance from your new Dual DIN sized CD receiver For your records Record the serial number found on the back of the unit in the spaces designated on the warranty card and in the space provided below Refer to the model and serial numbers whenever you call upon your Kenwood dealer for information or service on the product Model DPX308U ...

Page 18: ...rch Play function USB Setting Music CD Audio file Operation 18 Basic Operation Music Search Play function Direct music search Tuner Operation 20 Basic Operation Tuner Setting Station Preset Memory Auto Memory Entry Preset Tuning Direct access tuning Display Settings 24 Display Setting Text Display Selection Illumination Color Selection Auxiliary Input Display Setting Text scroll Clock and Other Fu...

Page 19: ...English 3 Appendix 36 Troubleshooting Guide 38 Specifications 40 ...

Page 20: ...s of the display and the panel appearing in this manual are examples used to explain more clearly how the controls are used Therefore what appears on the display in the illustrations may differ from what appears on the display on the actual equipment and some of the illustrations on the display may be inapplicable About discs used with this unit This unit can only play the CDs with The following d...

Page 21: ...English 5 ...

Page 22: ... turn and press the knob Refer to Function setting Operation page 9 for details 9 B BOOST button To boost the bass tone in two steps LV1 LV2 OFF p iPod button Select the iPod source q 4 button To select a station song and setting items w BAND button To select the receiving band and the folder for Audio file e SRC button To turn on this unit and select the Source To turn off this unit press the but...

Page 23: ...English 7 ...

Page 24: ...ting mode Refer to Demonstration mode Setting page 29 General operation Common Operation Power and source select Turns the power ON by pressing the SRC button When the power is ON select a source Press the SRC button each time switches between sources Tuner TUNER USB USB or iPod iPod CD CD Auxiliary input AUX Standby STANDBY Tuner Press the iPod button to switch the source to iPod Press the SRC bu...

Page 25: ...the VOL knob 3 Select the setting item Turn the VOL knob and press it when the desired item is displayed Repeat the operation until your desired setup item is selected Operation example VOL VOL Settings Seek Mode Auto Memory Audio Control 1 1 2 4 3 1 3 2 4 1 sec Exit In this manual the above selection is indicated as Select SETTINGS SEEK MODE 4 Make a setting Turn the VOL knob to select a setting ...

Page 26: ...ong you want to play 1 Select iPod source Press the iPod button 2 Enter Music search mode Press the button 3 Select a song Operation type Operation Move between items Turn the VOL knob Select an item Press the VOL knob Skip Search Press the 4 or button Return to previous item Press the button For example Searching by Artist name Turn the VOL knob and press it when the desired item is displayed Sel...

Page 27: ...n may become longer depending on the number of songs in iPod Turning on the all random function changes the iPod browse item to Songs This browse item will not be changed even if the all random function is turned off If the browse item is changed to search for music while the all random function is on the all random function is turned off and the songs in the browse item are played at random iPod ...

Page 28: ...button for at least 1 second The setting of SKIP SEARCH in iPod Setting page 12 and that in USB Setting page 17 are always the same Changing the setting of one reflects the other Selecting the Search mode You can select the most suited search method for the desired song from 3 types of the Search mode Search mode Operation Overview RELATED SRCH Press the 1 button Searches for music of the same art...

Page 29: ...c being played has no information on browsing items or no music was found NOT FOUND is displayed Alphabet Search You can select a song by alphabet This function searches songs whose name contain the specified character s in the list of the selected Search item artist album etc 1 Select iPod source Press the iPod button 2 Enter Music search mode Press the button 3 Select search item Turn the VOL kn...

Page 30: ... it when the desired item is displayed Select the song you want to play Turning ACC OFF or the power OFF cancels the My Playlist mode The ending of a song may be cut unless the song has a silence of 1 second or longer at the end Random play cannot be performed during playback of a song in the Playlist Deleting a Song from the Playlist 1 Enter Playlist mode Press the 5 button 2 Enter Delete Playlis...

Page 31: ...English 15 ...

Page 32: ...ource other than the USB Press the SRC button 2 Remove the USB device Removing the USB device with it selected as a source can damage the data stored in the USB device File Search Selecting the file you want to listen to from the device being played now 1 Select USB source Press the SRC button Select the USB display 2 Enter Music search mode Press the button 3 Select a file Operation type Operatio...

Page 33: ...r repeat play USB Setting You can select the following USB Setting items 1 Select USB source Press the SRC button Select the USB display 2 Enter Function setting mode Press the VOL knob 3 Turn the VOL knob and press it when the desired item is displayed Select SETTINGS 4 Select the setting item Turn the VOL knob and press it when the desired item is displayed Display Overview SETTINGS SKIP SEARCH ...

Page 34: ...n Fast Forwards or Fast Backwards Hold down the 4 or button No sound is output while playing Audio file Pause and Play Press the 6 button to pause or resume playback Function of Internal CD source Music Search Selecting the music you want to listen to from the disc being played now 1 Select CD source Press the SRC button Select the CD display 2 Enter Music search mode Press the button 3 Search for...

Page 35: ...e Random play Repeat play Press the 4 button Switches between Track Repeat TRACK REPEAT and OFF REPEAT OFF when pressed while playing a CD Switches between File Repeat FILE REPEAT Folder Repeat FOLDER REPEAT and OFF REPEAT OFF when pressed while playing an Audio file Function of remote control Direct music search Searching the music by entering the track number 1 Enter Direct Music search mode Pre...

Page 36: ... displayed Select SETTINGS 4 Select the setting item to adjust Turn the VOL knob and press it when the desired item is displayed Display Overview SETTINGS SEEK MODE Selects the tuning mode of the radio AUTO1 Automatic search for a station AUTO2 Search in order of the stations in the Preset memory MANUAL Normal manual tuning control AUTO MEMORY Memorizes 6 stations with good reception automatically...

Page 37: ...E of Initial Settings page 28 Auto Memory Entry Putting stations with good reception in the memory automatically 1 Select the radio band you wish to store in the preset memory 2 Enter Function setting mode Press the VOL knob 3 Enter Auto Memory Entry mode Turn the VOL knob and press it when the desired item is displayed Select SETTINGS AUTO MEMORY 4 Open Auto Memory Entry Turn the VOL knob and pre...

Page 38: ...ntering the frequency and tuning 1 Enter Direct access tuning mode Press the DIRECT button on the remote control is displayed 2 Enter the frequency Press the number buttons on the remote control Example Desired frequency Press button 92 1 MHz FM 9 2 1 810 kHz AM 8 1 0 3 Search the frequency Press the 4 or button on the remote control Cancelling Direct access tuning Press the button on the remote c...

Page 39: ...English 23 ...

Page 40: ...ton illumination when DISP OFF MODE is selected as described in Text Display Selection page 25 CLOCK ON Displays the clock OFF Dims the clock KEY ILLUMI ON Turns on the button illumination OFF Dims the button illumination DISP DIMMER Reduces the display Illumination brightness AUTO Dims the illumination in conjunction with the Light switch of the vehicle MANUAL1 Dims the illumination constantly MA...

Page 41: ...xit the detail color adjustment mode 5 Exit Function setting mode Press the button for at least 1 second Text Display Selection Changing displayed information on each source following Press the DISP button In Tuner source Information Display Frequency FREQUENCY Display off DISP OFF MODE In CD source Information Display Disc title DISCTITLE Track title TRACKTITLE Play time Track number P TIME Displ...

Page 42: ...ng mode Press the VOL knob 3 Enter Auxiliary input display setting mode Turn the VOL knob and press it when the desired item is displayed Select SETTINGS AUX NAME SET 4 Select the Auxiliary input display Turn the VOL knob Select AUX DVD PORTABLE GAME VIDEO or TV 5 Exit Function setting mode Press the button for at least 1 second Text scroll Press the DISP button for at least 1 second The displayed...

Page 43: ...English 27 ...

Page 44: ...cted ON Allows AUX source to be selected Use this setting when the built in AUX terminal is connected to the external equipment all the time OFF Disable AUX source selection Use this setting when the built in AUX terminal is not used CD READ Sets the CD read mode 1 Automatically distinguishes between Audio file disc and music CD when playing disc 2 Forces playing as music CD SWITCH PREOUT Switches...

Page 45: ...OL knob 6 Exit Function setting mode Press the button for at least 1 second Demonstration mode Setting Turning the demonstration mode ON OFF 1 Enter Function setting mode Press the VOL knob 2 Enter Demonstration mode setting Turn the VOL knob and press it when the desired item is displayed Select DEMO MODE 3 Set the Demonstration mode Turn the VOL knob and press it when the desired item is display...

Page 46: ...uses Listening to the audio during a call Press the SRC button The CALL display disappears and the audio system comes back ON When the call ends Hang up the phone The CALL display disappears and the audio system comes back ON To use the TEL Mute feature you need to hook up the MUTE wire to your telephone using a commercial telephone accessory Refer to Connecting Wires to Terminals page 10 of Quick...

Page 47: ...English 31 ...

Page 48: ...at is cut off when encoding at low bit rate less than 128Kbps Sampling frequency is 44 1kHz Supplementing is optimized by compression format MP3 WMA and AAC and processed according to bit rate The effect is negligible with music that is encoded at high bit rate variable bit rate or has minimal high frequency range Audio Control You can adjust the following Audio Setting items Display Overview AUDI...

Page 49: ...English 33 ...

Page 50: ...on ENT Enter Audio Control mode AUD In Tuner source Band select FM AM Station select 4 Recall preset stations 1 6 Enter Menu List mode 5 In USB Music CD Audio file source Music select 4 Folder select FM AM Pause Play ENT Enter Menu List mode 5 Enter Music search mode Movement between folders files during Search mode 5 Return to previous folder In iPod source Music select 4 Pause Play ENT Enter Men...

Page 51: ...d properly following the illustration inside the case CAUTION Do not set the remote control in hot places such as on the dashboard Lithium battery Danger of explosion if the battery is incorrectly replaced Replace only with the same or equivalent type The battery pack or batteries shall not be exposed to excessive heat such sunshine fire or the like Keep battery out of reach of children and in ori...

Page 52: ...d through the online manual as well In this manual the word USB device is used for flash memories and digital audio players which have USB terminals About USB device When the USB device is connected to this unit it can be charged up provided that this unit is powered Install the USB device in the place where it will not prevent you from driving your vehicle properly You cannot connect a USB device...

Page 53: ...d and iPod connection cable www kenwood com cs ce ipod If you start playback after connecting the iPod the music that has been played by the iPod is played first In this case RESUMING is displayed without displaying a folder name etc Changing the browse item will display a correct title etc You cannot operate iPod if KENWOOD or displayed on iPod About KENWOOD Music Editor This unit supports the PC...

Page 54: ...ation or miswiring Before calling service first check the following table for possible problems General The operation check sound beep sound does not sound The preout jack is being used The Touch Sensor Tone cannot be output from the preout jack Tuner source Radio reception is poor The car antenna is not extended Connect the Antenna control wire to the power terminal for the booster amplifier of t...

Page 55: ...format that this unit can t support COPY PRO A copy protected file is played REAR ERROR The file system of the connected USB device is broken Copy the files and folders for the USB device again If the error message is still displayed initialize the USB device or use other USB devices NO DEVICE The USB device is selected as a source although no USB device is connected Change the source to any sourc...

Page 56: ...liant with MPEG 1 2 Audio Layer 3 WMA decode Compliant with Windows Media Audio AAC decode AAC LC m4a files USB Interface USB Standard USB1 1 2 0 Full speed Maximum Supply current 500 mA File System FAT16 32 MP3 decode Compliant with MPEG 1 2 Audio Layer 3 WMA decode Compliant with Windows Media Audio AAC decode AAC LC m4a files Audio section Maximum output power 50 W x 4 Full Bandwidth Power at l...

Page 57: ...ence will not occur in a particular installation If this equipment does cause harmful interference to radio or television reception which can be determined by turning the equipment off and on the user is encouraged to try to correct the interference by one or more of the following measures Reorient or relocate the receiving antenna Increase the separation between the equipment and receiver Connect...

Page 58: ...5300 In The Continental U S A For Nearest Authorized Service Center Tel 1 800 536 9663 EUROPE Please inquire at the military resale outlets where you bought your Kenwood products or KENWOOD ELECTRONICS DEUTSCHLAND GMBH Rembrucker Str 15 63150 Heusenstamm Germany Tel 49 06104 69010 Iwakuni Kenwood Rep c o Marine Corps Exchange Marine Corps Air Station FPO Seattle 98764 JAPAN Yokota Kenwood Rep c o ...

Page 59: ... of purchase When applying for warranfy repairs you must present lhe original copy of yoor bill of sale and Ihis warranfycard asproofofwarranty sowerecommendthattheybe kept in asale place should they be reQuired in the future KENWOOD ELECTRONICS CANADA INC 6070 Kestrel Road Mississauga Ontario Canada l5T lS8 Tel 9051670 7211 Fax 905 670 7248 JVC KENWOOD DO BRASIL COMERCIO DE ELECTRONICOS LTDA olab...

Reviews: