Kenwood DPX-MP3110 Instruction Manual Download Page 14

14


|


DPX-MP5110U/DPX-MP4110/DPX-MP3110

Menu Operation

Menu System

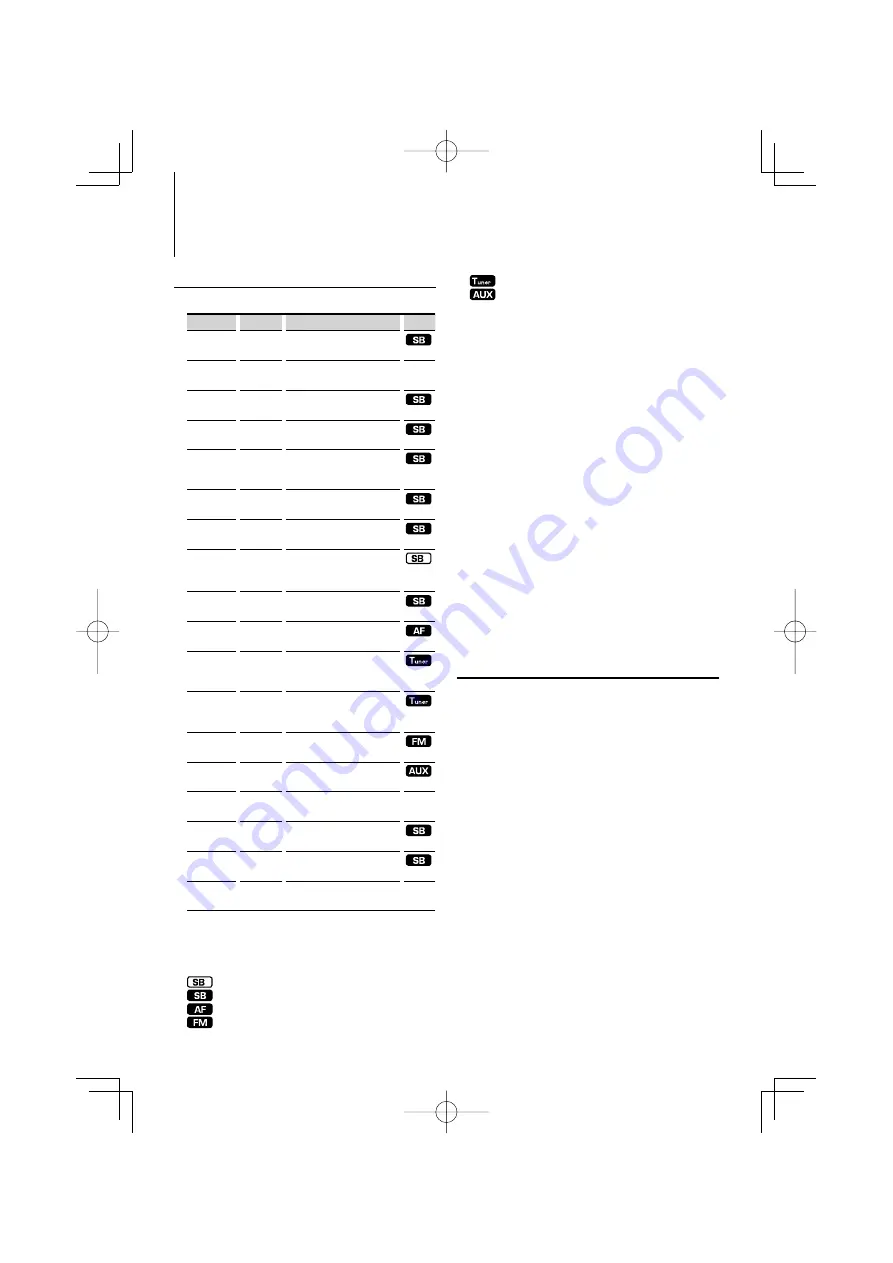
Set up the following functions;

Display

Setting

Setting overview

Source

“Code Set”

Refer to 
page 14

Sets security code. 

“I-EFCT”

0/1/2/3

Set the illumination color effect. 
(page 19)

“Beep”

On*/Off

Setting the operation check 
sound (beep sound) ON/OFF.

“CLK ADJ”

Refer to 
page 15

Sets the clock.

“DSI”

On*/Off

A red indicator will blink on the 
unit after the ACC is set to OFF, 
warning potential thieves.

“CONT“

1— 5*—
11

Adjusting the display contrast.

“SWPRE”

R*/SW

Sets the preout output.

“Zone2”

R*/F

Specifies the destination of AUX 
input sound when the Dual Zone 
function is turned on.

“AMP”

On*/Off

Turns on/off the built-in 
amplifier.

“SPRM”

On*/Off

Turns ON/OFF the Supreme 
function.

“Auto”

Auto1*/
Auto2/
Manual

Selects the tuning mode of 
the radio.

“A-Memory” Refer to 

page 11

Putting stations with good 
reception in the memory 
automatically.

“CRSC” 

Off/On*

Switches to Monaural to decrease 
noise when reception is poor.

“Name Set”

Refer to 
page 15

Sets the display when switched 
to AUX source.

“SCL”

Auto*/
MANU

Specifies whether the text is 
scrolled automatically.

“AUX”

Off/On*

Sets whether to display AUX 
during source selection.

“CD Read”

1*/2

Sets the CD read mode.

“DEMO”

Refer to 
page 16

Specifies whether to enable 
demonstration.

*Factory setting

Displayed item is depending on currently selected source.

The mark in Source column shows the source to which the 

item is displayed.

 : Can be set in other than standby state.
 : Can be set in standby state.
 :  Can be set while Audio file source of CD/USB.
 : Can be set during FM reception.

 : Can be set during Tuner reception.
 : Can be set while accessing AUX source.

   —    : Can be set during all sources.

1

  Enter Menu mode

Press the [M.JOG] button for at least 1 second.

“Menu” is displayed.

2

  Select the Menu item

Push the Control knob towards up or down.

3

  Set the Menu item

Push the Control knob towards right or left.

4

  Exit Menu mode

Press the [M.JOG] button.

•  Refer to the respective page for information on how to 

set the items with reference page number.

•  ”Zone2” is displayed when ”2ZON” in <Audio Setup> 

(page 8) is set to ”ON.

•  Refer to the <Appendix> (page 18) for the details of the 

menu items.

•  Strong electrical fields (such as from power lines) may 

cause unstable sound quality when CRSC is turned ON. 
In such a situation, turn it OFF.

Security Code

When Security Code is set, possibility of theft 
is reduced because input of Security Code is 
prompted to turn on the unit once it is turned off.

•  When you activate the Security Code function, it cannot be 

released.
Note, your Security Code is the 4 digit number entered in 
your “Car Audio Passport” in this package.

1

  Select Security Code item during Menu mode

Select the “Code Set” display.
For how to select menu items, refer to <Menu 
System>(page 14).

2

  Enter Security Code mode

Press the Control knob for at least 1 second.

When “Enter” is displayed, “Code” is also displayed.

3

  Select the digits to enter

Push the Control knob towards right or left.

4

  Select the Security Code numbers

Push the Control knob towards up or down.

5

  Repeat step 3 and 4, and complete the Security 

Code.

B64-4186-00̲00̲English.indd   14

B64-4186-00̲00̲English.indd   14

08.2.5   1:09:28 PM

08.2.5   1:09:28 PM

Summary of Contents for DPX-MP3110

Page 1: ...DUAL DIN SIZED CD RECEIVER DPX MP5110U DPX MP4110 DPX MP3110 INSTRUCTION MANUAL B64 4186 00 00 MW B64 4186 00 00 English indd 1 B64 4186 00 00 English indd 1 08 2 5 1 09 22 PM 08 2 5 1 09 22 PM ...

Page 2: ...ancer Control Spectrum Analyzer Select Illumination Color Select User Color Setting Display Switching Tuner Operation 11 Auto Memory Entry Direct Access Tuning Frequency Step Setting Music disc Audio file Operation 12 Play Functions of Disc Changer Direct Music Search Direct Disc Search List Select Track Select Cassette Operation 13 DPSS with the Remote control Menu Operation 14 Menu System Securi...

Page 3: ...does not operate normally after a while consult your Kenwood dealer If you experience problems during installation consult your Kenwood dealer When you purchase optional accessories check with your Kenwood dealer to make sure that they work with your model and in your area The characters which can be displayed by this unit are A Z 0 9 The illustrations of the display and the panel appearing in thi...

Page 4: ...d does not have any resistance Muting volume upon reception of phone call When there is a call CALL is displayed and the audio system is paused When the call ends CALL disappears and the audio system comes back on The audio system comes back on when SRC is pressed during a call Subwoofer output Control knob Switches between ON SW On and OFF SW Off each time pushing toward down for at least 2 secon...

Page 5: ...verses or forwards the music while keeping pushing toward left or right No sound is output while playing audio file Folder search Control knob Changes the folder containing the audio file when pushing toward up or down Select mode M JOG After pressing this button you can quickly search songs with the control knob See List Select page 12 for details Track File Folder repeat play 4 Switches between ...

Page 6: ...sh the Control knob toward right Skipping to a previous music Push the Control knob toward left Space between music and the first 5 seconds of the music are recognized as the previous music As many as 9 music can be skipped DPX MP4110 Basic Operation Dolby B NR 1 When Dolby B NR is ON B NR indicator is ON Scan play 2 Successively plays the intro of the music in the tape When Scan Play is turned on...

Page 7: ...g the detail of Audio Control Among the Basic Audio items you can adjust the Bass level Middle level and Treble level in detail Bass level Adjustment Item Display Range Bass Center Frequency BasF 40 50 60 70 80 100 120 150 Hz Bass Q Factor BasQ 1 00 1 25 1 50 2 00 Bass Extend B EX Off On Middle level Adjustment Item Display Range Middle Center Frequency MidF 0 5 1 0 1 5 2 0 kHz Middle Q Factor Mid...

Page 8: ... follows Adjustment Item Display Range Front High Pass Filter HPF Through 40 60 80 100 120 150 180 220 Hz Rear High Pass Filter HPR Through 40 60 80 100 120 150 180 220 Hz Low Pass Filter LPF 50 60 80 100 120 Through Hz Subwoofer Phase PHAS Reverse 180 Normal 0 Volume offset V Off 8 0 AUX 8 8 Loudness LOUD Off On Dual Zone System 2ZON Off On Volume offset Sets each source s volume as a difference ...

Page 9: ...r Turn the Control knob Color setting Display Scan of Color 1 10 V Scan Color 1 Color 1 Color 2 Color 2 Color 10 Color 10 User color User 4 Exit the Illumination color Select mode Press the COL button You can adjust the illumination color to your taste using RGB setting See User Color Setting page10 for detail When illumination effect I EFCT setting page 14 is 2 you can not set color When illumina...

Page 10: ...on for at least 1 second DISP SEL is displayed 2 Select the Display item Push the Control knob towards up or down 3 Exit Switching Display mode Press the 38 button When you select the clock display the display setting of each source will be changed to the clock display If the selected display item does not have any information alternative information is displayed User Color Setting Adjust the illu...

Page 11: ...step While pressing the 1 and 5 buttons press the SRC button Release your fingers from the button after the display appears The frequency step changes to FM band 200 kHz and AM band 10 kHz When the same operation is repeated the frequency step returns to the original setting When the frequency step is changed the frequencies in the memory are deleted Tuner Operation Auto Memory Entry Putting stati...

Page 12: ...ction is automatically canceled Function of disc changers with remote control Direct Disc Search Doing Disc Search by entering the disc number 1 Enter the disc number Press the number buttons on the remote control 2 Do Disc Search Press the FM or AM button Cancelling Direct Disc Search Press the 38 button Input 0 to select disc 10 Direct Disc Search cannot be performed during playing of Random pla...

Page 13: ...rack Select is available only during playing of the built in CD player Track Select cannot be performed during Random play or scan play DPSS with the Remote control Designating the music to be skipped with the remote control number buttons 1 Designate the music to skip Press number buttons on the remote 2 Skipping to a later music Press the button Skipping to a previous music Press the 4 button Ca...

Page 14: ...be set while Audio file source of CD USB Can be set during FM reception Can be set during Tuner reception Can be set while accessing AUX source Can be set during all sources 1 Enter Menu mode Press the M JOG button for at least 1 second Menu is displayed 2 Select the Menu item Push the Control knob towards up or down 3 Set the Menu item Push the Control knob towards right or left 4 Exit Menu mode ...

Page 15: ...rce AUX DVD PORTABLE GAME VIDEO TV 1 Select Auxiliary input display setting item during Menu mode Select the Name Set display For how to select menu items refer to Menu System page 14 2 Enter Auxiliary input display setting mode Press the Control knob for at least 1 second The presently selected Auxiliary input display is displayed 3 Select the Auxiliary input display Push the Control knob towards...

Page 16: ...t Demonstration mode Press the M JOG button Menu Operation General control Volume control VOL Source select SRC Volume reduce ATT When the button is pressed again the volume returns to the previous level When the volume is reduced the ATT indicator flashes In Audio control Audio item select AUD Adjusts the Audio item VOL Refer to Audio Control page 7 for the operation method such as the procedures...

Page 17: ...e batteries with the and poles aligned properly following the illustration inside the case Dual Zone control Dual zone system on and off 2 ZONE Rear channel volume control 5 In Tuner source Band select FM AM Station select 4 Recall preset stations 1 6 In CD USB source Music select 4 Folder Disc select FM AM Pause Play 38 In Cassette tape source DPSS 4 Fast forwards Rewinds FM AM Direction 38 DPSS ...

Page 18: ... a USB hub and Multi Card Reader Take backups of the audio files used with this unit The files can be erased depending on the operating conditions of the USB device We shall have no compensation for any damage arising out of erasure of the stored data No USB device comes with this unit You need to purchase a commercially available USB device When connecting the USB device usage of the CA U1EX opti...

Page 19: ...in order of the stations in the Preset memory Manual Manual Normal manual tuning control I EFCT Illumination effect Set the illumination color effect Illumination effect mode Display Mode off 0 Illumination color will change to variable each time this unit is operated 1 Illumination color will be mono color and then illumination color will change variable with the playback tone of sound 2 Illumina...

Page 20: ...ry wires the battery may die If the console has a lid make sure to install the unit so that the faceplate will not hit the lid when closing and opening If the fuse blows first make sure the wires aren t touching to cause a short circuit then replace the old fuse with one with the same rating Insulate unconnected wires with vinyl tape or other similar material To prevent a short circuit do not remo...

Page 21: ...sation To connect the Kenwood navigation system consult your navigation manual Power control Motor antenna control wire Blue White Connect either to the power control terminal when using the optional power amplifier or to the antenna control terminal in the vehicle FM AM antenna input Dimmer control wire Orange White To car light control switch Depending on what antenna you are using connect eithe...

Page 22: ...ing the supplied screws M5 6 mm M5 7 mm The holes of the car bracket to use will differ depending on the car model Accessory3 M5 7 mm or Accessory4 M5 6 mm Accessory2 Only for NISSAN car Car Bracket B64 4186 00 00 English indd 22 B64 4186 00 00 English indd 22 08 2 5 1 09 32 PM 08 2 5 1 09 32 PM ...

Page 23: ... Eject the disc magazine and check the number for the specified disc The disc is severely scratched Try another disc instead Audio file source The sound skips when an Audio file is being played The media is scratched or dirty Clean the media referring to the CD cleaning of the section on Handling CDs page 3 The recording condition is bad Record the media again or use another media Noise is heard w...

Page 24: ...activated Wire or insulate the speaker cable properly and press the reset button If the Protect code does not disappear consult your nearest service center NA File An Audio file is played with a format that this unit can t support Copy PRO A copy protected file is played Reading The unit is reading the data on the disc Hold The protective circuit in the unit activates when the temperature inside t...

Page 25: ...nterface DPX MP5110U USB Standard USB1 1 2 0 Maximum Supply current 500 mA File System FAT16 32 MP3 decode Compliant with MPEG 1 2 Audio Layer 3 WMA decode Compliant with Windows Media Audio AAC decode AAC LC m4a files Cassette player section DPX MP4110 Tape speed 4 76 cm sec Wow Flutter WRMS 0 1 Frequency response 70 μs 40 Hz 20 kHz 3 dB Separation 1 kHz 35 dB Signal to Noise ratio Dolby NR Off 5...

Page 26: ...B64 4186 00 00 English indd 26 B64 4186 00 00 English indd 26 08 2 5 1 09 33 PM 08 2 5 1 09 33 PM ...

Page 27: ...B64 4186 00 00 English indd 27 B64 4186 00 00 English indd 27 08 2 5 1 09 33 PM 08 2 5 1 09 33 PM ...

Page 28: ...B64 4186 00 00 English indd 28 B64 4186 00 00 English indd 28 08 2 5 1 09 33 PM 08 2 5 1 09 33 PM ...

Reviews: