background image

30

DP-K1000

*1:   In addition to audio signals, information called the Table of Contents (TOC) is recorded on each CD. The TOC is 

similar to the Contents page of a book and information such as the text, playing times and number of tracks 
includes some items that cannot be rewritten.

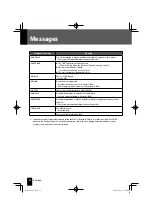
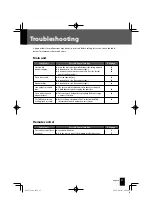
Displayed Message

Meaning

CAN’T PLAY

You are attempting to play an audio fi le that cannot be played on this system.

R

The system automatically skips to the next audio fi le.

CHECK DISC

The TOC

* 1

 information cannot be read.

R

The disc is dirty. Clean the disc. (See “Care and Storage” on P.34.)

The disc is not loaded correctly.

R

Set the disc in the tray correctly. (P.18)

The disc contains no playable audio fi les.

z

z

z

NO DISC

There is no CD loaded.

R

Load a CD.

NO PGM

No tracks are programmed.

R

Program the tracks you want to listen to. (P.24)

R

Cancel program mode and use normal playback. (P.25)

NO TEXT

There is no text information on a CD-TEXT disc.

PGM FULL

An attempt was made to program a 33rd CD track.

R

You can only program up to 32 tracks. (P.25)

PROTECTED

An attempt was made to play an audio fi le with the copyright protection function 
enabled. 

R

The system automatically skips to the next audio fi le.

TRAY OPEN

The CD tray is open.

R

Close the tray.

. . . . . . . . . . . .

There  is  no  TAG  information. (P.21)

Messages

B60-5719-00.indb   30

B60-5719-00.indb   30

2007/09/14   18:06:09

2007/09/14   18:06:09

Summary of Contents for DP-K1000

Page 1: ...h regard to the EMC Directive 2004 108 EC Manufacturer Kenwood Corporation 2967 3 Ishikawa machi Hachioji shi Tokyo 192 8525 Japan EU Representative s Kenwood Electronics Europe BV Amsterdamseweg 37 1422 AC UITHOORN The Netherlands B60 5719 00 indb 1 B60 5719 00 indb 1 2007 09 14 18 02 39 2007 09 14 18 02 39 ...

Page 2: ...DE TO CONSTITUTE A RISK OF ELECTRIC SHOCK TO PERSONS THE EXCLAMATION POINT WITHIN AN EQUILATERAL TRIANGLE IS INTENDED TO ALERT THE USER TO THE PRESENCE OF IMPORTANT OPERATING AND MAINTENANCE SERVICING INSTRUCTIONS IN THE LITERATURE ACCOMPANYING THE APPLIANCE The marking of products using lasers The marking this product has been classified as Class 1 It means that there is no danger of hazardous ra...

Page 3: ...zed plug IMPORTANT SAFETY INSTRUCTIONS Caution Read this page carefully to ensure safe operation Read Instructions All the safety and operating instructions should be read before the product is operated Retain Instructions The safety and operating instructions should be retained for future reference Heed Warnings All warnings on the product and in the operating instructions should be adhered to Fo...

Page 4: ...s have fallen into the product c If the product has been exposed to rain or water d If the product does not operate normally by following the operating instructions e If the product has been dropped or damaged in any way and f When the product exhibits a distinct change in performance this indicates a need for service g If an abnormal smell or smoke is detected 14 Replacement Parts When replacemen...

Page 5: ...tion systems Products with the symbol crossed out wheeled bin cannot be disposed as household waste Old electrical and electronic equipment should be recycled at a facility capable of handling these items and their waste byproducts Contact your local authority for details in locating a recycle facility nearest to you Proper recycling and waste disposal will help conserve resources whilst preventin...

Page 6: ...eparately allows you to do the following Automatically switch the R K1000 input to CD when you play a CD on the DP K1000 Control CD playback program playback random playback and repeat playback using the remote control supplied with the R K1000 Operation is linked so that turning the R K1000 on and off turns this unit on and off also When the DIMMER Display Saver and Auto Power Save functions are ...

Page 7: ...formation 9 Connecting the System 12 Component Names and Functions 14 Listening to a CD 18 Playing a CD 18 Selecting Folder Playback Mode 23 Program Playback 24 Random Playback 27 Repeat Playback 28 Display Settings 29 Setting the Display Brightness DIMMER 29 Messages 30 Troubleshooting 31 Glossary of Terms 33 Care and Storage 34 Specifications 35 B60 5719 00 indb 7 B60 5719 00 indb 7 2007 09 14 1...

Page 8: ... 1 About this Manual While some of the DP K1000 functions can be controlled from the main unit the explanations in this manual primarily describe operation procedures using the remote control System control cable 1 Accessories B60 5719 00 indb 8 B60 5719 00 indb 8 2007 09 14 18 06 02 2007 09 14 18 06 02 ...

Page 9: ... that contain large numbers of folders may take longer to begin than for normal discs If you write audio files and music CD tracks CD DA format to the same disc the disc may not play correctly Before writing audio files to a disc check that the files will play back correctly on the PC being used to write the files When writing ends check that the written files are played back correctly Use the cor...

Page 10: ...s ISO 9660 Level 1 ISO 9660 Level 2 Joliet Romeo File number limitations on discs Max files folders 512 in total Max folders 255 Files per folder 255 Maximum number of displayable characters File names 64 including file extension Folder names 64 Tag display Title Album Artist ID3 v1 0 1 1 30 ID3 v2 2 2 3 2 4 128 This system is capable of displaying alphanumeric characters Other character types are...

Page 11: ...em take the following actions 1 Remove any CDs from the unit 2 Press the E key and check that the NO DISC message is displayed 3 Wait a few seconds and then turn the system off 4 If there are any other components connected to the system check that they are all turned off before disconnecting the cables Important Information Always install the system on a flat stable surface When installing the sys...

Page 12: ... Before disconnecting any cords or cables always turn the main unit off and unplug the power cord from AC wall outlet To AC wall outlet AC power cord Insert the plug firmly all the way into the AC wall outlet z To optical digital input PCM signals Coaxial cable To CD IN COAX To SYSTEM CONTROL System control cable To analog audio input 1 2 A B MD recorder etc Amplifier other than R K1000 R K1000 To...

Page 13: ...inal on the amplifier to the ANALOG OUT terminal on the rear panel of the DP K1000 Connect the optical digital input terminals on components such as MD recorders to the DIGITAL OUT OPTICAL terminal on the rear panel of the DP K1000 To connect an R K1000 sold separately to the DP K1000 use the system control cable supplied with the DP K1000 to connect the SYSTEM CONTROL terminal on the R K1000 to t...

Page 14: ...ilarly if you set the R K1000 input to CD the DP K1000 starts playing the CD Operation is linked so that turning the R K1000 on and off turns the DP K1000 on and off also When the DIMMER Display Saver and Auto Power Save functions are set on the R K1000 they run on the DP K1000 also z z z Main unit keys with the same names as keys on the remote control have the same functions as the remote control...

Page 15: ...ng single track repeat playback P 28 Lights when a WMA file is playing P 10 Lights when an AAC file is playing P 10 Displays numbers and text Lights during playback P 18 TOTAL Lights during playback when the elapsed time for the entire disc is displayed REMAIN Lights when the remaining playback time for the current track is displayed TOTAL REMAIN Lights when the remaining time for the entire disc ...

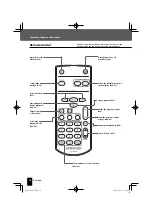
Page 16: ...andby P 18 Selects folders P 23 Selects the playback mode P 23 28 Enters number or selects the track P 24 26 Sets program playback P 24 Clears the program content settings P 24 26 Selects the information shown on the display P 20 21 Checks the program content P 26 Select the track P 19 Starts playback Pauses playback P 18 19 Stops playback P 19 Skips forward or back P 19 B60 5719 00 indb 16 B60 57...

Page 17: ...l After plugging the main unit into the AC wall outlet press the power K key on the remote control unit to turn the system on Once the system is turned on press the key for the function you want to use Point the remote control at the remote sensor when using it The remote control may not operate correctlyifdirectsunlightorlightfroma high frequency fluorescent lamp such as an inverter type is shini...

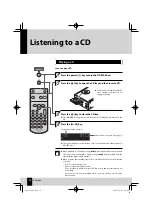
Page 18: ...ts playback from the next track after the lowest track number and pressing G starts playback from the track with the highest track number When you play the following types of disc track numbers may not be displayed correctly Discs recorded in Mix mode Discs recorded in multiple sessions Discs recorded in mixed formats of CD DA format and formats that are not music data Mix mode is a mode in which ...

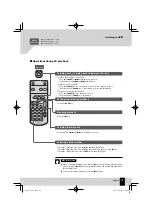
Page 19: ...he previous or next track Press the G or H key Remote control Turn the knob to G or H Main unit To return to an earlier track Press the G key two or more times in succession Remote control Turn the knob to G two or more times in succession Main unit To return to the beginning of a track Press the G key once Remote control Turn the knob to G once Main unit Skipping tracks skipping back skipping to ...

Page 20: ...andom playback When the total displayed time is 1000 minutes or more is displayed MP3 WMA AAC Only the elapsed time for 1 track is displayed z Listening to a CD Switching the time display Elapsed time for 1 track Remaining time for 1 track Elapsed time for 1 track Remaining time for 1 track Total elapsed time Total remaining time B60 5719 00 indb 20 B60 5719 00 indb 20 2007 09 14 18 06 06 2007 09 ...

Page 21: ...es and album names recorded on audio files The display changes as shown below each time you press the DISPLAY key Title Track number Only track numbers are displayed for discs that do not support CD TEXT z If there is no TAG information is displayed Depending on the settings and specifications of the software used for encoding TAG information may not be displayed correctly z z File name File numbe...

Page 22: ...older name Track file name F5_1 mp3 F5_2 mp3 Folder 6 Folder name Track file name F6_1 mp3 F6_2 mp3 F6_3 mp3 Folder 7 Sample folder configuration Playback sequence for folders and track files MP3 WMA AAC When you play a disc containing recorded audio files the track files on the disc are played sequentially beginning with the files in the ROOT folder as shown in the figure If a recorded folder con...

Page 23: ...to select the folder to be played 2 2 Supported Audio Files R P 10 Random Playback R P 27 Repeat Playback R P 28 z z z MP3 WMA AAC This mode plays only the files in the selected folder If you are already playing the CD press the F key to stop playback z Selecting Folder Playback Mode Program playback mode Cancel program playback mode Folder playback mode PGM unlit PGM lit N lit B60 5719 00 indb 23...

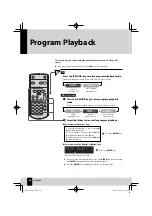
Page 24: ... 7 key For folder number 30 press the 10 key three times and then press the 0 key For folder number 105 press the 100 key and then the 5 key When folder number 158 is selected Selection with the G or H key Selection with number keys Press the ENTER key Press the ENTER key If you enter the wrong information press the CLEAR key before pressing the ENTER key and then enter the information again Press...

Page 25: ...press the CLEAR key before you proceed to step 3 Then enter the information again Proceed to step 3 within 20 seconds after selecting a track or file z z Press a number key or the G H key to select the track or file you want to listen to 2 2 Press the ENTER key 3 3 When file number 5 is selected MP3 WMA AAC CD When track number 10 is selected as program track 1 Program Playback Continued to next p...

Page 26: ...and press the CHECK key Press the G or H key to select the program number to be changed and then press the ENTER key Carry out steps 2 and 3 CD or steps 1 2 to 3 MP3 WMA AAC in the Program Playback procedure Then press the CHECK key to return to the normal display To add more tracks later Stop playback and carry out steps 2 and 3 CD or steps 1 2 to 3 MP3 WMA AAC To erase a programmed track To sele...

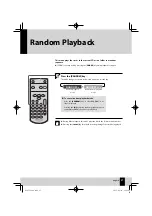
Page 27: ...back mode Press the RANDOM key so that RANDOM is no longer displayed Pressing the F key during random playback cancels random playback mode and stops playback 1 1 During folder playback this mode plays the files in the folder in random order Pressing the G key skips back to the beginning of the track being played z z Random playback mode Cancel random playback mode RANDOM lit RANDOM unlit Random P...

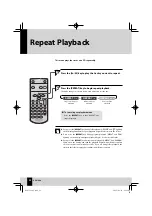
Page 28: ...racks in the folder If you press the REPEAT key during program playback REPEAT and PGM lights up on the display and repeat playback begins for the selected tracks If you press the REPEAT key during random playback REPEAT and RANDOM lights up on the display and random playback begins with different sequence once the current random sequence ends If you are using folder playback the tracks in the fol...

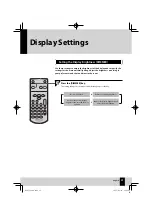
Page 29: ... the room 1 1 Press the DIMMER key The setting changes as shown below each time you press the key Normal brightness Reduces the display brightness Reduces the display brightness and turns off the dial lighting Restores the normal display brightness and turns off the dial lighting Setting the Display Brightness DIMMER Display Settings B60 5719 00 indb 29 B60 5719 00 indb 29 2007 09 14 18 06 08 2007...

Page 30: ...isc is not loaded correctly RSet the disc in the tray correctly P 18 The disc contains no playable audio files z z z NO DISC There is no CD loaded RLoad a CD NO PGM No tracks are programmed RProgram the tracks you want to listen to P 24 RCancel program mode and use normal playback P 25 NO TEXT There is no text information on a CD TEXT disc PGM FULL An attempt was made to program a 33rd CD track RY...

Page 31: ...ee Care and Storage z 34 I can t play some audio files The system will not play audio files that are corrupted Check that the system can play the audio file z z 10 There is a delay until playback starts There may be a delay prior to playback if there are large numbers of folders z 22 The TAG information is not displayed correctly Refer to Supported Audio Files to check which TAG information can be...

Page 32: ...cedure below to reset the microcomputer z 1Unplug the power cord from the AC wall outlet 2Plug the power cord back in while holding down the power K key on the main unit 3When the microcomputer is reset the display shown on the right appears If you reset the microcomputer with a disc loaded the disc is automatically ejected In that case remove the disc and close the CD tray z Main unit Troubleshoo...

Page 33: ...ompression method developed by Germany s Fraunhofer IIS that achieves high rates of data compression by discarding data that is not readily audible by humans MP3 can compress data down to rates of approximately 1 11 128 kbps while retaining sound quality equivalent to a music CD 10 Sampling frequency A number that indicates the number of times per second that analog signals are sampled for convers...

Page 34: ...with a soft dry cloth Do not use lacquer thinner benzine alcohol or contact revitalizer for these chemicals will cause discoloration or deformation z z z Care and storage of CD Before storing the CD When the main unit is not to be used for a long period take out the CD and store in the case When a CD becomes dirty When a disc is contaminated with fingerprints or other stains wipe gently in the rad...

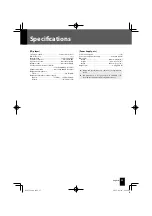
Page 35: ...5 dB Dynamic range More than 100 dB Total harmonic distortion THD N Less than 0 005 at 1 kHz Channel separation More than 100 dB at 1 kHz Output level impedance Fixed 2 0 V 100 Ω Output level impedance wave length Optical 21 dBm 15 dBm 660 nm Coaxial 0 5 Vp p 75 Ω Specifications Power Supply etc Power consumption 11 W Power consumption Standby Less than 0 25 W Dimensions Width 270 mm 10 10 16 Heig...

Page 36: ...ces designated on the warranty card and in the space provided below Refer to the model and serial numbers whenever you call upon your dealer for information or service on this product Model Serial Number B60 5719 00 indb 36 B60 5719 00 indb 36 2007 09 14 18 06 10 2007 09 14 18 06 10 ...

Reviews: