60
DNX7220
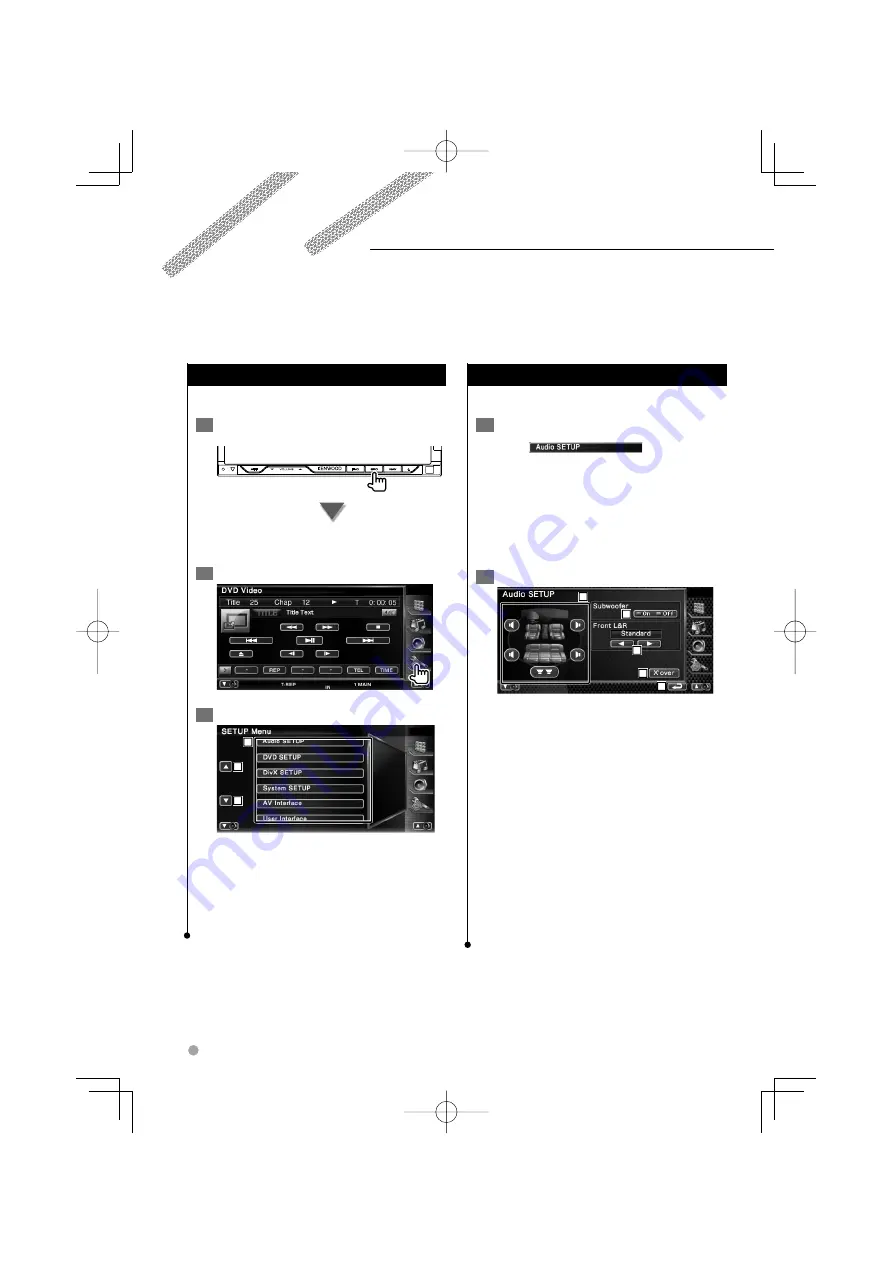
Setup Menu
Displays the Setup menu to set various functions.
1
Display the control screen of any source
Touch any source button on the "Source Select"
screen.
2
Display the SETUP Menu
3
Select the setup item
1
2
2
1
The selected setup screen appears.
2
Scrolls the setup menu.
⁄
• [Audio SETUP] and [AV Interface] options can be locked.
The key mark is displayed in reverse video for the locked
option. See <Setup Memory> (page 79).
You can setup various receiver parameters.
Setup Menu
Audio Setup
You can setup a speaker network, etc.
1
Display the Audio SETUP screen
Touch
in the "SETUP
Menu" screen (page 60).
⁄
• [Audio SETUP] cannot be selected under the following
conditions:
– When no source is selected.
– When dual zone function is set to on. See <Zone
Control> (page 84)
2
Setup each item
2
3
4
5
1
1
Selects the speaker to set the crossover. See
<Crossover Network Setup> (page 61).
2
Sets the availability of subwoofers. See
<System Setup> (page 64).
3
Selects the type of front speakers.
"Standard": Setup for general diameter
speakers
"Narrow": Setup for small diameter
speakers
"Middle": Setup for middle diameter
speakers
"Wide":
Setup for large diameter
speakers
4
Switches to the crossover setup screen.
See <Crossover Network Setup> (page 61).
5
Returns to the "SETUP Menu" screen.
DNX̲DDX7̲E.indb 60
DNX̲DDX7̲E.indb 60
08.1.31 1:26:47 PM
08.1.31 1:26:47 PM
Summary of Contents for DNX7220
Page 5: ...English 5 DNX DDX7 E indb 5 DNX DDX7 E indb 5 08 1 31 1 25 36 PM 08 1 31 1 25 36 PM ...
Page 35: ...English 35 DNX DDX7 E indb 35 DNX DDX7 E indb 35 08 1 31 1 26 20 PM 08 1 31 1 26 20 PM ...
Page 43: ...English 43 DNX DDX7 E indb 43 DNX DDX7 E indb 43 08 1 31 1 26 30 PM 08 1 31 1 26 30 PM ...
Page 81: ...English 81 DNX DDX7 E indb 81 DNX DDX7 E indb 81 08 1 31 1 27 10 PM 08 1 31 1 27 10 PM ...
Page 93: ...English 93 DNX DDX7 E indb 93 DNX DDX7 E indb 93 08 1 31 1 27 34 PM 08 1 31 1 27 34 PM ...
Page 100: ...DNX DDX7 E indb 100 DNX DDX7 E indb 100 08 1 31 1 27 37 PM 08 1 31 1 27 37 PM ...


