background image

90

90

91

Return to the Top page

Setting Up

Return to the Top page

Setting Up

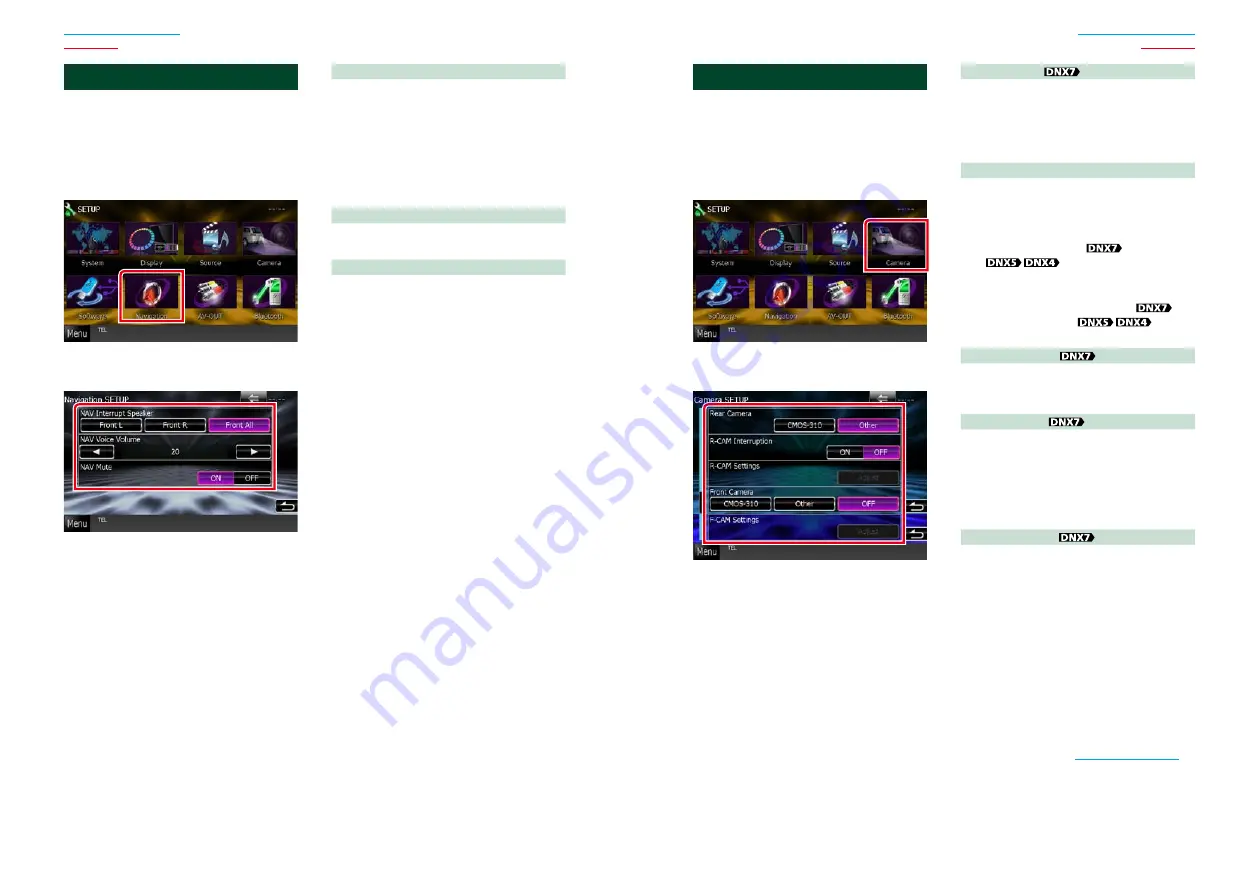
Camera Setup

You can set camera parameters.

Touch [Menu] on any screen.

Touch [SETUP].

SETUP Menu screen appears.

Touch [Camera].

Camera SETUP screen appears.

Set each item as follows.

Rear Camera*

1


Selects the type of rear camera to use.

CMOS-3xx

:  When the CMOS-300 series with ID 

1 set is connected.

Other (Default)

:  When the other camera is 

connected.

R-CAM Interruption

Sets a method for switching the display. 
Setting values are ON and OFF.

ON

:  Switches to the rear view camera video 

display when shifting to reverse or 
pressing the <AUD> 

 or <SCRN> 


button for 1 second.

OFF (Default)

:  Switches to the rear view 

camera video display when 
pressing the <AUD> 


or 

<TEL>*4


button 

for 1 second. 

R-CAM Settings*

2


Adjusts the CMOS-300 series with ID 1 set. 
For details, see the instruction manual of your 
camera.

Front Camera*

1


Selects the type of front camera to use.

CMOS-3xx

:  When the CMOS-300 series with ID 

2 set is connected.

Other

:  When the other camera is connected.

OFF (Default)

:  When the front camera is not 

used.

F-CAM Settings*

3


Adjusts the CMOS-300 series with ID 2 set. 
For details, see the instruction manual of your 
camera.

*1  These settings become settable only when 

the parking brake is on.

*2  This setting becomes settable only when 

the parking brake is on and the CMOS-300 
series is selected.

*3  This setting becomes settable only 

when the parking brake is on and “Front 
Camera” is set to [ON].

*4  [TEL Key Longer than 1 Second] must be 

set to “R-CAM”. See 

User interface (P.82)

Navigation Setup

You can set navigation parameters.

Touch [Menu] on any screen.

Touch [SETUP].

SETUP Menu screen appears.

Touch [Navigation].

Navigation SETUP screen appears.

Set each item as follows.

NAV Interrupt Speaker

Selects speakers used for voice guidance of the 
navigation system.

Front L

:  Uses the front left side speaker for 

voice guidance.

Front R

:  Uses the front right side speaker for 

voice guidance.

Front All (Default)

:  Uses both front speakers 

for voice guidance.

NAV Voice Volume

Adjusts the volume for voice guidance of the 
navigation system. Default is “20”.

NAV Mute

Mutes the volume of rear speakers during 
voice guidance of the navigation system. 
Default is “ON”.

Summary of Contents for DNX4330

Page 1: ...ick you can jump to the section of each media iPod USB VCD DVDVIDEO Music CD Disc Media BT Audio aha Pandora Tuner DigitalRadio TV 13DNX_IM366_Ref_M_En_02 M 2012 JVC KENWOOD Corporation DNX7330BT DNX7330BTM DNX5330BT DNX5330BTM DNX4330DAB DNX4330 GPS NAVIGATION SYSTEM INSTRUCTION MANUAL Before reading this manual click the button below to check the latest edition and the modified pages Check the l...

Page 2: ...________________________ 66 Bluetooth Control 68 Registering And Connecting Bluetooth Unit_____________________ 68 Playing Bluetooth Audio Device________ 70 Using Hands Free Unit________________ 71 Smartphone Link____________________ 76 Hands Free Setup____________________ 78 Setting Up 80 Monitor Screen Setup________________ 80 View Camera Control_________________ 81 System Setup_________________...

Page 3: ...e disc and move outward When removing discs from this unit pull them out horizontally If the disc center hole or outside rim has burrs use the disc only after removing the burrs with a ballpoint pen etc Discs that are not round cannot be used 8 cm 3 inch discs cannot be used Discs with coloring on the recording surface or discs that are dirty cannot be used This unit can only play the CDs with Thi...

Page 4: ... Security Indicator SI function is turned on this indicator flashes when the vehicle ignition is off P 85 2 ATT Switches attenuation of the volume on off Pressing for 1 second turns the screen off 3 5 Vol Adjusts volume 4 AUD Displays Graphic Equalizer screen P 101 Pressing for 1 second switches camera view display on off 5 NAV Displays the navigation screen Pressing for 1 second switches AV out s...

Page 5: ...t until it clicks 3 Attach the part of the front panel To eject the card Push the card until it clicks and then remove your finger from the card The card pops up so that you can pull it out with your fingers Number Name Motion 1 Disc insert slot A slot to insert a disc media 2 0 Eject Ejects the disc Pressing for 1 second ejects the disc forcibly 3 fi Reset If the unit or the connected unit fails t...

Page 6: ...s the disc forcibly 3 fi Reset If the unit or the connected unit fails to operate properly the unit returns to factory settings when this button is pressed P 115 If the Security Indicator SI function is turned on this indicator flashes when the vehicle ignition is off P 85 4 Remote Sensor Receives the remote control signal 5 MENU Displays the Top Menu screen P 16 Pressing for 1 second turns the pow...

Page 7: ...ch 2 or 3 to select the desired language 3Touch Enter For detailed operation see Language setup P 83 Angle Adjust the position of the monitor Default is 0 1Touch SET 2Touch desired angle number and For detailed operation see Monitor angle control P 87 iPod AV Interface Use Set the terminal which your iPod is connected to Default is iPod 1Touch iPod or AV IN2 Color Set the screen and button illumin...

Page 8: ... disc and playback starts To eject the disc Press the 0 button USB device Connect the USB device with the USB cable The unit reads the device and playback starts To disconnect the device Touch 0 on the screen and disconnect the device from the cable iPod Connect the iPod with the iPod cable The unit reads the iPod and playback starts NOTE When an iPod is connected while an application other than M...

Page 9: ...appears NOTE You can select the hiding icon by scrolling the screen left or right From this screen you can perform the following functions Function Icon Operation Switch the audio source etc Touch the icon of the desired source Enter setup mode etc Touch the icon of the desired setup function Display navigation screen or Touch NAV or navigation information Turn off all audio function Touch STANDBY...

Page 10: ... SW Control screen Displays the SETUP Menu screen Displays the Audio Control Menu screen Displays the control screen of current source Icon feature differs depending on the source Closes the menu List screen There are some common function keys in the list screens of most sources Scroll Scrolls the displayed text etc Touch keys with various functions are displayed here Displayed keys differ dependi...

Page 11: ...f the screen displays the full audio screen To return to the full navigation screen Touch NOTE For details on control keys refer to the instructions in each section 2 Navigation Operation For details on the navigation function please refer to the Navigation Instruction Manual Display the navigation screen Press the NAV button The navigation screen appears Control audio from the navigation screen Y...

Page 12: ...itle repeat chapter repeat function off VCD PBC On Does not repeat VCD PBC Off track repeat function off Hides all keys Touch Fast forward or fast backward Touch 1 or Each time you touch the key the speed changes standard 2 times 3 times Confirms play time See DVD You can switch the time display between title play time chapter play time and title remaining time Each time you touch the display swit...

Page 13: ...peaker DVD Disc Menu Operation You can set up some items in the DVD VIDEO disc menu 1 Touch illustrated area during playback Menu Control screen appears 2 Perform desired operation as follows Displays the top menu Touch Top Displays the menu Touch Menu Displays the previous menu Touch Return Enters selected item Touch Enter Enables direct operation Touch Highlight to enter the highlight control mo...

Page 14: ... switched Exits menu control Touch Exit Displays the Menu Control 1 screen Touch Previous Zoom Control For DVD And VCD You can enlarge Playback screen for DVD and VCD 1 For VCD touch illustrated area during playback Zoom Control screen appears NOTE For DVD please refer to DVD play mode setting P 26 to display the Zoom Control screen 2 Perform desired operation as follows Switches zoom ratio Touch ...

Page 15: ...ental level P 29 DISC SETUP See Disc setup P 30 Stream Information Displays the present source information The stream Dolby Digital dts Linear PCM MPEG WMA or AAC appears These items are disabled when a DVD is being played Language setup This setting is for the language used in the menu subtitle and voice You cannot setup these items during DVD playback 1 Touch SET of the desired item Menu Languag...

Page 16: ...d plays back an audio file disc a DVD or a music CD 2 Forcibly plays back a disc as a music CD Select 2 if you wish to play a music CD having a special format or if you cannot play a disc in 1 position On Screen DVD Sets an on screen display Auto When updated information appears for 5 seconds OFF Default Information does not appear NOTE CD Read is not available when a disc is in the unit You canno...

Page 17: ...s 3 play fast forward 1 fast backward search up 4 search down 7 stop R resume stop 8 pause 2 Movie display area Control switching area Touch to switch between the Simple Control and List Control screen CD Audio and Visual Files iPod Operation 3 Multi function key Touch to switch the multi function menu For details on the menu see Multi function menu P 36 4 Multi function menu Various functions can...

Page 18: ...see Multi function menu P 36 4 Multi function menu Various functions can be performed by using keys in this area For details on the keys see Multi function menu P 36 5 Sub function key Touch to display Sub function menu 7 in this table 6 Contents list Displays the list and contents The contents of the list differ depending on the playback status and source 7 Sub function menu Various functions can...

Page 19: ...EAR Touch to mute the rear speaker Sub function menu Music CD iPod Disc media USB device The following functions can be performed by using keys in this area Repeats the current track folder Each time you touch the key repeat mode switches in the following sequence CD iPod track repeat repeat off Disc media USB device file repeat folder repeat repeat off USB device and iPod only Searches track from...

Page 20: ... file of same artist album genre composer as the current track P 39 Folder List You can search a file according to hierarchy P 40 Thumbnail Viewer You can search a picture file P 40 NOTE For disc media you can display the folder list directly by touching Categorysearch USBdeviceandiPodonly 1 Touch the desired category from the left part of the screen 2 The list is sorted by selected category 3 Tou...

Page 21: ...k 1 Touch Sub function menu appears 2 Touch Favorite screen appears 3 Touch desired artwork in the lower line NOTE The key in the upper side of the screen functions differently depending on the status When Load Albums appears You have not yet loaded any artworks Touch the key to start loading When Load More Albums appears Some artworks are not loaded Touch the key to load all artworks If you touch...

Page 22: ...ete the album from the favorite list touch and drag it to the lower line You can change the playing order of the favorite list by dragging the artwork in the list The favorite list mode is canceled in the following situations Playing another album from other list folder list category list etc Playing another album by touching the artwork in the lower line in the artwork list screen The favorite li...

Page 23: ...enu P 45 5 Sub function key Touch to display Sub function menu 7 in this table 6 Content information Displays the information of the current content being played 7 Sub function menu Various functions can be performed by using keys in this area For details on the keys see Sub function menu P 45 8 List switching key Touch to switch between the content list and the current content information Multi f...

Page 24: ...creen that allows device selection only appears An iPhone connected via Bluetooth cannot be used for Pandora Internet radio reception If the volume of Pandora Internet radio received by a Bluetooth device is too low raise it on the Bluetooth device Station list screen You can perform the following functions from this screen Selects the station Touch the station name in the list Sort the list in al...

Page 25: ...the application installed in the iPhone or Android To enter Aha mode touch aha icon in the Top Menu screen NOTE Install the latest version of the Aha application on your iPhone or Android P 127 iPhone Search for Aha in the Apple iTunes App Store to find and install the most current version Android Search for Aha in the Google play to find and install the most current version For how to register th...

Page 26: ...oth Uses the Android smartphone connected via Bluetooth for an Aha connection Wired Uses the iPhone connected via the KCA iP202 or KCA iP102 optional accessory for an Aha connection NOTE If you touch when no device has been connected a popup screen that allows device selection only appears An iPhone connected via Bluetooth cannot be used for an Aha connection If the volume of Aha received by a Blu...

Page 27: ...y DRM register the code appeared on the screen Otherwise the file may not be able to play with this unit Remaining number of viewing is displayed when playing a DivX VOD file with the viewing restriction When the used number of viewing reached maximum number a warning message appears and the file cannot be played USB iPod DivX Setup You can perform setup when using USB iPod DivX NOTE Each operatio...

Page 28: ...a Switches the band Touch AM or FM Tunes in a station Touch 1 The method of frequency switching can be changed See Multi function menu P 55 The bar in center tuner only shows the current frequency location 8 List switching key Touch to switch between the preset list and the information list In tuner mode radio text plus will be displayed for models with region code 2 or 3 only Multi function menu ...

Page 29: ...ce and component Touch 1 The method of ensemble service and component switching can be changed See Multi function menu P 55 Display the Dynamic Label Segment screen Touch DLS Change the Replay mode Touch See Replay P 63 6 Label infomation Displays the list of preset service Displays the information of the current service Service Label PTY Label Ensemble Label Audio Quality Now playing Next program...

Page 30: ...by using keys in this area For details on the menu see Multi function menu P 59 4 Preset list analog TV only Displays the list of preset channels 5 Sub function menu The following function can be performed by using keys in this area Hide all keys Touch Switches the channel Touch 4 Switches the band Touch BAND TV screen 6 6 7 8 6 Switching channel area Touch to switch the channel 7 Switching band a...

Page 31: ...ppears 3 Touch in the control screen The multi function menu appears 4 Touch AME in the multi function menu 5 Touch 4 or in the function menu Auto memory starts Manual memory You can store the current receiving station or channel in memory 1 Select a station or channel you wish to store in memory NOTE For TV touch center bottom area of the screen if source control screen is not displayed 2 Touch P...

Page 32: ... bulletin starts However this feature requires a Radio Data System and Digital Radio that includes the TI information 1 Touch in the control screen The multi function menu appears 2 Touch TI in the multi function menu Traffic information mode is set When the traffic bulletin starts The Traffic Information screen appears automatically NOTE It is necessary to have Traffic Information function set to...

Page 33: ...to the Digital Radio antenna Set to ON when the Digital Radio antenna in use is equipped with a booster Default is ON L Band Tuning Sets L band reception When set to ON also receives L band ensembles This item can be set when in STANDBY source Tuner Setup You can set tuner related parameters This function is available for models with region code 2 or 3 1 Touch in the control screen Multi function ...

Page 34: ...ncement to receive it 1 Touch SET of Announcement Select in the Digital Radio SETUP screen The Announcement Select screen appears 2 Touch each Announcement list and set on or off NOTE The volume setting during reception of Announcement service is automatically stored The next time the Announcement service is received this unit recalls the volume setting automatically TV Setup You can set the TV si...

Page 35: ... the Bluetooth unit P 69 The Searched Device List screen cannot be displayed when the receiving source is PANDORA internet radio aha or Bluetooth Audio This unit is compatible with the Apple Easy Pairing function When an iPod touch or iPhone is connected to this unit using Dock Connector to USB Cable an authentication dialog appears Performing operation for authentication on this unit or iOS smart...

Page 36: ...ar If the volume is too low raise it on your cell phone or audio player Using Hands Free Unit You can use telephone function by connecting the Bluetooth telephone to this unit Making a call 1 Press the TEL button Hands Free screen appears NOTE When registration of your cell phone is completed the phone book of the cell phone is automatically downloaded to this unit Up to 600 phone numbers can be r...

Page 37: ...uch as battery and antenna displayed may differ from those displayed on the cell phone Setting the cell phone in the private mode can disable the hands free function Receiving a call 1 Touch to answer a phone call or to reject an incoming call NOTE While monitoring the camera view this screen does not appear even if a call comes in To display this screen press the TEL button or return the shift kn...

Page 38: ...ys and touch SET Moves the cursor Use 2 3 Switches the keyboard layout Use 5 The layout changes in the following sequence Alphabet numbers local language Toggles between uppercase and lowercase Touch Shift Changes the layout of the character keys ABC Alphabetical layout QWE Qwerty layout ALT Alternate key Erases the entered character Touch Clear To erase all the input characters touch for 2 second...

Page 39: ...tion function by touching on the Hands Free screen Smartphone Link You can receive Garmin s traffic information and weather forecast by connecting your Android smartphone in which the Smartphone Link application is installed to this unit 1 Press the NAV button Navigation screen appears Touch Apps on the Main Menu screen and then an icon of your desired content For details see Navigation system man...

Page 40: ...nit or the time interval set on the cell phone whichever is shorter takes effect Hands Free Setup You can perform various setup about handsfree function 1 Touch Menu on any screen 2 Touch SETUP SETUP Menu screen appears 3 Touch Bluetooth Bluetooth SETUP screen appears 4 Touch TEL SET UP in the Bluetooth SET UP screen Hands free SETUP screen appears 5 Set each item as follows Bluetooth HF Audio Sel...

Page 41: ...n perform this function only when you have applied the parking brake The image quality can be set for each source Setting Up View Camera Control You can set up display when a CMOS 300 Series view camera is used 1 Press the AUD button for 1second Camera view screen appears 2 Adjust each item as follows 3 2 1 1 Guideline Touching each time turns on or off the guideline display alternately 2 Switchin...

Page 42: ...en Language Setting screen appears 2 Set each item as follows Select Mode Selects the mode to select a language Easy Default Selects a language easily Advanced Allows you to select languages for respective items Language Select Selects a language If you select Advanced for Select Mode the following screen appears GUI Language Select Selects the display language used for the control screen and so f...

Page 43: ...can set up a security code to protect your receiver system against theft NOTE When the Security Code function is activated the code cannot be changed and the function cannot be released Note the Security Code can be set as the 4 digit number of your choice 1 Touch Security in the System Menu screen Security screen appears 2 Touch ON of SI NOTE If SI is turned on the SI indicator on the sub panel f...

Page 44: ... SETUP settings Also the locked key mark is displayed under each setting icon in the setup menu 3 Follow the instruction on the screen Recall Recalls the memorized settings Memory Memorizes the current settings Clear Clears the currently memorized settings Cancel Quits memorization recalling of settings Display Setup 1 Touch Menu on any screen 2 Touch SETUP SETUP Menu screen appears 3 Touch Displa...

Page 45: ...tions Touching Delete in the Background screen deletes the background image After you touch Delete a confirmation message appears Follow the message and complete the operation Panel color coordinate You can set the screen and button illumination color The selectable items differ depending on the unit 1 Touch Color in the Display Menu screen Color screen appears 2 Touch SET of Panel Color Coordinat...

Page 46: ...ther camera is connected OFF Default When the front camera is not used F CAM Settings 3 Adjusts the CMOS 300 series with ID 2 set For details see the instruction manual of your camera 1 These settings become settable only when the parking brake is on 2 This setting becomes settable only when the parking brake is on and the CMOS 300 series is selected 3 This setting becomes settable only when the p...

Page 47: ... any screen 2 Touch SETUP SETUP Menu screen appears 3 Touch Software Software Information screen appears 4 Confirm the software version Touch Update as necessary NOTE For how to update the software see the relevant update procedure manual which comes with the software AV Input Setup You can set AV input parameters 1 Touch Menu on any screen 2 Touch SETUP SETUP Menu screen appears 3 Touch Source 4 ...

Page 48: ...er you wish to adjust and set each item as follows Subwoofer Select if you are using a subwoofer Tweeter You can set the tweeter when you are selecting front speakers None Small Middle Large X over Displays the speaker crossover setup screen You can adjust the crossover setup that was set automatically when you selected the speaker type For details see Crossover network setup P 96 3 Select a speak...

Page 49: ... to set the BPF and the right arc to set the HPF Phase Sets the phase of tweeter mid range and woofer output The phase is reversed 180 degrees when set to Reverse Gain Sets gain of each speaker HPF FREQ High Pass Filter adjustment When tweeter is selected on Speaker Select screen BPF FREQ Band Pass Filter adjustment When mid range speaker is selected on Speaker Select screen LPF FREQ Low Pass Filt...

Page 50: ...olume balance 5 and adjust the front and rear volume balance Volume Offset Finely adjust the volume of the current source to minimize the difference in volume between different sources Subwoofer Level Adjusts the subwoofer volume This setting is not available when subwoofer is set to None See Speaker setup P 95 Bass Boost Sets the amount of bass boost among OFF Level1 Level2 Level3 Loudness Turns ...

Page 51: ...oxed area Adjust the gain level by touching the each frequency bar Touching 2 3 5 and can also adjust the level Use 2 and 3 to select a frequency and 5 and to set the level EQ INIT Returns to the previous level which the gain level is adjusted Flat Tone curve becomes flat Bass EXT Bass Extend Settings When turned on the frequency lower than 62 5 Hz is set to the same gain level as 62 5 Hz Loudness...

Page 52: ...05 Controlling equalizer manually 1 Touch Tone in the Equalizer screen 2 Set each item as follows FREQ Adjusts the center frequency for each range Setting values are as follows Bass 60Hz 70Hz 80Hz 100Hz 110Hz 120Hz 130Hz 150Hz Default is 100Hz Middle 500Hz 1kHz 1 5kHz 2kHz Default is 1kHz Treble 10kHz 12 5kHz 15kHz 17 5kHz Default is 12 5kHz LEVEL Adjusts the level of each range Each setting value...

Page 53: ...rom OFF Level1 Level2 Level3 Supreme Turns ON OFF the Supreme function Technology to extrapolate and supplement with proprietary algorithm the high frequency range that is cut off when encoding This function works on DVD MEDIA USB and iPod sources Space Enhancer 1 Touch Space Enhancer in the Sound Effect screen Space Enhancer screen appears 2 Touch Small Large or OFF Each setting value indicates t...

Page 54: ...er and other speakers 4 Input the differences calculated in step 3 for individual speakers 5 Adjust gain for individual speakers A sound image will be shifted to the speaker with increased gain Example When Front All is selected as the listening position 50cm 80cm 150cm 70cm 0cm 100cm Listening Position You can adjust the sound effects according to your listening position 1 Touch Position Position...

Page 55: ...batteries with the and poles aligned properly following the illustration inside the case Functions of the Remote control Buttons Switching the operation mode The functions operated from the remote control differ depending on the position of the mode switch DVD T V NAV AUD AUD mode Switch to this mode when controlling a selected source or tuner source etc DVD mode Switch to this mode when playing a...

Page 56: ...itches the display angle each time it is pressed NAV Switches between the heading up navigation and north up navigation map displays 12 5 AUD DVD Selects the folder to be played During radio source in AUD mode switches the bands to be received TV Switches between the station of the TV band to be received 13 2 3 AUD DVD Selects the track or file to be played During radio source in AUD mode switches...

Page 57: ...ason Solution The Touch Sensor Tone doesn t sound The preout jack is being used The Touch Sensor Tone cannot be output from the preout jack Error Messages When you fail to operate the unit correctly the cause of the failure appears as the message on the screen Error Message Cause Solution Protect Protective circuit has been activated because a speaker cord has shorted or it has come in contact wit...

Page 58: ...iPod is the latest version See Connectable iPod iPhone P 118 Navigation Error Please turn on power again later The communication error has occurred due to severely cold temperature Turn on power again after warming your car interior Antenna Error The antenna has a short circuit and the protective circuit has activated Check the Digital Radio antenna If a passive antenna without a booster is used s...

Page 59: ...h one surface containing DVD standard signals and the other surface containing music CD signals About disc format The disc format should be the one of the following ISO 9660 Level 1 2 Joliet Romeo Long file name About files The following audio video and picture files are supported Audio files AAC LC m4a MP3 mp3 WMA wma Linear PCM WAVE wav Mass storage class USB device only NOTE If music of normal ...

Page 60: ...s unit it can be charged through the USB cable Install the USB device in the place where it will not affect safe driving You cannot connect a USB device via a USB hub and Multi Card Reader Take backups of the audio files used with this unit The files can be erased depending on the operating conditions of the USB device We shall have no compensation for any damage arising from any erased data No US...

Page 61: ... being received TI 1 Indicates the reception state of traffic information White TP is being received Orange TP is not being received Models with region code 2 or 3 only TV AUTO1 Seek mode is set to AUTO1 AUTO2 Seek mode is set to AUTO2 MANUAL Seek mode is set to MANUAL DVD disc marks ALL Indicates a region number The discs with this mark can be played with any DVD player 8 Indicates the number of ...

Page 62: ...a tt Tatar tw Twi uk Ukrainian ur Urdu uz Uzbek vi Vietnamese vo Volapuk wo Wolof xh Xhosa yo Yoruba zh Chinese zu Zulu DVD Language Codes Specifications Monitor section Picture Size DNX7330BT DNX7330BTM 6 95 inches diagonal wide 156 6 mm W x 81 6 mm H DNX5330BT DNX5330BTM DNX4330DAB DNX4330 6 1 inches diagonal wide 136 2 mm W x 72 0 mm H Display System Transparent TN LCD panel Drive System TFT ac...

Page 63: ...uency Range L BAND 1452 960 1490 624 MHz BAND III 174 928 239 200 MHz Sensitivity 100 dBm S N Ratio dB 90 dB Digital Antenna Connector section DNX4330DAB Connector type SMB Output Voltage 11 16V 14 4 V Maximum Current 100 mA Video section Color System of External Video Input NTSC PAL External Video Input Level RCA mini jack 1 Vp p 75 Ω External Audio Max Input Level RCA mini jack 2 V 25 kΩ Video I...

Page 64: ...ration DivX DivX Certified and associated logos are trademarks of Rovi Corporation or its subsidiaries and are used under license About PANDORA internet radio Requirements for listening to the PANDORA internet radio are as follows iPhone or iPod touch Use an Apple iPhone or iPod touch running under iOS3 or later Search for Pandora in the Apple iTunes App Store to find and install the most current ...

Page 65: ... in compliance with the essential requirements and other relevant provisions of Directive 1999 5 EC Türkçe Bu vesileyle JVC KENWOOD DNX7230DAB DNX5230DAB DNX5230BT DNX4230DAB DNX4230BT ünitesinin 1999 5 EC Direktifinin başlıca gereksinimleri ve diğer ilgili hükümleri ile uyumlu olduğunu beyan eder For Turkey Bu ürün 28300 sayılı Resmi Gazete de yayımlanan Atik Elektrikli ve Elektronik Eşyalarin Ko...

Page 66: ......

Reviews: