background image

40   

DDX418/DDX4048BT/DDX318/DDX3048  

 Connecting a new Bluetooth 
device for the first time

When you connect a Bluetooth device to the 
unit for the first time, make pairing between 
the unit and the device. Pairing allows 
Bluetooth devices to communicate each 
other.
To make pairing, you may need to enter the 
PIN (Personal Identification Number) code of 
your Bluetooth device you want to connect.
•  Once the connection is established, it is 

registered in the unit even if you reset the 
unit. Up to 5 devices can be registered in 
total.

•  Only one device for Bluetooth phone and 

one for Bluetooth audio can be connected 
at a time.

•  To use the Bluetooth function, you need to 

turn on Bluetooth function of the device.

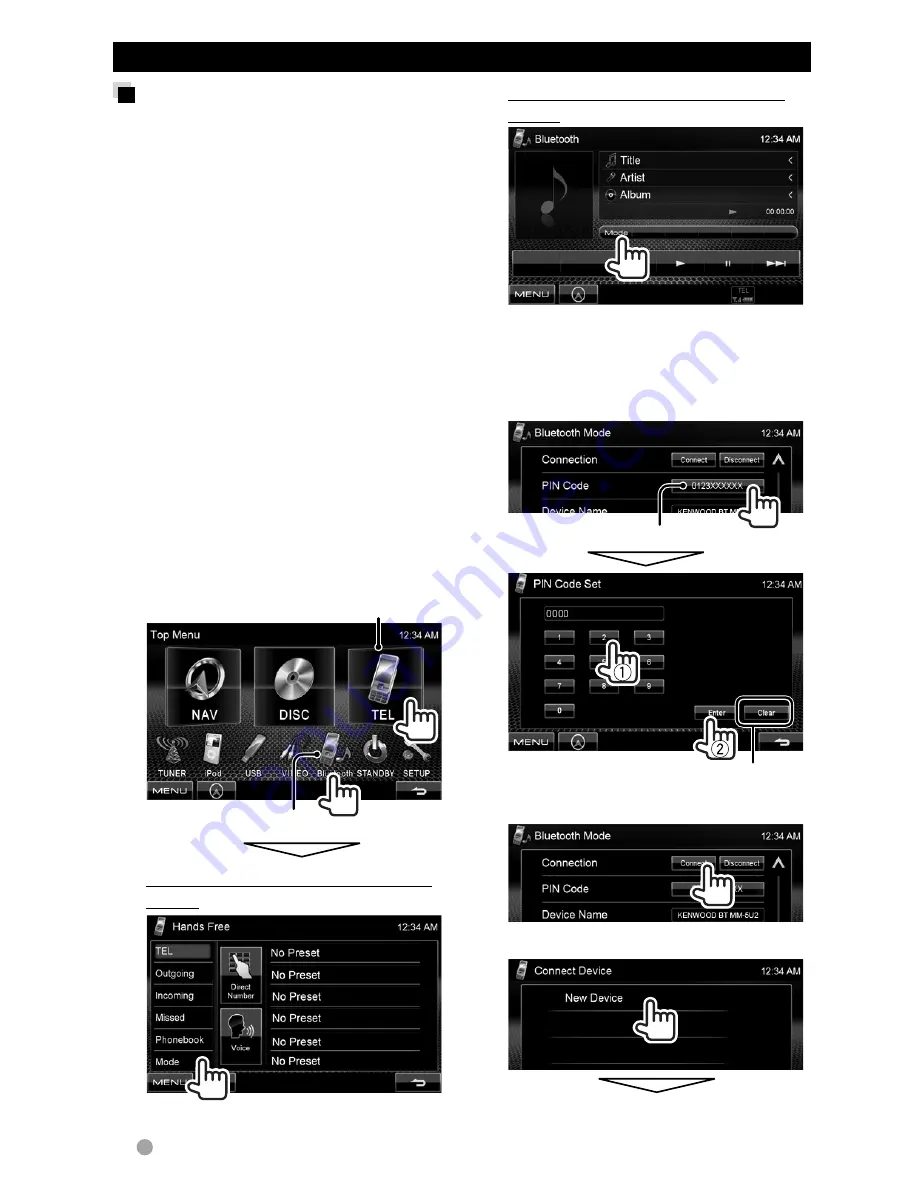
 1

  Display the Bluetooth setting 

screen.

On  <

Top Menu

>:


Mobile phone

Audio player

For connecting a Bluetooth mobile 
phone


 <

Hands Free Mode

> is displayed.

 Connecting Bluetooth devices 

For connecting a Bluetooth audio 
player


 <

Bluetooth Mode

> is displayed.

 2

  Change the PIN code.

•  If you skip changing PIN code, go to 

step 

3

.


PIN code (initial: 0000)

Deletes last character

3


4


EN_DDX_K.indb   40

10/12/20   18:36

Summary of Contents for DDX3048

Page 1: ...obtain the best performance from your new DVD Receiver For your records Record the serial number found on the back of the unit in the spaces designated on the warranty card and in the space provided below Refer to the model and serial numbers whenever you call upon your Kenwood dealer for information or service on the product Model DDX418 DDX4048BT DDX318 DDX3048 Serial number US Residence Only Re...

Page 2: ...navigation unit 27 Sound adjustment 28 Using the sound equalization 28 Adjusting the cross over frequency 29 Changing the display design 30 Setting for video playback 32 Picture adjustment 32 Changing the aspect ratio 33 Zooming picture 33 Using a rear view camera 34 Setting menu items 35 Memorizing recalling the settings 38 Locking the settings 38 Adjusting the touch position 38 BLUETOOTH OPERATI...

Page 3: ...t be synchronized with the sound or picture quality may decline in such environments How to read this manual Illustrations of DDX4048BT are mainly used for explanation This manual mainly explains operations using the buttons on the monitor panel and touch panel For operations using the remote controller RC DV340 supplied only for DDX4048BT DDX3048 page 48 indicates the variable screens menus opera...

Page 4: ...ld lose the authority to operate this equipment if an unauthorized change or modification is made FCC NOTE This equipment has been tested and found to comply with the limits for a Class B digital device pursuant to Part 15 of the FCC Rules These limits are designed to provide reasonable protection against harmful interference in a residential installation This equipment may cause harmful interfere...

Page 5: ...l AV IN or iPod page 37 R CAM Interrupt Select ON when connecting the rear viewcamera page37 Panel Color Selects the color of the buttons on the monitor panel page 30 Preout Setup Select Rear or Subwoofer depending on the connection to REAR SW jacks 2 Finish the procedure Activating the security function You can activate the security indicator to protect your receiver system against theft 1 On Top...

Page 6: ...ase of the output level Component names and functions You can change the color of the buttons on the monitor panel page 30 6 AV AV OUT button Displays the current source screen Press Selects the AV source for external monitor or amplifier Hold 7 For DDX418 DDX4048BT TEL V OFF button Displays the Hands Free screen Press page 40 Turns off on the screen Hold page 8 For DDX318 DDX3048 AUD V OFF button...

Page 7: ...ock time with the connected navigation unit Radio Data System Synchronizes the clock time with Radio Data System OFF Sets the clock manually below 1 Adjust the hour 2 Adjust the minute Reset Sets the minute to 00 Example 3 00 3 29 3 00 3 30 3 59 4 00 5 Finish the procedure Appears only when the navigation unit is connected ...

Page 8: ...e volume 00 to 35 Increase Decrease To attenuate the sound The ATT indicator lights up To cancel the attenuation press the volume adjustment knob Common operations Putting the unit in standby Turning off on the screen DDX418 DDX4048BT DDX318 DDX3048 Hold Hold The screen is turned off To turn on the screen press MENU ...

Page 9: ...uttons disappear by touching the screen or when no operation is done for about 5 seconds Not available for video from an external component and rear view camera Top Menu Changes the AV source Displays the Setup screen Setup Changes the detailed settings Switching screens Changes the page You can select 3 items to be displayed in this area page 36 Displays the navigation screen page 27 page 8 Appea...

Page 10: ...NER page 23 Switches to the radio broadcast VIDEO 4 page 26 Switches to an external component connected to AV IN input terminal on the monitor panel Bluetooth 3 page 46 Plays a Bluetooth audio player 1 You can select 3 items to be displayed in this area page 36 2 When no navigation unit is connected No Navigation appears 3 Only for DDX418 DDX4048BT 4 Select an appropriate input setting on AV Input...

Page 11: ...f a disc does not have any disc menu all tracks on it will be played repeatedly until you change the source or eject the disc Inserting a disc Label side The source changes to DISC and playback starts The IN indicator lights up while a disc is inserted If appears on the screen the unit cannot accept the operation you have tried to do In some cases without showing operations will not be accepted Wh...

Page 12: ...o Joliet CD DA VCD Video CD DivX 5 MPEG1 MPEG2 JPEG MP3 WMA WAV AAC MPEG4 1 If you insert a DVD Video disc of an incorrect Region Code Region code error appears on the screen 2 DVD R recorded in multi border format is also playable except for dual layer discs DVD RW dual layer discs are not playable 3 It is possible to play back finalized R RW Video format only discs DVD is selected as its disc ty...

Page 13: ...pe for DivX MPEG1 MPEG2 JPEG 2 Selects playback mode page 16 3 8 Starts playback pauses 7 3 Stops playback 4 Selects chapter track Press Reverse forward search 4 Hold 1 Reverse forward search during playback 4 Plays back in slow motion during pause Mode 5 Changes the settings for disc playback page 17 MENU Displays Top Menu screen For DivX MPEG1 MPEG2 JPEG the following buttons also appear Selects...

Page 14: ...NC R CAM hides the operation buttons The operation buttons disappear by touching the screen or when no operation is done for about 5 seconds For CD MP3 WMA WAV AAC Media type File type Playback status 3 play 8 pause Playing time MP3 WMA WAV AAC Folder no Track no CD Track no Track file information Touching scrolls the text if all the text is not shown While playing Jacket picture is shown if the f...

Page 15: ...l ST stereo L left R right Subtitle Selects the subtitle type Angle Selects view angle MENU Displays the disc menu DVD playlist DVD VR T MENU Displays the disc menu DVD original program DVD VR CUR Displays the menu playlist original program item selecting screen 5 2 3 Selects an item For DivX only 2 3 Skips back or forward by about 5 minutes ENTER Confirms the selection RETURN Returns to the previ...

Page 16: ...ess 7 then the direct selecting buttons to select a track number Selecting playback mode For DVD DVD VR Selects Repeat playback mode For VCD without PBC CD DivX MPEG1 MPEG2 MP3 WMA WAV AAC Selects Repeat playback mode Selects Random playback mode You cannot activate the repeat mode and the random mode at the same time Each time you press the button the playback mode changes The corresponding indic...

Page 17: ... change the dynamic range while playing Dolby Digital software zWide Select this to enjoy a powerful sound at a low volume level with its full dynamic range zNormal Select this to reduce the dynamic range a little zDialog Select this to reproduce the movie dialog more clearly For discs except VCD CD Screen Ratio Select the monitor type to watch a wide screen picture on the external monitor z16 9 z...

Page 18: ...ions cannot be used with the unit Do not use a USB device with 2 or more partitions Depending on the shape of the USB devices and connection ports some USB devices may not be attached properly or the connection might be loose This unit cannot recognize a USB device whose rating is other than 5 V and exceeds 500 mA This unit may not recognize a memory card inserted into the USB card reader Connect ...

Page 19: ...ntrol screen below or Pressing FNC R CAM hides the operation buttons The operation buttons disappear by touching the screen or when no operation is done for about 5 seconds To change settings for video playback page 32 MP3 WMA WAV AAC Folder no Track no JPEG Folder no File no Track file information for MP3 WMA WAV AAC Touching scrolls the text if all the text is not shown While playing Jacket pict...

Page 20: ...ptional accessory INSTALLATION MANUAL Do not use extension cables iPod iPhone that can be connected to this unit Made for iPod with video 5th Generation iPod classic iPod nano 6th Generation iPod nano 5th Generation iPod nano 4th Generation iPod nano 3rd Generation iPod nano 2nd Generation iPod nano 1st Generation iPod touch 4th Generation iPod touch 3rd Generation iPod touch 2nd Generation iPod t...

Page 21: ...aying time MENU Displays Top Menu screen Mode Changes the settings for iPod playback page 20 38 Starts playback pauses Selects Repeat playback mode 2 REP Functions the same as Repeat One Selects Random playback mode 2 RDM Functions the same as Shuffle Songs A RDM Functions the same as Shuffle Albums Displays the Music Video menu ontheiPod iPhone page22 4 Selects a track video 3 1 Reverse forward s...

Page 22: ...in the selected layer until a desired track starts playing Music menu Returns to the top layer Returns to the previous layer Switches between Music and Video Video menu Switches between Music and Video Available categories differ depending on the type of your iPod iPhone Selecting a track video from menu on the iPod iPhone ...

Page 23: ...p while monaural mode is activated Text Displays hides the information of the current station page 24 PTY Enters FM RBDS program search mode page 25 AM Selects AM band FM Selects FM band SEEK Changes the seek mode AUTO1 Auto Search AUTO2 Tunes in stations in memory one after another MANU Manual Search 4 Searches for a station The search method differs according to the selected seek mode above MENU...

Page 24: ...Storing stations in memory You can preset six stations for each band Automatic presetting AME Auto Memory 1 2 Hold Local stations with the strongest signals are searched and stored automatically Manual presetting 1 Tune in to a station you want to preset page 23 2 Select a preset number Hold The station selected in step 1 is stored Selecting a preset station ...

Page 25: ...gram of the same PTY code as you have selected that station is tuned in Activating deactivating TI Standby Reception TI indicator TI indicator TI Standby Reception Lights in white The unit will temporarily switch to Traffic Information TI if available Lights in orange Not yet activated Tune in to another station providing the RBDS signals Goes off Deactivated The volume adjustment for Traffic Info...

Page 26: ...ay the source control screen below or Pressing FNC R CAM hides the operation buttons The operation buttons disappear by touching the screen or when no operation is done for about 5 seconds To change settings for video playback page 32 Mode Changes the AV IN name Press 2 or 3 to select an AV IN name This setting does not affect the source name VIDEO displayed on Top Menu MENU Displays Top Menu scre...

Page 27: ...onnect a navigation unit KNA G610 KNA G630 optional accessory to the navigation input terminal so that you can view the navigation screen INSTALLATION MANUAL The navigation guidance comes out through the front speakers even when you listen to an audio source 2 3 Guidance Select front speakers used for the navigation guidance Volume Adjust the volume of the navigation guidance 0 to 35 NAV Mute Sele...

Page 28: ... the level of each band 1 then select the subwoofer level 2 The adjustments are stored and User is activated Adjustable only when the subwoofer is activated page 35 Using the sound equalization The adjustment is memorized for each source until you adjust sound again If the source is a disc the adjustment is stored for each of the following categories DVD DVD VR VCD CD DivX MPEG1 MPEG2 MP3 WMA WAV ...

Page 29: ... Adjustable only when the subwoofer is activated page 35 2 Not selectable when Freq is set to Through Adjusting the sound precisely 1 Perform steps 1 and 2 of Selecting a preset sound mode then 2 3 Adjust the sound of each band Flat Changes level of Bass Middle Treble to 0 Freq Selects frequency Level Adjusts level Q Factor Adjusts the width of the frequency Bass EXT Activates deactivates bass SW ...

Page 30: ...t only when User is selected 1 2 3 User color adjuster You can make your own color adjustment stored in User Dimmer setting You can make the color adjustment for each dimmer setting 1 On Top Menu 2 3 Select an item to change Background or Panel Color 4 Select a background panel color To select a background For setting your favorite scene as the background page 31 Changing the display design You ca...

Page 31: ... video or JPEG 2 Display User Customize page 30 3 4 Adjust the image 38 1 Starts playback pauses 3 1 2 Advances scenes frame by frame Magnifies the scene OFF Zoom1 Zoom3 5 2 3 Moves the zooming frame To cancel the capture screen press Cancel 1 Not displayed when playing an external component connected to AV IN input terminal 2 Not displayed when playing an iPod iPhone 5 Capture the image displayed...

Page 32: ...e adjustment You can adjust the picture quality 1 Display the adjustment menu 2 Select dimmer on DIM ON or off DIM OFF 3 Adjust the picture 15 to 15 Adjusts the brightness Adjusts the contrast Adjusts the tint Adjusts the color Adjusts the black Adjusts the sharpness Adjustable only when the incoming signal is NTSC ...

Page 33: ... For DISC USB only Aspect ratio is automatically selected to match to the incoming signals While DivX is played back with Screen Ratio set to 16 9 for disc page 17 for USB page 19 the aspect ratio is not set correctly Zooming picture You can zoom the picture Zoom1 to Zoom3 When Aspect is set to JUST or Auto left column the picture is zoomed with the aspect ratio of the FULL setting 1 2 5 2 3 Moves...

Page 34: ...STALLATION MANUAL Displaying the picture from the rear view camera The rear view screen is displayed when you shift the gear to the reverse R position For DDX418 DDX318 To erase the caution message touch the screen To display the picture from the rear view camera manually Hold When displaying the picture from the rear view camera manually you can change the setting of the picture page 32 To cancel...

Page 35: ...high frequencies to produce a well balanced sound at a low volume level The LOUD indicator lights up X over Adjust the cross over frequency page 29 Volume Offset Adjust and store the auto adjustment volume level for each source For discs the adjustment is stored for each of the following categories DVD DVD VR VCD CD and DivX MPEG1 MPEG2 MP3 WMA WAV AAC The volume level will automatically increase ...

Page 36: ...l zON Repeats scrolling zOnce Scrolls the displayed information once zOFF Cancels Touching scrolls the text regardless of this setting Menu Customize Select the large buttons to be displayed on the Top Menu screen Press Enter to display the setting screen Select the icon you want to show as large button by pressing or then press the target icon to confirm Screen Adjust Adjust the brightness and bl...

Page 37: ...e are available If another language has been selected the text language for external monitors will be set to English zGUI Language Select the language English or Local the language selected above used on operation buttons and menu items Clock Adjust the clock time page 7 Beep zON zOFF Activates the key touch tone Cancels Remote Sensor zON zOFF Activates the remote sensor Cancels SETUP Memory You c...

Page 38: ...memorized settings To cancel press Cancel Confirmation message appears Press Yes Locking the settings You can lock the settings to prevent them from being changed is shown beside the settings that can be locked 1 On Setup 2 To unlock the setting press Unlock Adjusting the touch position You can adjust the touch position on the touch panel if the position touched and the operation performed do not ...

Page 39: ...luetooth devices Connecting condition may vary depending on circumstances around you When the unit is turned off the device is disconnected BLUETOOTH OPERATIONS Only for DDX418 DDX4048BT Bluetooth is a short range wireless radio communication technology for the mobile device such as mobile phones portable PCs and other devices The Bluetooth devices can be connected without cables and communicate w...

Page 40: ...is registered in the unit even if you reset the unit Up to 5 devices can be registered in total Only one device for Bluetooth phone and one for Bluetooth audio can be connected at a time To use the Bluetooth function you need to turn on Bluetooth function of the device 1 Display the Bluetooth setting screen On Top Menu Mobile phone Audio player For connecting a Bluetooth mobile phone Hands Free Mo...

Page 41: ... For Bluetooth mobile phone Hands Free Mode For Bluetooth audio player Bluetooth Mode 2 To connect Select the device you want to connect All registered devices mobile phone and audio player are listed on Connect Device Selectable items depend on the device you are operating To disconnect A confirmation message appears Press Yes Deleting a registered Bluetooth device 1 On Connect Device Step 2 on t...

Page 42: ...icrophone While talking This adjustment does not affect the volume level of the other sources To adjust the volume of calls earpiece use the volume knob on the monitor panel Using the Bluetooth mobile phone Switching between handsfree mode and phone mode While talking Each time you press the button the talking method is switched handsfree mode phone mode Checking SMS reception If the mobile phone ...

Page 43: ...nnected mobile phone has the voice recognition system Speak the name you want to call To cancel press Cancel Making a call 1 On Top Menu 2 Select a method to make a call Preset list For presetting page 44 Direct number entry below Voice dialing the right column Call lists phone book the right column Direct number entry Hold Adds Deletes last character Presets the entered phone number on the preset...

Page 44: ...page 43 To delete the preset phone numbers initialize the settings from Initialize in Hands Free Mode page 47 Copying the phone book You can copy the phone book memory of a mobile phone into the unit up to 400 memories 1 On Top Menu 2 3 PIN code initial 0000 Numbers of the phone book memories copied 4 Operate the target mobile phone Refer to the instruction manual supplied with your mobile phone T...

Page 45: ...Dialled calls received calls and missed calls up to 50 entries each To display the phonebook call lists of the mobile phone or the unit Unit Connected mobile phone Deleting the phone number memory in the unit 1 Display the phone book call list you want to delete page 43 2 You cannot delete data when Phone is selected 3 Select the item you want to delete Delete all the numbers names in the selected...

Page 46: ...ext if all the text is not shown Battery reminder only when the information comes from the device Playback status 3 play 8 pause Playing time page 27 The operation buttons indications and information displayed on the screen differ depending on the connected device 3 Starts playback 8 Pauses 4 Selects track Press Reverse forward search Hold Mode Displays the Bluetooth setting screen below MENU Disp...

Page 47: ...all speakers Initialize Hold Enter to initialize all settings you have made for using Bluetooth mobile phone and Bluetooth audio player Auto Response 1 zOFF zON The unit does not answer the calls automatically Answer the calls manually The unit answers the incoming calls automatically SMS Notify 1 zOFF zON The unit does not inform you of the arrival of a message The unit informs you of the arrival...

Page 48: ...wing the illustration inside the case If the Remote Controller operates only over shorter distances or does not operate at all it is possible that the batteries are depleted In such instances replace the both batteries with new ones Remote Controller mode switch The functions operated from the remote controller differ depending on the position of the mode switch DVDt T Vt AUDt AUD mode Switch to t...

Page 49: ...me Press again to restore the previous volume NAV V SEL Switches to the navigation screen Cursor key Moves the cursor when displaying menu ENTER Enters options Hands free communication When a call comes in it answers the call Function Switches the function screen MODE Switches the screen mode Screen mode changes each time you press this key Operations from the remote controller ...

Page 50: ...r Cancel DVD VR Chapter number Program Playlist Cancel VCD 1 X VCD 2 X PBC OFF Track number Cancel VCD 2 X PBC ON Track number Cancel Once you have switched to the direct search feature specify the search number from the numeric keypad and then press ENTER key Numeric keypad Specify the number to search in direct search Press 1 2ABC to fast forward backward Switches the fast forward backward speed...

Page 51: ... search Selects the folder to be played Track search and file search Selects the track or file to be played Play Pause Pauses the track Press again to resume playing Direct search Pressing this key switches the features that can be searched directly Music Disc Track number Cancel Audio files in DVD CD disc Folder number File number Cancel Once you have switched to the direct search feature specify...

Page 52: ...e Example 92 1MHz FM 9WXYZ 2ABC 1 or Example 810kHz AM 8TUV 1 0 or Numeric keypad To use preset tuning press the number of a programmed broadcast station 1 6MNO Press the direct tuning key first then specify the frequency of the station to receive iPod AUD mode Music Video search Selects the music video to be played Play Pause Pauses the music video Press again to resume playing USB AUD mode Folde...

Page 53: ... edges Do not touch its recording surface When storing a disc in its case gently insert the disc around the center holder with the printed surface facing up Make sure to store discs in their cases after use Center holder To keep discs clean A dirty disc may not play correctly If a disc does become dirty wipe it with a soft cloth in a straight line from center to edge Do not use any solvents for ex...

Page 54: ...ata such as AIFF ATRAC3 etc File playback Playing DivX files This unit can play back DivX files with the extension code divx div or avi regardless of the letter case upper lower Audio stream should conform to MP3 or Dolby Digital The file encoded in the interlaced scanning mode may not be played back correctly The maximum bit rate for video signals average is 4 Mbps for discs 2 Mbps for USB Playin...

Page 55: ...uru TG Tajik BG Bulgarian IK Inupiak NE Nepali TH Thai BH Bihari IN Indonesian NO Norwegian TI Tigrinya BI Bislama IS Icelandic OC Occitan TK Turkmen BN Bengali Bangla IW Hebrew OM Afan Oromo TL Tagalog BO Tibetan JA Japanese OR Oriya TN Setswana BR Breton JI Yiddish PA Panjabi TO Tonga CA Catalan JW Javanese PL Polish TR Turkish CO Corsican KA Georgian PS Pashto Pushto TS Tsonga CS Czech KK Kazak...

Page 56: ...nnected iPod iPhone is compatible with this unit page 20 USB Device Error The USB power voltage is abnormal Turn off and turn on the unit Connect another USB device No BT Dongle Bluetooth adapter KS UBT1 is removed Connection Error The device is registered but the connection has failed Connect the registered device page 41 Please Wait The unit is preparing to use the Bluetooth function If the mess...

Page 57: ...o picture appears on the external monitor Connect the video cord correctly Select the correct input on the external monitor DivX MPEG1 MPEG2 JPEG MP3 WMA WAV AAC Disc cannot be played back Record the tracks using a compliant application on the appropriate discs page 12 Add appropriate extension codes to the file names Tracks are not played back as you have intended them to play Playback order may ...

Page 58: ...r signal reception The sound is interrupted or skipped while using a Bluetooth audio player Reduce the distance between the unit and the Bluetooth audio player Disconnect the device connected for Bluetooth phone Turn off then turn on the unit When the sound is not yet restored connect the player again The connected audio player cannot be controlled Check whether the connected audio player supports...

Page 59: ...tion 0 010 1 kHz S N Ratio dB 99 dB DVD Video 96 kHz Dynamic Range 98 dB DVD Video 96 kHz Disc Format DVD Video VIDEO CD CD DA Sampling frequency 44 1 48 96 kHz Quantifying Bit Number 16 20 24 bit USB interface section USB Standard USB 2 0 Full Speed File System FAT 16 32 Maximum Power Supply Current DC 5 V 1 A D A Converter 24 Bit Video Decoder Max 2 Mbps MPEG1 MPEG2 DivX DDX4048BT DDX3048 Audio ...

Page 60: ... Level mini jack 2 V 25 kΩ Video Output Level RCA jack 1 Vp p 75 Ω Audio Output Level mini jack 1 2 V 10 kΩ Analog RGB input 0 7 Vp p 75 Ω Audio section Maximum Power Front Rear 50 W 4 Full Bandwidth Power Front Rear 4 Ω 14 4 V 1 THD 22 W 4 Preout Level V 4 V 10 kΩ Preout Impedance 600 Ω Speaker Impedance 4 8 Ω General Operating Voltage 14 4 V 10 5 16 V allowable Maximum Current Consumption 10 A D...

Page 61: ...Apple performance standards Apple is not responsible for the operation of this device or its compliance with safety and regulatory standards iPhone iPod iPod classic iPod nano and iPod touch are trademarks of Apple Inc registered in the U S and other countries iTunes is a trademark of Apple Inc This item incorporates copy protection technology that is protected by U S patents and other intellectua...

Page 62: ...tooth word mark and logos are owned by the Bluetooth SIG Inc and any use of such marks by Kenwood Corporation is under license Other trademarks and trade names are those of their respective owners KS UBT1 USB Bluetooth Adapter Specifications Bluetooth Version Bluetooth 2 0 certified Power Class Class2 Radio Service Area 10 m 10 9 yd USB Standards USB V1 1 Full Speed Power Consumption 54 3 mA 5 V m...

Page 63: ...o guarantee that interference will not occur in a particular installation If this equipment does cause harmful interference to radio or television reception which can be determined by turning the equipment off and on the user is encouraged to try to correct the interference by one or more of the following measures Reorient or relocate the receiving antenna Increase the separation between the equip...

Page 64: ......

Page 65: ... 2010 Kenwood Corporation All Rights Reserved DDX418 DDX4048BT DDX318 DDX3048 MONITOR WITH DVD RECEIVER INSTALLATION MANUAL MONITEUR AVEC RÉCEPTEUR DVD MANUEL D INSTALLATION MONITOR CON RECEPTOR DVD MANUAL DE INSTALACIÓN ...

Page 66: ... and wiring this product requires skills and experience For best safety leave the mounting and wiring work to professionals Make sure to ground the unit to a negative 12V DC power supply Do not install the unit in a spot exposed to direct sunlight or excessive heat or humidity Also avoid places with too much dust or the possibility of water splashing Do not use your own screws Use only the screws ...

Page 67: ...nals or to both the rear output terminals do not mix front and rear For example if you connect the connector of the left speaker to a front output terminal do not connect the connector to a rear output terminal After the unit is installed check whether the brake lamps blinkers wipers etc on the car are working properly Mount the unit so that the mounting angle is 30 or less Do not press hard on th...

Page 68: ... when either the telephone rings or during conversation To connect the Kenwood navigation system consult your navigation manual To car light control switch Dimmer control wire Orange White Depending on what antenna you are using connect either to the control terminal of the motor antenna or to the power terminal for the booster amplifier of the film type antenna Antenna control wire Blue When usin...

Page 69: ...stance free stereo type mini plug KCA iP22F Optional Accessory iPod commercially available Navigation System Optional Accessory Connection cable Included in the Navigation System Audio Visual input iPod AV Input switchable USB terminal Navigation units that can be connected to this unit As of December 2010 KNA G610 KNA G630 For latest information access the www kenwood com cs ce Connecting Other P...

Page 70: ...Nissan or Mitsubishi Car using Brackets Car Bracket Accessory 3 M5x6mm or Accessory 4 M5x7mm Accessory 3 M5x6mm or Accessory 4 M5x7mm Installing the Escutcheon 1 Attach accessory 5 to the unit Accessory 5 Removing the Escutcheon 1 Engage the catch pins on the removal tool 6 and remove the two locks on the lower level Lower the frame and pull it forward as shown in the figure Accessory 6 Lock Catch...

Page 71: ...pe Peel the release coated paper of double face adhesive tape to fix on the place shown above Adjust the direction of the microphone to the driver Accessory 7 Removing the Unit 1 Remove the escutcheon by referring to the removal procedure in the section Removing the Escutcheon 2 Insert the two removal tools 6 deeply into the slots on each side as shown Accessory 6 3 Lower the removal tool toward t...

Page 72: ......

Page 73: ...vigat on IIF Les systemes de navigation suivants peu vent etre connectes acet apparel KNA G61O KNA G620T KNA G630 KNA G63OCN Les informations les pIuS recentes sont disponibles sur http www kenwood com cs ce V rifiez Ie nom de mod le du syst me de navigation compatible puis conneetez Ie aI appareil Kenwood Advanced N vigation IIF or mi l H19 AA 1 HIJm I KNA G610 KNA G620T KNA G630 KNA G63OCN Ii Ui...

Page 74: ...45 2201 East Dominguez Street Long Beach California 90801 5745 Tel 310 639 5300 U S A Hawaii Kenwood Factory Service 99 994 Iwaena St Aiea Hawaii 96701 Alaska Vista Radio TV 861 East Loop Road Anchorage Alaska 99501 Anchorage Commercial Electronics Inc 1450 East 9th Ave Anchorage Alaska 99501 Atsugi Kenwood Rep clo Atsugi NEX No 260 020 FPO Seattle 98767 JAPAN Yokota Kenwood Rep c o Yokota BX JAtV...

Page 75: ...nsidered by KENWOOD as avalid prool of purchase Wtten applying lorwarranty repairs you must present the original copy 01 your bill 01 sale and Ihis warrantycardasproololwarranly sowerecommendlhattheybe kepi in asale place shoold they be required in the luIure KENWOOD ELECTRONICS CANADA INC 6070 Kestrel Road Mississauga Ontario Canada L5T 188 Tel 905 670 7211 Fax 905 670 7248 JVC KENWOOD DO BRASIL ...

Reviews: