s
peed control
���
The following speeds are a guide only and will vary depending upon the
quantity and the temperature of the ingredients being mixed etc.
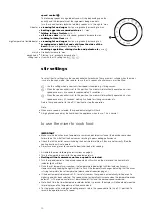
Turn the speed control clockwise to obtain speeds ‘min’ through to ‘max’.
K-beater
●
creaming fat and sugar
start on min, gradually increasing to ‘max’.
●
beating eggs into creamed mixtures
4
- ‘max’.
●
folding in flour, fruit etc
min - 1
●
all in one cakes
start on min speed, gradually increase to max.
●
rubbing fat into flour
min - 2.
high temperature flexible beater
●
creaming fat and sugar
start on min, gradually increasing to 3.
●
scraping mixes both hot and cold from the sides of the
bowl
start on min gradually increasing to 3.
●
sauteing vegetables, stirring risotto and polenta etc.,
use
.
whisk
●
Gradually increase to ‘max’.
dough hook
●
Start on ‘min’, gradually increasing to 1.
stirring tool
●
Use with the stir settings only
,
,
.
stir settings
To select the stir settings turn the speed control anti-clockwise These are most suitable when the mixer
is used in the cook mode. Please note, to use the stir speeds all outlet covers must be fitted.
– Use this setting when a constant slow speed is required e.g. stirring sauces.
– When the speed control is set to this position, the mixer will intermittently operate on a slow
speed once every 5 seconds for approximately 2 revolutions.
– When the speed control is set to this position, the mixer will intermittently operate on a slow
speed once every 30 seconds, making it suitable for stirring casseroles etc.
Return the speed control to the off ‘O’ position to stop the operation.
Note:
●
Whenever a speed is selected, the speed indicator light will flash.
●
A high pitched sound may be heard from the appliance when in use. This is normal.
to use the mixer to cook food
IMPORTANT
●
Make sure the induction area, temperature sensors and external surface of the bowl base are clean.
Failure to do this will affect the heat sensor, resulting in poor cooking performance.
●
Check that all the outlet covers including the heat shield are fitted. If they are not correctly fitted the
heating function will not operate.
●
Always use oven gloves to remove the bowl and tools after cooking.
1 Assemble the mixer following the instructions on page 9.
2 Turn the temperature control to the required temperature.
●
Heating will not commence unless a speed is selected.
3 Turn the speed control to the desired speed which will switch on the motor and the heater. Both
indicator lights will flash.
4 Once the set temperature is reached, the temperature indicator light will illuminate continuously.
However, during cooking the light will start to flash if the temperature changes indicating that the mixer
is trying to maintain the set temperature (please read introduction page 4).
●
If the bowl temperature exceeds 60°C, for safety reasons the speed is automatically limited even if a
higher speed has been selected. The speed will not automatically increase when the temperature drops
below 60°C. The speed control must be switched off first and the desired speed reselected.
●
Note: Each time the timer/temperature selector button is pressed, the display will alternate between the
timer display and the temperature of the bowl contents.
5 To stop or pause the mixing and heating process, return the speed control to the off ‘O’ position. To
resume the operation select a speed.
10
���
Summary of Contents for Cooking Chef KM070 Series
Page 1: ...KM070 series ...
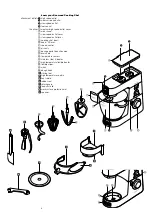
Page 15: ...15 헀 헁 햿 햹 햸 햺 햻 햽 햾 헂 헃 b c a ...
Page 19: ...Notes 19 ...
Page 33: ...33 헀 헁 햿 햹 햸 햺 햻 햽 햾 헂 헃 b c a ...
Page 51: ...51 헀 헁 햿 햹 햸 햺 햻 햽 햾 헂 헃 b c a ...
Page 69: ...69 헀 헁 햿 햹 햸 햺 햻 햽 햾 헂 헃 b c a ...
Page 87: ...87 헀 헁 햿 햹 햸 햺 햻 햽 햾 헂 헃 b c a ...
Page 105: ...105 헀 헁 햿 햹 햸 햺 햻 햽 햾 헂 헃 b c a ...
Page 123: ...123 헀 헁 햿 햹 햸 햺 햻 햽 햾 헂 헃 b c a ...
Page 141: ...141 헀 헁 햿 햹 햸 햺 햻 햽 햾 헂 헃 b c a ...
Page 159: ...159 헀 헁 햿 햹 햸 햺 햻 햽 햾 헂 헃 b c a ...


