background image

8

Top


Way


Technology

Top


Way


Technology

3.2 Monitor to Talk


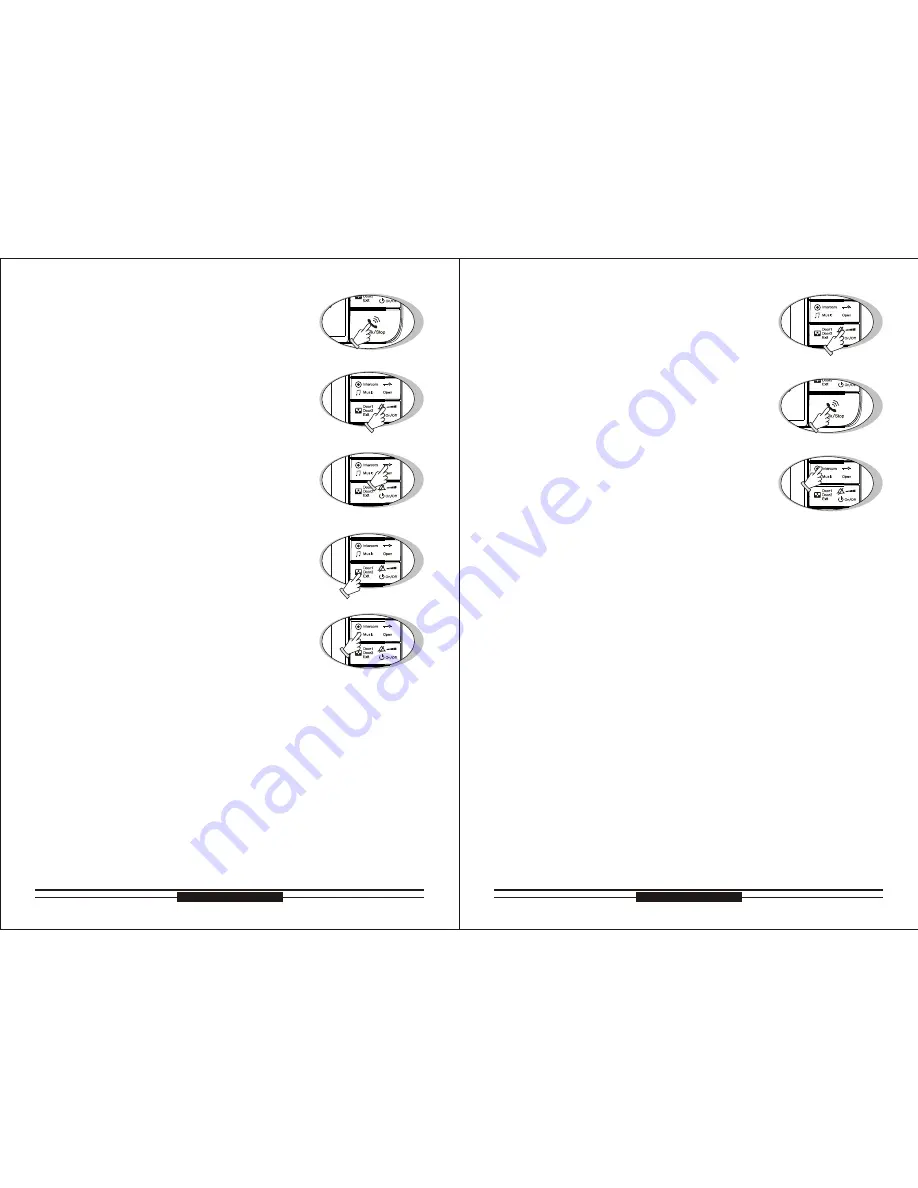
When the indoor unit under “monitor” status, please 


3.2 Monitor to Talk

see “P8 point 6”, press “talk” button(Pic. C) to enter 
talking status, the indoor unit and the monitored out

-

door unit can talk.


8. Ring Volume/talking Volume

8.1 Ring Volume


8. Ring Volume/talking Volume

8.1 Ring Volume

3.3 Stand-by to Talk

3.3 Stand-by to Talk


3.4 Stop


3.4 Stop

talk with outdoor unit 1 directly, it is available for the
indoor unit and outdoor unit 1 only. 

Enter talk status, repress “stop” button(Pic. C) to fi

-


nish talk, the unit will back to stand-by status or will


 If you don't want to talk with visitors when they press

be off automatically after 90s.

4. Reject answering

4. Reject answering

 call button, you can press talk button continually for 


  will stop automatically. 


 2 seconds to finish or wait 30 seconds and the ring

a.


You can press “open” button(Pic. C) to let visitors in


5. Open the door

5. Open the door

 when you talk with visitors. (An electronic lock should
 be installed on the outdoor)

b.  Press “open” button(Pic E), the system will under un

-


 lock status for 3s, if hold “open” button(Pic E), the
 system will always under unlock status, but after 8s, 
 the system will be back.


F) to monitor the outdoor unit 1, repress “monitor” 


6. Monitor/Exit monitor

6. Monitor/Exit monitor

“monitor” button again, the unit will exit to monitor 

button(Pic.  F)  to  monitor  the  outdoor  unit  2,  press 

status and back to stand-by status, after 90s. it will 


You  can  choose  the  chord  ring  by  pressing  the 

exit the monitor status automatically. (under monitor 

“Music” button(Pic. G) for 2 seconds when the unit 
is under standby. The ring is different by pressing 
“Music” button(Pic. G) each time, you can save the 

a. Per press “Volume” button(Pic. H) to adjust ring vo

-


 lume during selecting chord ring.


b. when this unit calls other indoor units, it will discon

-

tinuously sound “Du” and can not adjust the volume

Press the “no bother” button(Pic. H) for 2 seconds

under  standby  status,  the  unit  will  sound  “Di”  and 


can only see the picture of visitors without hearing 


enter  no  bother  status  and  the  LED  will  light. You 

the ring while the outdoor unit calls. By pressing the 


enter no bother status and the LED will light.

will turn off. Press the “no bother” button(Pic. H) for
2s under ringing status, the unit will stop ringing and

10. Exit no bother function:

10. Exit no bother function:


indoor unit enter talking status.


ccessful call from one indoor unit to another indoor 


unit.


wer off.

bother” button(Pic. H), it will exit the no bother sta

-

tus when the unit sound “Di”, the LED will turn off.

a. Under stand-by or no bother status, press the “no 

b. It will exit no bother function automatically while the

c. It will exit no bother function automatically after su

-

d. It will exit no bother function automatically after po

-

11. Intercom(more than 1 indoor units)

11. Intercom(more than 1 indoor units)

a.


Under standby status, press “Intercom” button(Pic.  

J)  and  then  “talk”  button(Pic.  I),  you  can  cal  an

-

 other indoor unit. (Remark: It's available for two in

-


Pic.D

Pic.H

Pic.J

Pic.E

Pic.F

Pic.G

Pic.C

Pic.I

“talk” button(Pic. I) to talk with visitor and the LED

status, there is no voice, cannot open the door)


or wait for the ring stop automatically. The select

-

ring  you  prefer  with  pressing  “talk”  button(Pic.  C)  

ed melody is for Door 1. The melody for Door 2 is 

continuously sound


“Du”.


the next melody.


The music from intercom will dis

-

9

7. Chord ring select

7. Chord ring select

8.2. Talking Volume

8.2. Talking Volume


 Press “Volume” button(Pic. H) to adjust talking vo

-


 lume during talking status.

9. No bother function

9. No bother function

Under  stand-by  status,  press  “monitor”  button(Pic. 

Under stand-by status, press “talk” button(Pic.C) to

Summary of Contents for KW-128C

Page 1: ...KW 128C User s Manual Video Door Phone Indoor Monitor Video Door Phone Indoor Monitor Top Way Intelligent Science Technology Co Ltd http www kenwei com ...

Page 2: ...Camera 1 2 Connection Diagram Of Indoor Unit And Outdoor Camera 1 2 Connection Diagram Of Indoor Unit And Outdoor Camera 2 1 Connection Diagram Of Indoor Unit And Outdoor Camera 2 1 Connection Diagram Of More Units Connection Diagram Of More Units TROUBLE SHOOTING GUIDE TROUBLE SHOOTING GUIDE SPECIFICATIONS SPECIFICATIONS FEATURES AND PARTS FEATURES AND PARTS KW 128C Features And Parts KW 128C Fea...

Page 3: ...hange or modify design features functions and specifications without any prior notice for the impro vement and promotion of products quality Remark 4 Top Way Technology Top Way Technology FEATURES AND PARTS 1 5 6 or 7 color TFT screen 2 LED for power LED for Image memory 3 LED for door 1 4 LED for door 2 5 Speake 6 TFT OSD navigation minus plus function selection 7 a Color Image memory navigation ...

Page 4: ...he Indoor Unit 2 Call Remind 2 1 Outdoor Unit 1 Call The Indoor Unit The indoor unit will display the image of outdoor unit 1 Door 1 2 2 Outdoor unit 2 call the indoor unit more than 1 outdoor unit 2 2 Outdoor unit 2 call the indoor unit more than 1 outdoor unit automatically when the outdoor unit 1 calls and the LED of outdoor unit 1 will light the LED of working status will glitter and the unit ...

Page 5: ...ic H to adjust ring vo lume during selecting chord ring b when this unit calls other indoor units it will discon tinuously sound Du and can not adjust the volume Press the no bother button Pic H for 2 seconds under standby status the unit will sound Di and can only see the picture of visitors without hearing enter no bother status and the LED will light You the ring while the outdoor unit calls By...

Page 6: ...Di and the LED will light continually The unit will with the away func calls the unit will store the image from the outdoor un tion when it turns on per time While the outdoor unit b With B W memory under stand by status the away function will be turned on by pressing monitor bu unit will exit the away function when the power is tton Pic N for 2s the unit will sound Di and the a With color memory ...

Page 7: ...f all indoor units see point 1 press call from outdoor ca mera and the indoor units will ring The unit s room b When there are more than 2 indoor units after initia main indoor unit and no 2 indoor unit and turn them on press call from outdoor camera and the indoor lization of all indoor units see point 1 connect the units will ring And then connect no 3 indoor unit and call from outdoor unit When...

Page 8: ... Di Power on Sound Di discontinuously Sound Di Di discontinuously Sound Di Di Di discontinuously sound Du Sound Di Remark indoor unit and outdoor unit connected well call the indoor indoor unit do not change the indoor unit any more All the indoor units and outdoor units are formatted in our factory Any indoor unit can connect any outdoor unit When unit from the outdoor unit first to let the syste...

Page 9: ... visitor calls in after 5 seconds of the monitor working press to re cord color video displays clock press to record color video 3 Play color video 3 Play color video When talking with outdoor camera press after 5 seconds when the screen a When in standby status press button for 5 seconds when the screen displays displays it is a video At this time press to play the recorded video b When playing v...

Page 10: ...emory unit the time will display and the time and date are editable from the outdoor camera the indoor unit will store the visitor s picture When you every time After 10 seconds the system will go back to monitor status come back home you can review the visitor s picture by pressing button display by pressing button every time Up to 32 or 64 pictures when more than 32 or 64 pictures the earliest p...

Page 11: ...y adjustment menu B while TFT is in 16 9 and 4 3 6 Image quality reset Press button the window will display the image quality adjustment menu B while TFT is will come back to default status 7 Exit Image quality adjustment menu Press button the window will display the image quality adjustment menu B while TFT is 1 Image quality of brightness contrast and color adjustment 2 Image quality setup 3 Col...

Page 12: ...ed Each port in one line please check it one by one after connection After connection insert the wiring ports to the needles 3 2 22 Top Way Technology Top Way Technology according the bracket hole and then drill the dilatant plug in it Make sure the connection place of the mounting bracket aim correct place make the bracket aimed at the hole screw the 23 at the hole in the wall or the wall box dri...

Page 13: ...to the bracket 4 5 86 Box 225 106 13 6 72 85 40 12 5 Surface Mount Type Sketch B Surface Mount Type Sketch B Unit MM 25 1 according the bracket hole and then drill the dilatant plug in it Make sure the connection place of the mounting bracket aim at the hole in the wall or the wall box drill 4 holes on the wall ...

Page 14: ...creen 3 Do not disassemble the unit by yourself Improper disassembly may damage the unit or cause electric shock 4 Do not splash water on the unit Install the unit in dry place In case that the unit gets wet turn off the unit and contact your dealer 5 Check the ambient temperature and humidity 1 Do not expose the unit to sunshine or rain 2 Do not expose to intense light 3 Do not disassemble the un...

Page 15: ...nsert this connector on single unit or last extension unit Lock Electric Power Lock Electric Power Lock Electric Power Electronic Lock Electronic Lock Electronic Lock Lock Electric Power Lock Electric Power Lock Electric Power Connection Diagram Connection Diagram 1 2 3 4 5 6 7 8 9 10 11 12 13 14 15 16 C VC G D N AF AF AF GND G D N D GN V C C VCC D T A VD VD VD OWE PR DO R2 O DOOR1 SR H O T T N ON...

Page 16: ... 5 6 7 8 9 10 11 12 13 14 15 16 VCC GND AF AF AF GND GND GND VCC VCC DAT VD VD VD POWER DOOR2 DOOR1 SHORT EXTENSION I O 1 1 1 1 2 2 2 2 I O I O I O I O DC13 5V KW 128C Main Indoor Unit KW 128C Main Indoor Unit KW 128C Extension KW 128C Extension Electronic Lock Lock Electric Power Outdoor Camera Outdoor Camera Lock Electric Power Electronic Lock Short circuit connector need to insert this connecto...

Page 17: ... extension unit 13 5V 1 5A 13 5V 1 5A 13 5V 1 5A 1 1 2 2 3 3 4 4 1 2 3 4 5 6 7 8 9 10 11 12 13 14 15 16 1 2 3 4 5 6 7 8 9 10 11 12 13 14 15 16 1 2 3 4 5 6 7 8 9 10 11 12 13 14 15 16 1 2 3 4 5 6 7 8 9 10 11 12 13 14 15 16 VCC GND AF AF AF GND GND GND VCC VCC DAT VD VD VD POWER DOOR2 DOOR1 SHORT EXTENSION I O 1 1 1 1 2 2 2 2 I O I O I O I O DC13 5V 32 Top Way Technology Top Way Technology RVV4 0 5 R...

Page 18: ...xit the off state refer on thod of the indoor unit Check the connection unit Exit the off state refers on No 1 of operation me The unit is in off are shorted The wires between the monitor and the camera Two room number is the same mera connection in door ca Check the connection Reset the room number refers on No 3 of special ber mera Exit the off state refers on No 1 of operation me Check the conn...

Reviews: