Kenmore KENMORE 11682, Owner'S Manual
The Kenmore KENMORE 11682 is a versatile and efficient home appliance. For easy and convenient operation, make sure to download the comprehensive Owner's Manual from our website. This free manual provides step-by-step instructions and troubleshooting tips, ensuring you get the most out of your product.
Share
Download


Reviews:
No comments
Related manuals for KENMORE 11682

KX-FB421
Brand: Panasonic Pages: 2

8354
Brand: IDEAL Pages: 48

APW-895N/IP-420
Brand: SanDisk Pages: 125

BINDPRO
Brand: National Flooring Equipment Pages: 36

OKIFAX 4550
Brand: Oki Pages: 128
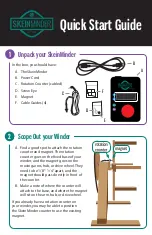
Skeinminder
Brand: Alpenglow Yarn Pages: 4

79-103
Brand: Singer Pages: 15

3822-1/22
Brand: Pfaff Pages: 78

SVE C36-XS
Brand: SandenVendo Pages: 57

B 140 R
Brand: Kärcher Pages: 5

Crescendo BLCR
Brand: Baby Lock Pages: 216

WFE1015M8
Brand: Goddess Pages: 24

Auto-Logic KX-T1720
Brand: Panasonic Pages: 9

EASA-PHONE KX-1423BA
Brand: Panasonic Pages: 16

2Line KX-TG8280FX
Brand: Panasonic Pages: 60

831.285750
Brand: LIFESTYLER Pages: 12

VDL900SM
Brand: HQ Power Pages: 20

R 53-1100 UHS
Brand: Cleanfix Pages: 16


