background image

19

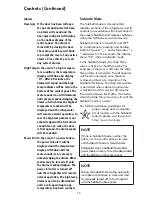
Door Ajar  If the door has been left open 

for an extended period of time, 
an alarm will sound and the 
door ajar indicator will display 
on the bottom display of the 

control panel. The alarm is 

turned off by closing the door. 

The mute sounds key will blink 

to prompt the reset of any active 
alarms. Press this key to reset 
any system alarms.

High Temp In the event of a high tempera

-

ture condition, the temperature 
display will blink and display 
“HI”. After 20 minutes, the 
alarm will sound and the high 
temp indicator will be red on the 

bottom of the control panel. The 

mute sounds icon will illuminate 
until pressed, acknowledging the 
alarm, at which time the highest 
temperature reached will be 
displayed and the refrigerator 
will resume normal operation. In 
case the high temp alarm is not 

acknowledged at the first alarm 

sound time out, when the door 

is first opened, the alarm sound 

will be repeated.

Power Fail In the event of a power failure, 

the power fail alert will be 
displayed and the temperature 
display will blink until the 
mute sounds icon is pressed, 
acknowledging the alarm. Other 
modes may be turned off until 

the alarm is acknowledged. The 

power fail alert is turned off 
and the refrigerator will resume 

normal operation. The high temp 

alarm may also be illuminated 
until a safe operating range 
temperature has been reached.

NOTE

During the Sabbath Mode, the automatic 
ice maker will continue to work and must 

be manually turned off to be compliant 

with the Sabbath observances.

Controls (Continued)

Sabbath Mode

The Sabbath Mode is a feature that 
disables portions of the refrigerator and its 
controls in accordance with observance of 
the weekly Sabbath and religious holidays 
within the Orthodox Jewish community.
Sabbath Mode is turned ON and OFF 
by simultaneously pressing and holding 
both the freezer “ v ” and refrigerator “ ^ 

” indicators for five seconds. The display 

shows “Sb” while in Sabbath mode.
In the Sabbath Mode, the High Temp 
alarm is active for health reasons. For 
example, if the door is left ajar the High 
Temp alarm is activated. The refrigerator 
will function normally once the door 
is closed, without any violation of the 
Sabbath/Holidays. The High Temp alarm 
is permitted when cabinet temperature 
is outside the safe zone for 20 minutes. 
The alarm silences itself after 10 minutes 
while the High Temp icon stays lit until the 
Sabbath mode is exited.
For further assistance, guidelines for 

proper usage and a complete 
list of models with the Sabbath 
feature, please visit the web at 
http:\\www.star-k.org.

NOTE

While in Sabbath Mode, neither the 
lights, nor the control panel will work 
until Sabbath Mode is deactivated.
Refrigerator stays in Sabbath Mode after 
power failure recovery. It must be deactivated 
with the buttons on the control panel.

Alarms

Summary of Contents for Elite 970-7070 Series

Page 1: ... Sears Canada Inc Toronto Ontario Canada M5B 2C3 www sears ca Use Care Guide Guide d utilisation et d entretien English Français Kenmore Elite French Door Bottom Freezer Color number le numéro de couleur Refrigerateur de Compartiment Superposés ...

Page 2: ...re You Call 35 37 Table of Contents Please Read and Save these Instructions This Use Care Guide provides specific operating instructions for your model Use your unit only as instructed in this Use Care Guide These instructions are not meant to cover every possible condition and situation that may occur Common sense and caution must be practiced when installing operating and maintaining any applian...

Page 3: ...commended in all instructions supplied with the product 7 Damage to or failure of parts or systems resulting from unauthorized modifications made to this product Disclaimer of implied warranties limitation of remedies Customer s sole and exclusive remedy under this limited warranty shall be product repair as provided herein Implied warranties including warranties of merchantability or fitness for ...

Page 4: ...ironmentally Friendly Appliance Cleaners And a whole lot more We have access to over 1 million parts and accessories In home or in shop service is available for all major brands Call 1 800 4 MY HOMETM Sears ca parts MAJOR APPLIANCES STOVES Range Hood Filters Elements Bulbs Smooth Top Cleaning Kits DISHWASHERS Stainless Steel Hoses Clamps Dishwasher Fittings Dishwasher Installation Kits LAUNDRY Rub...

Page 5: ...ice as often as you want us whenever you want us No lemon guarantee replacement of your covered product if four or more product failures occur within twelve months Product replacement if your covered product can t be fixed Annual Preventive Maintenance Check at your request no extra charge Power surge protection against electrical damage due to power fluctuations 250 Food Loss Protection annually ...

Page 6: ...ammable liquids in the vicinity of this or any other appliance Read product labels for warnings regarding flammability and other hazards Do not operate the unit in the presence of explosive fumes Proper Disposal of Your Appliance Risk of Child Entrapment Child entrapment and suffocation are not problems of the past Junked or abandoned appliances are still dangerous even if they will sit for just a...

Page 7: ...followed to ensure that safety mechanisms in this unit will operate properly IMPORTANT CFC HCFC Disposal Your old refrigerator may have a cooling system that used CFCs or HCFCs chlorofluorocarbons or hydrochlorofluorocarbons CFCs and HCFCs are believed to harm stratospheric ozone if released to the atmosphere Other refrigerants may also cause harm to the environment if released to the atmosphere I...

Page 8: ...fingers Rinse with warm water and dry with a soft cloth Do not use sharp instruments rubbing alcohol flammable fluids or abrasive cleaners to remove tape or glue These products can damage the surface of your refrigerator After you remove all of the package materials clean the inside of your refrigerator before using it See the Care Cleaning section in this manual See important information about cl...

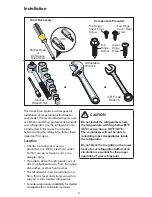
Page 9: ...tor only as instructed in this Use Care Guide Before starting the refrigerator follow these important first steps Location Choose a place that is near a grounded non GFCI electrical outlet Do Not use an extension cord or an adapter plug If possible place the refrigerator out of direct sunlight and away from the range dishwasher or other heat sources The refrigerator must be installed on a floor th...

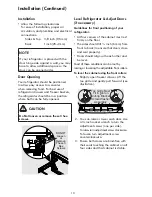
Page 10: ...el Most of these conditions can be met by raising or lowering the adjustable front rollers To level the cabinet using the front rollers 1 Slightly open freezer drawer Lift the toe grille and gently pull forward see illustration Installation Continued Installation Allow the following clearances for ease of installation proper air circulation and plumbing and electrical connections Sides Top 3 8 inc...

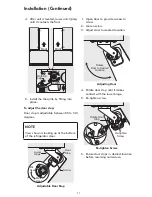
Page 11: ... door stop Door stop is adjustable between 85 to 145 degrees 1 Open door to provide access to screw 2 Loosen screw 3 Adjust door to desired location 4 Rotate door stop until it makes contact with the lower hinge 5 Re tighten screw Rotate Door to Desired Location Adjusting Door Adjustable Door Stop Door Stop Screw Lower Hinge Min Open Max Open 6 Ensure door stops in desired location before resuming...

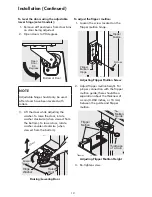
Page 12: ...flipper mullion hinge 2 Adjust flipper mullion height For proper connection with the flipper mullion guide there should be a separation about the thickness of a coin 0 060 inches or 1 5 mm between the guide and flipper mullion 3 Re tighten screw 3 Lift the door while adjusting the washer To raise the door rotate washer clockwise when viewed from the bottom To lower door rotate washer counter clock...

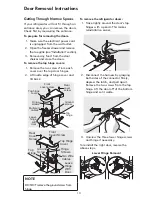
Page 13: ...re for removing the doors 1 Make sure the electrical power cord is unplugged from the wall outlet 2 Open the freezer drawer and remove the toe grille see Installation section 3 Remove any food from the door shelves and close the doors To remove the top hinge covers 1 Remove the two screws from each cover over the top door hinges 2 Lift inside edge of hinge cover and tilt back Rear Cover Screw Fron...

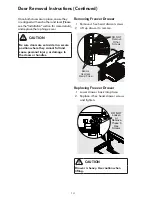
Page 14: ...doors are in place ensure they are aligned with each other and level Please see the Installation section for more details and replace the top hinge cover Removing Freezer Drawer 1 Remove 4 hex head drawer screws 2 Lift up drawer to remove Remove Hex Head Drawer Screw DO NOT Remove Other Screws DO NOT Loosen or Remove These 3 Hex Screws Replacing Freezer Drawer 1 Lower drawer back into place 2 Repl...

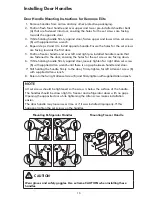
Page 15: ...fastened into door ensuring the holes for the set screws are facing towards the opposite door 3 While holding handle firmly against door fasten upper and lower Allen set screws B with supplied Allen wrench 4 Repeat steps 2 and 3 to install opposite handle Ensure the holes for the set screws are facing towards the first door 5 Position freezer handle end over left and right pre installed handle mou...

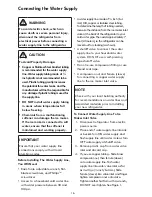
Page 16: ...d PhillipsTM screwdriver Access to a household cold water line with water pressure between 30 and 100 psi To Connect Water Supply Line To Ice Maker Inlet Valve 1 Disconnect refrigerator from electric power source 2 Place end of water supply line into sink or bucket Turn ON water supply and flush supply line until water is clear Turn OFF water supply at shutoff valve 3 Remove plastic cap from water...

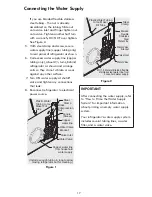
Page 17: ...Prime the Water Supply System for important information about priming an empty water supply system Your refrigerator s water supply system includes several tubing lines a water filter and a water valve Connecting the Water Supply If you use braided flexible stainless steel tubing The nut is already assembled on the tubing Slide nut onto valve inlet and finger tighten nut onto valve Tighten another...

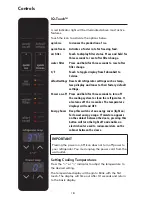
Page 18: ...us defaultsettings Resets all refrigerator settings such as temp temp display and tones to their factory default settings Power on off Press and hold for three seconds to turn off the cooling system to clean the refrigerator It also turns off the ice maker The temperature displays will read OFF Energy Saver Keep this switch set on energy saver light on for lowest energy usage If moisture appears o...

Page 19: ... a safe operating range temperature has been reached NOTE During the Sabbath Mode the automatic ice maker will continue to work and must be manually turned off to be compliant with the Sabbath observances Controls Continued Sabbath Mode The Sabbath Mode is a feature that disables portions of the refrigerator and its controls in accordance with observance of the weekly Sabbath and religious holiday...

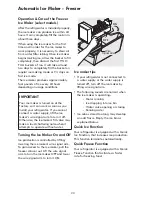
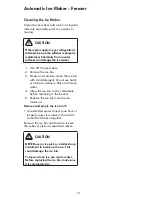
Page 20: ... the wire signal arm to turn the ice maker OFF and lower the wire signal arm to turn it ON Ice maker tips If your refrigerator is not connected to a water supply or the water supply is turned off turn off the ice maker by lifting wire signal arm The following sounds are normal when the ice maker is operating Motor running Ice dropping into ice bin Water valve opening or closing Running water Ice c...

Page 21: ...5 Replace the ice bin Turn the ice maker on Remove and empty the ice bin if An extended power failure one hour or longer causes ice cubes in the ice bin to melt and freeze together Remove the ice bin and shake to loosen the cubes or clean as explained above CAUTION NEVER use an ice pick or similar sharp instrument to break up the ice This could damage the ice bin To loosen stuck ice use warm water...

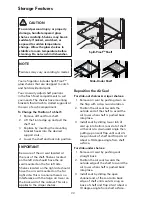
Page 22: ... and flap sits at about a 10 degree angle from shelf surface For slide under shelves 1 Remove air seal by pushing seal straight back 2 Position the air seal towards the outside edge of the shelf to avoid the air tower when shelf is pushed back into place 3 Install seal by sliding the open channel end of the seal onto back edge of shelf until seal sits snug on back of shelf and flap sits at about a...

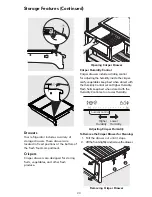
Page 23: ... Cleaning 1 Pull the drawer out until it stops 2 Lift the front slightly and remove the drawer Adjusting Crisper Humidity Higher Humidity Lower Humidity humidity control Removing Crisper Drawer Storage Features Continued Crisper Humidity Control Crisper drawers include a sliding control for adjusting the humidity inside the crisper Leafy vegetables keep best when stored with the Humidity Control s...

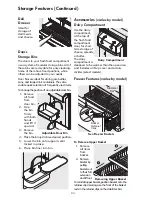
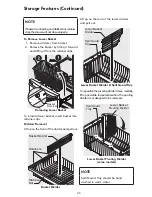
Page 24: ... clips making sure the front of the basket rests in the retainer clips on the stabilizer bar Removing Upper Basket Deli Drawer Ideal for storage of deli meats and cheese Doors Storage Bins The doors to your fresh food compartment use a system of modular storage bins All of these bins are removable for easy cleaning Some of them have fixed positions while others can be adjusted to your needs Door b...

Page 25: ...retainer clips Dividers Removal Lift up on the front of the divider and pull out Lower Basket Divider Spill Guard Tray Lower Basket Divider Spill Guard Tray Lift up on the rear of the lower divider and pull out To reposition the pivoting divider some models lift up and slide to desired location The pivoting divider is not designed to be removed Lower Basket Pivoting Divider some models Spill Guard...

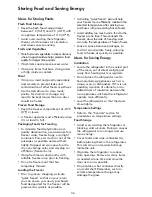
Page 26: ...ou can ensure your newly purchased food designated for the freezer will be preserved as quickly as possible Activating quick freeze also will help your freezer more efficiently maintain the selected temperature after placing new purchases with pre existing frozen foods Avoid adding too much warm food to the freezer at one time This overloads the freezer slows the rate of freezing and can raise the...

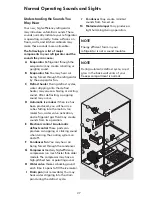
Page 27: ...ling into the ice bin Ice maker fan water valve activation and refrigerant gas fluid may create sounds from its operation E Electronic control automatic defrost control These parts can produce a snapping or clicking sound when turning the cooling system on and off F Condenser fan You may hear air being forced through the condenser G Compressor Modern high efficiency compressors run much faster tha...

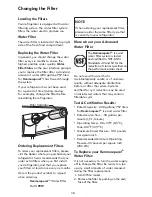
Page 28: ... filter before reinstalling the refrigerator Filter Cartridge Do not use with water that is microbiologically unsafe or of unknown quality without adequate disinfection before or after the system Systems certified for cyst reduction may be used on disinfected waters that may contain filterable cysts Test Certification Results Rated Capacity 200 gallons 757 liters for Kenmorepure TM ice and water f...

Page 29: ...filter should be installed facing downward 4 To close the air filter door push the top and bottom to lock the door closed 5 Press and hold the Air Filter Reset button on the control panel for three seconds When the display changes from Replace to Good the status has been reset 6 The Air Filter Reset will turn itself off after a few seconds 3 Slide the old water filter cartridge straight out of the...

Page 30: ...fore cleaning IMPORTANT If you store or move your refrigerator in freezing temperatures be sure to completely drain the water supply system Failure to do so could result in water leaks when the refrigerator is put back into service Contact a service representative to perform this operation CAUTION Pull the refrigerator straight out to move it Shifting it from side to side may damage flooring Be ca...

Page 31: ... ice if you will be gone one month or more Turn the cooling system off see Controls section for location of On Off button and disconnect power cord Turn water supply valve to closed position Clean interior thoroughly Leave both doors open to prevent odors and mold build up Block doors open if necessary Moving Remove all food and ice If using a handcart load from the side Adjust rollers all the way...

Page 32: ...e and dry Exterior Handles Soap and water Non abrasive glass cleaner Do not use commercial household cleaners containing ammonia bleach or alcohol to clean handles Use a soft cloth to clean smooth handles Do not use a dry cloth to clean smooth doors Exterior Handles Stainless Steel Models Only Soap and water Stainless steel cleaners Never use CHLORIDE or cleaners with bleach to clean stainless ste...

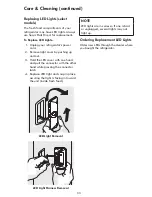
Page 33: ...hing up and out 3 Hold the LED cover with one hand and pull the connector with the other hand while pressing the connector latch 4 Replace LED light and snap in place assuring the light is facing in toward the unit inside fresh food Ordering Replacement LED Lights Order new LEDs through the dealer where you bought the refrigerator LED Light Harness Removal LED Light Removal NOTE LED lights are in ...

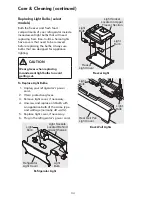
Page 34: ... cord 2 Wear protective gloves 3 Remove light cover if necessary 4 Unscrew and replace old bulb with an appliance bulb of the same type and wattage normally 40 watts 5 Replace light cover if necessary 6 Plug in the refrigerator s power cord Light Bulb Light Sockets Located Behind Glass Shelves Light Bulb Refigerator Light Cover Refrigerator Light Light Socket Located in Upper Freezer Section Freez...

Page 35: ...valve Replace valve if necessary Ice maker is not making enough ice Ice maker is producing less ice than you expect The water filter may be clogged with foreign material The water supply line is kinked Saddle valve on cold water pipe is clogged or restricted by foreign material Freezer control is set too warm freezer ice maker Freezer ice makers will produce approximately 2 5 pounds of ice every 2...

Page 36: ...r cabinet Close both doors gently Ensure floor is level and solid and can adequately support the refrigerator Contact a carpenter to correct a sagging or sloping floor Ensure floor is level and solid and can adequately support the refrigerator Contact a carpenter to correct a sagging or sloping floor Drawers are difficult to move Food is touching shelf on top of drawer Track that drawers slide on ...

Page 37: ...un continuously except during defrost mode DIGITAL TEMPERATURE DISPLAY Digital temperature displays are flashing Electronic control system has detected a performance problem Call your Sears Home Service representative who can interpret any messages or number codes flashing on the digital displays WATER MOISTURE FROST INSIDE REFRIGERATOR Moisturecollects on inside of refrigerator walls Weather is h...

Reviews: