background image

16

Setting Oven Controls

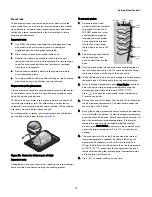
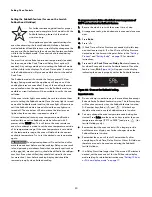
 Setting Oven Controls

1.

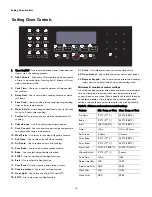
Timer Set/Off - Use to set and cancel timer. Timer does not 
stop or start the cooking process.

2. Add 1 Minute

 - Each press of this feature adds one minute 

of time to an active timer. Pressing Add 1 Minute will start 
timer when timer is idle.

3. Cook Time

 - Use to set a specific amount of time needed 

for cooking. 

4. Delay Start - 

Use to set a delay cooking feature or delay 

self clean.


5. Slow Cook

 - Use for cooking foods requiring long cooking 

times at lower temperatures.

6. Warm & Hold

 - Use to keep cooked food warm in the oven 

for up to 3 hours after cooking.

7. Pre Heat - 

Use to bring oven to desired temperature for 

cooking.

8. Cakes Breads

 - Use for baking bread and pastries. 

9. Conv Convert

 - Use to convert regular recipe temperature 

to a convection recipe temperature.

10. Meat Probe

 - Use to set for cooking with probe feature.

11. Self Clean

 - Use to select the self clean function.

12. Air Guard

 - Use to reduce odors while cooking.

13. Conv Bake - 

Use to cook with convection feature.


14. Bake

 - Use to select normal baking function.

15. START

 - Use for starting all cooking functions

16. Broil

 - Use to select broiling function.

17. Conv Roast - 

Use for roasting hams, turkey, roasts.

18. Cooktop Lockout - 

Use to lock surface controls.

19. Oven Light -

 Use to turn oven light ON and OFF.

20. STOP

 - Use to stop any cooking function. 

21. Clock

 - Use with numeric keys to set the time of day.

22. Oven Lockout

 - Use to lock oven door and control panel.

23. Numeric Keypad 

- Use to enter temperatures and cooking 

times, and use to enter time of day when setting clock.

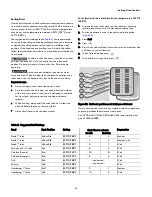
Minimum & maximum control settings 

All of the cooking features listed have minimum and maximum 
time and temperature settings that may be entered into the 
control. An entry error tone (3 short beeps) will sound if the entry 
of the temperature or time is below the minimum allowable 
setting or above the maximum setting for the cooking feature. 

Self

Clean

Cakes

Breads

Pre

Heat

Slow

Cook

Warm

& Hold

Delay

Start

 Add 1 

Minute

Cook

Time

 Conv

  Bake

Bake

Broil

START

STOP

 Conv

  Roast

Timer

Conv

Convert

7

8

0

9

4

5

6

1

2

3

COOKTOP

LOCKOUT

OVEN

LOCKOUT

Meat

Probe

 Air

Guard

1

2

3

4

5

6

7

8

9

10

11

12

13

14

15

16

17

18

19

20

21

22

23

Table 2:  

Minimum and maximum control settings

Feature

Min. Temp. or Time Max. Temp. or Time

Pre Heat

170°F (77° C)

550°F (288°C)

Bake

170°F (77° C)

550°F (288°C)

Broil

400°F (205°C)

550°F (288°C)

Timer

1 Min

11 Hrs. 59 Mins.

Self Clean

2 Hours

4 Hours

Conv Bake

170°F (77° C)

550°F (288°C)

Conv Roast

170°F (77° C)

550°F (288°C)

Slow Cook

LO 225°F (108°C)

HI 275°F (134°C)

Warm & Hold

170°F (77° C)

3 hours

Cook Time

1 Min.

11:59

Delay time 12hr

1:00

12:59

Delay time 24hr

0:00

23:59

Clock 12hr

1:00

12:59

Clock 24hr

0:00

23:59

Summary of Contents for 970C4256

Page 1: ...ic Range Cuisinière Électrique color number numéro de coleur Use Care Guide Guide d utilisation et d entretien English Français Model Modèle 970C4256 P N 139900801 Rev A Sears Canada Inc Toronto Ontario Canada M5B 2C3 www sears ca ...

Page 2: ... maintain this product 6 Damage to or failure of this product if it is not installed operated or maintained according to all instructions supplied with the product 7 Damage to or failure of this product resulting from accident abuse misuse or use for other than its intended purpose 8 Damage to or failure of this product caused by the use of detergents cleaners chemicals or utensils other than thos...

Page 3: ... Call 1 800 4 MY HOME TM Sears ca parts_ MAJOR APPLIANCES And a whole lot more We have access to over 1 million parts and accessories REFRIGERATORS Water Air Filters Ice Maker Stainless Steel Water Line Thermometers Environmentally Friendly Appliance Cleaners VACUUMS Bags Belts Hoses Wands Brushes Nozzles Filters LAWN GARDEN Tune up Kits Oil Fuel Stabilizers Filters Blades Belts Spark Plugs Shear ...

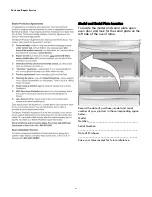
Page 4: ...the left side of the oven frame Record the date of purchase model and serial number of your product in the corresponding space below Model Number _________________________________ Serial Number ________________________________________ Date of Purchase ________________________________________ Save your sales receipt for future reference 2500 10 ...

Page 5: ...dren to climb or play around the oven The weight of a child on an open over door may cause the oven to tip resulting in serious burns or other injury Never cover any slots holes or passages in the oven bottom or cover an entire oven rack with materials such as aluminum foil Aluminum foil linings may trap heat causing a fire hazard When heating fat or grease watch it closely Grease may catch fire i...

Page 6: ...ct heating elements or interior surfaces of oven until they have sufficient time to cool Other surfaces of the appliance may become hot enough cause burns such as the oven door windows and the oven vent Remove the oven door from any unused oven if it is to be stored or discarded Proper Installation Be sure your appliance is properly installed and grounded by a qualified technician in accordance wi...

Page 7: ...PS Do not cook on a broken cooktop If the cooktop is broken cleaning solutions and spills may penetrate the cooktop and create a risk of electric shock Contact a qualified technician immediately Clean cooktop with caution If a wet sponge or cloth is used to wipe spills on a hot cooking area be careful to avoid steam burns Some cleaners can produce noxious fumes if applied to a hot surface IMPORTAN...

Page 8: ...nstructed Do not use oven cleaners No commercial oven cleaner oven liner or protective coating of any kind should be used in or around any part of the oven Do not clean the oven door gasket The door gasket is essential for a good seal Do not rub damage or move the gasket Some birds are extremely sensitive to the fumes given off during the self clean cycle of any oven Move birds to another well ven...

Page 9: ... If the cookware melts it will damage the cooktop Be sure to follow all the cookware manufacturer s suggestions when using any type of cookware on the ceramic cooktop About the ceramic glass cooktop The ceramic cooktop has radiant surface elements located below the surface of the glass The design of the ceramic cooktop outlines the area of the surface element underneath Be sure to match the pan si...

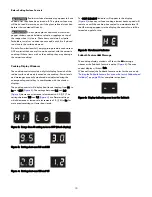
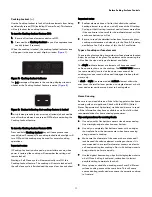
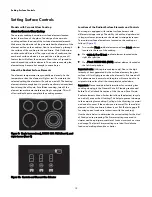
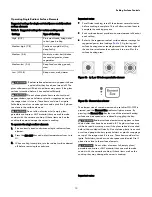
Page 10: ...window displays The cooktop control will display heat levels ranging from Hi to Lo and OFF Figure 2 The settings between 9 5 and 3 0 Figure 3 decrease or increase in increments of 5 1 2 The settings between 2 8 and 1 2 Figure 4 are Simmer settings which decrease or increase in increments of 2 1 5 to Lo for more precise settings at lower heat levels The HOT ELEMENT indicator will appear in the disp...

Page 11: ...Call sections of this Use Care Guide Types of cooktop surface elements The ceramic glass cooktop has radiant surface elements located below the surface of the glass The patterns on the ceramic glass will outline the size and type of element available The single radiant element or elements will have one round outline pattern shown on the cooktop The warmer zone feature on some models located on the...

Page 12: ...eases The radiant surface elements are located on the cooktop as follows Figure 9 Two smaller 7inch radiant elements and one 6 inch element located in the rear of the cooktop One triple 6 9 or 12 inch radiant element located at the right front position One 9 inch TURBO BOIL FLEX radiant element located at the left front position Important note White glass cooktops only Due to the high intensity of...

Page 13: ...element settings for suggested power level settings Table 1 A glowing red surface heating area extending beyond the bottom edge of the cookware indicates the cookware is too small for the surface heating area The element size of some burners can be set after ON OFF is pressed and the Element Size indicator light comes on By pressing the Element Size key the size of the element heating surface can ...

Page 14: ... Radiant Surface Elements in this section Cooktop Lockout Use the Cooktop Lockout to lock all surface elements from being accidentally turned ON including Warmer Zone This feature will only lockout the cooktop features To turn the Cooktop Lockout feature ON 1 Be sure all surface element controls are OFF 2 Press and hold Cooktop Lockout keypad until acceptance tone sounds about 3 seconds When the c...

Page 15: ...ven rack some models or flat handle oven rack some models may be used for most cooking needs The offset oven rack on some models is designed to place the base of the rack about 1 2 of a rack position lower than flat oven racks The Glide oven rack some models allows you to easily slide bakeware in and out to check food or to remove or place items while firmly holding even heavier items in place The...

Page 16: ... controls 19 Oven Light Use to turn oven light ON and OFF 20 STOP Use to stop any cooking function 21 Clock Use with numeric keys to set the time of day 22 Oven Lockout Use to lock oven door and control panel 23 Numeric Keypad Use to enter temperatures and cooking times and use to enter time of day when setting clock Minimum maximum control settings All of the cooking features listed have minimum ...

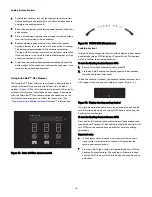
Page 17: ...mer may be used alone or while using any of the other oven functions When timer is set for more than 1 hour it will display hours and minutes until 1 hour remains When less than 1 hour remains the display counts down in minutes and seconds With less than 1 minute remaining only seconds will display If the timer is active during a cooking process the timer will show in the display To view the statu...

Page 18: ... cally Do not open the oven door Allow about 15 seconds for the oven door to completely lock Once door is locked Loc will appear in the display To cancel the oven lockout feature 1 Press and hold Oven Lockout for 3 seconds The motor door latch will begin unlocking the oven door automatically Do not open the oven door Allow about 15 seconds for the oven door to completely unlock 2 When the Loc mess...

Page 19: ...cipe calls for baking using normal temperatures The convection fan will turn on and remain on until the oven has reached the set temperature A reminder tone will sound indicating when the set bake tempera ture is reached and to place the food in the oven Bake may be set for any oven temperature between 170 F 77 C to 550 F 288 C To set Bake for oven temperature of 425 F 218 C 1 Press Bake 2 Enter 4...

Page 20: ...pans with no sides or very low side to allow heated air to circulate around the food Dark or dull pans absorb more heat than shiny bakeware resulting in dark or over browning of foods It may be necessary to reduce the oven temperature or cook time to prevent over browning of some foods Dark pans are recommended for pies Shiny pans are recommended for cakes cookies and muffins Convection baking rac...

Page 21: ...ads functions are designed to give optimum baking performance for Cakes or Breads These functions work well for baking cakes brownies pies fresh or frozen baked custards cheesecakes breads rolls biscuits muffins and corn bread The Cakes function provides a preheat with a gentle cycling of heat giving cakes more volume and allowing delicate foods to cook more evenly The Breads function adds a speci...

Page 22: ...than one hour before or after cooking Doing so can result in food poisoning or sickness Foods that can easily spoil such as milk eggs fish meat or poultry should be chilled in the refriger ator first Even when chilled they should not stand in the oven for more than 1 hour before cooking begins and should be removed promptly when finished cooking To program oven for a Delay Start beginning at 5 30 ...

Page 23: ...d splatter When broiling always pull the oven rack out to the stop position before turning or removing food Always broil foods with the door closed To set Broil with the default broil oven temperature of 550 F 288 C 1 Arrange the oven racks when cool For optimum browning results preheat oven for 2 minutes before adding food 2 Position bakeware in oven to the preferred rack position Figure 35 3 Pre...

Page 24: ...Slow Cook settings are available high Hi or low Lo The high setting is best for cooking foods between 4 and 5 hours The low setting is best for cooking foods up to 9 hours or longer Food poisoning hazard Do not let food sit for more than one hour before or after cooking Doing so can result in food poisoning or sickness Foods that can easily spoil such as milk eggs fish meat or poultry should be ch...

Page 25: ...the food DO NOT preheat or start cooking before properly inserting the meat probe Probe should be inserted into the food and recep tacle while the oven is still cool 2 Place the prepared food on the desired oven rack position and slide into the oven 3 Plug the meat probe into the probe receptacle located on the left front oven cavity side On some models the recep tacle can be found at the top of t...

Page 26: ...ing pastries or breads the cover should have an opening to allow moisture to escape Use only dish ware utensils and cookware recommended for oven and cooktop use in the warmer drawer 1 Press warmer drawer The warmer drawer indicator light will turn on 2 To reach the desired heat setting of either low medium or high do the following 3 To set LO press LO once Pressing LO twice will activate the Proo...

Page 27: ...r to the warmer drawer recommended food settings below If a particular food is not listed start with the medium level and adjust as needed Do not place flammable items such as plastic salt and pepper shakers spoon holders or plastic wrappings on top of the range when it is in use These items could melt or ignite Potholders towels or wooden spoons could catch fire if placed too close to the surface...

Page 28: ...should only be used with foods that are already at serving temperatures Warm Hold will keep cooked foods warm and ready for serving for up to 3 hours after cooking has finished After 3 hours the Warm Hold will shut off automati cally Warm Hold will keep the oven temperature at 170 F 77 C To set Warm Hold 1 If needed arrange oven racks and place cooked food in oven 2 Press Warm Hold HLd will appear...

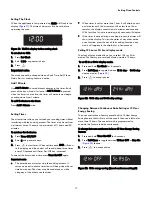
Page 29: ...unction temperatures If the temperature shows an adjustment of 20 F and a 20 F adjustment is needed toggle between the minus or plus in the display by pressing the Self Clean key Do not use oven thermometers such as those found in grocery stores These oven thermometers may vary as much as 20 to 40 F degrees from actual temperatures Restoring Factory Default Settings Your appliance was set with pre...

Page 30: ...n temperature again Food poisoning hazard Do not let food sit for more than one hour before or after cooking Doing so can result in food poisoning or sickness Foods that can easily spoil such as milk eggs fish meat or poultry should be chilled in the refriger ator first Even when chilled they should not stand in the oven for more than 1 hour before cooking begins and should be removed promptly whe...

Page 31: ...ly removed from the oven while still in the Sabbath feature however the oven cannot be turned back on until after the Sabbath Holidays After the Sabbath observance turn off the Sabbath feature Press and hold both Cook Time and Delay Start keys for at least 3 seconds simultaneously to turn the Sabbath feature off SF will disappear from the display and the oven may be used with all normal functions ...

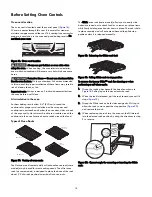
Page 32: ... use oven cleaners or oven protective coatings in or around any part of the oven interior Clean any soil from the oven frame the door liner outside the oven door gasket and the small area at the front center of the oven bottom Figure 46 These areas heat sufficiently to burn soil on Clean using soap and water prior to starting Self Clean Do not clean the oven door gasket Figure 46 The woven materia...

Page 33: ... time of day the oven is empty and ALL oven racks are removed Be sure oven door is completely closed 2 Press Delay Start 3 Using numeric keys enter 9 0 0 for time to start 4 Press to accept 5 Press Self Clean 6 Press If it becomes necessary to stop Self Clean when active 1 Press 2 If Self Clean has heated the oven to a high temperature allow enough time for the oven to cool and the door Opn messag...

Page 34: ...g stainless steel Always rub in direction of metal grain to avoid damaging Do not use cleaners with high concentrations of chlorides or chlorine Do not use harsh scrubbing cleaners Polish with a lint free cloth Always be sure to wipe excess cleaner polish off from the metal surface as bluish stains may occur during future oven heating that cannot be removed Clean heavier soils with hot soapy water...

Page 35: ...ous to your health and can chemically damage the ceramic glass surface Before cleaning the cooktop be sure the controls are turned to OFF and the cooktop is COOL The glass surface could be hot and burns may occur if the glass surface is touched before it has cooled sufficiently For light to moderate soil Apply a few drops of CookTop Cleaning Creme directly to the cooktop Use a paper towel or use a...

Page 36: ...l linings may trap heat causing a fire hazard Protective Liners DO NOT USE ALUMINUM FOIL to line the oven bottom Only use aluminum foil as recom mended in this manual Improper installation of these liners may result in risk of electric shock or fire Aluminum foil Use of aluminum foil on a hot cooktop can damage the cooktop Do not use thin aluminum cooking utensils or allow aluminum foil to touch t...

Page 37: ...iance To replace the warmer drawer 1 Pull the bearing glides to the front of the outer compart ment glide channels until they snap into place See Figure 53 2 Carefully line up both sides of the warmer drawer glide rails to the outer compartment glide channels located inside the empty warmer drawer compartment See Figure 54 3 While holding the warmer drawer level and square using the warmer drawer ...

Page 38: ...Figure 57 2 Holding the oven door at the same angle as the removal position See Figure 57 seat the hook of the hinge arm over the roller pins located on each side of the oven door frame See Figure 58 The hook of the hinge arms must be fully seated onto the roller pins 3 Fully open the oven door horizontal with floor See Figure 55 4 Push the door hinge locks up toward and into the oven frame on bot...

Page 39: ... temperature before placing food in the oven Use proper rack position for baking needs Set oven temperature 25 F 13 C lower than recommended Cakes not done in center Oven too hot Incorrect pan size Pan not centered in oven Set oven temperature 25 F 13 C lower than recommended Use pan size suggested in recipe Use proper rack position and place pan so there is 5 1 cm to 10 2 cm 2 to 4 of space on al...

Page 40: ... slide easily Oven racks left in oven cavity during self clean Always remove oven racks from oven cavity before starting a self clean cycle Clean using a mild abrasive cleaner following manufacturer s instructions Rinse with clean water dry and replace in oven Oven smokes excessively when broiling Incorrect setting Follow broiling instructions in Setting Broil on page 23 Meat too close to the broi...

Page 41: ...nce is not level Be sure floor is level strong and stable enough to adequately support range If floor is sagging or sloping contact a carpenter to correct the situation Poor installation Place oven rack in center of oven Place a level on the oven rack Adjust leveling legs at base of appliance until the rack is level Kitchen cabinet alignment may make range appear not level Be sure cabinets are squ...

Page 42: ...424712 10 20 08 SR Printed in the U S A 02488 ...

Reviews: