background image

5

ENGLISH

Protection  Agreements

Master Protection Agreements 

Congratulations on making a smart purchase. 

Your new Kenmore

®

product is designed and manufactured for years of dependable operation. 
But like all products, it may require preventive maintenance or repair from 
time to time. That’s when having a Master Protection Agreement can 
save you money and aggravation.  

The Master Protection Agreement also helps extend the life of your new 
product. Here’s what the Agreement* includes: 

Parts and labor needed to help keep products operating properly 
under normal use, not just defects. Our coverage goes well
beyond the product warranty. 
No deductibles, no functional failure 
excluded from coverage – real protection. 

Expert service by a force of more than 10,000 authorized Sears 
service technicians
, which means someone you can trust will be 
working on your product. 

Unlimited service calls and nationwide service, as often as you 
want us, whenever you want us. 

“No-lemon” guarantee – replacement of your covered product if 
four or more product failures occur within twelve months. 

Product replacement if your covered product can’t be fixed. 

Annual Preventive Maintenance Check at your request – no extra 
charge. 

Fast help by phone – we call it Rapid Resolution – phone support 
from a Sears representative on all products. Think of us as a “talking 
owner’s manual”. 

Power surge protection against electrical damage due to power 
fluctuations.

$250 Food Loss Protection annually for any food spoilage that is 
the result of mechanical failure of any covered refrigerator or 
freezer.

Rental reimbursement if repair of your covered product takes 
longer than promised. 

10% discount off the regular price of any non-covered repair 
service and related installed parts. 

Once you purchase the Agreement, a simple phone call is all that it takes 
for you to schedule service. You can call anytime day or night, or 
schedule a service appointment online. 

The Master Protection Agreement is a risk free purchase. If you cancel 
for any reason during the product warranty period, we will provide a full 
refund. Or, a prorated refund anytime after the product warranty period 
expires. Purchase your Master Protection Agreement today! 

Some limitations and exclusions apply. For prices and additional 
information in the U.S.A. call 1-800-827-6655. 

* Coverage in Canada varies on some items. For full details call 
Sears Canada at 1-800-361-6665. 

Sears Installation Service 

For Sears professional installation 

of home appliances, garage door 

openers, water heaters, and other major home items, in the U.S.A. or 
Canada call 1-800-4-MY-HOME

®

.

Acuerodes de protección

Acuerdos maestros de protección 

Enhorabuena por haber hecho una compra inteligente. 

Su nuevo 

producto Kenmore

®

está diseñado y fabricado para brindarle años de 

funcionamiento fiable. Pero, como cualquier producto, puede necesitar 
mantenimiento preventivo o reparaciones periódicas. Es por eso que 
tener un Acuerdo maestro de protección podría ahorrarle dinero y 
molestias.  

El Acuerdo maestro de protección también sirve para prolongar la 
durabilidad de su nuevo producto. El acuerdo* incluye lo siguiente: 

Piezas y mano de obra necesarias para contribuir a mantener el 
funcionamiento adecuado de los productos utilizados en 
condiciones normales de uso
, no sólo en caso de defectos de los 
productos. Nuestra cobertura va mucho más allá que la garantía 
del producto. 
No se aplican deducibles ni exclusiones por fallas del 
funcionamiento: es decir, verdadera protección. 

Servicio técnico por expertos (más de 10000 técnicos 
autorizados de Sears
), lo cual significa que quien repare o realice 
el mantenimiento de su producto será un profesional de confianza. 

Servicio técnico a escala nacional y número ilimitado de 
llamadas de solicitud de servicio técnico: 
se puede poner en 
contacto con nosotros cuantas veces lo desee y cuando lo desee. 

Garantía “sin sorpresas”: se reemplaza el producto cubierto por el 
acuerdo si ocurren cuatro o más fallas del producto en un periodo 
de 12 meses. 

Reemplazo del producto: en caso de que no se pueda reparar el 
producto cubierto por el acuerdo. 

Revisión anual preventiva de mantenimiento del producto: 
puede solicitarla en cualquier momento, sin costo alguno. 

Rápida asistencia telefónica, la cual denominamos Solución 
rápida: 
es decir, asistencia telefónica a través de cualquiera de 
nuestros representantes de Sears, sobre cualquiera de nuestros 
productos. Piense en nosotros como en un “manual parlante del 
usuario”. 

Protección contra fallas eléctricas, contra daños debidos a 
fluctuaciones de la corriente eléctrica. 

$250 al año para cubrir cualquier posible deterioro de 
alimentos
 que haya tenido que desechar debido a una falla 
mecánica de cualquiera de nuestros refrigeradores o congeladores 
cubiertos por este acuerdo. 

Devolución de gastos de alquiler de electrodomésticos si la 
reparación de su producto asegurado toma más que el tiempo 
prometido.

10% de descuento aplicable tanto a los costos del servicio de 
reparación, como de las piezas instaladas relacionadas que no 
hayan quedado cubiertos por este acuerdo. 

Una vez que haya realizado el pago de este acuerdo, bastará una simple 
llamada telefónica para concertar una visita de servicio. Puede llamar a 
cualquier hora del día o de la noche, o bien concertar una visita de 
servicio por Internet. 

La adquisición del Acuerdo maestro de protección es una inversión 
exenta de riesgos. Si por cualquier motivo decide cancelar dicho acuerdo 
durante el periodo de garantía del producto, le haremos un reintegro total 
del valor. O bien un importe proporcional si cancela el acuerdo en 
cualquier otro momento posterior al vencimiento del periodo de garantía 
del producto. ¡Adquiera hoy mismo su Acuerdo maestro de protección! 

Algunas limitaciones y exclusiones podrían aplicarse. Para solicitar 
precios e información adicional, llame al 1-800-827-6655 (en los 
EE.UU.).

* La cobertura en Canadá varía en el caso de algunos artículos. Para 
obtener detalles completos al respecto, llame al 1-800-361-6665 de 
Sears de Canadá. 

Servicio de instalación de Sears 

Para solicitar la instalación por profesionales de Sears

 de 

electrodomésticos, abridores de puertas de garaje, calentadores de agua 
y otros artículos de uso prioritario en el hogar, llame al 1-800-4-MY-
HOME
 en los EE.UU. o Canadá.

Summary of Contents for 790. 7136

Page 1: ...LISH p n 316462432 0705 www sears com Sears Roebuck and Co Hoffman Estates IL 60179 U S A Models Modelos 790 Gas Range Use Care Guide Estufa a gas Guía para el uso y cuidado 7136 7137 color number número de color ...

Page 2: ...te family purposes this warranty applies for only 90 days from the date of purchase This warranty covers only defects in material and workmanship Sears will NOT pay for 1 Expendable items that can wear out from normal use including but not limited to filters belts light bulbs and bags 2 A service technician to instruct the user in correct product installation operation or maintenance 3 A service t...

Page 3: ...to heat or warm the room Doing so may result in carbon monoxidepoisoning NEVERcoveranyslots holesorpassagesinthe oven bottom or cover an entire rack with materials such as aluminumfoil Doingsoblocksairflowthroughtheovenandmay causecarbonmonoxidepoisoning Aluminumfoilliningsmaytrap heat causing a fire hazard Stepping leaningorsittingonthedoorsor drawers of this range can result in serious injuries ...

Page 4: ...ce burner pans or oven bottom except as suggested in this manual Improperinstallationoftheselinersmayresultinrisk of electric shock or fire Glazed Cooking Utensils Only certain types of glass glass ceramic ceramic earthenware orotherglazedutensils are suitable for cooktop service without breaking due to sudden change in temperatures Check the manufacturer s recommendations for cooktop use IMPORTAN...

Page 5: ...ve para prolongar la durabilidad de su nuevo producto El acuerdo incluye lo siguiente Piezas y mano de obra necesarias para contribuir a mantener el funcionamiento adecuado de los productos utilizados en condiciones normales de uso no sólo en caso de defectos de los productos Nuestra cobertura va mucho más allá que la garantía del producto No se aplican deducibles ni exclusiones por fallas del fun...

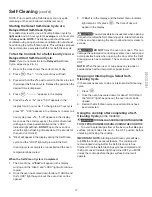
Page 6: ...f Cleaning Oven interior 14 Adjustable Oven Racks s 15 Large 1 piece Oven Door Handle 16 Full width Oven Door style vary with model 17 Storage Drawer some models or Warmer Drawer with Handle and Warmer Drawer rack some models 18 5 000 BTU Simmer Burner some models 19 9 500 BTU Center Burner some models 20 12 000 BTU Power Burner some models 21 14 200 BTU Power Burner some models 22 16 200 BTU Powe...

Page 7: ...ops Lift up front of rack and slide out To replace fit the rack onto the guides on the oven walls Tilt the front of the rack upward and slide the rack back into place Recommended Rack Positions for Broiling Baking Roasting Food Position Broiling hamburgers steaks See Broil Broiling meats chicken or fish See Broil Cookies cakes pies biscuits Muffins 2 or 3 Frozen pies angel food cake 1 or Roasting ...

Page 8: ...nitors will spark at the same time However only the burner you are turning on will ignite 5 Visually check that the burner has lit 6 Push the control knob in turn counterclockwise to the desired flame size The control knobs do not have to be set at a particular setting Use the guides adjust the flame as needed DO NOT cook with the surface control knob in the LITE position The electronic ignitor wi...

Page 9: ...so TIMER SET OFF pad is used to set the Continuous Bake feature Note The OVEN indicator light on the electronic display will turn ON and OFF when using the Bake feature and during preheat This is normal and indicates that the oven is cycling to maintain the selected baking temperature When the preheat indicator light turns OFF your oven is ready WARM HOLD PAD Used to set the Warm Hold feature RECI...

Page 10: ...en if the control is left on for more than 11 hours and 59 minutes The oven can be programmed to override this feature for continuous baking To set control for continuous baking 1 Press and hold down for 5 seconds until tone is heard hr will appear in display for continuous cooking The current time of day will return to the display 2 To cancel the Continuous Bake function press and hold for 5 seco...

Page 11: ... HR MIN Note During Timed Bake the preheat indicator light will not function Setting Oven Controls cont d To set Control for Oven Lockout feature 1 Press and hold for 3 seconds Loc will appear in display the Door Locked indicator light will flash and the motor driven door lock will begin to close automatically DO NOT open the oven door while the indicator light is flashing Allow about 15 seconds f...

Page 12: ...or oven light see Changing the Oven Light in the General Care Cleaning section To Set Add 1 Minute Feature The ADD 1 MINUTE pad is used to set additional minutes to the Minute Timer Each time the pad is pressed another minute is added to the Minute Timer if the Minute Timer is already active If the Minute Timer is not active and the pad is pressed the Minute Timer feature will become active and wi...

Page 13: ... within 10 15 seconds the request for Slow Cook will be clear 3 Press and release the to set the Slow Cook feature with a high setting HI will appear in the display This setting is best for cooking foods from a 4 to 5 hour time period The oven indicator light will turn ON below the time display indicating the oven has turned ON with the settings you choose 4 or press and release the to set the Slo...

Page 14: ...automatically The oven will remember that it is set for the Sabbath and the food may be safely removed from the oven while still in the Sabbath feature however the oven cannot be turned back on until after the Sabbath After the Sabbath observance turn OFF the Sabbath feature Press and hold both the and pads for at least 3 seconds SAb will disappear from the display and the oven may be used with al...

Page 15: ... of the rack and a casserole dish under See Fig 1 In the downward position to allow you to place light weight food items and empty dishware for example rolls or pastries and dinner plates See Fig 2 Setting Warmer Drawer Controls Fig 1 Fig 2 Fig 3 2 For best results preheat the drawer before adding food An empty drawer will preheat in approximately 15 minutes 3 Turn the thermostat control to OFF af...

Page 16: ...locking system Use caution when opening the door after the Self Cleaning cycle is completed The oven may still be VERY HOT Self Cleaning Oven A Self Cleaning oven cleans itself with high temperatures well above cooking temperatures which eliminate soils completely or reduces them to a fine powdered ash you can wipe away with a damp cloth Adhere to the following cleaning precautions DO NOT use oven...

Page 17: ...open the oven door while the light is flashing it takes about 15 seconds for the oven door to lock 6 CLn will appear in the display during the Self Clean cycle and the LOCK light will glow until the Self Cleaning cycle is complete or cancelled and the oven temperaturehascooled When the Self Clean Cycle is Completed 1 The time of day or End will appear in the display window and the Clean and LOCK l...

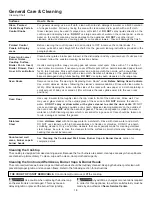
Page 18: ...r difficult spots with an ammonia soaked paper towel for 30 to 40 minutes Rinse with clean water and a damp cloth then scrub with a soap filled scouring pad Rinse wipe dry with a clean cloth Remove all cleaners or the porcelain may become damaged during future heating DO NOT use spray oven cleaners on the range top Glass Painted Plastic Body Parts Control Knobs Painted Control Panels Display areas...

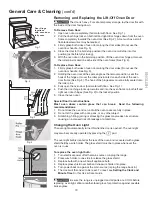
Page 19: ...nto the oven frame on both left and right oven door hinges See Fig 2 to the locked position 5 Close the oven door Special Door Care Instructions Most oven doors contain glass that can break Read the following recommendations 1 Do not close the oven door until all the oven racks are fully in place 2 Do not hit the glass with pots pans or any other object 3 Scratching hitting jarring or stressing th...

Page 20: ...up spill with an absorbent cloth Rinse with a clean damp cloth and wipe dry To Remove or Replace the Surface Burner Caps Surface Burner Heads Remove in the following order 1st surface burner grate 2nd surface burner cap 3rd surface burner head and 4th surface burner drip pan if equipped Reverse the procedure above to replace the surface burner cap surface burner head and surface burner drip pans i...

Page 21: ...logged With the burner OFF use a small gauge wire or needle to clean ports See Cleaning the Contoured Well Areas Burner Cap Burner Head Burner Drip Pans in the General Care Cleaning section for complete cleaning instructions 4 Range power cord is disconnected from outlet electric ignition models only Be sure cord is securely plugged into the outlet 5 Electrical power outage electric ignition model...

Page 22: ...oning 1 teaspoon salt seasoning 1 tablespoon parsley 6 medium potatoes sliced 1 medium onion sliced Roast Beef with Vegetables 3 to 3 lb sirloin tip roast 2 cups water 4 to 5 medium potatoes quartered 1 lb small carrots 2 large onion quartered 4 garlic cloves cup worstershire sauce salt pepper Center roast in large roasting pan Add water Spread potatoes carrots onions and garlic cloves evenly arou...

Page 23: ......

Reviews: