background image

FI

5

RST

ENGLISH

FIRST STEPS

This Owner’s Guide provides specific operating instructions
for your model. Use the freezer only as instructed in this
Owner’s Guide. 

Before starting the freezer, follow these

important first steps.

INSTALLATION

• Choose a place that is near a grounded electrical outlet.

Do Not

 use an extension cord or an adapter plug.

• For the most efficient operation, the freezer should

be located where surrounding temperatures will not drop
below 40° F (5° C) or exceed 110° F (43° C).

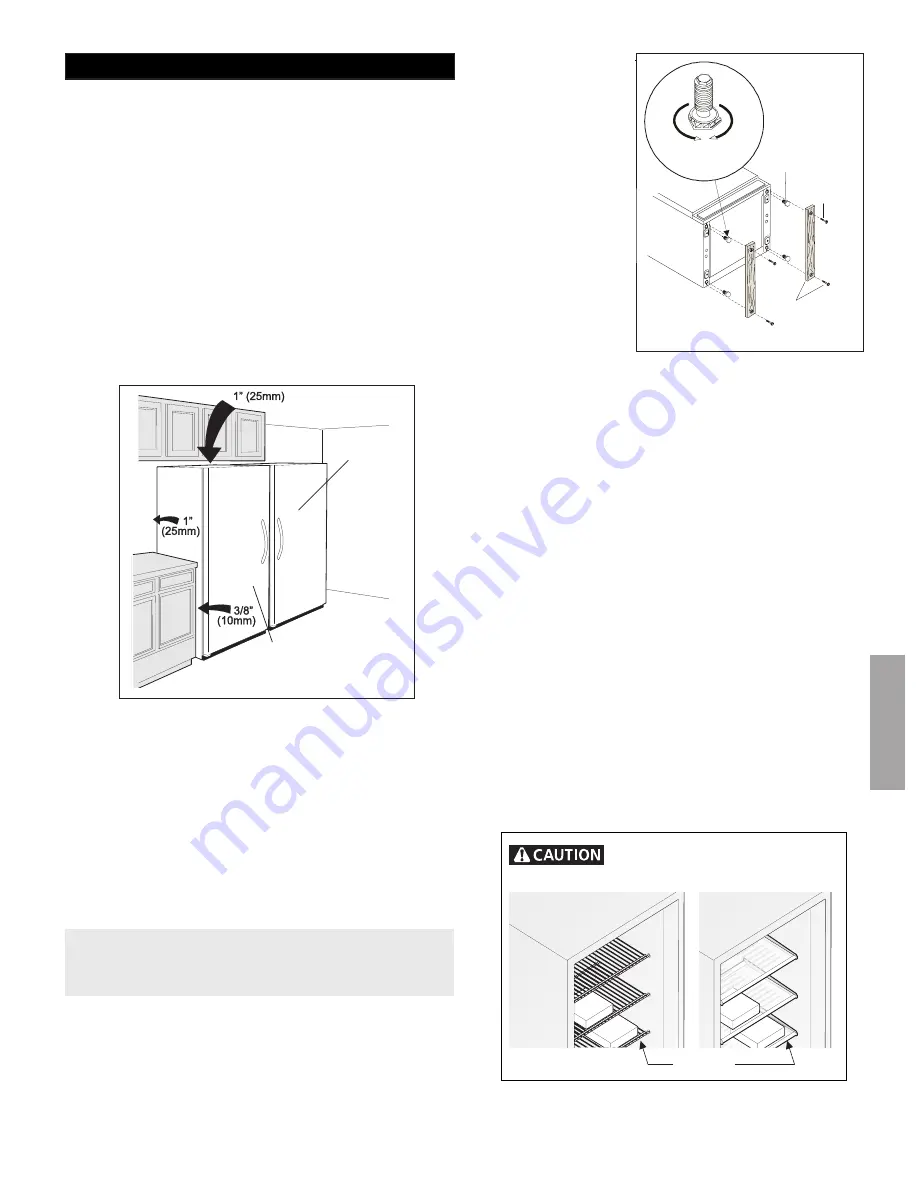
Allow the following clearances for ease of installation,
proper air circulation, and electrical connections:

Sides ----------------------- 3/8”
Back & Top ---------------- 1”

• Do Not block the toe grille on the lower front of your

freezer. Sufficient air circulation is essential for the proper
operation of your freezer.

NOTE: 

The exterior walls of the freezer may become quite

warm as the compressor works to transfer heat from the
inside.  Temperatures as much as 30° F warmer than room
temperature can be expected.  For this reason it is particu-
larly important in hotter climates to allow enough space for
air circulation around your refrigerator.

DOOR OPENING

LEVELING

The freezer must have all bottom corners resting firmly on a
solid floor. The floor must be strong enough to support a fully
loaded freezer. 

NOTE

:  It is 

Very Important

 for your freezer to

Installation

NOTE:

 If your freezer is placed with the door hinge

side against a wall, you may have to allow additional
space so the door can be opened wider.

Unpacking and Leveling

be level in order to
function properly.  If the
freezer is not leveled
during installation, the
door may be misaligned
and not close or seal
properly, causing
cooling, frost, or
moisture problems.

To Level Freezer:

After discarding crating
screws and wood base,
use a carpenter’s level
to level the freezer from
front-to-back. Adjust the
plastic leveling feet in
front, ½ bubble higher, so that the door closes easily when left
halfway open.

Leveling Instructions for all Refrigerator/Freezer Pair:

Remove two leg levelers provided in literature bag. While
unit is lying on its back wood skid removal, install both leg
levelers in rear of unit.

Level door of first unit using all four levelers and slide unit
into place. Recheck for levelness and adjust if necessary.

Measure distance from floor to bottom of door on first unit.
Adjust and level second unit so door height matches.

Leg Level Adjustments

One full turn of all four leg levelers will raise door 5/32”.

One full turn of both front leg levelers will raise door 3/16”
and tilt top of door back 7/16”.

One full turn of both rear leg levelers will lower door 1/32”
and tilt top of door forward 7/16”.

One full turn of both side leg levelers will raise door 3/16”
and tilt top of door 3/8”.

Slide second unit into place leaving a minimum gap of 3/16”
between units for door swing clearance.

This last step may require at least one extraction of the
second unit to properly align units in a “built-in” application.

Plastic
Leveling Feet 

Crating
Screw

Discard  The (4) Crating Screws
And (2) Wood Bases 

Turn
Left To
Raise

Turn
Right To
Lower

Unpacking and Leveling 

To allow door to close and seal properly,   DO

NOT let food packages extend past the front of shelves.

Shelf Front

Refrigerator

Freezer

Summary of Contents for 44713

Page 1: ...Guía para su uso y cuidado Congélateur Guide d utilisation et d entretien Sears Roebuck and Co Hoffman Estates IL 60179 U S A Sears Canada Inc Toronto Ontario Canada M5B 2B8 ENGLISH ESPAÑOL FRANÇAIS www sears com 297025000 0411 ª 44713 ...

Page 2: ...uct labels for flammability and other warnings CHILD SAFETY Destroy carton plastic bags and any exterior wrapping material immediately after the freezer is unpacked Children should never use these items to play Cartons covered with rugs bedspreads plastic sheets or stretch wrap may become airtight chambers and can quickly cause suffocation Remove all staples from the carton Staples can cause sever...

Page 3: ...ip the plug firmly and pull straight out from the receptacle NOTE Turning the temperature control to OFF turns off the compressor but does not disconnect the power to the light bulb or other electrical components FREEZER WARRANTY Avoid fire hazard or electric shock Do not use an extension cord or an adapter plug Do not remove any prong from the power cord Warranty Information KENMORE FREEZER WARRA...

Page 4: ...ment online Sears has over 12 000 professional repair specialists who have access to over 4 5 million quality parts and accessories That s the kind of professionalism you can count on to help prolong the life of your new purchase for years to come Purchase your Master Protection Agreement today Some limitations and exclusions apply For prices and additional information call 1 800 827 6655 Sears In...

Page 5: ...function properly If the freezer is not leveled during installation the door may be misaligned and not close or seal properly causing cooling frost or moisture problems To Level Freezer After discarding crating screws and wood base use a carpenter s level to level the freezer from front to back Adjust the plastic leveling feet in front bubble higher so that the door closes easily when left halfway...

Page 6: ...oading the freezer forces the compres sor to run longer Foods that freeze too slowly may spoil or lose quality Be sure to wrap foods properly and wipe containers dry before placing them in the freezer This cuts down on frost build up inside the freezer Freezer shelves should not be lined with aluminum foil wax paper or paper toweling Liners interfere with cold air circulation making the freezer le...

Page 7: ...prevent movement Also protect outside of freezer with a blanket or similar item POWER FAILURE FREEZER FAILURE NOTE Do not open freezer door unnecessarily if freezer is off for several hours If a power failure occurs frozen foods will stay frozen for at least 24 hours if the freezer is kept closed If the power failure continues pack seven or eight pounds of dry ice into the freezer every 24 hours L...

Page 8: ... To ensure proper function of your ice maker hook up water supply immediately or turn ice maker OFF by lifting the wire signal arm until it clicks and locks in the UP position Ice Container 1 or less Leveling Bracket IMPORTANT Check the leveling bracket on the ice maker to ensure the ice maker is level If the gap between the freezer wall and the ice maker is the same at top and bottom then the ice...

Page 9: ...ecautions Interior Door Liner Soap and water Baking soda and water Use 2 tablespoons of baking soda in 1 quart of warm water Be sure to wring excess water out of sponge or cloth before cleaning around controls light bulb or any electrical part Door Gaskets Soap and water Wipe gaskets with a clean soft cloth Drawers Bins Soap and water Do not wash any removable items bins drawers etc in dishwasher ...

Page 10: ...z i l i b a t s o t e r u t a r e p m e t e h t r o f e s u a c l l i w l a e s r o o d e h t n i s k a e L t e k s a g e g n a h c r o n a e l C d e r i s e d n i a t n i a m o t r e d r o n i r e g n o l n u r o t r e z e e r f e r u t a r e p m e t s i e r u t a r e p m e t r e z e e r F r o i r e t n I d l o c o o t o o t t e s s i l o r t n o C e r u t a r e p m e T w o l s r u o h l a r e v ...

Page 11: ...e t f o s s e l r o o d e h t n e p O R E Z E E R F E D I S T U O T S O R F E R U T S I O M R E T A W f o e d i s u o n o s m r o f e r u t s i o M r e z e e r f g n i t a e s e b t o n y a m r o o D r i a d l o c e h t g n i s u a c y l r e p o r p t e e m o t r e z e e r f e h t e d i s n i m o r f e d i s t u o m o r f r i a t s i o m m r a w e e S S M E L B O R P R O O D n o i t c e S R E Z E ...

Page 12: ...eligrosos para los niños porque son fáciles de tragar y pueden causarles asfixia Saque la puerta de cualquier artefacto que no esté en uso aún si está siendo descartado INDICE DE CONTENIDO INSTRUCCIONES IMPORTANTES DE SEGURIDAD Proseso para disponer de su refrigerador o congelador Riesgos de entrapamiento de niños Niños atrapados y sofocados no son un problema del pasado Refrigeradores o congelado...

Page 13: ...l enchufe firmemente y tire derecho hacia afuera del tomacorriente NOTA Si gira el control a la posición OFF el compresor se apaga pero no se desconecta la energía a los otros componentes eléctricos GARANTÍA DEL CONGELADOR Evite los riesgos de incendios o choques eléctricos No use un cordón de extensión o un adaptador para el tomacorriente No saque ninguna espiga del enchufe del cordón eléctrico I...

Page 14: ...amar una cita de servicio por computadora Sears cuenta con más de 12 000 especialistas profesionales de reparación con acceso a más de 4 5 millones de piezas y accesorios de calidad Esa es la clase de profesionalismo con la que puede contar para extender la vida útil de su nueva adquisición por muchos años Adquiera su Acuerdo Maestro de Protección hoy Algunas limitaciones y exclusiones podrían apl...

Page 15: ...nil los niveladores de plástico delanteros 1 2 burbuja más altos para que la puerta cierre fácilmente cuando se deje abierta a medias Instalación Desempaque y nivelación Gire a la derecha para bajar Gire a la izquierda para subir Tornillos de nivelación de plástico Tornillo de empaque Deseche los 4 tornillos de empaque y las 2 bases de madera Desempaque y nivelación Refrigerador Congelador Instruc...

Page 16: ...masiado el congelador el compresor debe funcionar por períodos más largos Los alimentos que se congelan demasiado lentamente pueden perder calidad o echarse a perder Asegúrese de que los alimentos están envueltos debidamente y seque los envases antes de colocarlos en el congelador Esto reduce la acumulación de escarcha dentro del congelador Las parrillas del congelador no deben ser forradas con pa...

Page 17: ...ne la puerta del congelador cerrada Si la falla de corriente continúa coloque siete u ocho libras de hielo seco dentro del congelador cada 24 horas Busque en las Páginas Amarillas bajo Hielo Seco Productos Lácteos o Fabricantes de Hielo para encontrar los proveedores locales de hielo seco Siempre use guantes y tenga cuidado cuando manipule el hielo seco Si el congelador ha dejado de funcionar vea ...

Page 18: ...necte el suministro de agua inmediatamente o APAGUE la máquina de hacer hielo levantando el brazo de alambre hasta que se enganche en la posición ELEVADA IMPORTANTE Verifique el soporte de nivelación en la máquina de hacer hielo para asegurarse de que la máquina esté nivelada Si el espacio entre la pared del congelador y la máquina de hacer hielo es el mismo en la parte superior y en la parte infe...

Page 19: ...s Agua y jabón Limpiavidrios no abrasivo No use limpiadores comerciales domésticos amoníaco ni alcohol para limpiar las manijas Use un paño suave para limpiar las manijas lisas No limpie las puertas lisas con un paño seco Exterior y manijas modelos de acero inoxidable solamente Agua y jabón Amoníaco Limpiadores de acero inoxidable Limpie la parte delantera y las manijas de acero inoxidable con un ...

Page 20: ... d a l e g n o c l E e t n e m a t e l p m o c s á m e j a b a r t r o d a l e g n o c l e e u q á r a s u a c o i b i t o t n e m i l a l E a d a e s e d a r u t a r e p m e t a l a z n a c l a e s e u q a t s a h a l e u q z e v a d a c r o d a l e g n o c l a a r t n e e t n e i l a c e r i a l E a i c n e u c e r f s o n e m n a c a t r e u p a l a r b A e r b a e s a t r e u p a m e l b o r P...

Page 21: ...b a e t n e m a r e g i l r a t s e a t r e i b a a d i n e t n a m s e a t r e u p a L o g r a l o d a i s a m e d o d o í r e p n u r o p a d a i s a m e d n o c a t r e i b a s e o a i c n e c e r f l a m r o n s e o t s E r e V A T R E U P A L N O C S A M E L B O R P n ó i c c e s a l n e a m e l b o r P a t r e u p a l e u q z e v a d a c r o d a l e g n o c l a e t n e i l a c e r i a a r t ...

Page 22: ...èle Ou N de série Date de l achat LISEZ TOUTES CES INSTRUCTIONS AVANT D UTILISER LE CONGÉLATEUR POUR VOTRE SÉCURITÉ N entreposez pas et n utilisez pas d essence ou autres vapeurs et liquides inflammables à proximité de cet appareil ou d un autre Lisez les étiquettes donnant les caractéristiques d inflammabilité et autres avertissements SÉCURITÉ DES ENFANTS Détruisez le cartonnage les sacs plastiqu...

Page 23: ... sortez la de la prise en tirant droit vers vous Remarque En mettant la commande sur OFF ARRÊT vous ne coupez pas l alimentation de l ampoule ni des CONGÉLATEUR GARANTIE Éviter tout risque de feu ou de choc électrique Ne pas utiliser de cordon prolongateur ni fiche d adaptation N enlever aucune des broches du cordon Informations concernant la garantie GARANTIE DU CONGÉLATEUR KENMORE GARANTIE COMPL...

Page 24: ...en ligne Sears dispose d une équipe de 12 000 professionnels spécialistes des réparations qui ont accès à plus de 4 5 millions d accessoires et de pièces de qualité C est le genre de professionnalisme sur lequel vous pouvez compter et qui vous aidera à maximiser la longévité de votre nouvel appareil pendant des années Souscrivez sans attendre votre contrat de protection Certaines limitations et ex...

Page 25: ...vers l arrière Ajustez les pieds de mise à niveau avant plus haut d une demi patte de manière à ce que la porte se referme facilement si elle est laissée à moitié ouverte Instructions de mise à niveau pour l ensemble tout réfrigérateur tout congélateur Enlevez les deux pieds de mise à niveau fournis dans la pochette de documentation Pendant que l appareil est couché sur le dos pour enlever la pale...

Page 26: ...s longtemps Les aliments qui congélent trop doucement risquent de perdre leur qualité ou de se gâter Enveloppez correctement les aliments et essuyez les contenants avant de les ranger dans le congélateur Ceci diminue la condensation à l intérieur du congélateur Les clayettes ne devraient pas être recouvertes de papier aluminium papier ciré ou essuie tout Ces revêtements entravent la circulation de...

Page 27: ... un rangement supplémentaire Pouavoir accès à un article inclinez le dessus de l étagère panier vers le bas CLAYETTES INTÉRIEURES RÉGLABLES Les clayettes intérieures à multi positions peuvent être déplacées à toute position selon la dimension des paquets Les entretoises d expédition qui stabilisent les clayettes lors de l expédition peuvent être enlevées et jetées CARACTÉRISTIQUES DU CONGÉLATEUR P...

Page 28: ...T PANNE DU CONGÉLATEUR En cas de panne de courant les aliments resteront congelés au moins 24 heures si le congélateur reste fermé Si la panne continue placez sept ou huit livres de glace sèche dans le congélateur toutes les 24 heures Cherchez dans les pages jaunes les fournisseurs sous Glace sèche Laiteries ou Fabricants de crème glacée Portez toujours des gants et soyez prudent lors de la manipu...

Page 29: ...chine à glaçons raccordez l alimentation en eau immédiatement ou ÉTEIGNEZ la machine à glaçons en soulevant la manette jusqu à ce qu elle s enclenche dans la position HAUTE IMPORTANT Vérifiez le support de mise à niveau de la machine à glaçons pour vous assurer que cette dernière est à niveau La machine à glaçons est à niveau lorsque l espace entre le mur du congélateur et le haut de la machine à ...

Page 30: ...e Ammoniaque Nettoyant pour acier inoxydable Nettoyez l avant et les poignées en acier inoxydable avec un chiffon à vaisselle imbibé d eau savonneuse Rincez avec un chiffon doux imbibé d eau propre Nettoyez les taches rebelles avec un essuie tout imbibé d ammoniaque et rincez Utilisez un nettoyant pour acier inoxydable non abrasif Ces nettoyants peuvent être achetés dans la plupart des magasins de...

Page 31: ... e L e r u t a r é p m e t a l t n i e t t a t i a l i u q e c à u q s u j e c t e r u e t a l é g n o c e é r i s é d t r e v u o t s e l i u q s i o f e u q a h c à e r t n e y d u a h c r i a l e D t n e v u o s s n i o m e l z e r v u O z e y o V E T R O P E D S E M È L B O R P d u a h c s u l p e g a l g é r n u r u s e d n a m m o c a l z e n r u o T e s i l i b a t s e s e r u t a r é p m e...

Page 32: ... o c e L t r e v u o t r e v u o é t s e r t s e r u e t a l é g n o c e L t n e v u o s p o r t u o s p m e t g n o l p o r t l a m r o n t s e i c e C z e y o V E T R O P E D S E M È L B O R P t n e v u o s s n i o m e l z e r v u O R U E T A L É G N O C U D R U E I R É T X E I L À E R V I G É T I D I M U H U A E à e m r o f e s n o i t a s n e d n o c a l e D r u e t a l é g n o c u d r u e i r...

Page 33: ......

Page 34: ...essional installation of home appliances and items like garage door openers and water heaters 1 800 4 MY HOME 1 800 469 4663 Call anytime day or night U S A and Canada www sears com www sears ca Our Home For repair of carry in items like vacuums lawn equipment and electronics call or go on line for the location of your nearest Sears Parts Repair Center 1 800 488 1222 Call anytime day or night U S ...

Reviews: