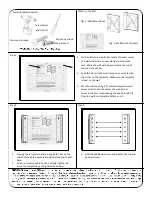
Tools/Hardware needed:
Screw Driver
and/or Drill
You may also need:
Mounting screws
and anchors
Qty 1: Wall Mount Rack
What’s in the box?
Step 1:
Step 2:
1. With a electronic stud finder, locate the exact center
of a wall stud where you would like to mount the
rack. Mark the wall with a pencil where the top of
the wall rack will be.
2. Tape the stencil to the wall lining up your mark with
the arrow on the template. Make sure the template
is level on the wall.
3. We recommend using 2.5” common drywall screws
driven directly into the center of a wood stud.
Screw in the first screw leaving the head around 1/2
from the wall into template holes 1 and 2.
1. Leaving the template in place, hang both sides on the
screws through the keyhole provided at the top of each
base.
2. Screw in screws 3 and 4 but do not fully tighten. Re-
move the template by pulling from the bottom.
Step 3:
1. Add the additional screws and tighten the top and
bottom screws.
Qty 1: Wall Mount Template
Summary of Contents for 8U-1915-3-001-08
Page 1: ......


