6
User Instructions
Bevel Cutting - Setting the Blade Depth
GB
TIP
Change your blade regularly. The cost of
half a blade (two cutting tips per blade)
compared to matboard is negligible.
Firstly, remove the blade left in the holder from test
cutting slacken the clamping screw and slide the blade
out from the back of the Bevel Blade Holder.
ADJUST THE BLADE DEPTH
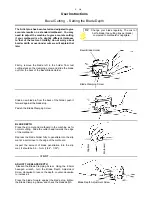
Slacken the Blade Clamping Screw. Using the 2.5mm
hexagon wrench, turn the Blade Depth Adjustment
Screw clockwise to reduce the depth, counter-clockwise
to increase it.
Press the blade forward against the blade stop, tighten
the Blade Clamping Screw and check the blade depth.
The Artist plus has been tested and adjusted to give
accurate results on a standard matboard. You may
need to adjust the machine to give accurate cutting
if your matboard is of a slightly different thickness
to that of the test mat. Initially, do not worry about
border width or over/under cuts we will explain that
later.
Blade Clamping Screw
Bevel Blade Holder
Slide a new blade in from the back of the holder, push it
forward against the blade stop.
Fasten the Blade Clamping Screw.
BLADE DEPTH
Place the slip mat and matboard in the machine as for
normal cutting. Slide the cutter head towards the edge
of the matboard.
Depress the blade holder fully to penetrate into the slip
mat at a point close to the edge of the matboard.
Inspect the amount of blade penetration into the slip
mat, It should be 0.5 - 1mm (1/64" - 1/32").
Matboard
Slip Mat
IF NOT
Blade Depth Adjustment Screw


