background image

14 


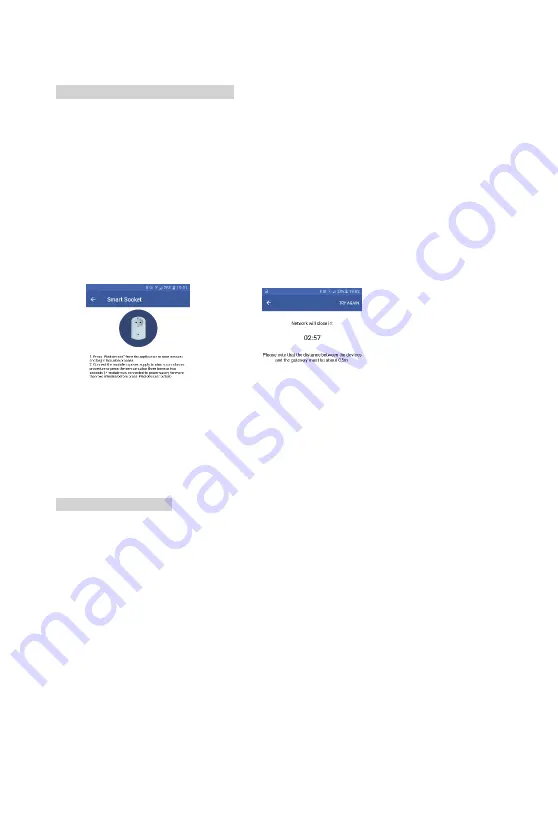
Illustration 18: Adding device 

Illustration 19: Inclusion time 

3. 

Update device name and location 

5.1.1.  Add a device to the gateway 


Please follow next steps in order to add a new device to the gateway: 

1. 

Tap the “Help” button in the upper right corner 

2. 

Select the device which you want to add to the gateway and read instructions for 
adding the device (Illustration 18) 

3. 

After having read the instructions, tap the “Find devices” button in the upper left 
corner. This action will open a new window for integrating the device. The 
remaining time for device integration  will be displayed (see Illustration 19) 

4. 

Add the device based on manufacturer’s instructions, since the process may vary 
from device to device 

5. 

Once the device is added to network, it will be displayed among the list of devices 


NOTE: 

 in order to add a new Z-wave device to the network, make sure that the device is 

removed from the previous network first (

see manufacturer’s instructions). 


5.1.2 Remove a device 


Please follow the next steps in order to remove a device: 
 

1. 

Tap on the device name and hold it until the “Delete” option appears (see 
Illustration 20) 

2. 

The type of device (Z-wave or ZigBee) will determine which of the following 
processes should be used: 
a. 

In case of ZigBee device, you just need to confirm deletion 

b. 

In case of Z-Wave device, the network must be opened for exclusion 
process. Once the network is opened the device needs to be exclude 
manually according to manufacturer’s instructions (see Illustration 21) 

Summary of Contents for KP-GW-01

Page 1: ...Ordering Code KP GW 01...

Page 2: ......

Page 3: ...ion 12 4 4 HOME SETUP 12 5 DEVICE MANAGEMENT 13 5 1 MANAGEDEVICESBYUSINGCLIENTAPPLICATION 13 5 1 1 Addadevicetothegateway 14 5 1 2 Removeadevice 14 5 1 3 Updatedevicenameandlocation 15 5 2 MANAGEDEVIC...

Page 4: ...s 4 Do not use device in gas filled environments 5 Do not place the device near heat sources 6 Do not expose the device to direct sunlight 7 Do not place cables and or power supplies under heavy objec...

Page 5: ...communicates with connected devices and enables users to monitor and control their home FRONT Front button LED indicator Power supply socket Back button Ethernet port KEEMPLE automation gateway consis...

Page 6: ...Home Automation Gateway to the AC power supply 2 Connect the Gateway to the home network router by using Ethernet Illustration 2 or WiFi Connection Illustration 3 In case you have connected your gatew...

Page 7: ...it for connection to home network router over WiFi gateway s SSID or network name is located on the label on the backside of the device 2 Connect your client device PC tablet or smart phone to the WiF...

Page 8: ...in home or remotely it is smart enough to connect to the gateway directly if possible to ensure the best user experience Keemple automation gateway takes central place in home automation system Combin...

Page 9: ...ions Keemple client app is available for download at the Apple and Google application stores 4 2 CREATE USER ACCOUNT Account registration can be done in two ways 1 By using client application 2 By usi...

Page 10: ...be displayed 8 Confirm the activation link sent in the email message 4 2 2 Create user account by using web application Please follow next steps in order to create new account 1 Visit https cloud your...

Page 11: ...Home Setup option from the main menu Illustration 13 4 On the Home Setup screen tap the Add gateway button in the upper right corner Illustration 14 5 Enter required gateway information a Security ID...

Page 12: ...r a unique identifier for every gateway device It consists of 12 characters e g 7CDD9078CC00 and can be found on bottom of the device c Name choose a name for your gateway 4 Tap the SAVE button to add...

Page 13: ...which you want to add the room and tap the button in the upper right corner to enter a room name b To delete the room select the floor at which the room is located tap and hold the room name until th...

Page 14: ...instructions since the process may vary from device to device 5 Once the device is added to network it will be displayed among the list of devices NOTE in order to add a new Z wave device to the netwo...

Page 15: ...device to the gateway 1 Short press gateway s main button 2 times to open network for device inclusion While network is open the LED will blink blue once per second 2 Start adding procedure on the dev...

Page 16: ...next steps in order to control or monitor devices by type 1 Select Device by type option in the application s main menu 2 To filter devices by type choose a desired type from the menu on the left side...

Page 17: ...on to the user s email address or push notification to the user s smartphone By using Keemple mobile application the user is able to 1 Create a new scene 2 Run the scene 3 Edit the scene 4 Delete the...

Page 18: ...ialog choose the time when the scene should be active Illustration 27 b Choose the schedule for the scene In case of one time event set the desired date In case the event should repeat choose the Week...

Page 19: ...on in the upper right corner Illustration 30 a Control device by location b Control device by type c Send email notification d Send push notification e Set the status 12 In addition to definition of a...

Page 20: ...the scene you want to run and tap the button 3 From the drop down menu select option Run 7 3 EDIT THE SCENE Please follow next steps in order to edit the scene 1 Select Scenes option in the applicatio...

Page 21: ...of network connection settings is followed by reset of the gateway device If Ethernet cable is connected to the gateway during boot process gateway will automatically connect to the home network rout...

Page 22: ...No network Blink blue 5x per second System error Light purple AP mode Blink blue 1x per second 12 TECHNICAL DATA Communication Protocols ZigBee Z Wave plus IP WiFi and Ethernet Range Up to 15m depend...

Page 23: ...you require any technical support and not be able to get it at your specialist dealer s please contact our technical support team at mail keemple com tel 357 25 732220 2 Agias Fylaxeos and Zinonos Ros...

Reviews: