4 | Connection of the control
KEB Automation KG
16
ma_dr_f6-cu-a-inst-20118593_en
4 Connection of the control
Observe the following instructions to avoid malfunctions!
• Install control cables and power cables separately (approx. 10…20 cm distance);
Lay crossings in a right angle.
• In case of inductive load on the relay outputs a protective wiring must be
provided (e.g. free-wheeling diode).
• Electro magnetic interferences can be prevented by the following measures:
– Always use twisted and shielded cables for analog control lines. Connect
the shield at one side at the signal source.
– Twist digital control cables. Up from 3 m a shield may be required. In this
case connect the shield at both ends.
– Connect the shield of the brake and temperature monitoring together with
the motor shield. Leave the inner shields longer in order to avoid interfer-
ence coupling or decoupling (the latter during temperature measurement)
as far as possible.
The terminals of the control terminal block, enocder inputs and communication in-
terface are securely isolated in accordance with
4.1 Assembly of wires
ACHTUNG
Loose and slack cable connections!
Malfunctions due to loose contacts.
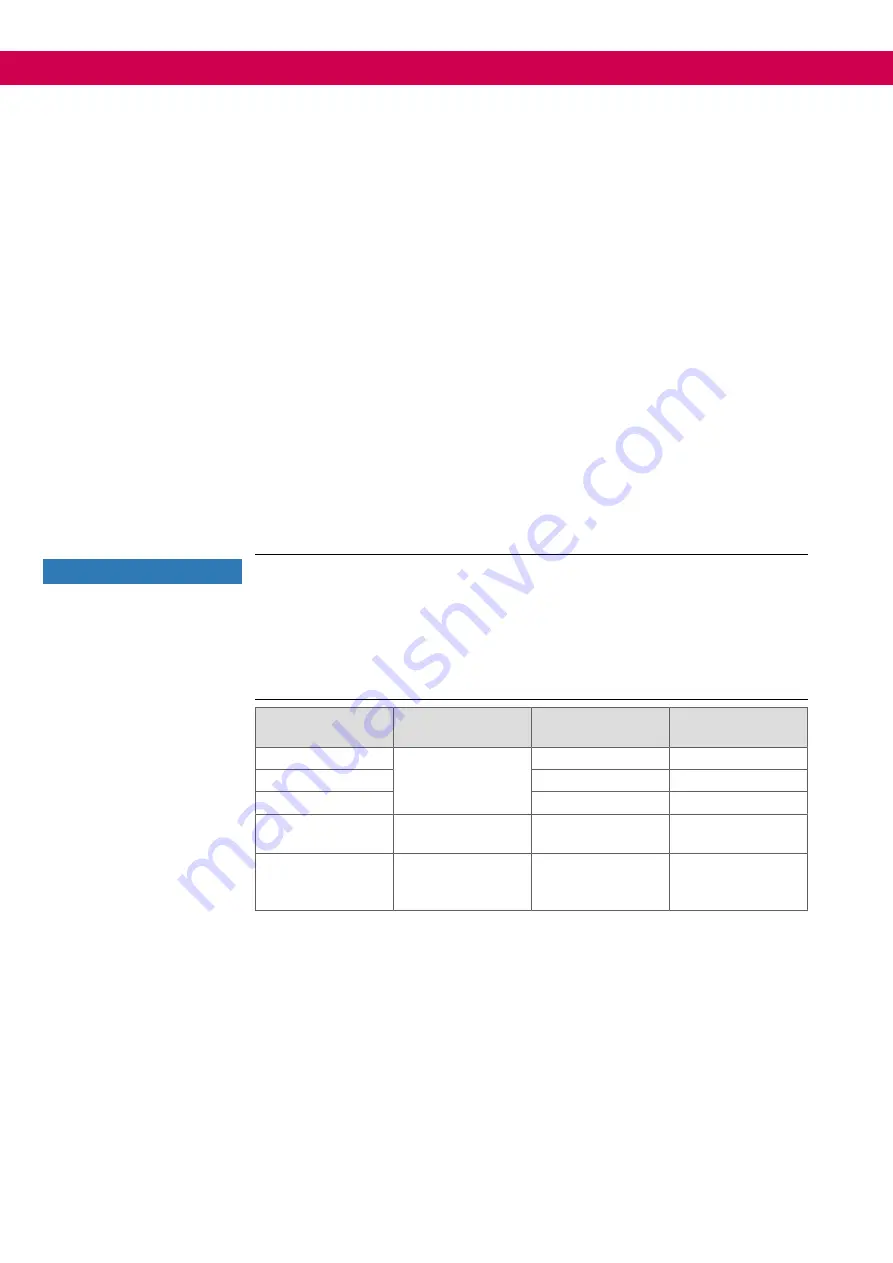
a) Observe metal sleeve length and stripping length according to table.
b) Use a suitable pressing tool.
c) Make sure that all wires are inserted into the wire-end sleeve.
d) After inserting the cable into the terminal, check that it is firmly seated.
Cross-section
Wire-end ferrule
Metal sleeve
length
Stripping length
0.5 mm²
with plastic collars
10 mm
12 mm
0.75 mm²
12 mm
14 mm
1.0 mm²
12 mm
15 mm
1.5 mm²
without plastic col-
lars
10 mm
10 mm
0.2…1.5 mm²
ein- oder
feindrähtig
without wire-end
ferrule
-
10…12 mm
Tab. 8:
Wire-end ferrules and stripping length


