background image

4

App Installation / 

Ԋ၆ᔖҢแԒ

For Android user (Android 6 and above) / 
Android 

ҢИĩ

Android 6

ġЅоΰĪ

• Open Play Store. / 

҈໠ġ

Play Store

Ȅ

• Search for 

“KDK Ceiling Fan”

 App. / 

ཪષġ

“KDK Ceiling 

Fan” 

ᔖҢแԒ


• Download and install. / 

ήၷٮԊ၆Ȅ

For iOS user (iOS 12 and above) / 
iOS

ġҢИĩ

iOS 12

ġЅоΰĪ

• Open App Store. / 

҈໠ġ

App Store

Ȅ

• Search for 

“KDK Ceiling Fan”

 App. / 

ཪષġ

“KDK Ceiling 

Fan” 

ᔖҢแԒ


• Download and install. / 

ήၷٮԊ၆Ȅ


Note:

• The App user interface image may change for version upgrade 

without prior notice.

• There is no charge for using this App. However, other charges 

may be incurred for network connection.

App Setting / 

ᔖҢแԒ೩ည

Before setting

• Confi rm the wireless router is connected to the network 

correctly.

• Confi rm the Wi-Fi of the smart devices is activated.
• Smart devices and ceiling fan should be connected to the same 

wireless router.

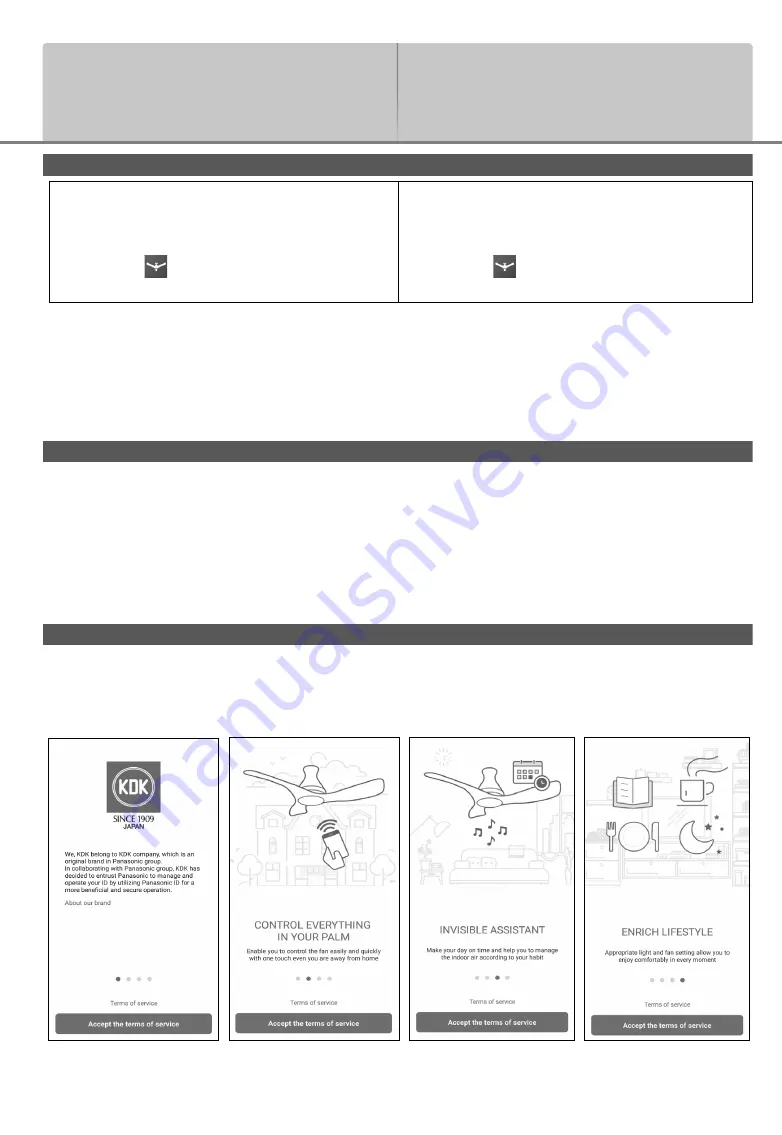
Get started on “KDK Ceiling Fan” App / 

໠ۖٺҢġ

“KDK Ceiling Fan” 

ᔖҢแԒ

Before using the App, ensure to read the Terms of service. To 

continue, press “Accept the terms of service” button.

How to prepare for 
setup

ԃդྥര೩ည

ġ

രݧ

:

ġ

˙

ᔖҢแԒٺҢޱϭ७ห७џ૖ོӰގҏЀ઻Մ׽ᡐȂ৽ϚѪ՗

೽ޣȄ

ġ

˙

ҏᔖҢแԒϚԝາȄծ࢐Ȃ೿௥ᆩၯџ૖ོ౰ҡڏтາҢȄ

೩ညࠉ

ġ

˙

ጂᇯฒጣၯҥᏢϐғጂ೿௥ᆩၯȄ

ġ

˙

ጂᇯසኋ೩രϐ໠ంġ

Wi-Fi

Ȅ

ġ

˙

සኋ೩രᇄӤਉᔖ೿௥ڗӣΙএฒጣၯҥᏢΰȄ

ٺҢᔖҢแԒϞࠉȂ፜୛҆Ꭷ᠞݈୛న෡Ȅ፜ࡸġ

“Accept the 

terms of service” 

ᗤ᝷៉Ȅ

Summary of Contents for E48HP

Page 1: ...e read the instructions carefully and save this manual for future use System Overview 2 3 How to prepare for setup 4 5 How to connect product to home network 5 10 How to register product to smart devi...

Page 2: ...d subscribe separately Download from App Store Play Store App Store Play Store KDK Ceiling Fan Network Adaptor Wi Fi Module built in Model DNSK P11 Input Voltage DC 5V From Ceiling Fan Unit Current Co...

Page 3: ...NIGHT LIGHT Button Press to select Night Light setting 7 WARM COLOR Button Press to select Light color Warm 8 WHITE COLOR Button Press to select Light color White 9 LIGHT Button Increase light bright...

Page 4: ...ade without prior notice There is no charge for using this App However other charges may be incurred for network connection App Setting Before setting Con rm the wireless router is connected to the ne...

Page 5: ...ON the ceiling fan from the wall switch 3 If the fan is rotating after the wall switch is on turn OFF the ceiling fan by pressing the OFF ON button on remote control 4 Before connecting smart devices...

Page 6: ...wise press No to repeat from beginning step Two methods to connect product to network Method 1 WPS Wi Fi Protected Setup Press WPS button on Wi Fi router until the connection established Please refer...

Page 7: ...ged pattern Press Yes if the buzzer is beeping Otherwise press No and refer to note 2 If the buzzer have 5 seconds long beep sound press Yes Otherwise press No 3 Press Next 4 Refer Product Registratio...

Page 8: ...ilable connect the ceiling fan through manual setting 1 Ensure that the smart devices are connected to the desired network Then press Next Note Only 2 4 GHz can be used 2 Enable the location access Fo...

Page 9: ...e Control Make sure the beep sound is change pattern Then press Yes Otherwise press No 4 For certain smart devices which prompt for Wi Fi connection press Join or select Ceiling Fan wirelessAP from th...

Page 10: ...id user can go to step 9 9 Press Next Refer Product Registration step on page 11 to continue 6 SSID Wi Fi Connect 7 5 Yes No 8 iOS Wi Fi Join Android 9 9 Next 11 Note SSID Wi Fi network name Send Wi F...

Page 11: ...essing Registration 2 Press Yes if the buzzer is beeping Otherwise press No to follow the App to set ceiling fan to enter Wi Fi setting mode 3 Press the Remote Control button The ceiling fan should ch...

Page 12: ...hen press Register 6 Once the registration is complete the registered product appears under Product registered 7 Press Back to return to Main screen You can control the ceiling fan through the App now...

Page 13: ...odel Number Serial number c Product and Lighting preset can be renamed Group selection can be changed also d Registered product could be removed from the App by pressing Delete product button If the p...

Page 14: ...together The group name can be changed under Edit group 5 Help For any inquiries on Help page user can access to Frequently Asked Question Instruction manual Terms of service Copyright information an...

Page 15: ...Warning message about the ceiling fan Group section Group registered in the account All Control Control all products in the group simultaneously Detail Setting Detail setting for fan and light Fan spe...

Page 16: ...n speed selection Yuragi function On O Yuragi Fan setting Light setting Light On O Scene setting Night Light mode Light adjustment Color temperature adjustment Not applicable for Night Light Light Set...

Page 17: ...g can choose to set Group control with fan only or light only or both 3 Press the Operation button to enable Group control mode 4 Set the setting page 16 based on preferences 5 Press Apply Scene Setti...

Page 18: ...ding to preference 3 Press the scene setting 4 Press Overwrite preset 5 Select one of the scene setting to be replaced To edit preset name of scene 1 Press light setting 2 Press scene setting 3 Select...

Page 19: ...an to turn ON 3 Select the default melody for the ceiling fan when it is turned ON 4 Press Done To set the OFF timer Note OFF Timer can only be activated when ceiling fan is ON 1 Press timer function...

Page 20: ...When the SLEEP MODE is enabled the fan speed and timer will gradually reduce until the fan is turned o The operation pattern of SLEEP MODE Fan reduces two speeds after every two hours minimum speed 1...

Page 21: ...lready has schedule press at the top right of the screen 3 Select the day and time to operate the schedule 4 Choose to set the schedule with fan only or light only or both 5 Press button of operation...

Page 22: ...or Light with operation Then press Done 7 Press Save to con rm 8 Press Yes to complete the settings Edit Schedule Setting 1 Press the schedule button 2 Press Edit Select which schedule to edit 3 Set...

Page 23: ...nd press Edit 2 Choose the desired schedule to copy 3 Press Copy at the bottom of the screen 4 Choose the day you want to paste the copied setting then press Copy at the top right of the screen 5 Pres...

Page 24: ...dit 2 Press Copy all 3 Choose the product that you want to copy 4 Choose the product that you want to paste the copied setting then press Back 5 Press Copy 6 Press Done 7 Con rm copy destination fan n...

Page 25: ...delete 4 Press Delete button 5 Press Done 6 Press Save 7 Press Yes 1 2 Edit 3 4 Delete 5 Done 6 Save 7 Yes Note Schedule settings are stored in the server If uninstall the App from smart devices the...

Page 26: ...done below steps the ceiling fan will be deleted from all App accounts that have been registered and the schedule settings will be cleared 1 If the fan is rotating turn o using remote control 2 Long p...

Page 27: ...r Your shall mean an individual or Legal Entity exercising permissions granted by this License Source form shall mean the preferred form for making modi cations including but not limited to software s...

Page 28: ...ght notice this list of conditions and the following disclaimer in the documentation and or other materials provided with the distribution 3 Neither the name s of the above listed copyright holder s n...

Page 29: ...d under the terms of Sections 1 and 2 above on a medium customarily used for software interchange or c Accompany it with the information you received as to the o er to distribute corresponding source...

Page 30: ...the copyright line and a pointer to where the full notice is found one line to give the program s name and a brief idea of what it does Copyright C year name of author This program is free software yo...

Page 31: ...31 Memo...

Page 32: ...E48HP8002AM M0722 1082 Printed in Malaysia KDK Company Division of PES Head Of ce 4017 Takaki cho Kasugai Aichi Japan KDK Company Division of PES 2022...

Reviews: