KD One NAVIEN UHA-742SG/M User Manual Download Page 11

11

OPERATION

■ 

When using the Monitoring function 

■ 

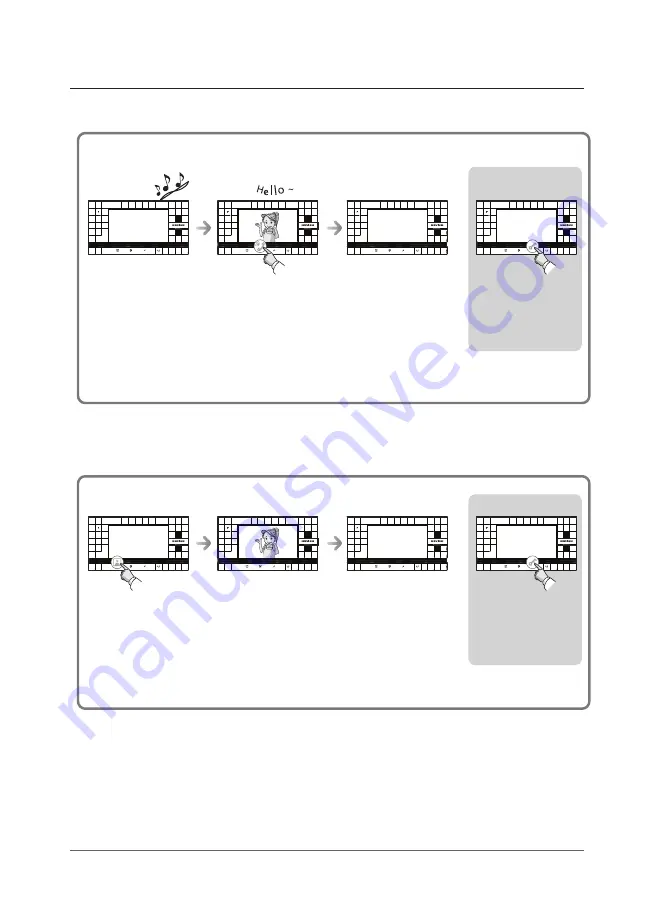
When a visitor pushes a Call Button 

When a visitor pushes the Call Button on the door-phone at the front door, the call is 

transferred to the Videophone  

Call signal is ringing on 

the videophone, while 

“Talk” button is flickering,

and the image of the visit

appears on the screen.

When Talk button is 

pressed, the conversation 

with the visitors starts,

and “Talk” button LED 

illuminates. 

If you press the “Talk”

button while talking 

with the visitor or the

time limit of 1 minute 

is reached, the screen 

goes blank and the 

conversation ends.

If you press the 

“Door Open” button, 

the relevant door 

opens and the 

conversation ends.

‘DOOR#1’ or ‘DOOR#2’  appears at the top of the screen 

‘DOOR#1’ or ‘DOOR#2’  appears at the top of the screen 

If there’s no input from the door phone camera,  the “No Signal” message appears, 

which means there is no video signal.

If you press the 

“Monitoring” button, 

pictures captured by the 

door-phone at the front 

door will appear on the 

screen.

If two door-phones are 

installed, door-phone #2 

can also be monitored by

pressing the “Monitornig”

button once more. 

If you press the “Talk”

button while using the 

monitoring function, 

talking activated through 

the door-phone 

that is currently installed.

If you press the 

“Door Open” button 

during monitoring, 

the relevant door opens 

and monitoring ends.

Summary of Contents for NAVIEN UHA-742SG/M

Page 1: ...M Please carefully read this User s Guide in particular precautions for safety before using a product and follow instructions to use a product exactly The company is not responsible for any safety acc...

Page 2: ......

Page 3: ...Warning and important safeguards Components Installation Product specifications Operation Manager mode Manager mode Video memory equipped model Wiring diagram Warranty 4 8 9 10 11 13 17 20 21 Contents...

Page 4: ...in the right and speci cation are subject to change without notice for quality improvement This symbol is intended to alert the user to the presence of uninsulated dangerous voltage within the produc...

Page 5: ...rence to radio communication However there is no guarantee that interference will not occur in a particular installation If this equipment does cause harmful interference to radio or television recept...

Page 6: ...cold humid or excessive dust Use only with a mounting accessory recommended by the manufacturer or sold with the unit Installing this unit should follow instructions of manufacturer and qualified ser...

Page 7: ...y or damage to the system 13 Object and Liquids Never push objects of any kind into this unit through the openings Never spill liquid of any kind on the unit 14 Servicing Do not attempt to service thi...

Page 8: ...Button Door Open Button Intercom Button Speaker Up Button Down Button Set Button Connection terminal for door camera 1 Connection terminal for door camera 2 Connection terminal for Intercom input Conn...

Page 9: ...1 After determining the mounting locations for both the outside camera and inside monitor 2 At the selected monitor mounting location 1 450mm is suggested from the bottom Caution Install the monitor a...

Page 10: ...Dimensions Mounting Specification AC 100 240 50 60Hz Doorphone 4 wires in polarity Intercom 8 wires in polarity 2 Doorphones Additional 3 intercoms DOOR TIV 0 5 28M TIV 0 65 50M TIV 0 8 70M Up to the...

Page 11: ...ion ends If you press the Door Open button the relevant door opens and the conversation ends DOOR 1 or DOOR 2 appears at the top of the screen DOOR 1 or DOOR 2 appears at the top of the screen If ther...

Page 12: ...uring communication or the talk duration up to 1 minute the screen goes blank and conversation ends To call the designated device please select and press INTERCOM button Select the ID of the designate...

Page 13: ...tton the user can adjust the level of the volume by 1 3 steps After adjustment of the volume push SET button to complete the adjustment 3 Adjust the display status When the user pushes the button of S...

Page 14: ...ension or interphone call The product must be turned off and on again to save and apply the configuration changed in Manager mode When power is OFF ON in the middle of changing the configuration on Ma...

Page 15: ...PHONE ID is not possible ID of MAIN PHONE is 0 If DEVICE TYPE is set as SUB PHONE the user can set ID of SUB PHONE In case of SUB PHONE default is 1 In the menu of MANAGER when the user selects PHONE...

Page 16: ...set the type of the door phone camera to be connected with the videophone Set up as PAL by default Select CAMERA TYPE from MANAGER MENU using the UP and DOWN buttons and then If you push the SET butt...

Page 17: ...if set up as VIDEO only video images are stored and played If you push SET button on an image playing screen about 10 seconds passes playing ends automatically User menu VMM setting menu You can ente...

Page 18: ...ate Setting the date Month setting is followed by date setting You can set the date using the UP and DOWN buttons and if you push the SET button you move to Setting the time Setting the hour Date sett...

Page 19: ...TILL as storage type using UP or DOWN VIDEO video 5 seconds storage STILL still image storage If you push the SET button the User menu appears again If you push the SET button on the standby screen th...

Page 20: ...D POWER VOICE VIDEO GND UTP CABLE If UTP CABLE CAT 5 is used use 5th lines for GND line Note Arbitrarily installed additional monitors occur the lower quality of video and voice transmission Intercom...

Page 21: ...ered serial numbers 3 The liability of is limited to the cost of repair replacement of the unit under warranty 4 If you need a warranty service you should send the product to our customer service Dep...

Page 22: ...memo 22...

Page 23: ......

Page 24: ...4F KOAMI Bldg 22 Gukhoe daero 76 gil Yeongdeungpo gu Seoul 150 870 Korea KD One global business Dept Website www kdone co kr 20025724A...

Reviews: