background image


Remote Control 

1.


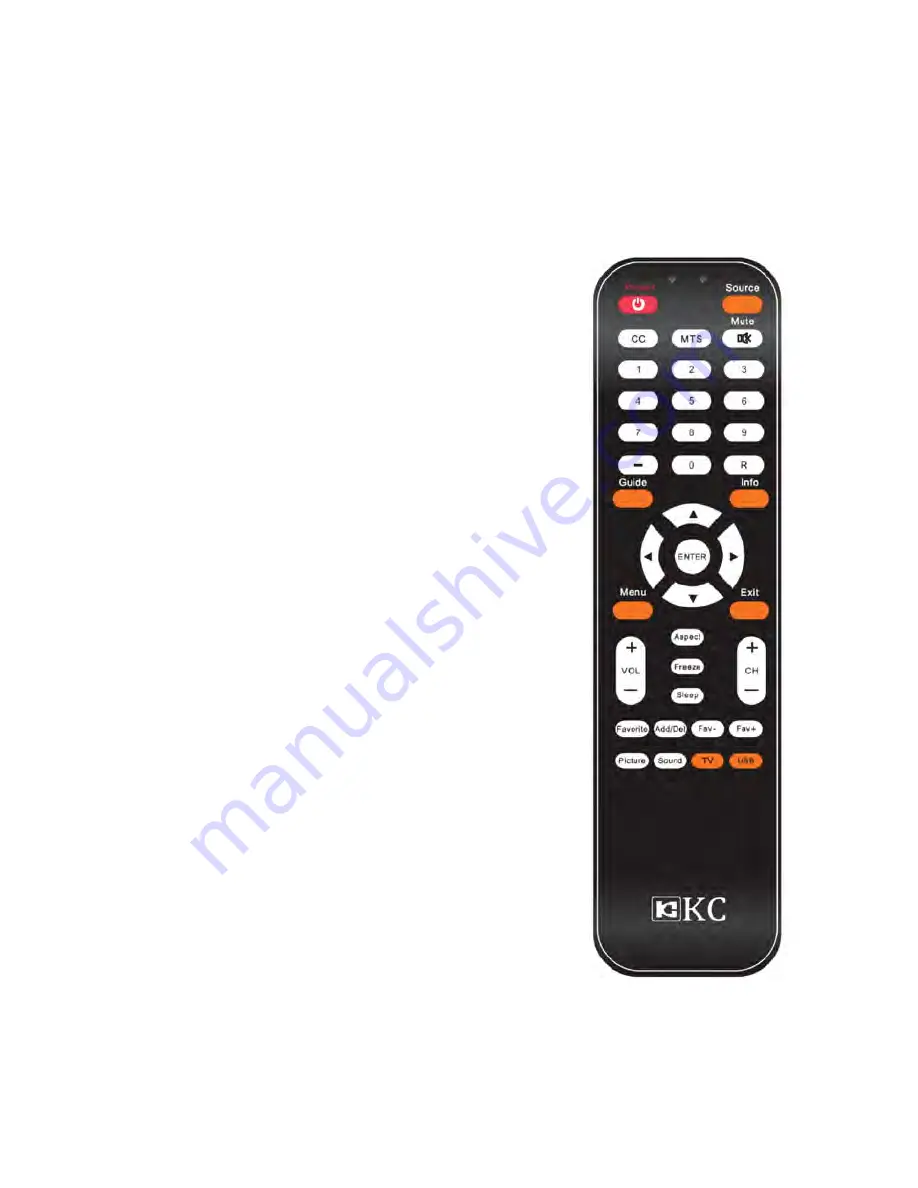
POWER: Turns the TV on and off. 

2.


Source: Press to display and select the available video 

sources. 

3.


CC: Press to control the caption decoder. 

4.


MTS: Press to choose stereo, mono or Separate Audio 

Program (SAP broadcast). 

5.


MUTE: Press to temporarily cut off the sound. 

6.


0-9: Numeric buttons for direct channel selection or 

track/chapter numbers. 

7.


- : Press to select additional channels (digital) being 

broadcast by the same station. For example, to select 
channel ‘5-3’, press ‘5’, then press -/-- and ‘3.’ 

8.


R: Press to switch between the current and the previous 

channel. 

9.


Guide: Selects Electronic Programmer Guide. 

10.


Info: Press to display information to the TV screen. 

11.

  ▲

/

/

/

/ENTER: Use to select on-screen menu items 

or change channels and increase or decrease the 
volume and change menu values. 

12.


MENU: Press to display the main on-screen menu. 

13.


EXIT: Exits setup menus. 

14.


VOL+/-: Press to increase or decrease the volume. 

15.


CH+/-: Press to change channels. 

16.


ASPECT: Selects different picture size modes. 

17.


FREEZE: Freezes picture. Press again to restore normal 

viewing. 

18.


SLEEP: Press to set up the TV auto turn off time. 

19.


FAV: Displays Favorite program list. 

20.


Add/Del: Press to add/remove the highlighted channel 

as favorite. 

21.


FAV+: Add a favorite program. 

22.


FAV-: Remove a favorite program. 

23.


PMODE: Press to select the picture mode. 

24.


SMODE: Press to select the sound mode. 

25.


TV: Press to select the TV mode directly. 

26.


USB: Press to select the USB mode directly. 


Summary of Contents for KC-3913

Page 1: ...KC 3913 USER MANUAL...

Page 2: ......

Page 3: ...Manufactured under license from Dolby laboratories Dolby and double D symbol are trademarks of Dolby laboratories...

Page 4: ...Inputs Outputs 7 CONNECTIONS 8 Basic Use 10 Powering the LED TV 10 Setup Wizard 10 Selecting Input Source 12 Main Menu 12 Application 13 Operating the Menu 13 Customizing the PICTURE Settings 15 Custo...

Page 5: ...al device pursuant to Part 15 of the FCC Rules These limits are designed to provide reasonable protection against harmful interference when the equipment is operated in a residential installation This...

Page 6: ...r pinched particularly at the plugs convenience receptacles and at the point where they exit from the apparatus 11 Only use attachments accessories specified by the manufacturer 12 Use only with the c...

Page 7: ...ntrol Battery 1 5V AAA X2 User Manual Please make sure the following items are included with your LED TV If any items are missing contact your dealer The items color and shape may vary depending on th...

Page 8: ...cord unplugged Is there a special fluorescent light or neon sign nearby Base Assembly Guide Package List TV Base Screw 1 Carefully place the TV faced down on a suitable surface with a soft cloth or c...

Page 9: ...VOL buttons as you would use the VOL buttons on the remote control 2 CH Press to change channels In the on screen menu use the CH buttons as you would use the CH buttons on the remote control 3 Press...

Page 10: ...to display information to the TV screen 11 ENTER Use to select on screen menu items or change channels and increase or decrease the volume and change menu values 12 MENU Press to display the main on s...

Page 11: ...Pr AV R L AV Interlace or Sequential Component Video Input typical use PS3 or X Box 4 5 HDMI1 HDMI2 HDMI3 Input from HDMI source High Definition 6 VGA PC AUDIO PC input RGB Stereo audio input from PC...

Page 12: ...PC Connect stereo Use SOURCE button to select VGA Antenna or cable HDMI Connect HDMI input Use SOURCE button to select HDMI HDMI Input Hard Drive Switch TV to standby and insert either the USB Hard D...

Page 13: ...s from your retailer Use SOURCE INPUT button to select YPbPr or AV HDMI Connect HDMI input Use SOURCE button to select HDMI HDMI Input Coaxial Connect to the Digital Amplifier Earphone Plug in headpho...

Page 14: ...er equipments connected to the TV Connect an RF cable from the TV s input called RF In and to your TV Aerial socket Select Language Press buttons to select the language to be used for menu and message...

Page 15: ...11 Select Time Press buttons to select the antenna type Press buttons to select go to next step and press ENTER button to start auto scan...

Page 16: ...unction to switch to the input source you wish to view Press SOURCE button on the remote control Use buttons to move to the desired input source Press button to select Main Menu Press MENU to display...

Page 17: ...menu will appear on the screen 3 Use the buttons to select your main menu option PICTURE MENU Allows you to make adjustments your picture settings Select TV sources for example SOUND MENU Allows you c...

Page 18: ...HANNEL MENU Allows you to search channels and set up a variety of channel options Select TV source 4 Use the buttons to select an option of the sub menu and press the button While in adjustment mode u...

Page 19: ...it the menu The PICTURE menu includes the following options Picture Mode Cycle among picture display modes Standard Dynamic Soft User Power Saving Brightness Control the overall brightness of the pict...

Page 20: ...you to use the buttons to select Video Graphic Customizing the Audio Settings Select TV source for example Press SOURCE button to select TV mode 1 Press the POWER button to turn the LED TV on 2 Press...

Page 21: ...dio Language Press the buttons to select English French and Spanish Digital Audio Output Press the buttons to select PCM Raw Off Surround Sound Allow you to use the buttons to select Off On AVL Allow...

Page 22: ...ing time Time Format Allow you to use the buttons to select 12 hour 24 hour Auto Clock Allow you to use the buttons to select Off On Clock Set the Internal Clock In the TV mode Customizing the SETUP S...

Page 23: ...on to highlight the Close Caption item and then press the button to enter into the following menu CC Mode Allow you to select the CC Mode among CC On CC Off and CC Mute Analog CC Allow you to select t...

Page 24: ...utton to highlight the Input Label item then press the button to enter into the following menu Press the button to set Other Settings Use the button to highlight the Other Settings item then press the...

Page 25: ...eric keys to input 4 digital password After you that the screen will display the junior menu After settings press menu button to exit NOTE The factory password is 0000 The LOCK menu includes the follo...

Page 26: ...spects age based and content based Age Define TV Y General audience TV Y7 Parental guidance suggested TV G Parents strongly cautioned TV PG Restricted TV 14 No one 17 and under admitted TV MA Adult au...

Page 27: ...V programs by US Ratings Only available when System Lock is on Press button to enter RRT Setting Display an advance V Chip rating table for digital channels The item is available only When current str...

Page 28: ...Allow you t add these channels which you desired as the favorite channels Use the buttons to highlight the Favorite item Use the buttons to highlight the desired item then press ENTER button to add o...

Page 29: ...e Before operating Media menu Plug in USB device then press INPUT button to set the input source to USB Press INPUT button on the remote control Use buttons to select USB in the source menu Press butt...

Page 30: ...file you want to watch in the file selecting menu Then press media button to display picture When highlighting the option you select the file information will appear on the right and picture will be p...

Page 31: ...ile you want to watch in the file selecting menu Then press Enter button to add the file to play list press media button to display and operate file details When highlighting the option you select the...

Page 32: ...appears click on Appearance and Themes and a display dialog box will appear 3 When the control panel window appears click on Display and a display dialog box will appear 4 Navigate to the Setting tab...

Page 33: ...ize or resolution Stripes appear on the screen and it shakes Discontinue use of wireless telephones hair dryers or power tools Consider installing a surge protector The screen does not move Press the...

Page 34: ...ation 5000 1 YPbPr 1 AUDIO L R 1 PC AUDIO L R 1 HDMI 3 TV 1 COAXIAL 1 USB 1 Power Source AC 100 240V 50 60Hz Standby Power Dissipation 1W Power Consumption 69W Wall Mount Dimension W200 H200mm Dimensi...

Page 35: ...which the product qualifies for ENERGY STAR Any changes to default as shipped television configuration and settings would change the energy consumption And enabling certain optional features and funct...

Page 36: ......

Reviews: