background image

20

Operation and Service megaSun 4500

3.7.  

Canopy drive

In order to ensure a trouble-free operation of the drive, check 
and service it each time the tubes are replaced (see table be-
low).If the canopy does not remain safely in the upper position 
any more, the spring must be re-tensioned. 

While tensioning or relaxing the spring, fi x it against torsion. 

Regular mainte-

nance

Tension the spring

Figure 3-15 Spring compressor The 
spring has to be secured against torsion 
while tensioning and relaxing.

Figure 3-16 Return pulley

Figure 3-17 Upper rope covering

Step

Procedure

Reference

1

Check the spring rope for wear. Should individual wires of 
the rope be spliced, replace the rope.

2

Lubricate the rope in the return-pulley area by using HHS 
2000 spray lubricant.

Fig. 3-16

3

Tension the spring in such a way that the canopy remains 
stable in any position. The spring-compressor is kept below 
the bed, at the front left-hand side

Fig. 3-15

4

The rope has to be replaced after 3,000 hours of use:· 
- Completely relax the spring.
- Remove the upper covering of the attachment 

fi

 tting of 

the rope.
- Undo the bolt and remove the used rope, paying attention 
to the position of the bolt.
- Hinge the lubricated new rope, 

fi

 x the bolt and tension the 

spring.

Fig. 3-17

Fig. 3-18 

spray lubricant 
HHS 2000

5

Test the canopy drive: If it is working properly, you can ea-
sily open and close the canopy, and it remains stable when 
in its upper position.

Summary of Contents for megaSun 4500 Super

Page 1: ...Operation and Maintenance megaSun 4500 BA4500EN_C 0606 ...

Page 2: ...art without prior written consent by KBL Solarien AG Up to date manuals are available under http www kbl support de is a registered trademark of KBL Solarien AG Certified according to DIN ISO 14001 Only original spare parts especially tubes and burners have to be used otherwise operating authorization and terms of guarantee will become invalid KBL Solarien AG Ringstraße 24 26 56307 Dernbach German...

Page 3: ...un 4500 XXL Super Power Spaghetti 29 4 8 megaSun 4500 XXL Ultra Power Spaghetti 29 5 Wiring diagrams 30 5 1 Mains voltage 30 5 2 External audio signal 31 5 3 Music Preselection 32 5 4 External Timer 33 6 Service mode inductive 34 6 1 Service level I inductive 35 6 2 Service level II inductive 36 7 Service Mode CPI 36 7 1 General information and structure 36 7 3 Service level I CPI 40 7 4 Service l...

Page 4: ...4 Operation and Service megaSun 4500 ...

Page 5: ...ect the system from the voltage supply Do not operate the tanning system if a filter pane is defective Section 3 3 Filter panes The data indicated in the tanning schemes are based on the assumption that both tubes and burners are replaced at regular intervals Sere Section 3 4 Tubes and facial tanners With regard to tube replacement remember to reset the control and the working hour counter of the ...

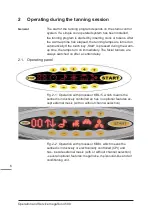
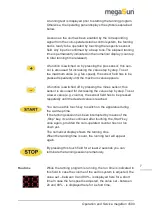
Page 6: ...ed during the warm up time the lamps turn on immediately The facial tanners are always switched on after a certain delay Fig 2 1 Operation with processor KBL 5 which means the sunbed is inductively controlled an has no optional features ex cept external music with or without channel selection Fig 2 2 Operation with processor KBl 4 which means the sunbed is inductively or electronically controlled ...

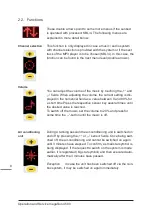
Page 7: ...pressing the minus sensor this sensor is also used for decreasing the value step by step To set a lower value e g volume the sensor field has to be pressed repeatedly until the desired value is reached You can use this touch key to switch on the apparatus during the warm up time If the tanning session has been interrupted by means of the Stop key it can be continued after touching the Start key on...

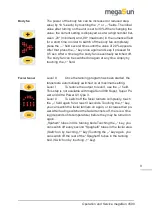
Page 8: ...to 20 and press for some time the button until the music is off During a tanning session the air conditioning unit is switched on and off by pressing the or sensor fields Once being swit ched off the air conditioning unit cannot be switched on again until 3 minutes have elapsed To confirm a small star symbol is being displayed If the request to switch on the system is made earlier it is registered...

Page 9: ...field Level II Once the tanning program has been started the tannersare automatically switched on at maximum setting Level I To reduce the output to level I use the field This step is not available with megaSun 4000 Super Super Po wer and Ultra Power UV type 3 Level 0 To switch off the facial tanners completely touch the field again for at least 3 seconds Touching the key you can switch the facial...

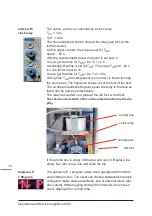
Page 10: ...x The fragrance comes out at the foot of the bed The air stream leads the fragrance over the body to the face so that it can be perceived intensively The relay is mounted on a plate at the left foot in the front The client cannot switch off or on the aroma function by the dis play aroma box clock relay compressor left foot If the aroma box is empty lift the top and open it Replace the empty box wi...

Page 11: ...table cleaning agents To clean the varnished or plastic surfaces use a damp soapy cloth Make sure that there is no cleaning fluid run ning inside the appliance This has to be avoided at any rate Unsuitable cleaning or disinfecting agents may damage the surface of the acrylic panes base pane and further materials particularly if there are drops of perspiration in addition to that The cleaning and d...

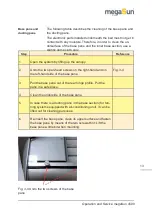
Page 12: ...ket carefully to the right left and swing the front swivel hinge profile downwards If necessary pull a little bit in the middle Once the canopy pane may be moved tilt it down wards and place it on the bed section arrange for padding Fig 3 1 Fig 3 2 3 When the pane is in the lower position you can lift it out of the swivel hinge profile if necessary For cleaning the pane this is not required Fig 3 ...

Page 13: ... pane Step Procedure Reference 1 Open the system by lifting up the canopy 2 Undo the two pan head screws on the right hand and on the left hand side of the base pane Fig 3 4 3 Pull the base pane out of the rear hinge profile Put the pane in a safe place 4 Clean the underside of the base pane 5 In case there is a ducting pane in the base section for tan ning systems equipped with air conditioning u...

Page 14: ...dismantled and replaced by trained ex pert staff only After having dismantled the frame carrying the filter pane see below clean the filter pane with a household glass cleaning agent and a soft cloth or chamois leather Filter pane in the frame Safety function Filter panes Figure 3 5 Cover of the filter frame Figure 3 6 Remove the filter frame 1 2 3 Step Procedure Reference 1 Dismantle the acrylic ...

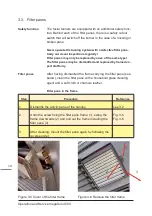
Page 15: ...ce 1 Undo the screw fastening the filter pane covering 1 Sw ing the covering towards yourself 2 and pull it out 3 Fig 3 7 2 Press carefully the filter pane downwards using both hands 4 until the pane is released by the upper springs 5 Take the filter pane out of the clamping springs that retain it Fig 3 8 3 After cleaning use any household glass cleaning agent mount the filter pane again ...

Page 16: ... equipped with CPI technology it is vital to carry out a reset after each tube replacement see For units operated with inductive technology also install new starters with each tube replacement Remember to set the wor king hours counter to zero see 6 1 Dismantling Unit lighting Step Procedure Reference 1 Dismantle the canopy pane and the base pane Section 3 2 2 For units equipped with burners You w...

Page 17: ...sur faces of both sockets and burners are clean Insert the burners straight into their sockets After being inserted into the socket the little metal shackle in the centre of the reflector should face the reflector Installing the bur ners Abb 3 11 Burner KBL 3230 355 00 Step Procedure Reference 1 Remove the canopy pane and the filter pane frame Section 3 2 and 3 3 2 Hold the burners with a soft clo...

Page 18: ...s Undo the screw fixing the interior lateral panel Remove the panel and the coloured tube covering Now you may replace both tube and starter Fig 3 6 1 and Fig 3 6 2 2 Re install all parts in reverse order 3 Bench The lighting tube is installed behind the front profile and may be easily exchanged The starter is located at the left hand socket 4 Canopy Take off one of the chromed faceplate which is ...

Page 19: ...megaSun 4500 Fig 3 6 3 Unit lighting in the lower base section the starter at the left hand side Fig 3 6 4 Chromed faceplate Fig 3 6 5 Mounting plate Fig 3 6 6 Mounting plate removed Fig 3 6 7 Correct position of the connector ...

Page 20: ... wear Should individual wires of the rope be spliced replace the rope 2 Lubricate the rope in the return pulley area by using HHS 2000 spray lubricant Fig 3 16 3 Tension the spring in such a way that the canopy remains stable in any position The spring compressor is kept below the bed at the front left hand side Fig 3 15 4 The rope has to be replaced after 3 000 hours of use Completely relax the s...

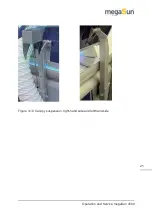
Page 21: ...21 Operation and Service megaSun 4500 Figure 3 18 Canopy suspension right hand side and left hand side ...

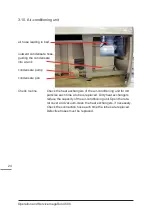
Page 22: ... is drawn in through two dust filters Depending on the installation site clean the filter mats or if necessary replace them after approx every 100 hours of use To ensure trouble free operation of the unit exclusively use original spare filter mats Whenever you clean or replace the filter mats also check the heat exchangers of the air conditioning unit for traces of dirt section 3 10 Dirty heat exc...

Page 23: ...g unit and led through an air hose to the space between ducting pane and base pane At the foot end of the base section the air is blown into the tanning space of the system Cooling of the base pane A clean exhaust air system in good working order prevents the unit from overheating The maximum length of the exhaust air hose of 6 metres must not be exceeded if there is no additional fan Maintenance ...

Page 24: ...ondensate pan Check the heat exchangers of the air conditioning unit for dirt particles each time a tube is replaced Dirty heat exchangers reduce the capacity of the air conditioning unit Open the late ral cover and vacuum clean the heat exchangers if necessary Check the connection hose each time the tubes are replaced Defective hoses must be replaced Check routine ...

Page 25: ...ront cover and slowly fill the condensate pan in the air conditioning unit with water Ensure that the water is pumped out when the pan is around half full For this check the mains voltage must be connected By servicing the unit regularly and properly you substantially contribute to a long period of trouble free and safe operation The condensate hose must be guided into the condensate tank without ...

Page 26: ... C 86 F ATTENTION The unit must not be operated in case the coin box timer system or the internal monitoring of the maximum tan ning time is faulty or if a filter broken or missing Water outlet in dry rooms with sufficient air supply and ventilation Disposal connection to sewage system or tank capacity 5 litres Quantity depends on the local conditions and the air humidity Note As the condensate ha...

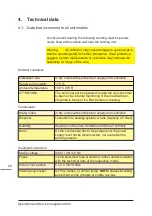
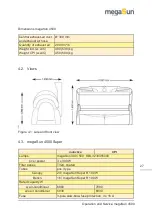
Page 27: ...uantity of exhaust air 2000 m h Weight ind w A C Weight CPI w A C 480 530 kg 450 500 kg inductive CPI Lamps megaSun 300 500 KBL 3230355000 pcs power 3 x 300 W Filter panes T324 coated Tubes pcs type Canopy 24 megaSun Super R 100 W Bench 16 megaSun Super R 100 W Rated capacity W w air conditioner 6890 7890 w o air conditioner 5930 6930 Fuse 3 pole slow blow fuse protection 3 x 16 A ...

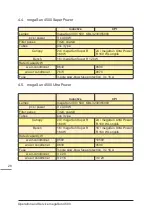
Page 28: ...conditioner 8630 9630 w o air conditioner 7670 8670 Fuse 3 pole slow blow fuse protection 3 x 16 A inductive CPI Lamps megaSun 300 500 KBL 3230355000 pcs power 3 x 400 W Filter panes T324 coated Tubes pcs type Canopy 24 megaSun Super R 160 W 24 megaSun Ultra Power R 160 W Longlife Bench 16 megaSun Super R 160 W 16 megaSun Ultra Power R 160 W Longlife Rated capacity W w air conditioner 9590 10590 w...

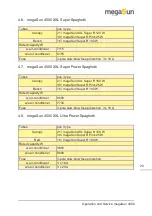
Page 29: ... Fuse 3 pole slow blow fuse protection 3 x 16 A Tubes pcs type Canopy 21 megaSun XXL Super R 180 W 30 megaSun Super R Pink 25 W Bench 16 megaSun Super R 100 W Rated capacity W w air conditioner 8690 w o air conditioner 7730 Fuse 3 pole slow blow fuse protection 3 x 16 A Tubes pcs type Canopy 21 megaSun XXL Super R 180 W 30 megaSun Super R Pink 25 W Bed 16 megaSun Super R 160 W Rated capacity W w a...

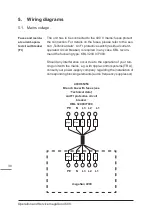
Page 30: ...reaker is required in any case KBL recom mend the following type KBL 3200 077000 Should any interference occur due to the operation of your tan ning unit with the mains e g with ripple control systems TRA consult your power supply company regarding the installation of corresponding blocking elements audio frequency suppressor 5 1 Mains voltage 400V 3N 50 Branch box with fuses see Technical data an...

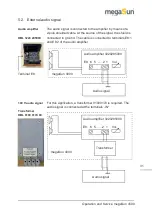
Page 31: ...udio amplifier KBL 3220 285000 The audio signal is connected to the amplifier by means of a 2 pole shielded cable At the source of the signal the shield is connected to ground The cable is connected to terminals E8 1 and E8 2 of the audio amplifier Terminal E8 100 V audio signal Transformer KBL 9100 0170 00 For this application a transformer 91000170 is required The audio signal is connected at th...

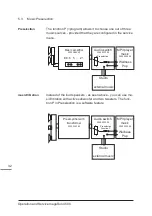
Page 32: ...20 3233 50 Preselection Function P MP3 player music 3220 3222 90 Wellness Pop Studio external music The function P program allows it to choose one out of three music sources provided that they are configured in the service menu Preselection musicVibration Instead of the loud speakers as seen above you can use mu sicVibration with active subwoofer and two tweeters The func tion P in Preselection is...

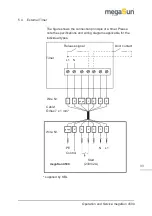
Page 33: ...ction principle of a timer Please note the specifications and wiring diagrams applicable for the individual types gnge 3 6 4 5 1 2 gnge 4 3 2 1 5 6 Control PE N L1 Start 230V 2A L1 N Release signal Door contact Timer Wire Nr Cable Ölflex 7 x 1 mm2 Wire Nr megaSun 4500 supplied by KBL ...

Page 34: ...tes have to be fulfilled there must not be any error message on the display there must not be any incoming signal from the coin token box system In case there is an error message pending you need to reset this message by touching the Stop sensor field Figure 6 1 Touch keys 1 0 for service operations To access service level I first enter the sequence 1 6 1 and then enter the PIN 1 1 1 1 This level ...

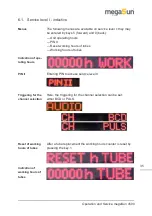
Page 35: ...Reset working hours of tubes Working hours of tubes Entering PIN to access service level II Here the triggering for the channel selection can be set either BCD or PULS After a tube replacement the working hours counter is reset by pressing the key 1 Menus Indication of ope rating hours PIN II Triggering for the channel selection Reset of working hours of tubes Indication of working hours of tubes ...

Page 36: ...e KBL pro zessor 4 Also inductive controlled sunbeds with more features than external music are equipped with the KBL processor 4 The processor 4 used a serial interface for software download All functions see chapter 7 are available in this sunbed There are two service levels which are both accessible by pass words To get into these levels and to release processes the touch keys 1 0 have to be pr...

Page 37: ...ni cal service staff only Starting from level I menu PIN II you will get into level II by entering the correct PIN not 1 1 1 1 When having called up service level I the following keys can be used as follows Key 5 t o move forward in the menu Key 0 to move backwards in the menu Stop key to leave service level or menu Start key to select a menu item or to save the value dis played Service level I Se...

Page 38: ...te Operation Info Working hours Tube hours CPI Mode Ö P SP CPI RESET Timer A on Timer A off Timer B on Timer B off PIN II Enter correct PIN Service level II Air Condition Air Cond on off Blower delay Blower start Audio Volume Nonstop 84 2 ON OFF Preselection W P S CH BCD CH PULS Service level I ...

Page 39: ...39 Operation and Service megaSun 4500 Adjust of the tube hours Zero or start value Display clock Display Date Configuration C M A B Timestamp 1st Llading Timestamp last loading Service level II ...

Page 40: ... tubes TUBE are displayed The different CPI modes are displayed which can be adopted or reset RESET Operation info CPI Display Selection 5 0 You open this menu using START here OPERATION INFO You go back to the next higher level menu using STOP here OPERATION INFO CPI Modes Selection Confirmation 4 9 CPI Reset Selection Confirmation 0 5 1 ...

Page 41: ... pre set It is also possible to switch the fan off The time lag of the body fan can be set in steps of 5 seconds with each new start this interval will be accepted The setting is saved and is then available for the next start This function allows you to specify two times for switching on and two times for switching off the decorative lighting for any day of the week If you do not need the switchin...

Page 42: ... time A BON und A BOF Hrs Min Store 2 3 4 8 Display Date Selection 5 0 Change the time Selection Store Hrs Min 1 3 6 8 Change the date Day Store 1 6 The day of the week appears automatically This menu shows time and date Both values can be changed Enter PIN II and in service level II the menu CMAB opens ...

Page 43: ...th the tanning cycle CH The channel selection may be changed from channel and volume selection to BCD selection of a music source It is possible to select up to 4 music sources The volume is adjusted at the music amplifier PRESELECTION shows which music sources are set by the studio operator WPS Selection of the music sources Wellness Pop and Studio The menu can be selected by pressing the 0 and 5...

Page 44: ...ator can preselect which source is selected after the start of the tanning program Press the key 4 or the key 9 The appropri ate character W P or S is shown in the PRESEL menu During the tanning program the client can toggle between these sources He opens the first submenu by pressing the key above or the key below the P The newly selected music source Wellness Pop or Studio is displayed for a sho...

Page 45: ...e faded out C Channel Music channel M Music Volume A Air conditioning B Facial tannerThe setting can be changed by pressing the or key above or below the symbol If the two dots behind the letter are at the bottom the respective function is inactiva ted C no channel selection possible B facial tanner can be operated In this menu you can set the service hours of the tubes in steps of 5 hours This di...

Page 46: ...ey The cause of the error message has to be removed by service staff Reasons for these error messages appearing are insufficient cooling of the unit or dirty filter matsThis error message is displayed on the ope rating panel and may be acknowledged by pressing the Stop touch key This message will be displayed after 40 minutes of uninterrupted operation of the tanning system By turning off the coin...

Page 47: ... required in case of pronounced individual sensitivity to UV radiation and in cases where certain medicines or cosmetics are used 6 It is not to be taken as a general fact that exposure to UV radiation in tan ning systems reduces the risk of suffering sunburn in any individual case 7 The unit must not be operated if the timer or filter pane s are defective 8 The following safety precautions must b...

Page 48: ... 18 22 10 14 19 24 11 15 21 26 12 16 22 28 The interval between two tanning sessions must be at least 48 hours Max number of tanning sessions per year 15 kJ m 60 43 33 Tanning session Skin type II Skin type III Time in min Skin type IV 1 4 4 4 2 4 4 5 3 5 5 6 4 5 6 7 5 5 7 8 6 6 8 9 7 6 9 10 8 7 9 12 9 7 10 13 10 8 11 14 11 8 12 15 12 9 13 16 The interval between two tanning sessions must be at le...

Page 49: ...must be at least 48 hours Max number of tanning sessions per year 15 kJ m 60 43 33 Tanning session Skin type II Skin type III Time in min Skin type IV 1 4 4 4 2 4 4 5 3 5 5 6 4 5 6 7 5 5 7 8 6 6 8 9 7 6 9 10 8 7 9 12 9 7 10 13 10 8 11 14 11 8 12 15 12 9 13 16 The interval between two tanning sessions must be at least 48 hours Max number of tanning sessions per year 15 kJ m 60 43 33 8 4 megaSun 450...

Page 50: ...least 48 hours Max number of tanning sessions per year 15 kJ m 60 43 33 Tanning session Skin type II Skin type III Time in min Skin type IV 1 5 5 5 2 6 7 7 3 7 8 9 4 8 9 10 5 8 10 13 6 9 12 t14 7 10 13 16 8 10 14 17 9 11 15 18 10 12 17 21 11 13 18 23 12 14 19 25 The interval between two tanning sessions must be at least 48 hours Max number of tanning sessions per year 15 kJ m 60 43 33 8 6 megaSun ...

Page 51: ... 48 hours Max number of tanning sessions per year 15 kJ m 60 43 33 8 8 megaSun 4500 XXL Super Power Spaghetti UV type 4 Tanning session Skin type II Skin type III Time in min Skin type IV 1 5 5 5 2 6 6 7 3 7 8 8 4 7 9 10 5 8 10 12 6 9 11 14 7 9 12 15 8 10 14 17 9 11 15 18 10 12 16 50 11 12 17 22 12 13 18 24 The interval between two tanning sessions must be at least 48 hours Max number of tanning s...

Page 52: ...D Dismantling the panes 11 E Exhaust air 23 External Timer 33 Externer Timer 33 F Facial tanner 9 Facial tanners 16 Filter mats Cleaning 22 Filter panes 14 I Installing the burners 17 M Mains voltage 30 Menus inductive 34 O Operation 6 R Running time Operation menu 7 S Safety information 5 Service level II inductive 36 Service levels CPI 36 Service levels inductive 34 Service level II CPI 45 Servi...

Reviews:

Related manuals for megaSun 4500 Super