SET-UP
• Remove the heater from the box and remove all packaging materials
• Place the heater on a firm, level, open surface free from obstructions at least 3 feet (0.9m) way from
any wall, furniture or combustible material.
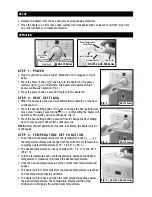
S T E P 1 : P O W E R
• Plug the unit into your wall outlet. When the unit is plugged in, it will
beep.
• Press the Power button (
) once to turn the heater on. The power
indicator light (
) will illuminate. The heater will operate on high
power, continuous operation (Fig. 1)
• Press the power button a second time to turn the heater off.
S T E P 2 : H E A T S E T T I N G S
• When the heater is turned on it will automatically operate on max heat,
continuous run.
• Press the heat setting button (
) once to change the heat setting from
max power to energy saver mode (
). In this setting the heater will
operate at 900 watts and run continuously. (Fig. 2)
• Press the heat setting button a second time to change the heat setting
back to max power (1500 watts), continuous run.
NOTE:
Unless the temperature set function is activated the heater will run
continuously.
S T E P 3 : T E M P E R A T U R E S E T F U N C T I O N
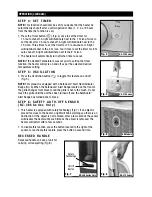
• To set the desired temperature, turn the temperature knob (
),
the temperature display will change from the current room temperature
to display a default temperature of 75° F (23.8° C) (Fig. 3).
• The desired temperature can be set between 45° F (7.2° C) and 80° F
(26.6° C).
• Turn the temperature knob counterclockwise to decrease the desired
temperature or clockwise to increase the desired temperature.
• Once the desired temperature is set the current room temperature will
appear.
• The heater will turn off shortly after the Desired Temperature is reached
and the Temperature Display will blink.
• The heater will turn back on when the room temperature drops below
the Desired Temperature. The Temperature Display will then stop
blinking and will display the current room temperature.
Fig. 1
OPERATION
Fig. 2
Fig. 3
HZ-370 Series
HZ-3750 & HZ-385 Series
HZ-370 Series
HZ-3750 & HZ-385 Series
Timer Button
Power/Temperature
Contol Knob
Heat Setting Button
HZ-370 Series
Power/Temperature
Contol Knob
Timer Button
Heat Setting
Button
Oscillation Button


