background image

2

2

1

1

Casing

assembly

2 2

2 2

1

1

Fan

Fan

Upper propeller

housing

Filter

Motor

2

2

2

2

1

1

1

1

1

1

1

Heat

exchanger

Temperature

sensor plug

Drain pan

2

2

1

1

Casing

assembly

Electric

control

box

1

1

07

4) If necessary, you should:

a) Remove any foreign matters that may impede air flow. 
b) Remove the dust with compressed air or clean water and avoid damage to the heat exchanger. 
c) Dry with compressed air. 
d) Check for any impurities in the drain pipe that may impede water flow. 

e) Check whether the system has air.


Start and let the system run for several minutes.


Stop the system.


Open air discharge valve to remove air.


Repeat this operation until the air is exhausted.

5) Maintain the circuits.

Check whether the power cord, electrical contacts, terminals etc. are loose or damaged. 

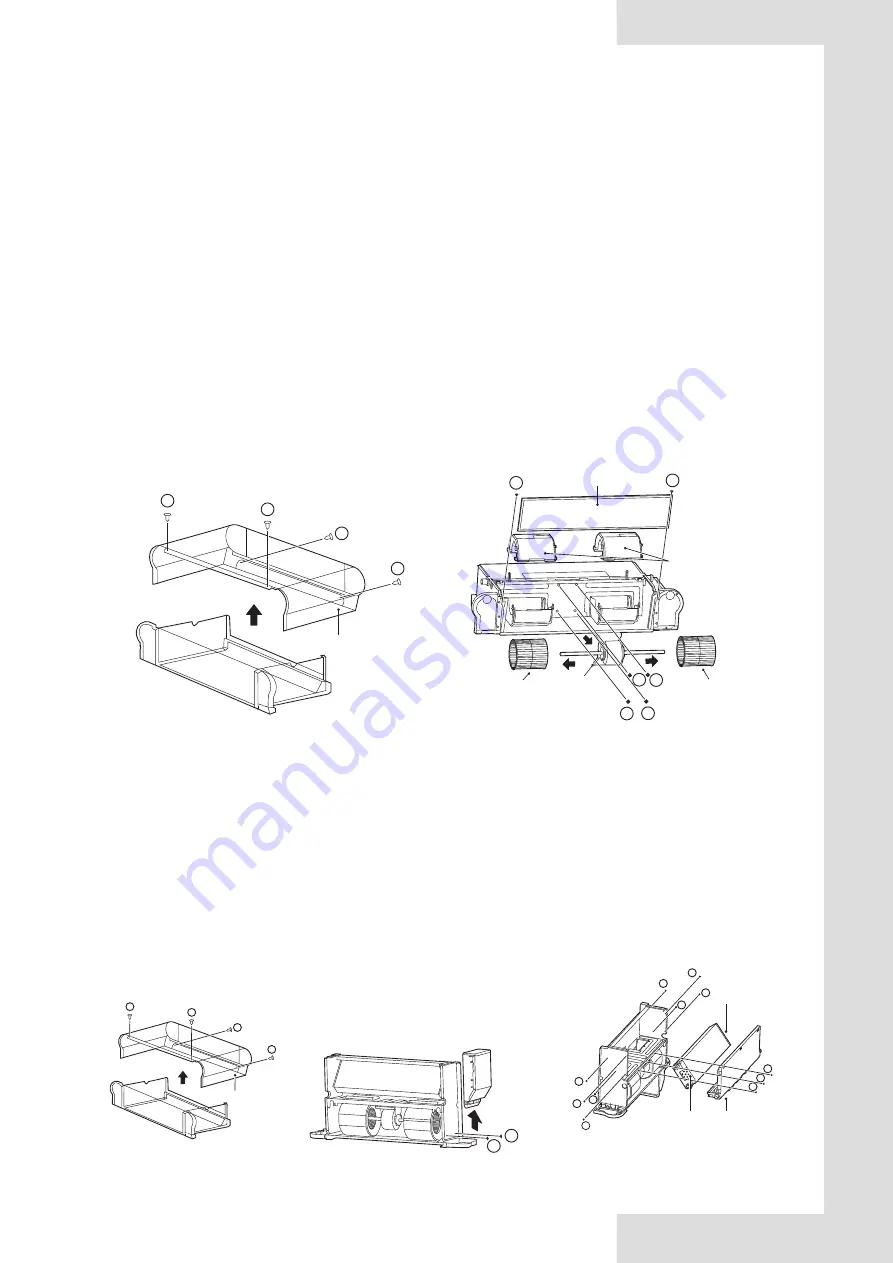
6) If the motor needs to be replaced, follow the steps below:

a) Unplug the unit.
b) As shown in Figure 4-4, remove screws 

*2 and 

*2 and then the casing. 

c) As shown in Figure 4-5, remove screws 

*2 to take the filter out. Then, remove the upper volute.

After that, remove four screws (

) that fix the motor, to disconnect the motor cable and the main board. Then, take out the fan 

and the motor. 
Disassemble the fan to get the motor.
Install back the motor in reverse order.

Figure 4-4 Removal of casing

Figure 4-5 Removal of filter, upper volute and motor screws

7) If the heat exchanger needs to be replaced, follow the steps below: 

a) Unplug the unit. 
b) Shut off the water supply. 
c) As shown in Figure 4-6, remove screws 

*2 and 

*2 and then the casing. 

d) Drain the coil. 
e) Disassemble the inlet and outlet pipes. 
f)As shown in Figure 4-7, remove screws 

*2 to remove the electric control box. 

g) As shown in Figure 4-8, remove screws 

*7 to take the drain pan out. Then, remove screws 

*4 to take the heat 

exchanger out. 
h) Pull out the temperature sensor plug.
Install back the heat exchanger in reverse order.

Figure 4-6 Removal of casing

Figure 4-7 Removing the electric control box

Figure 4-8 Removal of drain pan and heat exchanger 

Summary of Contents for KFC-S2-2T-250D

Page 1: ...250D KFC S2 2T 350D KFC S2 2T 500D KFC S2 2T 800D IMPORTANT NOTE Thank you very much for purchasing our air conditioner Before using your air conditioner please read this manual carefully and keep it for future reference OWNER S INSTALLATION MANUAL Ceilin Floor Fancoils Units ...

Page 2: ...3 3 3 Air Supply Direction Adjustment 05 4 CLEANING AND MAINTENANCE 4 1 Maintenance by Customer 05 4 2 Professional Maintenance 05 5 INSTALLATION INSTRUCTIONS 5 1 Packaging and Assembly 08 5 2 Handling Instructions 08 5 3 Installation 08 5 4 Liquid Pipe Connections 11 5 5 Electrical Connection 13 5 6 Startup Guide 16 6 SERVICE GUIDE 6 1 Troubleshooting 16 6 2 Non Unit Related Faults 17 6 3 Product...

Page 3: ...r items All the illustrations of this manual are for explanatory purpose only If the appearance functions and physical objects are inconsistent refer to the actual product NO Name Schematic Unit Qty Remarks 1 Owner and Installation Manual Pcs 1 Accessories 2 Fastening screw Pcs 4 To be purchased separately 3 Three way valve and its piping assembly Set 1 To be purchased separately from manufacturer...

Page 4: ...r animal rearing Do not install the unit where flammable gas may leak Otherwise fire may occur Do not install the unit in potentially explosive atmospheres Keep the unit far away from combustible spray to avoid fire Use proper fuse Do not use iron wire or copper wire as it may cause fire or unit abnormality When connecting power supply to the unit follow the regulations of the local electric compa...

Page 5: ...ldren without supervision The manufacturer is not responsible for unit damages or personal injury resulting from unauthorized operations or use of non original parts or accessories Ventilation Periodically ventilate the room where the unit is installed Ventilation is especially important in case the room has many people in it or has flammable devices or gas sources Poor ventilation may result in l...

Page 6: ...tput signal specification table 1 Start and stop Start or stop the unit using the wired controller or centralized controller Controller output voltage Fan speed Seven fan speeds 0 voltage 1 shutdown 1 voltage 3 low 3 voltage 4 medium low 4 voltage 5 medium 5 voltage 6 medium high 6 voltage 7 high 7 voltage 8 super high 8 voltage 10 strong Auto speed The wired controller is adjusted according to th...

Page 7: ...aning the outer surface of the unit is permitted Dip a piece of soft cloth in cold water and alcohol to clean the unit Do not use hot water solvent abrasive or corrosive substances 1 Cleaning the air filter To ensure proper air return clean the air filter at least once every month If used in a dusty environment the filter must be cleaned on a more frequent basis Take the air filter out before you ...

Page 8: ...ylon fibre and the aluminum alloy air filter can be customized the motor has internal overheat protection and overcurrent protection a centrifugal rotating fan is used a soundproof material such as sponge is used the fin type heat exchanger is composed of copper pipe and aluminum foil and the heat exchanger pipe connection can be changed on site 4 2 2 Maintenance Before maintenance or check discon...

Page 9: ...ove screws 2 and 2 and then the casing c As shown in Figure 4 5 remove screws 2 to take the filter out Then remove the upper volute After that remove four screws that fix the motor to disconnect the motor cable and the main board Then take out the fan and the motor Disassemble the fan to get the motor Install back the motor in reverse order Figure 4 4 Removal of casing Figure 4 5 Removal of filter...

Page 10: ...ting or handling equipment falls over All of the following operations must be performed in accordance with current health and safety regulations including the equipment used and the procedures followed Before operation verify that the lifting device is capable of lifting the unit You can lift or move the unit using your hand or using a proper handcart Move the unit in case it weighs over 30 kilogr...

Page 11: ... 5 12 The drain pipe for condensate water must be smooth enough to allow unobstructed water discharge As shown in Figure 5 2 fasten four screws into a proper masonry structure Figure 5 2 Diagram for fixing the unit body The footings shown in Figure 5 3 are optional You can purchase them separately and install them as follows 1 Put the footings beside the unit to be installed 2 Place the mounting h...

Page 12: ...during operation If not enough space is reserved during installation the unit may face difficult maintenance and reduced performance The unit allows vertical installation provided that correct positioning is arranged in advance As shown below a is greater than 150 mm b greater than 90 mm c greater than 50 mm and d greater than 1500 mm Figure 5 7 Figure 5 8 Figure 5 9 Ceiling exposed Figure 5 10 Ve...

Page 13: ...function 5 3 2 Dimensions Table 5 1 Unit mm Figure 5 12 5 4 Liquid Pipe Connections 1 Only professionals can operate the liquid pipes Drain pipe must be the different side with the electric control box Connect the unit to the water system using inlet and outlet connectors Figure 5 13 Unit mm MODEL KFC S2 E 2T 250D KFC S2 E 2T 350D KFC S2 E 2T 500D KFC S2 E 2T 800D A 1020 1240 1240 1360 B 495 495 4...

Page 14: ...set the elbow The customer has to purchase the three way valve and its accessories Operation and Installation Manual attached separately from the manufacturer The customer may also need to purchase the auxiliary drain pan separately from the manufacturer if required See the steps below for installation of auxiliary drain pan 4 How to change the coil from left hand connection to right hand connecti...

Page 15: ... The unit must be grounded reliably Make sure that the power cord has a large enough cross section to withstand the maximum current required Never use a damaged cable Perform electrical connections according to the wiring nameplate Figure 5 20 of the unit Secure the cable using clamps in the electric control box to ensure the safety of the power supply cable and the connection cable Do not pull st...

Page 16: ... XS1 XP2 XS2 XP3 XS3 Swing Motor1 Swing Motor2 CN21 CN20 T2H CS TO CCM COMM BUS MODBUS RTU TO UPPER UNIT WATER ENC1 S2 S3 S4 S1 CN13 Y G BLU RED CN26 CN37 CN16 ALARM PUMP PUMP ALARM N L COOL WATER VALVE HOT WATER VALVE CN4 CN24 DC FAN VALVE N VALVE C VALVE H T1 XP4 XS4 XP5 XS5 T2C FAN MAIN BOARD XP6 XS6 Green LED Red LED XP7 XS7 bi direction communication Wire controller Infrared Wire controller 1...

Page 17: ... is 2 Select circuit breaker that having a contact separation in all poles not less than 3 mm providing full disconnection where MFA is used to select the current circuit breakers and residual current operation breakers Table 5 2 Please refer to the corresponding wired controller manual for the wired controller wiring Table 5 3 Model ALL Power supply Phase 1 phase Volt and frequency 220 240V 50 60...

Page 18: ...nel Except as noted above if the above faults are not typical and the unit still fails follow the steps below Error Measures If a safety device such as a fuse circuit breaker or aleakage circuit breaker is triggered frequently or the ON OFF switch is not working properly Turn off the main power switch The operating switch is not functioning normally Turn off the power supply If a centralized contr...

Page 19: ...peration must be carried out by qualified maintenance personnel 4 Fault symptom dust and dirt in the unit This may happen after the unit is used again after being left idle for a long period This is because there is dust inside the unit 5 Fault symptom odour from unit This unit will absorb the odours of rooms furniture cigarettes and others and then disperse the odours again Odour might occur afte...

Page 20: ... 26 0 49 0 95 Standard coil connections G3 4 Condensation drain pipe connection ODΦ18 5mm Power supply 220 240V 50Hz Conditions ambient temperature 27 C DB 19 C WB water inlet temperature 7 C water outlet temperature 12 C high speed Conditions ambient temperature 20 C DB 15 C WB water inlet temperature 45 C water outlet temperature 40 C high speed The sound pressure level in dB A indicates the val...

Page 21: ...l electric power input Pelec 26 51 W Sound power level per speed setting if applicable LWA 52 51 dB contact details MODEL KFC S2E 2T 500D Information to identify the model s to which the information relation Item Symbol Value Unit Cooling capacity sensible Prated c 3 25 3 58 kW Cooling capacity latent Prated c 1 05 1 07 kW Heating capacity Prated h 4 30 4 35 kW Total electric power input Pelec 50 ...

Page 22: ......

Reviews: