Kawai Concert Artis CA61 Owner'S Manual Download Page 24

Page

24

3

Pla

ying the Piano

…

 Step 2

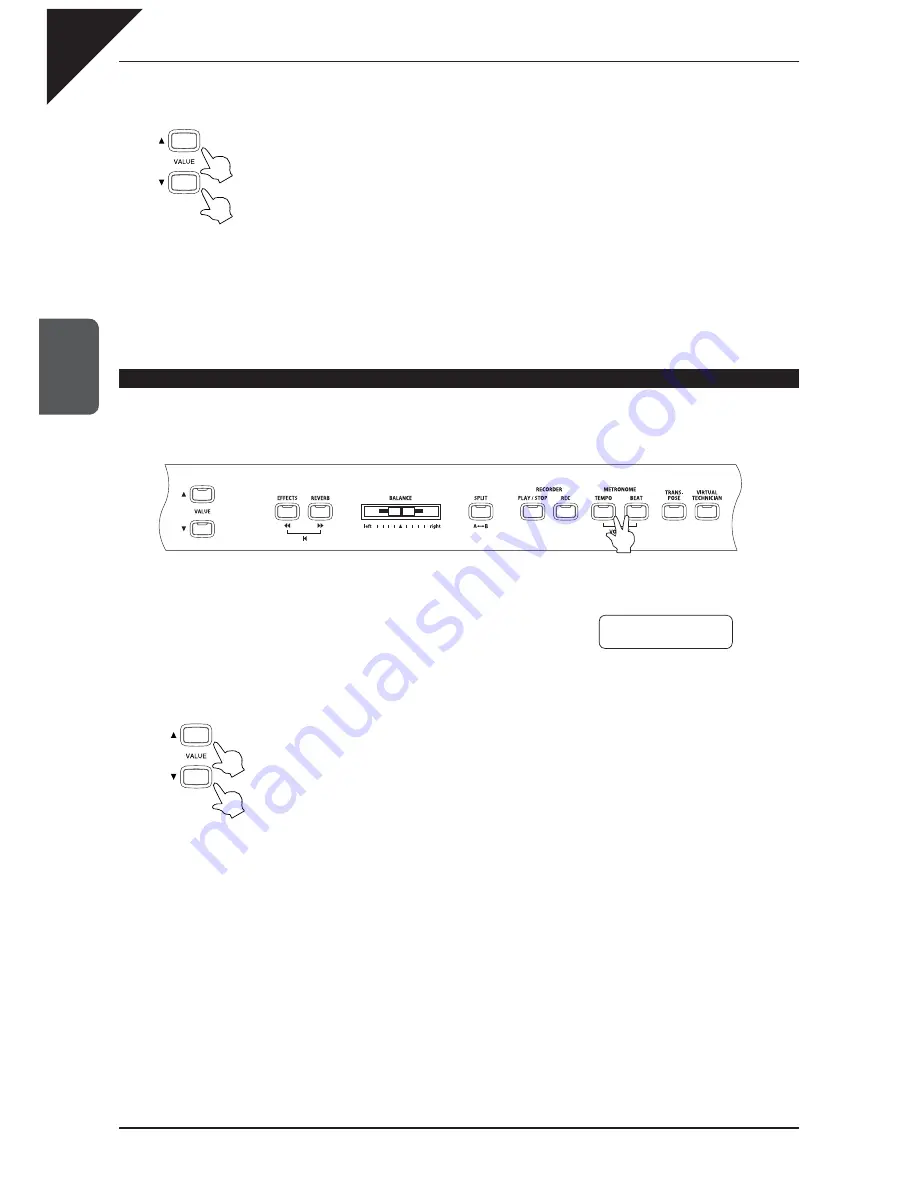
Use the VALUE buttons to change the beat / rhythm.

The beat can be selected from 1/4, 2/4, 3/4, 4/4, 5/4, 3/8, 6/8, 7/8, 9/8, 12/8.

The rhythm can be selected from 100 patterns (please see page 25 for a list of available

rhythms).

…

 Step 3

To stop the metronome or rhythm, press the BEAT button again. The LED indicator for the BEAT button 
will be turned off.

‘

 Setting the sound volume for the metronome / rhythm

…

 Step 1

Press the TEMPO and BEAT buttons at the simultaneously.

You will see the LED indicators for these buttons turn on and hear the 

metronome begin counting.

The Metronome volume is displayed on the LCD display.

…

 Step 2

Use the VALUE buttons to set the volume.

The volume can be set within a range of 1 to 10.

…

 Step 3

To stop the metronome or rhythm, press the TEMPO and BEAT buttons simultaneously again. The LED 
indicators for the TEMPO and BEAT button will be turned off.


Volume


=


5


~|||

CA61̲EN.indd   24

2008/10/17   12:11:39

Summary of Contents for Concert Artis CA61

Page 1: ...1 Part Names and Functions 2 Listening to the Piano 3 Playing the Piano 4 Recorder 5 Lesson Function 6 Concert Magic 7 Hymn Player 8 Virtual Technician 9 Menu Functions 10 Appendix Owner s Manual...

Page 2: ...aker system providing an even more realistic piano experience Your CA61 piano is equipped with a Lesson function which in addition to basic nger exercises includes songs from Alfred s Basic and Premie...

Page 3: ...ing a Song 41 2 Listening to the Song 42 3 Performing a Song 43 4 Part Volume Balance for Concert Magic 43 5 Concert Magic Song Arrangement Types 44 6 Steady Beat 45 7 Concert Magic Song Demo 46 8 Adj...

Page 4: ...se instructions 3 Heed all warnings 4 Follow all instructions 5 Do not use this apparatus near water 6 Clean only with dry cloth 7 Do not block any ventilation openings Install in accordance with the...

Page 5: ...iods of time at high volume levels Doing so may result in hearing problems It is a good practice to have the instrument near the AC outlet and the power cord plug in a position so that it can readily...

Page 6: ...llow any foreign matter to enter the product Doing so may cause the illumination to fall over resulting in fire Do not place naked flame such as lighted candles on the product CAUTION Indicates a pote...

Page 7: ...ception which can be determined by turning the equipment off and on the user is encouraged to try to correct the interference by one or more of the following measures Reorient or relocate the receivin...

Page 8: ...peakers and headphones Move this slider to the right to increase the volume and move to the left to decrease the volume z Sound buttons Use these buttons to select the different preset sounds Press th...

Page 9: ...OP button is used to select a song and part to play and to start and stop play back of the recorded songs It is also used to start stop playback when using the lesson function page 26 z METRONOME Use...

Page 10: ...ront panel Press this button to turn on the power Pressing it again will turn off the power When the power is rst turned ON you will hear the CA61 s main piano sound The name of the sound Concert Gran...

Page 11: ...more than one demo assigned to them Press the same SOUND SELECT button repeatedly to select the other demos assigned to that button Step 3 Press the DEMO button again to exit the demo mode You can als...

Page 12: ...manual Step 1 Press the DEMO and LESSON buttons simultaneously The LED indicators for these buttons will be turned on and the piano music selection screen will be displayed Step 2 Use the VALUE button...

Page 13: ...Modern E P 60 s E P Modern E P 2 New Age E P Crystal E P Drawbar Jazz Organ Drawbar Organ Drawbar Organ 2 Be 3 Jazzer Odd Man Church Organ Church Organ Diapason Full Ensemble Diapason Oct Chiffy Tibia...

Page 14: ...on repeatedly to select the different sounds assigned to that button The VALUE buttons can also be used to select sounds Step 2 Try playing the keyboard You will hear your selected sound as you play U...

Page 15: ...e the String Ensemble sound to Slow Strings while holding down the PIANO 1 button press the STRINGS button again until Slow Strings is displayed in the LCD If you want to layer two sounds assigned to...

Page 16: ...ess the desired SOUND SELECT button to select the lower sound The LCD display shows the selected sound for the upper and lower sections The symbol will be displayed at the bottom left corner of the LC...

Page 17: ...LED indicator ashes for the selected SOUND SELECT button Press the same button repeatedly to select a different sound type assigned to that button Step 6 Use the BALANCE slider to adjust the volume b...

Page 18: ...ndicate four hands mode is active On the LCD display the top line indicates the sound for the right section and the lower line indicates the sound for the left section Concert Grand is the default sou...

Page 19: ...imulates a larger room than Room1 STAGE Simulates the ambiance of a small hall or live stage HALL1 HALL2 Simulates the ambiance of a concert hall or theater Hall2 simulates a larger hall or theater th...

Page 20: ...the rotor between SLOW and FAST page 8 Step 1 Press the EFFECTS button to turn the effects on off The LED indicator will be turned on to indicate that the effects are in use Press and hold the EFFECT...

Page 21: ...TS button and use the VALUE buttons to select the effect type you wish to edit Step 2 With the EFFECTS button still held down use the MENU buttons to select the parameter to be edited Effect type Item...

Page 22: ...the LED indicator for the TRANSPOSE button is on The current transpose value is displayed in the display while the TRANSPOSE button is held down The default setting is C major The C key at the middle...

Page 23: ...D indicator for theTEMPO button will be turned off The metronome function cannot be used when Concert Magic is active Changing the metronome time signature and rhythm You probably noticed that there a...

Page 24: ...tton will be turned off Setting the sound volume for the metronome rhythm Step 1 Press the TEMPO and BEAT buttons at the simultaneously You will see the LED indicators for these buttons turn on and he...

Page 25: ...k 2 43 Funk 3 44 Funk Shuf e 1 45 Funk Shuf e 2 46 Buzz Beat 47 Disco 1 48 Disco 2 49 Hip Hop 1 50 Hip Hop 2 No Rhythm 51 Hip Hop 3 52 Hip Hop 4 53 Techno 1 54 Techno 2 55 Techno 3 56 Heavy Techno 57...

Page 26: ...racks separately adjust the tempo without changing the pitch or use a different effect setting from one you have recorded Once you understand the recorder you will nd it to be a useful tool for both p...

Page 27: ...rformance data stored in the CA61 piano will be saved even after turning off the power You can record a second part in the second track part of the same song After recording the rst part use the VALUE...

Page 28: ...e the MENU buttons to select a song The symbol appears on the second line on the display if the selected part has already been recorded Step 3 Use the VALUE buttons to select a part Part 1 2 Both part...

Page 29: ...ration press any SOUND SELECT button 3 Deleting a Song or Part You can delete songs or parts within a song that were not recorded as you wished or that you do not want to keep any more Step 1 Press th...

Page 30: ...on The display returns to the play back standby screen when the PLAY STOP button is pressed again Repeat the same procedures to delete multiple songs parts If you wish to delete all the recorded songs...

Page 31: ...sing the Alfred Lesson Books You can choose one of the songs and 1 Listen to study the overall performance 2 Practice the right hand part while listening to the left hand part of the song 3 Practice t...

Page 32: ...may turn it on by pressing the TEMPO or BEAT button of the metronome To change the tempo use the VALUE buttons while holding down the TEMPO button Press the T button to decrease the tempo and press t...

Page 33: ...ess the button to advance the song one bar at a time Press the button to rewind the song one bar at a time To fast forward or fast rewind the song hold down the corresponding button You may use this f...

Page 34: ...guide To practice the left hand part while listening to the right hand part of a song Move the slider to the right The volume of the left hand part of the song is decreased so that you can still hear...

Page 35: ...for the loop is set and the LED indicator for the A B button turns on The section to be repeated looped is now de ned The section of the song de ned by the start A and end B points will be repeated l...

Page 36: ...NCE slider Step 2 To stop recording press the PLAY STOP button Song play back and recording stops and the LED indicators for the REC and PLAY STOP buttons turn off The recorded performance can be dele...

Page 37: ...D display to allow you to objectively review your own performance Use the included music book FINGER EXERCISES for practice Selecting an exercise Step 1 Press the LESSON button The Lesson selection sc...

Page 38: ...to decrease the tempo and press the S button to increase the tempo To reset the tempo press the VALUE S and T buttons at the same time Step 2 Press the PLAY STOP button of the RECORDER once again The...

Page 39: ...Step 2 To stop recording press the PLAY STOP button Exercise play back and recording stops and the LED indicators for the REC and PLAY STOP buttons turn off Three different evaluation points as shown...

Page 40: ...The display changes from the evaluation result display screen to the exercise selection screen The recorded performance can be played even after canceling the evaluation result screen Exiting the less...

Page 41: ...ne of the 88 preprogrammed songs and tap any of the 88 piano keys with a steady rhythm and tempo CONCERT MAGIC will provide the correct melody and accompaniment notes regardless of which keys you pres...

Page 42: ...back This is called the Note Navigator These circles and plus signs provide a visual guide that shows you when to press the next key The space between the circles and position of the circles in the LC...

Page 43: ...ic is a perfect method for small children to learn music especially to develop a sense of rhythm For older people who may think it is too late to learn the keyboard Concert Magic is a good rst step fo...

Page 44: ...e following example F r Elise The Note Navigator indicates that you should keep a constant steady rhythm all the way through the song This is the distinguishing character of an Easy Beat song Press an...

Page 45: ...with Steady Beat you can play any Concert Magic song by simply tapping any key with a constant steady beat Step 1 Press and hold the CONCERT MAGIC button The LCD display will change to show the curre...

Page 46: ...ic songs in random order To stop the demo press the DEMO button again To select the songs in different categories select a song from the desired category 8 Adjusting the Playback Speed for the Concert...

Page 47: ...in for a missing pianist at a moment s notice 1 Turning Hymn Player On Off Step 1 Use the MENU buttons to select the Hymn Player function The second line on the display shows On or Off Step 2 Use the...

Page 48: ...mas Thanksgiving Easter Patriotic and Wedding All of the hymn titles and categories are listed in the appendix of this owner s manual Step 1 To select a hymn press the key to which your desired hymn i...

Page 49: ...circles in the LCD display turn into smaller plus signs as the hymn is played back This is called the Note Navigator These circles and plus signs provide a visual guide that shows you when to press t...

Page 50: ...played automatically in time with the tempo you tap As you tap harder the notes will get louder as you tap softer the notes will get quieter As you tap faster the notes speed up as you tap slower the...

Page 51: ...on using NORMAL mode and the different Concert Magic song hymn arrangement types please see page 44 5 Part Volume Balance for Hymn Player When used with Hymn Player the balance slider adjusts the vol...

Page 52: ...the hymn titles and categories are listed in the appendix of this owner s manual Category Play Category Play allows you to exclusively play all of the hymns within one of the six categories Press the...

Page 53: ...1 After selecting a hymn to play back hold down the TEMPO button The LCD display will show the tempo value Step 2 While holding down the TEMPO button use the VALUE buttons to change the tempo You can...

Page 54: ...heVALUE buttons to select the desired voicing type from Normal Mellow 1 Mellow 2 Dynamic Bright 1 and Bright 2 The second line on the display shows the selected voicing type Normal Produces the normal...

Page 55: ...volume of the damper resonance Step 2 Use the VALUE buttons to set the volume within a range of Off 1 to 10 5 is the default setting Damper resonance will not be active when Off is selected Step 3 Aft...

Page 56: ...if they are part of the same harmonic series In addition adjacent notes will also be resonated The string resonance function simulates this phenomenon This is called string resonance For example when...

Page 57: ...adjust the volume of the key off effect Step 2 Use the VALUE buttons to set the volume within a range of Off 1 to 10 5 is the default setting The key off effect will not be active when Off is selected...

Page 58: ...hedesiredtouchcurve youcanexitthevirtualtechnicianfunctionbypressingtheVIRTUAL TECHNICIAN button The touch curve setting defaults to Normal each time the power is turned off You can use the user memor...

Page 59: ...om soft to loud in order to let the CA61 piano analyze you playing style The screen shown below will be displayed a few seconds after the REC button is pressed While you are playing a musical note wil...

Page 60: ...me discordance of the fth in pure temperaments has been corrected This temperament produces more beautiful chords than pure temperaments Werckmeister III temperament Werckmeister Kirnberger III temper...

Page 61: ...to select the cent value setting screen A different half step tone is displayed each time the MENU S button is pressed MENU buttons 6 Temperament C 0 6 Temperament C 0 6 Temperament B 0 To create a u...

Page 62: ...the temperament key Step 1 After pressing theVIRTUALTECHNICIAN button use the MENU buttons to select the key of temperament function Step 2 Use the VALUE buttons to select the desired key within the r...

Page 63: ...ng the VIRTUAL TECHNICIAN button use the MENU buttons to select the stretch tuning function The second line on the display shows either Normal or Wide Step 2 Use the VALUE buttons to select either Nor...

Page 64: ...s displayed When the MENU T is pressed the last menu item is displayed You can scroll through the various menu items in ascending descending order by repeatedly pressing the MENU buttons 1 Brilliance...

Page 65: ...ift function setting defaults to 0 each time the power is turned off You can use the user memory function page 78 to save your desired lower octave shift setting This way your current lower octave shi...

Page 66: ...hen you use the dual function page 15 For example when you play in dual mode using Concert Grand Piano and String Ensemble you can adjust the octave range for the String Ensemble sound up or down Step...

Page 67: ...while maintaining control of the layered sound For example when you play in dual mode using Concert Grand Piano and String Ensemble you can use the layer dynamics function to adjust the String Ensembl...

Page 68: ...al is depressed sustained sounds will be sustained even after the keys are released When set to off and the sustain pedal is depressed sustained sounds will begin to decay fade out after the keys are...

Page 69: ...to set the pitch within a range of 427 0 to 453 0 Hz The pitch can be changed by 0 5 Hz each time one of the VALUE buttons is pressed Step 3 When you are nished press any one of the SOUND SELECT butt...

Page 70: ...d are capable of transmitting and receiving data via MIDI There are 16 MIDI channels available to choose from on the CA61 piano In addition to channel to channel connection it is possible to receive o...

Page 71: ...eceive channel setting You can specify the channels within the range of 1 to 16 Transmit receive Program change sound type number You can transmit to or receive program change data from a MIDI connect...

Page 72: ...mode off once a speci c channel is selected using the MIDI channel function Then data will be received only on the speci ed channel When you want to specify channel 1 in the omni mode off state rst s...

Page 73: ...ct the send PGM function The second line on the display shows the program number Step 2 Use the VALUE buttons to specify the program change number to be transmitted within the range of 1 to 128 Step 3...

Page 74: ...tep 1 Use the MENU buttons to select the local control on off function The second line on the display shows On or Off Step 2 Use the VALUE buttons to select On or Off Step 3 When you are nished press...

Page 75: ...orresponding buttons are pushed When set to off no program change or other panel information will be transmitted via MIDI Refer to page 77 for multi timbral mode Step 1 Use the MENU buttons to select...

Page 76: ...2 Jazzer 21 18 95 1 Odd Man 22 17 95 6 z Church Organ Church Organ 23 20 121 0 Diapason 24 20 95 7 Full Ensemble 25 21 95 1 Diapason Oct 26 20 95 6 Chiffy Tibia 27 20 95 17 Stopped Pipe 28 20 95 21 z...

Page 77: ...l Off This turns off the multi timbral capability Only one MIDI channel will be active and only the preset sound currently selected will be heard when a MIDI signal is received With this function you...

Page 78: ...mory function read the section below to save your desired channel mute setting This way your current channel mute setting will remain even after the power is turned off 14 User Memory This function al...

Page 79: ...exit the menu 15 Factory Reset This screen will be displayed only when the user memory function has been used This function resets the CA61 piano to the factory settings All parameters you saved in U...

Page 80: ...preventing the CA61 piano from producing sounds If this occurs turn off the power and then turn it on again y Do not directly connect the LINE IN and LINE OUT jacks of the CA61 together with a cable...

Page 81: ...it on the computer http www kawaius com archive download_archive_2 html Read the instruction manual thoroughly before connecting the unit to the computer and make sure to install the driver If you co...

Page 82: ...e unit failure To pull out the cord remove the connector while pressing the locking tab Parts included items Assembling screws Use a Phillips head screwdriver to assemble the unit Stand Piano Score st...

Page 83: ...tand x When you move the unit remove the pedal support before moving Readjust the pedal support after moving is complete Caution x Use the cord clamp to secure the power cord so that the cord will not...

Page 84: ...r op 17 Field Nocturne 1 Nocturne No 10 in E Minor Field Nocturne 2 Nocturne No 5 in B at Major Mendelssohn 1 Lieder Ohne Worte Heft 1 in E Dur op 19b SWEET REMEMBRANCE Mendelssohn 2 Lieder Ohne Worte...

Page 85: ...the Attic Stairs 14 Chopsticks 15 Down the Attic Stairs 15 Over and Over 16 Old MacDonald Had a Mouse 16 Row Row Row Your Boat 17 Rock Wall 17 Picnic Ants 18 Climbing Down 18 Butter y 19 A Jazzy Tune...

Page 86: ...17 A Happy Song 17 Good King Wenceslas 18 See Saws 18 The Rainbow 19 Just a Second 19 Good Morning to You 20 Balloons 20 Happy Birthday to You 21 Who s on Third 21 Yankee Doodle 22 Mexican Hat Dance...

Page 87: ...What Can I Share 18 When The Saints Go Marching In With RH Melody LH Chords 19 When The Saints Go Marching In With LH Melody RH Chords 20 Love Somebody 21 A Friend Like You 22 The Donkey 23 Money Can...

Page 88: ...s This Greensleeves F 2 MP Patriotic Songs America The Beautiful A2 MP Battle Hymn Of The Republic G 2 MP Hail To The Chief B2 MP My Country Tis Of Thee G2 MP Yankee Doodle A 2 MP American Classics Au...

Page 89: ...5 MP What A Friend We Have In Jesus F 5 MP Classical Selections An Die Freude Ode To Joy F6 MP Andante from Symphony No 94 Haydn D 6 MP Blue Danube Waltz B6 SK Clair De Lune F 6 SK Fledermaus E7 EB F...

Page 90: ...thfulness F 2 MP Have Thine Own Way Lord G2 MP Holy God We Praise Thy Name G 2 SK Holy Holy Holy A2 SK How Firm a Foundation A 2 MP How Great Thou Art B2 MP I Heard the Voice of Jesus Say C3 SK I Need...

Page 91: ...A Friend We Have in Jesus D6 MP When I Survey the Wondrous Cross D 6 SK When We All Get To Heaven E6 MP Wonderful Grace of Jesus F6 SK Christmas Angels We Have Heard On High F 6 SK Away in a Manger G6...

Page 92: ...ve Thine Own Way Lord G2 MP I Surrender All D3 MP I Need Thee Every Hour C 3 MP How Great Thou Art B2 MP Spirit of the Living God B4 SK Sweet Hour of Prayer D5 MP It is Well With My Soul D 3 MP Just A...

Page 93: ...an Voicing 6 types Damper resonance String resonance Key off effect Touch curve 6 preset types 2 user defined curves Temperament 9 types and user defined temperament Stretch tuning 2 types Transpose F...

Page 94: ...elay 2 04 Delay 3 05 Tremolo 06 Rotary 1 07 Rotary 2 0E 00 03 06 07 00 Reverb Off 01 Room 2 02 Stage 03 Hall 1 06 Room 1 07 Hall 2 14 00 7F Dual Split balance 16 1F 60 Tune 40 440 Hz 17 00 7F 00 Progr...

Page 95: ...d off through MIDI channel setting operations Note number Range 21 108 0 127 0 127 9 120 including transpose Velocity Note on Note off 9nH v 1 127 9nH v 0 After touch Key speci c Channel speci c Pitch...

Page 96: ......

Page 97: ......

Page 98: ...CA61 Owner s Manual KPSZ 0266 816430 OW1022E S0810 Version 2 Printed in Indonesia Copyright 2008 KAWAI Musical Instruments Mfg Co Ltd All Rights Reserved...

Reviews: