background image

82

Set

tings

Power Setting menu

1

 Auto Power Off

The CS6 features a power saving function that can be used to automatically turn off the instrument after a 

specified period of inactivity.

„

  Auto Power Off setting

Auto Power Off setting

Explanation

Off

The Auto Power Off function is disabled.

30 min.

The instrument will turn off automatically after 30 minutes of inactivity.

60 min.

The instrument will turn off automatically after 60 minutes of inactivity.

120 min.

The instrument will turn off automatically after 120 minutes of inactivity.

„

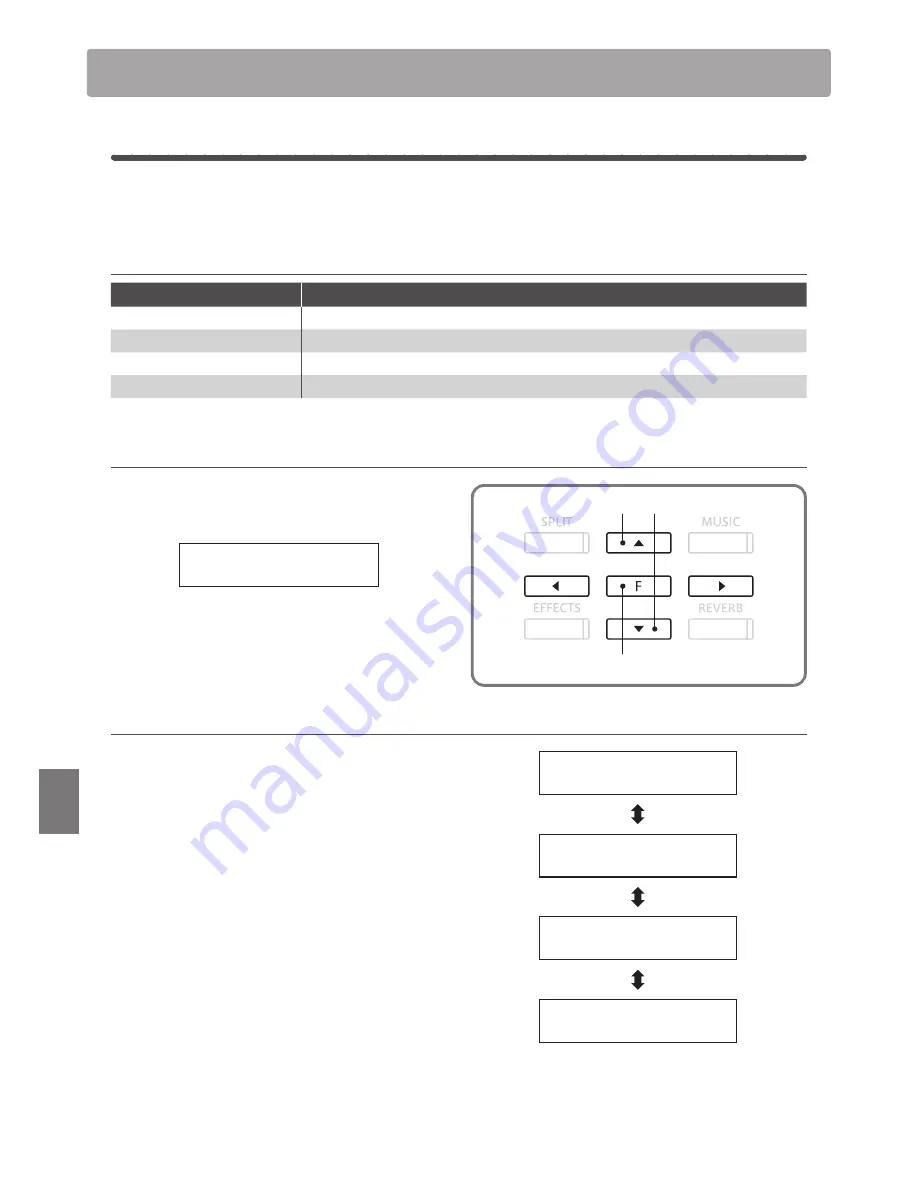
Entering the Power Setting menu

Press the FUNCTION button to enter the Functions menu.

Press the 

c

 or 

d

 buttons to select the Power Setting menu.

Functions
6.Power Setting

Press the FUNCTION button again to enter the menu.

The Auto Power Off setting will be selected automatically.

1. Changing the Auto Power Off setting

Press the 

c

 or 

d

 buttons to increase or decrease the value of 

the Auto Power Off setting.

* The Auto Power Off value can be set within the range of Off-120 mins.

Press a SOUND SELECT button to exit the Auto Power Off 

setting and return to normal operation.

The Auto Power Off setting will be stored in the instrument’s 

memory and automatically recalled every time the CS6 digital 

piano is turned on.

Select the Functions menu

Enter and exit the selected Functions menu

Auto Power Off

= Off

Auto Power Off


=


30 min.

Auto Power Off


=


60 min.

Auto Power Off


= 120 min.

Summary of Contents for Classic Series CS6

Page 1: ...Preparation Before Use Playing the Piano Music Menu Recorder Settings Appendix CS6 Owner s Manual...

Page 2: ...s Kawai Classic Series digital piano This owner s manual contains important information regarding the usage and operation of the CS6 digital piano Please read all sections carefully keeping this manua...

Page 3: ...nt of playing but also help to absorb moisture thus preventing fingers from slipping In addition the CS6 keyboard action is further equipped with a special Let Off feature accurately recreating the su...

Page 4: ...point within an equilateral triangle is intended to alert the user to the presence of important operating and maintenance servicing instructions in the leterature accompanying the product WARNING TO R...

Page 5: ...d itself may damage the cord causing a fire electric shock or short circuit Do not disassemble repair or modify the product Doing so may result in product breakdown electric shock or short circuit Whe...

Page 6: ...such as TVs and radios Failure to do so may over heat the product resulting in fire Ensure that the ventilation is not impeded by covering the ventilation openings with items such as newspaper table c...

Page 7: ...red markings identifying the terminals in your plug proceed as follows The wire which is coloured BLUE must be connected to the terminal which is marked with the letter N or coloured BLACK The wire wh...

Page 8: ...ely 28 4 Repeating sections of a lesson song 29 5 Recording a lesson song practice 30 6 Finger Exercises 31 Concert Magic 32 1 Performing a Concert Magic song 32 2 Concert Magic demo mode 33 3 Concert...

Page 9: ...annel transmit receive 70 2 Send Program Change Number 71 3 Local Control 71 4 Transmit Program Change Numbers 72 5 Multi timbral Mode 73 6 Channel Mute 74 USB MIDI USB to Host connector 75 USB Menu 7...

Page 10: ...10 Preparation Before Use Part Names and Functions Preparation Before Use a b c e f h i j m d g k l q r p o n s Kawai CS6 Classic Series...

Page 11: ...is button is used to store and recall one of the eight different registration memories Each registration can store sound reverb and effects settings as well as various other panel options k METRONOME...

Page 12: ...e words Concert Grand will be shown in the LCD display indicating that the Concert Grand sound is selected and the CS6 digital piano is ready to be played Concert Grand The CS6 features a power saving...

Page 13: ...ones Use the jacks located beneath the keyboard on the left hand side to connect stereo headphones to the CS6 digital piano Two pairs of headphones can be connected and used simultaneously When a pair...

Page 14: ...ill be selected automatically when the instrument is turned on Selecting a sound Press the desired SOUND SELECT button The LED indicator for the button will turn on to indicate that this category has...

Page 15: ...d of the rotary simulation between Slow and Fast effect modes Sostenuto pedal centre pedal Depressing this pedal after playing the keyboard and before releasing the keys sustains the sound of only tho...

Page 16: ...off Press the REVERB button to turn reverb on off TheLEDindicatorfortheREVERBbuttonwillturnontoindicate that reverb is in use The currently selected reverb type and status will be shown in the LCD di...

Page 17: ...ary 1 is a normal rotary effect while Rotary 2 adds distortion The soft pedal can be used to alternate the speed of the rotary simulation between Slow and Fast effect modes Turning effects on off Pres...

Page 18: ...mode only Adjusts the speed of the Rotary effect Entering the effect settings menu Press and hold the EFFECTS button then press the c or d buttons to cycle through the different effect types Release...

Page 19: ...other sounds assigned to that button For example to change the layered String Ensemble sound to Slow Strings first press and hold the PIANO 1 button then press the STRINGS button repeatedly until Slo...

Page 20: ...sound in the upper section Entering split mode Press the SPLIT button The LED indicator for the SPLIT button will turn on to indicate thatsplitmodehasbeenenabled Inaddition theLEDindicator for the upp...

Page 21: ...thin the same key range using the same instrument Entering four hands mode Press and hold the SPLIT button then press the sustain right and soft left pedals simultaneously The LED indicator for the SP...

Page 22: ...r d buttons to increase or decrease the tempo The metronome tempo can be adjusted within the range of 10 400 bpm 20 800 bpm for eighth note rhythms Press the e or f buttons to select the desired time...

Page 23: ...on will turn on to indicate that the registration function is in use and the sound s for the currently selected registration memory will be shown in the LCD display Press one of the REGISTRATION SELEC...

Page 24: ...o song will start to play Selecting a demo song While Demo mode is selected Press a SOUND SELECT button The first demo song of the sound category will start to play Press the c or d buttons to cycle t...

Page 25: ...s The LED indicator for the PLAY STOP button will turn on and the song Tamourin by Rameau will start to play Selecting a piano music song While Piano Music mode is selected Press the c or d buttons to...

Page 26: ...l Song Lists booklet for more information 1Selecting a lesson book song Entering lesson mode Press the MUSIC button then press the c or d buttons until Lesson Mode is shown in the LCD Display Music Me...

Page 27: ...song Press the PLAY STOP button once again A one bar count in will be heard before the lesson song resumes playback from the previous position Press the PLAY STOP button to stop the lesson song then...

Page 28: ...e selected lesson song Press the PLAY STOP button A one bar count in will be heard before the song starts to play from the specified bar number To practice the right hand part while listening to the l...

Page 29: ...cator for the SPLIT button will turn on indicating that the end point of the B of the loop has been set Burgmueller25 01 Bar 10 2 126 The defined A B section of the lesson song will repeat loop contin...

Page 30: ...starts to play Burgmueller25 01 Bar 4 1 126 Press the PLAY STOP button The LED indicator for the PLAY STOP button will turn off and the recorded lesson song will stop playing The A B loop function ca...

Page 31: ...hown alternately in the LCD display Press the REC and PLAY STOP buttons simultaneously to erase the recorded finger exercise practice The recorded practice will be erased automatically when a differen...

Page 32: ...g bank A is assigned A Concert Magic song from bank A will be selected with the song number and name shown in the LCD display A01 Twinkle Twinkle 3 Performing a Concert Magic song Press a key on the k...

Page 33: ...RONOME button then press the e or f buttons to increase or decrease the tempo of the song Category playback Enter Concert Magic mode and select the desired song Press and hold the MUSIC button then pr...

Page 34: ...ned throughout the song This is the distinguishing characteristic of an Easy Beat song Fur Elise Key on X X X X X X X X X X X X X X X X X X X X Melody Play These songs are also relatively easy to play...

Page 35: ...the rhythms that are heard The Internal Song Lists booklet indicates the arrangement type next to each song title as EB for Easy Beat MP for Melody Play and SK for Skillful 4Steady Beat mode Steady Be...

Page 36: ...h the currently selected song and part number shown in the LCD display Record Internal Song 1 Part 1 If a USB memory device is connected press d button to select Record Internal then press the FUNCTIO...

Page 37: ...stored during recording Panel operations NOT stored during recording Changes made to the sound type SOUND SELECT buttons etc Changes made to the reverb settings Switching between dual split modes Chan...

Page 38: ...y Internal option then press the FUNCTION button 2 Selecting a song part s to be played back Press the c or d buttons to select the song then press the e or f buttons to select the part s to be played...

Page 39: ...ol will be shown Erase Press F Song 1 Part 1 2 3 Erasing a song Press the FUNCTION button A confirmation message will be shown in the LCD display prompting to confirm or cancel the erase operation Sur...

Page 40: ...ofer IIS and Thomson MP3 codec is Copyright c 1995 2007 SPIRIT 1Recording an audio file 1 Entering audio recorder mode Connect a USB memory device to the USB port Press the REC button The LED indicato...

Page 41: ...ting to confirm or cancel the overwrite operation Overwrite file No Yes Press the e or f buttons to cancel or confirm the operation If cancelled the audio recorder will return to the saving screen ste...

Page 42: ...B memory device USB devices should be formatted to use the FAT or FAT32 filesystems 2Playing an audio file 1 Entering audio playback mode Connect a USB memory device to the USB port Press the PLAY STO...

Page 43: ...rence in volume between audio file playback and the CS6 keyboard sound When playing back MP3 WAV audio data please adjust the volume of the audio file as desired Press the e or f buttons to rewind or...

Page 44: ...or d buttons to increase or decrease the playback volume of the song file Press the e or f buttons to rewind or advance the playing position of the song file Press and hold the METRONOME button then...

Page 45: ...the part s to played and converted 2 Selecting the Convert to Audio function Press the FUNCTION button The Convert to Audio screen will be shown in the LCD display Convert to Audio Song 1 Part 1 2 3...

Page 46: ...ontrol Speaker Volume Phones Volume Tuning Damper Hold Four Hands User Memory Factory Reset 2 Virtual Technician Touch Voicing Damper Resonance String Resonance Key off Effect Stretch Tuning Temperame...

Page 47: ...ld Change the effect of the sustain pedal on organ string etc sounds off 8 Four Hands Enable the Four Hands Mode function off 9 User Memory Store current panel settings as the default power on configu...

Page 48: ...ed or lowered by up to 12 semi tones Press a SOUND SELECT button to exit the Key Transpose setting and return to normal operation 2Song Transpose The Song Transpose setting allows the pitch of SMF son...

Page 49: ...ecting the Tone Control setting Enter the Basic Settings menu page 47 Press the e or f buttons to select the Tone Control setting 2 Changing the Tone Control type Press the c or d buttons to cycle thr...

Page 50: ...ume The Phones Volume setting allows the maximum volume level of the headphones output to be increased The default setting for Phones Volume is Low in order to protect an individual s ears from excess...

Page 51: ...r sounds such as organ or strings should be sustained continuously when the sustain damper pedal is depressed or whether these sounds should decay naturally Damper Hold settings Damper Hold setting Ex...

Page 52: ...s the c or d buttons to turn the Four Hands setting on off When enabled the LED indicators for the SPLIT and SOUND SELECT buttons will flash Press a SOUND SELECT button to exit the Four Hands setting...

Page 53: ...function clears any settings stored using the User Memory function above resetting the CS6 digital piano back to its factory default settings This function does not clear or otherwise affect recorder...

Page 54: ...Key off Effect Adjust the volume of the sound that is heard when keys are released 5 6 Stretch Tuning Adjust the level of stretch tuning for equal temperaments Normal 7 Temperament Adjust the tuning s...

Page 55: ...striking force to achieve a forte note For players with a very delicate touch Light A louder volume is produced even when playing with a soft touch For those still developing finger strength This curv...

Page 56: ...ser Touch curve When selecting the User1 or User2 touch types Press the REC button Playthepianodynamicallyfromverysofttoveryloud allowing the instrument to examine the personal playing technique Press...

Page 57: ...acter that changes dramatically from mellow to bright depending on the strength of key strike Bright 1 A bright tonal character throughout the entire dynamic range Bright 2 An even brighter tonal char...

Page 58: ...nance Sounds affected by Damper Resonance PIANO 1 Concert Grand Studio Grand Mellow Grand Jazz Grand Concert Grand 2 Studio Grand 2 Mellow Grand 2 Jazz Grand 2 PIANO 2 Pop Piano Pop Piano 2 1 Selectin...

Page 59: ...tly hold down the C key as shown in the illustration below then press any of the keys marked with a z symbol In addition to the sound of each note played it should also be possible to hear the strings...

Page 60: ...tting and return to normal operation 6Stretch Tuning Stretch tuning is a piano specific tuning method in which the tuning for the lower notes is slightly lower and the tuning for the higher notes is s...

Page 61: ...ed with certain fifths for the Mersenne pure temperament It produces chords that are more beautiful than those played with equal temperament Werckmeister III Temperament Werkmeister Kirnberger III Tem...

Page 62: ...old the FUNCTION button After a few seconds the User Temperament edit mode will be selected with the note name and cent value shown in the LCD display Press the e or f buttons to select the note to ad...

Page 63: ...ard will remain unchanged 1 Selecting the Key of Temperament setting Enter the Virtual Technician menu page 54 Press the e or f buttons to select the Key of Temperament setting 2 Changing the Key of T...

Page 64: ...Layer Dynamics Adjust the dynamic sensitivity of the layered sound when using Dual mode 10 Default settings will be shown in the first LCD display illustration i e Step 1 for each setting explanation...

Page 65: ...SOUND SELECT button to exit the Lower Octave Shift setting and return to normal operation 2Lower Pedal The Lower Pedal setting determines whether or not the sustain pedal will affect i e sustain the...

Page 66: ...64 Press the e or f buttons to select the Layer Octave Shift setting 2 Adjusting the Layer Octave Shift value Press the c or d buttons to increase or decrease the value of the Layer Octave Shift setti...

Page 67: ...two combined sounds In addition to reducing the volume of the layered sound limiting its dynamic sensitivity also allows the layered sound to be controlled more easily in relation to the main sound 1...

Page 68: ...from another MIDI device and the transmit channels are used to transmit data to another MIDI device The illustration below shows three musical instruments connected together using MIDI Transmitting i...

Page 69: ...cer via the MIDI OUT jack Receive multiple channel MIDI data from a MIDI connected musical instrument or device Multi timbral setting must be enabled Transmit receive exclusive data Receive volume dat...

Page 70: ...nt is automatically set to omni mode on allowing MIDI information to be received on all MIDI channels 1 16 When the MIDI Channel setting is used to specify a transmit receive channel the instrument wi...

Page 71: ...n to normal operation 3Local Control The Local Control setting determines whether the instrument will play an internal sound when the keys are pressed This setting is useful when using the CS6 digital...

Page 72: ...List on pages 89 90 1 Selecting the Transmit Program Change Numbers setting Enter the MIDI Settings menu page 69 Press the e or f buttons to select the Transmit Program Change Numbers setting 2 Chang...

Page 73: ...ed On2 The sound shown in the right column is selected Please refer to the Program Change Number List on pages 89 90 1 Selecting the Multi timbral Mode setting Enter the MIDI Settings menu page 69 Pre...

Page 74: ...g the Channel Mute setting Enter the MIDI Settings menu page 69 Press the e or f buttons to select the Channel Mute setting 2 Changing the Channel Mute setting Press the e or f buttons to select the M...

Page 75: ...is not supported Please use the standard MIDI IN OUT connectors USB MIDI information If the instrument s MIDI IN OUT jacks and USB MIDI port are both connected simultaneously the USB MIDI port will be...

Page 76: ...stored on a USB memory device 4 Delete Delete a file stored on a USB memory device 5 Format Format a USB memory device erasing all stored data Entering the USB menu Press the FUNCTION button to enter...

Page 77: ...a symbol will be shown Any existing recorder song data will be replaced by the loaded song Press the FUNCTION button 3 Selecting the song to be loaded Press the c or d buttons to select the song to be...

Page 78: ...numeric characters and the e or f buttons to move the cursor Press the FUNCTION button 4 Saving the song A confirmation message will be shown in the LCD display prompting to confirm the save song oper...

Page 79: ...buttons to move the cursor Press the FUNCTION button A confirmation message will be shown in the LCD display prompting to confirm the rename operation Press the e or f buttons to cancel or confirm the...

Page 80: ...file to be deleted Press the c or d buttons to select the file to be deleted then press the FUNCTION button 3 Deleting the file A confirmation message will be shown in the LCD display prompting to con...

Page 81: ...onfirmation message will be shown in the LCD display prompting to confirm the format operation Press the e or f buttons to cancel or confirm the operation A second confirmation message will be shown i...

Page 82: ...the Functions menu Press the c or d buttons to select the Power Setting menu Functions 6 Power Setting Press the FUNCTION button again to enter the menu The Auto Power Off setting will be selected au...

Page 83: ...edal cable is firmly connected to the instrument p 93 When depressing a pedal the pedal board flexes and is not firm Check that the pedal support bolt is fully extended p 15 USB A USB memory device is...

Page 84: ...ng any sound from being produced If this occurs turn the power off and then on again to reset the amplifier protection circuit Do not connect the LINE IN and LINE OUT jacks of the CS6 digital piano to...

Page 85: ...from an external audio device such as a CD or MP3 player to the instrument s speakers The LINE IN adjustment knob cannot be used to adjust the LINE IN level therefore please use the volume controls o...

Page 86: ...Drawbar Organ 2 Be 3 Jazzer Odd Man Church Organ Diapason Full Ensemble Diapason Oct Chiffy Tibia Stopped Pipe HARPSI MALLETS Harpsichord Harpsichord 2 Vibraphone Clavi Marimba Celesta STRINGS Slow St...

Page 87: ...Organ Original Kawai 15 Drawbar Organ 2 Original Kawai 16 Church Organ Toccata Gigout 17 Diapason Wohl mir da ich Jesum habe Bach 18 Full Ensemble Original Kawai HARPSI MALLETS 19 Harpsichord French S...

Page 88: ...k 3 44 Funk Shuffle 1 45 Funk Shuffle 2 46 Buzz Beat 47 Disco 1 48 Disco 2 49 Hip Hop 1 50 Hip Hop 2 No Rhythm 51 Hip Hop 3 52 Hip Hop 4 53 Techno 1 54 Techno 2 55 Techno 3 56 Heavy Techno 57 8 Shuffl...

Page 89: ...2 121 1 E PIANO Classic E Piano 13 5 121 0 Modern E P 14 6 121 0 60 s E P 15 5 121 3 Modern E P 2 16 6 121 1 New Age E P 17 6 95 2 Crystal E P 18 6 95 1 ORGAN Jazz Organ 19 18 121 0 Drawbar Organ 20...

Page 90: ...1 0 VOCAL PAD Choir 43 53 121 0 Pop Ooh 44 54 95 39 Pop Aah 45 54 95 40 Choir 2 46 54 95 53 Jazz Ensemble 47 54 95 2 Pop Ensemble 48 54 95 7 New Age Pad 49 89 121 0 Atmosphere 50 100 121 0 Itopia 51 9...

Page 91: ...1 Pedal support bolt x 1 j Tapping screw short silver x 4 l Headphone hook set x 1 Headphone hook x 1 _ 1 Assembling the side panels b pedal board and pedal support bolt e Unfasten and extend the ped...

Page 92: ...and are not visible when viewed from above Gently slide the main body backwards until the base engages with the fixings and locks into place When lifting the main body onto the stand and sliding it in...

Page 93: ...notch in the pedal plug is facing upward when connecting Connect the power cable f to the AC IN terminal also located on the rear of the main body then use the binders to fix the cables into place 6...

Page 94: ...4 3 4 4 4 5 4 3 8 6 8 7 8 9 8 12 8 Rhythm 100 types Demo Songs 34 songs Piano Music 29 or 42 pieces depending on market area Concert Magic 176 songs Virtual Technician Voicing Damper Resonance String...

Page 95: ...v 1 127 Note off 9nH v 0 After touch Key specific Channel specific Pitch bend Control change 0 32 Bank select 7 Volume 10 Panpot 11 Expression pedal 64 Right pedal Damper pedal 66 Middle pedal Sostenu...

Page 96: ...CS6 Owner s Manual KPSZ 0457 817025 OW1052E S1012 Version 1 Printed in Indonesia Copyright 2010 Kawai Musical Instruments Mfg Co Ltd All Rights Reserved...

Reviews: