background image

107

Settings 

Virtual Technician

8

. Key-off Effect

When playing an acoustic piano – particularly in the bass region of the keyboard – if a key is played with force and 
released quickly, it is often possible to hear the faint sound of the damper touching the strings immediately before 
the vibrations are stopped.

In addition, the speed at which keys are lifted will also affect the character of the sound.  For example, when lifting 
the keys quickly (e.g. staccato playing) the “release” portion of the sound will be noticeably shorter than when lifting 
the keys slowly (e.g. legato playing).

This instrument reproduces both characteristics, with the Key-off Effect setting allowing the volume of the key-off 
sound to be adjusted, and the key-off release speed detection to be turned on or off.

* This Virtual Technician setting will affect acoustic piano and electric piano sounds.

„

„

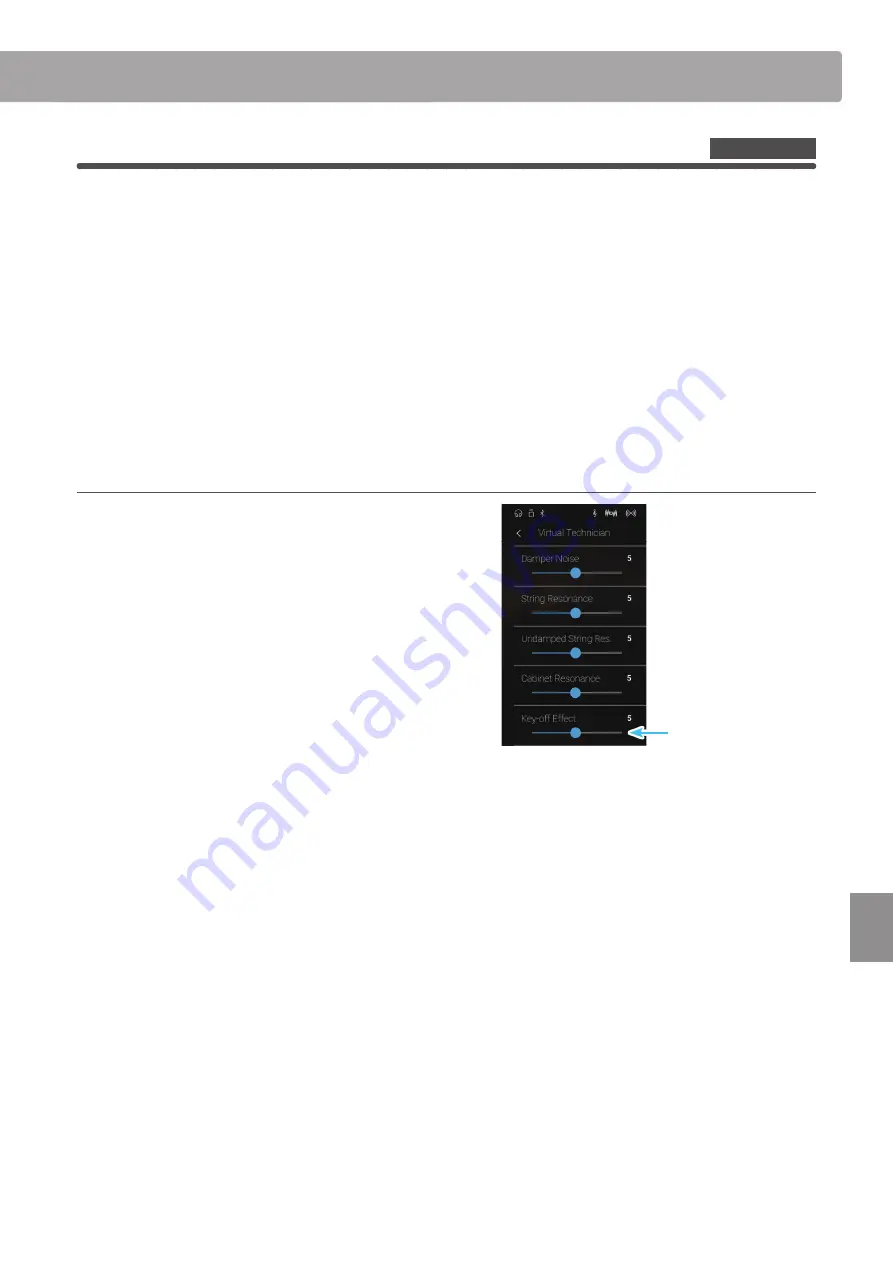
Adjusting the Key-off Effect volume

Long press and drag the slider to adjust the volume of the Key-
off Effect setting.

* The Key-off Effect volume can be adjusted within the range of Off, 

1~10, with higher values resulting in a more pronounced effect.

* When the Key-Off Effect setting is set to Off, the key-off release speed 

detection will also be disabled, and the speed at which keys are lifted 
will not affect the character of the sound.

* Any changes made to the Key-off Effect setting will remain until the 

power is turned off.

* Preferred Key-off Effect settings can be stored to the sound’s memory 

(in Sound mode) or a Favorite memory for convenient recall.  For 
more information, please refer to “1. Storing and Selecting Favorite 
memories” on page 79 and 
“Storing the Virtual Technician settings” 
on page 98.

Sound Mode

Key-off Effect slider

Summary of Contents for ANYTIMEX3

Page 1: ...Introduction Playing the Piano Recorder Music Screen Favorite Screen Settings Appendix ATX3 Owner s Manual ...

Page 2: ...urchasing this Kawai ANYTIMEX3 piano This owner s manual contains important information regarding this instrument s usage and operation Please read all sections carefully keeping this manual handy for future reference ...

Page 3: ...ean only with dry cloth 7 Do not block any ventilation openings Install in accordance with the manufacturer s instructions 8 Do not install near any heat sources such as radiators heat registers stoves or other apparatus including amplifiers that produce heat 9 Do not defeat the safety purpose of the polarized or grounding type plug A polarized plug has two blades with one wider than the other A g...

Page 4: ...de positionner le câble d alimentation secteur de sorte qu il puisse être débranché rapidement en cas d urgence le courant électrique étant toujours présent tant que la prise est branchée même si le bouton de mise en marche est en position Arrêt INSTRUCTIONS DE MISE À LA TERRE Si vous ne le faisiez pas la foudre pourrait provoquer un incendie Si vous ne le faisiez pas la surchauffe de l appareil p...

Page 5: ...oduct to fall over resulting in injury Do not lean against the keyboard Do not disassemble repair or modify the product Doing so may result in product breakdown electric shock or short circuit When disconnecting the AC power cord s plug always hold the plug and pull it to remove it Pulling the AC power cord itself may damage the cord causing a fire electric shock or short circuit Failure to do so ...

Page 6: ...d other cords take care not to get them tangled Doing so may result in discoloration or deformation of the product When cleaning the product put a soft cloth in lukewarm water squeeze it well then wipe the product Do not wipe the product with benzene or thinner Doing so may cause the product to become deformed or fall over resulting in breakdown or injury Do not stand on the product or exert exces...

Page 7: ...ed RED Do not plug either terminal of the power cord to the the ground od AC outlet on the wall FCC Information U S A CAUTION Changes or modifications not expressly approved by the party responsible for compliance could void the user s authority to operate the equipment NOTE This equipment has been tested and found to comply with the limits for a Class B digital device pursuant to Part 15 of the F...

Page 8: ...Recorder USB memory 45 1 Recording an audio file Pianist and Sound mode 45 Music Screen About the Music Screen 48 Demo Songs 49 Piano Music 51 Lesson Songs 53 Concert Magic 59 1 Concert Magic song performance 61 2 Concert Magic song playback 63 Recorder Playback 65 USB Memory Player 71 Favorite Screen About the Favorite Screen 77 1 Storing and Selecting Favorite memories 79 2 Editing Favorite memo...

Page 9: ...udio Volume 131 4 Rename File 132 5 Delete File 133 6 USB Format 134 MIDI Overview 135 7 MIDI Channel 137 8 Send Program Change Number 138 9 Local Control 138 10 Transmit Program Change Numbers 139 11 Multi timbral Mode 140 12 Channel Mute 140 13 LCD Contrast 141 14 Auto Display Off 141 15 Auto Power Off 142 16 Factory Reset 143 Appendix Connecting to Other Devices 144 Jack Panel 145 Headphone Pan...

Page 10: ...10 Introduction Part Names and Functions k m n p o a b c d e f g h i j l ...

Page 11: ...ract with this instrument by gently tapping on buttons and icons that appear or by swiping left and right or up and down A protective plastic film is attached to the display during production Please remove this film before attempting to play this instrument The display can be set to turn off automatically after a period of inactivity For more information please refer to 14 Auto Display Off on page...

Page 12: ...he KAWAI logo will appear in the touchscreen display After a short period the Pianist mode screen will appear indicating that this instrument is ready to be played To turn off the power press and hold the POWER button again for 1 2 seconds Please do not turn off this instrument while the initial KAWAI logo is displayed This instrument features a power saving mode that can turn off the instrument a...

Page 13: ...s instrument at the same time When a pair of headphones is connected sound will not be produced by the speakers In addition the headphones icon will appear in the status bar of the touchscreen display The maximum volume level of the headphones output and other headphone characteristics can be adjusted by using the settings in the Sound Settings menu For more information please refer to pages 125 1...

Page 14: ...nd is performed by momentarily touching areas of the screen typically buttons and icons with a single finger In this owner s manual this operation will be referred to as tap the xxxx button Swipe This operation is frequently used to cycle through lists of sounds songs and settings The operation is performed by touching the screen with a single finger then sliding up down left or right while liftin...

Page 15: ... explained below a Status bar Thisareaindicatesthestatusofconnecteddevices headphones USB Bluetooth and important functions transpose effects reverb b Menu button This button is used to display the function settings menu for the current screen c Sound adjustment selection area This area is used to change the rendering character and resonancedepthoftheSK EXconcertgrandpianosound Pianist mode screen...

Page 16: ...nds screen Recorder bar a Recorder button Tap to expand the Recorder bar and show additional recorder settings b Recorder status Indicates the current Recorder status c Record Start Stop button Tap to place the Recorder in Standby then tap again to Start Stop recording For more information about the Recorder function please refer to About the Recorder on page 35 Metronome bar a Metronome button Ta...

Page 17: ...ton Show the Sound mode screen utilising the multi instrument sound engine c Music button Show the Music screen used for accessing the built in demonstration songs piano music pieces lesson songs recorder songs and the USB audio player d Favorite button Show the Favorite screen used for recalling favorite sounds and settings a b c d ...

Page 18: ...rformance Tap the Pianist button to show the Pianist mode screen a Pianist mode menu button Tap to display the function settings menu for the Pianist mode screen b Rendering character Swipe left right or tap the arrow buttons to change the rendering character used for the SK EX Rendering piano sound engine c Resonance depth Long press and drag up down to adjust the Resonance depth of the SK EX Ren...

Page 19: ...jazz Brilliant A bright grand piano sound with emphasised treble Rich A rich grand piano sound with emphasised resonances Ballad A clear light grand piano sound that is suitable for ballads Pop A strong grand piano sound with emphasised attack that is suitable for pop music Vintage A soft grand piano sound with a vintage character Boogie A small grand piano with a detuned character Selecting the R...

Page 20: ...en please refer to the table on next page d Virtual Technician Tap to open the Virtual Technician menu This menu is used to adjust various characteristics of the acoustic piano sound For more information about the Virtual Technician menu please refer to Virtual Technician on page 95 e Sound Settings Tap to open the Sound Settings menu This menu is used to adjust various settings of the sound For m...

Page 21: ...ounge Simulates the soft ambience of a lounge Bright Lounge Simulates the bright ambience of a lounge Studio Simulates the ambience of a recording studio Wood Studio Simulates the ambience of a wooden recording studio Live Stage Simulates the ambience of a live stage Echo Simulates the ambience of an echo chamber Pianist Demos songs Song name Composer 1 Polonaise in A flat major Op 53 Frédéric Cho...

Page 22: ...ease refer to Sound List Sound mode on page 151 Tap the Sound button to show the Sound mode screen a Sound mode menu button Tap to display the function settings menu for the Sound mode screen b Single Tap to select the Single keyboard mode This is the standard mode for playing one sound across the entire length of the keyboard c Dual Tap to select the Dual keyboard mode This mode allows two sounds...

Page 23: ...layered together creating a more complex sound For example a piano sound layered with strings or a church organ combined with a choir etc Selecting Dual keyboard mode Tap the Dual button to select Dual keyboard mode The sound selection area of the Sound mode screen will divide into two halves The top half indicates the main sound while the bottom half indicates the layered sound By default Slow St...

Page 24: ...in sound 10 Tap the Menu button to show the Sound mode menu Next tap Keyboard Settings to show the Dual keyboard mode settings a Back button Tap to return to the Sound mode menu b Balance Long press and drag the slider to adjust the volume balance between the main and layered sounds c Layer Octave Shift Long press and drag the slider to adjust the pitch of the layered sound in octave steps d Layer...

Page 25: ...be used for the lower section sound Selecting sounds Selecting sounds in Split keyboard mode is identical to that of Single and Dual keyboard modes 1 Tap the upper or lower section sound area to enter sound selection mode 2 Swipe left right to change the instrument sound and up down to change the instrument category Split keyboard mode settings Split setting Description Default Setting Balance Adj...

Page 26: ...ower Octave Shift Long press and drag the slider to adjust the pitch of the lower section sound in octave steps d Lower Pedal ON OFF button Tap to enable disable the damper pedal for the lower section sound e Split Point Tap to set the point on the keyboard that divides the upper and lower sections Changing the Split point Tap the Split Point setting A message will appear prompting to press a key ...

Page 27: ...f indicates the right section sound while the bottom half indicates the left section sound By default the SK EX Concert Grand sound will be used for both the right and left sections Selecting sounds Selecting sounds in 4Hands keyboard mode is identical to that of Single Dual and Split keyboard modes 1 Tap the right or left section sound area to enter sound selection mode 2 Swipe left right to chan...

Page 28: ...ave Shift Long press and drag the slider to adjust the pitch of the right section sound in octave steps d Left Octave Shift Long press and drag the slider to adjust the pitch of the left section sound in octave steps e Split Point Tap to set the point on the keyboard that divides the right and left sections Changing the Split Point Tap the Split Point setting A message will appear prompting to pre...

Page 29: ...Adjust the decay length speed of the reverberation 1 10 Reverb settings are independent for each sound variation Tap the Menu button to show the Sound mode menu Next tap Reverb to show the Reverb settings a Back button Tap to return to the Sound mode menu b Type Swipe left right or tap the arrow buttons to change the reverb type c Depth Long press and drag the slider to adjust the depth of the rev...

Page 30: ...uttons to turn Effects on off When Effects is turned on the Effects icon will be shown in the status bar Effects settings Effects setting Description Range Type Change the type of effect Dry Wet Adjust the primary setting of the effect 1 10 Time Adjust the secondary setting of the effect 1 10 Effects settings are independent for each sound variation Tap the Menu button to show the Sound mode menu ...

Page 31: ...he sound of a rotary speaker commonly used with vintage electronic organs There are three different levels of overdrive with and without a Chorus effect The soft pedal can be used to alternate the speed of the rotary simulation between Slow and Fast effect modes Combination Effects Different combinations of the above effects applied simultaneously Combination effect types Phaser Chorus Phaser Auto...

Page 32: ... playing styles and musical genres The Metronome function is available on both the Pianist mode screen and the Sound mode screen Turning the Metronome on off Tap the Metronome Start Stop button The Metronome Start Stop button will change colour and a 4 4 beat will start to count The current metronome beat and tempo will also be shown in the Metronome status bar Tap the Metronome Start Stop button ...

Page 33: ... preset tempo term There are 17 tempo presets ranging from Grave to Prestissimo d Tempo selection Swipe each digit up down or tap the arrow buttons to adjust the metronome tempo The metronome tempo can be adjusted with the range of 10 400 BPM e Time signature selection Swipe left right or tap the arrow buttons to change the metronome time signature When the metronome is counting the current beat o...

Page 34: ...t drum rhythm mode c Drum rhythm category Swipe left right or tap the arrow buttons to change the drum rhythm category There are 11 drum rhythm categories d Tempo selection Swipe each digit up down or tap the arrow buttons to adjust the drum rhythm tempo The drum rhythm tempo can be adjusted with the range of 10 400 BPM e Drum rhythm pattern selection Swipe left right or tap the arrow buttons to c...

Page 35: ...ttings Virtual Technician settings All changes Overdubbing possible No Yes Yes MPEG Layer 3 audio coding technology licensed from Fraunhofer IIS and Thomson In Sound mode the current Reverb Effects and Virtual Technician settings will be used when the internal recorder song is played back Record Start Stop button The Record Start Stop button Pianist mode and Sound mode provides a quick way to star...

Page 36: ...cted automatically If a USB memory device is not connected this setting will not be shown and the Internal recorder mode will be used d Song memory selection Swipe left right or tap the arrow buttons to change the song memory to be used for recording In Pianist mode up to 3 songs can be recorded e Play Stop button Tap to Play Stop the currently selected song f Record Start Stop button Tap to place...

Page 37: ...rt Stop buttonagaintostoptherecording In Pianist mode the maximum internal recording capacity is approximately 10 minutes per song memory If the maximum recording capacity is reached during recording the recorder will stop automatically Recorder songs will remain in memory after the power is turned off During recording it will not be possible to select Sound mode Recording to a song memory that ha...

Page 38: ...ack Recorder songs please refer to Recorder Playback on page 65 Erasing the song 1 Tap the Menu button The Pianist mode internal recorder menu will be shown 2 Tap Erase Song A confirmation box will be shown 3 Tap the Yes button to erase the song or the No button to cancel Play Stop button Menu button Erase Song Confirmation box ...

Page 39: ...ted automatically If a USB memory device is not connected this setting will not be shown and the Internal recorder mode will be used d Song memory selection Swipe left right or tap the arrow buttons to change the song memory to be used for recording In Sound mode up to 10 songs can be recorded e Play Stop button Tap to Play Stop the currently selected song f Part record selection button Tap to sel...

Page 40: ...d to the part button will be filled blue or white Recording the song part1 1 Tap the Record Start Stop button The Recorder will enter Standby mode Press and hold the Record Start Stop button to cancel the Standby mode 2 Press a key on the keyboard or tap the Record Start Stop button again The Record Start Stop button will change colour and the recording will start Press the Metronome Start Stop bu...

Page 41: ...corder will stop automatically Recorder songs will remain in memory after the power is turned off During recording it will not be possible to select Pianist mode Recording to a part that has already been recorded to will result in that part being overwritten Playing the song part1 1 Tap the Play Stop button The previously recorded part1 of the song will start to play 2 Tap the Play Stop button aga...

Page 42: ... mode Press and hold the Record Start Stop button to cancel the Standby mode 3 Press a key on the keyboard or tap the Record Start Stop button again The Record Start Stop button will change colour and the recording will start The previously recorded part1 will also be played 4 Tapthe RecordStart Stop buttonagaintostoptherecording The selected 02 button will change colour blue to indicate that part...

Page 43: ...top playback For more information about playing back Recorder songs please refer to Recorder Playback on page 65 3 Tap the 01 button The 01 button will change colour white to indicate that part1 has been recorded to but is not enabled for playback 4 Tap the Play Stop button The previously recorded part2 of the song will start to play with part1 muted Play Stop button Play Stop button ...

Page 44: ...button The Sound mode internal recorder menu will be shown 2 Tap Erase Song or Erase Song Part1 Part2 A confirmation box will be shown 3 Tap the Yes button to erase the song part or the No button to cancel Menu button Erase Song Erase Song Part 1 Erase Song Part 2 Confirmation box ...

Page 45: ...rder bar Tap the Recorder bar to expand the Recorder a Recorder bar Tap to close the Recorder settings b Recorder menu button Tap to open the Recorder menu c Recorder mode Tap to select whether the Recorder should record to internal memory or USB memory If a USB memory device is connected to this instrument USB Audio mode will be selected automatically If a USB memory device is not connected this ...

Page 46: ...he range of 0 dB 15 dB Exercise caution when increasing the gain setting as higher levels may result in distorted recordings Recording a song 1 Tap the Record Start Stop button The Recorder will enter Standby mode Press and hold the Record Start Stop button to cancel the Standby mode 2 Press a key on the keyboard or tap the Record Start Stop button again The Record Start Stop button will change co...

Page 47: ... the root folder of the USB memory device It is not possible to save the file in a different folder During recording it will not be possible to alternate between Pianist Sound modes Playing the song 1 Tap the Play Stop button The previously recorded song will start to play 2 Tap the Play Stop button again to stop playback For more information about playing back Recorder songs please refer to Recor...

Page 48: ... play back a selection of classical music pieces using the Shigeru Kawai SK EX grand piano sound c Lesson Songs Tap to enter the Lesson Songs function This function allows aspiring pianists to learn and practise the piano using a selection of classical and contemporary lesson books d Concert Magic Tap to enter the Concert Magic function This function allows non pianists to enjoy playing a selectio...

Page 49: ... selection of high quality sounds and its power speaker system For a complete listing of demonstration songs please refer to Demo Song List on page 150 From the Music screen tap Demo Songs to enter the function Demo Songs screen a Back button Tap to return to the Music screen b Demo songs list Tap an instrument sound to select the demo song for playback Swipe up down to scroll through the list of ...

Page 50: ... song c Previous button Tap to select the previous demo song for playback d Play Stop button Tap to Play Stop the selected demo song e Next button Tap to select the next demo song for playback When the selected song has finished the next demo song in the same demo category will begin to play automatically When all songs in the category have been played the first song in another category selected a...

Page 51: ... listing of Piano Music pieces please refer to Internal Song Lists booklet From the Music screen tap Piano Music to enter the function Piano Music screen a Back button Tap to return to the Music screen b Piano Music pieces list Tap a Piano Music title to select the piece for playback Swipe up down to scroll through the list of Piano Music pieces Selecting a Piano Music piece Tap a Piano Music piec...

Page 52: ...Next button Tap to select the next Piano Music piece for playback When the selected Piano Music piece has finished the next piece will begin to play automatically While a song piece is playing selecting the Pianist or Sound modes will cause playback to stop Piano Music settings menu a Balance Long press and drag the slider to adjust the volume balance between the right hand and left hand parts of ...

Page 53: ...on Books Classical Lesson Books Alfred s Premier Piano Course Lesson 1A Burgmüller 25 25 Etudes Faciles Opus 100 Alfred s Premier Piano Course Lesson 1B Czerny 30 Etudes de Mécanisme Opus 849 Alfred s Basic Piano Library Lesson Book Level 1A Czerny 100 Hundert Übungsstücke Opus 139 Alfred s Basic Piano Library Lesson Book Level 1B Beyer 106 Vorschule im Klavierspiel Opus 101 Alfred s Basic Adult P...

Page 54: ...k for practise Swipe up down to scroll through the list of lesson song books Selecting a lesson book and song piece 1 Tap a lesson song book to select the book A list of songs pieces from the selected lesson book will be shown 2 Tap a lesson song piece to select the song piece for practice The Lesson Song playback screen will be shown b a Lesson Song book list ...

Page 55: ...se refer to Changing the lesson song playback mode on page 57 f Previous button Tap to select the previous lesson song piece g Play Stop button Tap to Play Stop the selected lesson song piece h Next button Tap to select the next lesson song piece i A B Repeat button Repeat a section of the selected lesson song piece between points A and B Tap to set the A start and B end points of the phrase to be...

Page 56: ...p button Following a 1 bar count in the lesson song piece will start to play The bar beat indicator will scroll to indicate the current playing position 2 Swipe the bar beat indicator left right to adjust the playback position 3 Tap the Play Stop button The lesson song piece will stop playing 4 Tap the Play Stop button again The lesson song piece will resume playback from 2 bars before the stop po...

Page 57: ...esson song piece to be looped between two points in order to practise difficult passages continuously While the lesson song piece is playing 1 Tap the A B Repeat button to specify the start point of the loop An A symbol will appear above the button 2 Tap the A B Repeat button again to specify the end point of the loop A B symbol will appear above the button and the defined section will be repeated...

Page 58: ... of the current lesson song piece allowing each hand to be practiced separately While the lesson song piece is playing 1 Tap the Menu button to show Lesson Song menu 2 Long press and drag the slider to the left most position 9 1 The right hand part of the selected lesson song piece will be muted allowing this part to be practiced 3 Long press and drag the slider to the right most position 1 9 The ...

Page 59: ...p Concert Magic to enter the function Concert Magic screen a Back button Tap to return to the Music screen b Concert Magic category list Tap a category to show the available Concert Magic songs in that category Swipe up down to scroll through the list of categories Selecting a Concert Magic category and song 1 Tap a Concert Magic category A list of songs from the selected category will be shown 2 ...

Page 60: ...p to Play Stop the selected Concert Magic song g Next button Tap to select the next Concert Magic song h Performance mode button Tap to change the Concert Magic performance mode between Normal and Steady Beat modes For more information about Concert Magic performance modes please refer to Changing the Concert Magic performance mode on page 62 Concert Magic settings menu a Balance Long press and dr...

Page 61: ...cteristic of an Easy Beat song Key on X X X X X X X X X X X X X X X X X X X X Melody Play MP These songs are also relatively easy to play especially if they are familiar to the player To perform them tap out the rhythm of the melody on any key of the keyboard Singing along as the rhythm is tapped can be helpful The following example shows the notated score for Twinkle Twinkle Little Star When perf...

Page 62: ...e pressing heavily will produce a loud sound Changing the Concert Magic performance mode Tap the Performance Mode button to change the Concert Magic performance mode Perform the selected Concert Magic song by tapping any key following the song arrangement type Perform the selected Concert Magic song by tapping any key with a constant steady beat regardless of the song arrangement type Performance ...

Page 63: ... Changing the Concert Magic playback mode Tap the playback mode button to change the Concert Magic playback mode Play the selected song repeatedly Play the selected song then play other songs from the current category in order Play the selected song then play another song from the current song group at random Adjusting the Concert Magic song playback tempo It is possible to adjust the playback tem...

Page 64: ... when using the playback function 1 Tap the Menu button to show the Concert Magic settings menu 2 Long press and drag the slider to the left most position 9 1 The right hand part of the selected Concert Magic song will be muted allowing this part to be practiced 3 Long press and drag the slider to the right most position 1 9 The left hand part of the selected Concert Magic song will be muted allow...

Page 65: ...g Recorder Internal memory on page 36 From the Music screen tap Recorder Playback to enter the function Recorder Playback song selection screen a Back button Tap to return to the Music screen b Recorder Playback song list Lists the songs that have been recorded to internal memory Tap a song to select it for playback Swipe up down to scroll through the list of internal recorder songs The Recorder P...

Page 66: ... button Tap to select the next internal recorder song h Overdubbing bar Overdubbing Start Stop button Tap to open the Overdubbing settings and or Start Stop the Overdubbing function This function will only be visible when a USB memory device is connected to this instrument and a Sound song is selected For more information about the Overdubbing function please refer to Overdubbing a song audio file...

Page 67: ... File SMF format This function applies to internal songs recorded in Sound mode only e Load Song From USB Tap to load a Kawai KSO format song saved to a USB memory device into one of this instrument s internal song memories f Erase Song Tap to erase the currently selected recorder song from internal memory g Erase All Song Tap to erase all recorded songs from internal memory h Close Menu Tap to cl...

Page 68: ...semi tone steps This setting applies to internal songs recorded in Sound mode only Saving the song to USB memory When playing songs recorded in Sound mode these functions allow the currently selected song to be saved to USB memory in internal Kawai KSO or Standard MIDI File SMF formats 1 Tap the Menu button to show Recorder Playback settings menu 2 Tap Save To USB INT or Save To USB SMF functions ...

Page 69: ...loaded into A list of files and folders stored on the USB memory device will be shown 4 Tap the filename of the song to be loaded into the selected internal memory A confirmation box will be shown 5 Tap the Yes button to load the song into the selected internal memory or the No button to cancel It should now be possible to play the loaded song via the playback screen This function applies to inter...

Page 70: ...n 3 Tap the Yes button to erase the song or the No button to cancel Erasing all songs This function allows all recorder songs to be erased from internal memory 1 Tap the Menu button to show Recorder Playback settings menu 2 Tap Erase All Song A confirmation box will be shown 3 Tap the Yes button to erase all of the recorder songs stored in internal memory or the No button to cancel Erase Song Conf...

Page 71: ...y Player to enter the function USB Memory Player supported formats Song KSO Kawai Song file SMF Format 0 Format 1 Audio MP3 32 kHz 44 1 kHz 48 kHz Stereo 8 320 kbit s fixed variable WAV 44 1 kHz Stereo 16 bit USB Memory Player song selection screen a Back button Tap to return to the Music screen b USB Memory file list Lists the song and audio files stored on the connected USB memory device Tap a f...

Page 72: ...selected song audio file h Next button Tap to select the next song audio file in the folder i A B Repeat button Repeat a section of the selected song audio file between points A and B Tap to set the A start and B end points of the phrase to be repeated Tap the A B button for a third time to turn off the A B repeat function j Overdubbing bar Overdubbing Start Stop button Tap to open the Overdubbing...

Page 73: ...nge the song audio file playback mode Play the selected song audio once then stop Play the selected song audio repeatedly Play the selected song audio then play other files stored in the same folder in order Play the selected song audio then play other files stored in the same folder at random Repeating a section of the song audio file A B Repeat The A B Repeat function allows sections of the sele...

Page 74: ...ong recorded to internal memory in Sound mode or a song loaded from USB memory to an MP3 WAV audio file In addition the LINE IN audio and Bluetooth Audio if connected will also be mixed and recorded to the MP3 WAV audio file This function will only be visible when a USB memory device is connected to this instrument 1 Tap the Overdubbing Start Stop button The Overdubbing function will enter Standby...

Page 75: ...ave the file in a different folder During overdubbing it will not be possible to alternate between Pianist Sound modes USB Memory Player settings menu a Play Volume Long press and drag the slider to adjust the playback volume of the currently selected song audio file b Song Transpose Long press and drag the slider to adjust the playback pitch of the currently selected song audio file This setting ...

Page 76: ...g the slider to adjust the playback volume of the currently selected song audio file Transposing the song file This setting allows the playback pitch of the song file to be changed 1 Tap the Menu button to show USB Memory Player settings menu 2 Long press and drag the slider to adjust the playback pitch of the currently selected song audio file This setting applies to KSO SMF songs only Play Volum...

Page 77: ... Metronome Settings Rendering character Mode Resonance depth Tempo Ambience type depth Time Signature Rhythm Volume Sound Mode Single Sound Virtual Technician Settings Dual Sounds Balance Layer Octave Shift Layer Dynamics Touch Curve incl User Split Sounds Balance Lower Octave Shift Lower Pedal Split Point Voicing incl User 4Hands Sounds Left Octave Shift Right Octave Shift Split Point Damper Reso...

Page 78: ...l be represented by a musical note icon d Recorder bar Record Start Stop button Tap to open the Recorder settings and or Start Stop the recorder For more information about the Recorder function please refer to About the Recorder on page 35 e Metronome bar Metronome Start Stop button Tap to open the Metronome settings and or Start Stop the metronome For more information about the Metronome function...

Page 79: ...u button to show the mode s menu 2 Tap Store To Favorite at the bottom of the menu In Sound mode it may be necessary to scroll the screen in order to see the Store to Favorite function The Favorite Name screen will be shown 3 Enter the desired name for the Favorite memory using the onscreen keyboard then tap the Done key to confirm the store Pianist Mode Sound Mode Menu button Pianist Mode Sound M...

Page 80: ... button The Favorite screen will be shown If a Favorite memory was selected previously that memory will be re selected automatically 2 Tap the desired Favorite memory The Favorite memory will be selected and its settings will be recalled If necessary swipe the screen left right to cycle through the available Favorite pages Favorite button Favorite memory buttons ...

Page 81: ... The Favorite settings menu will be shown 2 Tap the Startup with Favorite ON OFF button to enable the function The next time this instrument is turned on the Favorite screen will be shown with the first top left Favorite memory selected automatically To startup with a different Favorite memory follow the steps above to reposition that memory to the first position To startup in Pianist mode set the...

Page 82: ... settings menu will be shown 2 Tap Edit Favorite The Edit Favorite screen will be shown 3 Tap the X icon in the top left corner of a Favorite memory to delete that memory If necessary swipe the screen left right to cycle through the available Favorite pages 4 Tap the Back button to exit the Edit Favorite screen and return to the Favorite settings menu Menu button Edit Favorite X icon Back button ...

Page 83: ...orite screen will be shown 3 Long press a favorite memory then drag the memory into the desired position Release the finger to confirm the new Favorite memory position It is also possible move a memory onto another page by dragging the memory to the left of right edge of the screen 4 Tap the Back button to exit the Edit Favorite screen and return to the Favorite settings menu Menu button Edit Favo...

Page 84: ...ntly selected Favorite memory 1 Tap the Menu button The Favorite settings menu will be shown 2 Tap Rename Selected Favorite The Favorite Name screen will be shown 3 Enter the desired name for the Favorite memory using the onscreen keyboard then tap the Done key to confirm the store Menu button Rename Selected Favorite ...

Page 85: ...ise p 103 Fall back Noise p 108 Hammer Delay p 109 Minimum Touch p 111 Key Volume p 117 Half Pedal Adjust p 119 Soft Pedal Depth p 119 Store to Sound p 98 Sound Settings Adjust settings related to the overall sound such as the volume of speakers headphones line inputs etc Tone Control p 122 Speaker Volume Line In Level p 124 Wall EQ SHS Mode p 125 Phones Type p 126 Phones Volume p 127 Settings Adj...

Page 86: ...Settings p 120 Tap to open the Sound Settings menu This menu is used to adjust various settings related to the overall sound of this instrument f Settings p 128 Tap to open the Settings menu This menu is used to adjust various system settings g Store To Favorite p 94 Tap to store the current piano sound and associated settings to a Favorite memory h Close Menu Tap to close the menu and return to t...

Page 87: ...n of a wooden recording studio Live Stage Simulates the ambience reverberation of a live stage Echo Simulates the ambience reverberation of an echo chamber About Pianist Demos screen This screen contains pieces that demonstrate the SK EX Rendering piano sound engine a Back button Tap to return to the Pianist mode menu b Song title Displays the title of the currently selected internal demo song c P...

Page 88: ...Op 53 Frédéric Chopin 2 Suite bergamasque Prélude Claude Debussy 3 Turkish March Wolfgang Amadeus Mozart Other Pianist mode menu settings For information regarding the other Pianist mode menu settings please refer to the pages below Virtual Technician page 95 Sound Settings page 120 Settings page 128 ...

Page 89: ...s keyboard modes Dual Balance Layer Octave Shift Layer Dynamics p 94 Split Balance Lower Octave Shift Lower Pedal Split Point p 94 4Hands Balance Right Octave Shift Left Octave Shift Split Point p 94 Virtual Technician Adjust various characteristics of the simulated grand piano sound Virtual Technician Mode p 95 Touch Curve p 99 Voicing p 101 Damper Resonance p 103 Damper Noise p 103 String Resona...

Page 90: ...ment s operation such as Bluetooth and MIDI connectivity USB functions LCD appearance etc Bluetooth MIDI p 129 Bluetooth Audio p 130 Bluetooth Audio Volume p 131 Rename File p 132 Delete File p 133 USB Format p 134 MIDI Channel p 137 Send PGM p 138 Local Control p 138 Transmit PGM On Off p 139 Multi timbral Mode p 140 Channel Mute p 140 LCD Contrast p 141 Auto Display Off p 141 Auto Power Off p 14...

Page 91: ...d Settings menu This menu is used to adjust Dual Split and 4Hands keyboard mode settings This item will not be shown when Single keyboard mode is selected g Virtual Technician p 95 Tap to open the Virtual Technician menu This menu is used to adjust various characteristics of the acoustic piano sound h Sound Settings p 120 Tap to open the Sound Settings menu This menu is used to adjust various sett...

Page 92: ...o sliders to adjust the depth and time of the reverb The Reverb depth and time can be adjusted within the range of 1 10 Reverb types Reverb type Description Room Simulates the ambience of a small rehearsal room Lounge Simulates the ambience of piano lounge Small Hall Simulates the ambience of a small hall Concert Hall Simulates the ambience of a concert hall or theatre Live Hall Simulates the ambi...

Page 93: ... Effects settings menu 3 Swipe left right or tap the arrow buttons to change the Effect type The Effect type can be set to one of 24 types For a full list of available effect types please refer to Effect types on page 31 4 Long press and drag the two sliders to adjust the settings of the effect Effects ON OFF button Effects settings Menu button Effect type Dry Wet slider Time slider ...

Page 94: ...keyboard mode settings This item will not be shown when Single keyboard mode is selected The settings in this menu will vary depending on the keyboard mode selected For more information regarding the different keyboard modes and adjusting their relevant settings please refer to the pages below Dual keyboard mode page 23 Split keyboard mode page 25 4Hands keyboard mode page 27 Store To Favorite fun...

Page 95: ...e Virtual Technician is only available in Sound mode Tap the Smart button to select the Smart Mode Virtual Technician a Back button Tap to return to the Sound mode menu b Virtual Technician Mode select button Tap to change the Virtual Technician to Smart or Advanced mode c Smart Mode Select Swipe left right or tap the arrow buttons to change the Smart Mode preset d Smart Mode preset explanation Di...

Page 96: ... sound will change and information about the selected Smart Mode preset will be shown in the explanation area Storing the Smart Mode preset Store the current Virtual Technician settings to the selected instrument sound 1 Tap Store to Sound The current Virtual Technician Smart Mode preset will be stored to the selected instrument sound and recalled automatically whenever that sound is selected Smar...

Page 97: ...nance Adjust the resonance that is heard when notes are held 5 p 104 6 Undamped Str Res Adjust the resonance produced by the topmost undamped strings 5 p 105 7 Cabinet Resonance Adjust the resonance produced by the piano cabinet itself 1 p 106 8 Key off Effect Adjust the sound that is heard when keys are released 5 p 107 9 Fall Back Noise Adjust the sound that is heard when the key action falls ba...

Page 98: ... recall preferred settings whenever this instrument is turned on without needing to use Favorite memories About Stored Virtual Technician settings As mentioned above in Sound mode the Virtual Technician settings are adjusted and stored independently for each sound This allows different Virtual Technician adjustments to be made for each piano voice For example it may be desirable to voice the SK Co...

Page 99: ...lighter touch curve This Virtual Technician setting will affect all sounds Touch Curve types Touch Curve Description Light Requires less striking force to achieve a forte note For players with a very delicate touch Light A louder volume is produced even when playing with a soft touch For those still developing finger strength This touch curve is recommended for children and organ players Normal de...

Page 100: ...le Creating a User Touch Curve 1 Swipe left right or tap the arrow buttons to select the User touch curve type 2 Tap the Edit button The User Touch Curve screen will be shown 3 Tap the Start button 4 Play the piano dynamically from very soft to very loud allowing this instrument to examine the personal playing technique More than one attempt may be required in order to create an accurate User Touc...

Page 101: ... type Description Normal default The normal tonal character of an acoustic piano throughout the entire dynamic range Mellow 1 A softer more mellow tonal character throughout the entire dynamic range Mellow 2 An even softer tonal character than Mellow 1 Dynamic A tonal character that changes dramatically from mellow to bright depending on the strength of key strike Bright 1 A bright tonal character...

Page 102: ...will be shown 3 Tap Key then press the desired key on the keyboard to be adjusted The selected key should be shown 4 Long press and drag the slider to adjust the UserVoicing value for the selected key The User Voicing value can be adjusted within the range of 5 5 with lower values creating a mellower sound and higher values creating a brighter sound 5 Tap the Back button to return to theVirtualTec...

Page 103: ...g Favorite memories on page 79 and Storing the Virtual Technician settings on page 98 4 Damper Noise When the damper pedal of an acoustic piano is pressed and released it is often possible to hear the sound of the damper head touching and releasing the strings This instrument reproduces this sound with the Damper Noise setting allowing the volume of this sound to be adjusted The speed at which the...

Page 104: ...ound of each note played it should also be possible to hear the strings of the first C key resonating sympathetically thus demonstrating String Resonance F G C B F G C G C E G C D E G C C A A E h o l d Adjusting the String Resonance volume Long press and drag the slider to adjust the volume of the String Resonance setting The String Resonance volume can be adjusted within the range of Off 1 10 wit...

Page 105: ...g the volume of this resonance sound to be adjusted This Virtual Technician setting will affect acoustic piano sounds only Adjusting the Undamped String Resonance volume Long press and drag the slider to adjust the volume of the Undamped String Resonance setting The Undamped String Resonance volume can be adjusted within the range of Off 1 10 with higher values resulting in a more pronounced reson...

Page 106: ...llowing the volume of this resonance sound to be adjusted This Virtual Technician setting will affect acoustic piano sounds only Adjusting the Cabinet Resonance volume Long press and drag the slider to adjust the volume of the Cabinet Resonance setting The Cabinet Resonance volume can be adjusted within the range of 1 10 with higher values resulting in a more pronounced resonance Any changes made ...

Page 107: ...o be turned on or off This Virtual Technician setting will affect acoustic piano and electric piano sounds Adjusting the Key off Effect volume Long press and drag the slider to adjust the volume of the Key off Effect setting The Key off Effect volume can be adjusted within the range of Off 1 10 with higher values resulting in a more pronounced effect When the Key Off Effect setting is set to Off t...

Page 108: ...ieces where the fall back noise may become too prominent This Virtual Technician setting will affect acoustic piano and harpsichord sounds Adjusting the Fall back Noise volume Long press and drag the slider to adjust the volume of the Fall back Noise setting The Fall back Noise volume can be adjusted within the range of Off 1 10 with higher values resulting in a more pronounced noise Any changes m...

Page 109: ... instruments with a slightly worn keyboard action This Virtual Technician setting will affect acoustic piano sounds only Adjusting the Hammer Delay value Long press and drag the slider to adjust the value of the Hammer Delay setting The Hammer Delay value can be adjusted within the range of Off 1 10 with higher values resulting in an increased delay Any changes made to the Hammer Delay setting wil...

Page 110: ...projection Open2 Simulates the character of a half open topboard with reduced sound projection Open1 Simulates the character of a partially open topboard with limited sound projection Closed Simulates the character of a closed topboard with minimum sound projection Changing the Topboard position Swipe left right or tap the arrow buttons to change theTopboard position The Topboard can be set to one...

Page 111: ...eyvelocityrequiredtoproduceasoundtobeadjusted Bydefault this setting recreates the extremely fine touch sensitivity of a concert grand piano allowing a very soft sound to be produced with the slightest of key touches However it may be desirable to reduce this sensitivity when wishing to recreate the sensitivity of a small grand piano or an upright piano This Virtual Technician setting will affect ...

Page 112: ... Off Stretch tuning is disabled Normal default Normal stretch tuning is applied Wide Wide stretch tuning is applied User A custom tuning method allowing the pitch of each key to be individual tuned Changing the Stretch Tuning type Swipe left right or tap the arrow buttons to change the Stretch Tuning type The Stretch Tuning type can be set to one of 4 types The tonal character of the sound will ch...

Page 113: ...Key then press the desired key on the keyboard to be adjusted The selected key should be shown 4 Long press and drag the slider to adjust the UserTuning value for the selected key The UserTuning value can be adjusted within the range of 50 50 A value of 20 indicates a pitch increase of 20 cents 5 Tap the Back button to return to theVirtualTechnician menu If desired tap Store to Sound to ensure tha...

Page 114: ...ords but produces very characteristic melodic lines Meantone This temperament which uses a mean between a major and minor whole tone to eliminate dissonance for thirds was devised to eliminate the lack of consonances experienced with certain fifths for the Mersenne pure temperament It produces chords that are more beautiful than those played with equal temperament Werckmeister Kirnberger These two...

Page 115: ...e keyboard to be adjusted The selected key should be shown 4 LongpressanddragtheslidertoadjusttheUserTemperament value for the selected key The User Temperament value can be adjusted within the range of 50 50 A value of 20 indicates a pitch increase of 20 cents 5 Tap the Back button to return to theVirtualTechnician menu If desired tap Store to Sound to ensure that the UserTemperament type is reta...

Page 116: ...oard will remain unchanged Changing the Temperament Key Swipe left right or tap the arrow buttons to change the Temperament Key The Temperament Key can be set within the range of C to B Any changes made to the Temperament Key setting will remain until the power is turned off Preferred Temperament Key settings can be stored to the sound s memory in Sound mode or a Favorite memory for convenient rec...

Page 117: ... the keyboard towards the treble region Low Damping Gradually reduces the volume of the keyboard towards the bass region High Low Damping Gradually reduces the volume of the keyboard in both the treble and bass regions Center Damping Gradually reduces the volume of the keyboard in the central region User A custom keyboard volume allowing the volume of each key to be individually adjusted Changing ...

Page 118: ... then press the desired key on the keyboard to be adjusted The selected key should be shown 4 Long press and drag the slider to adjust the User Key Volume value for the selected key The User Key Volume value can be adjusted within the range of 50 50 with lower values attenuating the sound and higher values amplifying the sound 5 Tap the Back button to return to theVirtualTechnician menu If desired...

Page 119: ... memories on page 79 and Storing the Virtual Technician settings on page 98 19 Soft Pedal Depth The Soft Pedal Depth setting adjusts the extent to which the soft pedal of this instrument softens the sound of played notes While the default value is intended to replicate the effectiveness of a concert grand soft pedal it may be desirable for players to adjust the value of this setting to suit their ...

Page 120: ...l on organ string etc sounds Off p 121 3 Tone Control Adjust the EQ settings of this instrument s sound Off p 122 Speaker Volume Change the maximum volume level of the speaker output Normal 4 Line In Level Adjust the input volume of the Line In connectors 0 dB p 124 Wall EQ Optimise this instrument s speaker system based on instrument placement Off 5 SHS Mode Select the desired SHS Spatial Headpho...

Page 121: ... 2 Damper Hold The Damper Hold setting is used to determine whether sounds such as organ or strings should be sustained continuously when the damper pedal is pressed or whether these sounds should decay naturally The Damper Hold setting will be hidden in Pianist mode Damper Hold setting Damper Hold Description Off default Organ strings etc sounds will gradually decay even while the sustain pedal i...

Page 122: ...ies creating a clearer sound User Allows the low mid and high range frequency bands to be adjusted separately Changing the Tone Control type Swipe left right or tap the arrow buttons to change the Tone Control type The Tone Control can be set to one of 7 types Any changes made to the Tone Control setting will remain until the power is turned off Preferred Tone Control settings can be stored to a F...

Page 123: ...djusts the volume of the high range frequency band 5000 20000 Hz Adjusting the User Tone Control setting 1 Swipe left right or tap the arrow buttons to select the User tone control type 2 Tap the Edit button The User Tone Control screen will be shown 3 Long press and drag the sliders to adjust the volume of the different frequency bands Each frequency band can be adjusted within the range of 6 dB ...

Page 124: ...ith this instrument s sound The Line In Level can also be adjusted by using the LEVEL knob located on the jack panel For more information please refer to LINE IN STEREO jack 1 8 phone jack on page 145 Adjusting the Line In Level setting Long press and drag the slider to adjust the Line In Level setting The Line In Level can be adjusted within the range of 10 dB 10 dB Any changes made to the Line I...

Page 125: ...eadphones for extended periods of time This setting does not affect the speaker or Line Out sound SHS Mode setting SHS Mode Description Off Disable the Spatial Headphone Sound feature Forward Front focused somewhat narrow spatial positioning Normal default Naturally balanced spatial positioning that is neither forward nor wide Wide Wide very open spatial positioning Changing the SHS Mode setting S...

Page 126: ...en Optimises the sound for open type headphones Semi open Optimises the sound for semi open type headphones Closed Optimises the sound for closed type headphones Inner ear Optimises the sound for inner ear type headphones Canal Optimises the sound for canal type headphones Changing the Phones Type setting Swipe left right or tap the arrow buttons to change the Phones Type setting The Phones Type c...

Page 127: ...crease the maximum volume level of the headphones output This setting does not affect the speaker or Line Out sound Phones Volume setting Phones Volume Description Normal default This instrument s headphone connectors will output sound at the normal volume level High This instrument s headphone connectors will output sound at an increased volume level Changing the Phones Volume setting Swipe left ...

Page 128: ...tored data p 134 7 MIDI Channel Specify the channel that is used to transmit receive MIDI information 1 p 137 8 Send PGM Change Send a MIDI program change number from 1 to 128 p 138 9 Local Control Specify whether internal sounds will be heard when the keyboard is pressed On p 138 10 Trans PGM Change Specify whether program change data is sent when sounds are changed On p 139 11 Multi timbral Mode...

Page 129: ... using Bluetooth MIDI After enabling the Bluetooth MIDI function of this instrument enable Bluetooth communications on the smart device then open the desired MIDI app After a few seconds ATX3 AR Audio should appear in the app s device list Tap the ATX3 AR Audio entry to connect this instrument to the smart device It should now be possible for MIDI apps to communicate wirelessly with this instrumen...

Page 130: ...l remain until the power is turned off Connecting this instrument to a smart device using Bluetooth Audio After enabling the Bluetooth Audio function of this instrument enable Bluetooth communications on the smart device After a few seconds ATX3 AR Audio should appear in the smart device s Bluetooth settings device list Tap the ATX3 AR Audio entry to connect this instrument to the smart device It ...

Page 131: ... certain situations Adjusting the Bluetooth Audio Volume setting Long press and drag the slider to adjust the Bluetooth Audio Volume setting The Bluetooth Audio Volume setting can be adjusted within the range of 15 dB 15 dB Increasing the Bluetooth Audio Volume setting above normal levels may result in distortion or reduced audio quality Any changes made to the Bluetooth Audio setting will remain ...

Page 132: ...enaming a file 1 Tap Rename File The Rename File screen will be shown listing song and audio files stored on the USB device 2 Tap the file to be renamed A filename input screen will be shown 3 Enter the desired filename for the selected file using the onscreen keyboard then tap the Done key to confirm the name The filename length is limited to 20 characters To cancel the rename operation press the...

Page 133: ...covered This function will only be visible when a USB memory device is connected to this instrument Deleting a file 1 Tap Delete File The Delete File screen will be shown listing song and audio files stored on the USB device 2 Tap the file to be deleted A confirmation box will be shown 3 Tap the Yes button to confirm the delete operation or the No button to cancel Delete File File Confirmation box...

Page 134: ...evice is connected to this instrument The USB Format function will erase all data stored on the connected USB memory device Exercise caution when using this function in order to prevent accidental data loss Formatting a USB device 1 Tap Format USB A confirmation box will be shown 2 Tap the Yes button to confirm the format operation or the No button to cancel Format USB Confirmation box ...

Page 135: ...ransmit channels are used to transmit data to another MIDI device The illustration below shows three musical instruments connected together using MIDI Transmitting instrument a Receiving instrument b Receiving instrument c Transmitting instrument a sends transmit channel and keyboard information to receiving instruments b c The information arrives at the receiving instruments b c Receiving instrum...

Page 136: ...channels within the range of 1 to 16 Transmit receive pedal data Transmit receive sustain sostenuto and soft pedal data to from a MIDI connected musical instrument or device Transmit receive exclusive data Transmit receive front panel or menu function settings as exclusive data Receive volume data Receive MIDI volume data sent from a MIDI connected musical instrument or device Multi timbral mode s...

Page 137: ...set to omni mode on allowing MIDI information to be received on all MIDI channels 1 16 When the MIDI Channel setting is used to specify a transmit receive channel this instrument will be set to omni mode off Multi timbral mode and Split Dual modes Using Split mode with Multi timbral mode enabled Notes played in the lower section of the keyboard will be transmitted on the channel that is 1 channel ...

Page 138: ...be useful when using this instrument to control an external MIDI device that is connected to the instrument s amplifier speakers Local Control setting Local Control Description Off This instrument will transmit information to an external MIDI device only On default This instrument will play an internal sound and transmit information to an external MIDI device Changing the Local Control setting Tap...

Page 139: ...m Change Number List on page 152 Changing the Transmit Program Change Numbers setting Tap the ON OFF buttons to turn Transmit Program Change Numbers on off Any changes made to the Transmit Program Change Numbers setting will remain until the power is turned off PreferredTransmit Program Change Numbers settings can be stored to a Favorite memory for convenient recall For more information please ref...

Page 140: ... will remain until the power is turned off Preferred Multi timbral Mode settings can be stored to a Favorite memory for convenient recall For more information please refer to 1 Storing and Selecting Favorite memories on page 79 12 Channel Mute The Channel Mute setting determines which MIDI channels 1 16 are activated to receive MIDI information when Multi timbral mode is enabled Changing the Chann...

Page 141: ...automatically after a period of inactivity This setting may be desirable if the display becomes a distraction when playing in low light environments Auto Display Off setting Auto Display Off Description Off default This instrument s LCD display with remain turned on at all times On This instrument s LCD display with turn off automatically after a period of inactivity Changing the Auto Display Off ...

Page 142: ...Off function is disabled 15 min This instrument will turn off automatically after 15 minutes of inactivity 60 min This instrument will turn off automatically after 60 minutes of inactivity 120 min This instrument will turn off automatically after 120 minutes of inactivity Changing the Auto Power Off setting Swipe left right or tap the arrow buttons to change the Auto Power Off setting The Auto Pow...

Page 143: ...mories restoring this instrument to its factory default settings This function will not clear recorder songs stored in internal memory Restoring Factory settings 1 Tap Factory Reset A confirmation box will be shown 2 Tap the Yes button to confirm the Factory Reset operation or the No button to cancel Factory Reset Confirmation box ...

Page 144: ...s devices etc Connect this instrument to a computer or tablet to send or receive MIDI data Connect the audio from other devices to this instrument s speakers USB type B USB type A Before connecting this instrument to other devices ensure that the power to both the instrument and the other device is turned off If connections are established while the power is turned on extraneous noise that can dam...

Page 145: ...s MIDI IN OUT jacks These jacks are used to connect this instrument to external MIDI devices or to a computer using a USB MIDI interface as an alternative to the USB to Host port For more information about MIDI please refer to MIDI Overview on page 135 Headphone Panel PHONES jacks 1 4 1 8 phone jacks These jacks are used to connect stereo headphones to this instrument Two pairs of headphones can b...

Page 146: ...B MIDI driver software NOT required The standard built in Mac OS X USB MIDI driver will be installed automatically when this instrument is connected to the computer Mac OS 9 USB MIDI is not supported Please use the standard MIDI IN OUT connectors USB MIDI information If this instrument s MIDI IN OUT jacks and USB MIDI port are both connected simultaneously the USB MIDI port will be given priority ...

Page 147: ...created by an acoustic grand piano as accurately as possible This includes various resonances noises and other subtle characteristics that contribute to the overall piano playing experience While these additional tones are intended to enhance the realism of this instrument it is possible to reduce their prominence or disable the effects altogether using the settings in the Virtual Technician menu ...

Page 148: ...ent USB device This instrument pauses briefly when connecting a USB memory device This is recognised behaviour when using large capacity e g 8GB USB memory devices USB MIDI MIDI Bluetooth MIDI Issue Possible Cause and Solution Page no This instrument is connected to the computer using a USB cable however the software does not respond to key presses Check that a USB MIDI driver is installed on the ...

Page 149: ...USB Memory Player supported formats table p 71 The file transfer speed of the USB memory device may be too slow to play the audio file Please try using a different USB memory device ensuring that it conforms to USB2 0 Hi Speed standards p 145 When recording MP3 WAV audio files the volume is too low too high distorted Check the gain setting before recording the audio and if necessary adjust to incr...

Page 150: ... Kawai ORGAN Jazz Organ Original Kawai Blues Organ Original Kawai Drawbar Organ Original Kawai Church Organ Chorale Prelude Wachet auf ruft uns die Stimme Bach Diapason Wohl mir daβ ich Jesum have Bach Full Ensemble Original Kawai HARPSI MALLETS Harpsichord French Suite No 6 Bach Harpsichord Oct Prelude in Ab Bach Vibraphone Original Kawai Clavi Original Kawai STRINGS Slow Strings Original Kawai S...

Page 151: ...rawbar Organ 3 Drawbar Organ 4 Church Organ Diapason Full Ensemble Diapason Oct Chiffy Tibia Principal Oct Principal Choir Baroque Soft Diapasn Soft Strings Mellow Flutes Medium Ensemble Loud Ensembe Bright Ensemble Full Organ Reed Ensemble Harpsi Mallets Harpsichord Harpsichord Oct Vibraphone Clavi Marimba Celesta Harpsichord 2 Bell Split Strings Slow Strings String Pad Warm Strings String Ensemb...

Page 152: ...Piano 15 1 95 33 Honky Tonk 16 4 121 0 Electric Piano Classic Electric Piano 17 5 121 0 60 s Electric Piano 18 5 121 3 Modern Electric Piano 19 6 121 0 Classic Electric Piano 2 20 5 121 1 Classic Electric Piano 3 21 5 95 1 Crystal Electric Piano 22 6 95 1 Modern Electric Piano 2 23 6 121 1 Modern Electric Piano 3 24 6 121 2 Organ Jazz Organ 25 18 121 0 Blues Organ 26 17 121 0 Ballad Organ 27 17 95...

Page 153: ... 121 0 Celesta 54 9 95 1 Harpsichord 2 55 7 121 3 Bell Split 56 15 95 5 Strings Slow Strings 57 45 95 1 String Pad 58 49 95 8 Warm Strings 59 49 95 1 String Ensemble 60 49 121 0 Soft Orchestra 61 50 95 1 Chamber Strings 62 49 95 14 Harp 63 47 121 0 Pizzicato Str 64 46 121 0 Vocal Pad Choir 65 53 121 0 Pop Ooh 66 54 95 39 Pop Aah 67 54 95 40 Choir 2 68 54 95 53 Jazz Ensemble 69 54 95 2 Pop Ensemble...

Page 154: ...k 4 121 1 Classic E P 4 5 121 2 Legend E P 6 121 3 Phase E P 6 121 4 WideHarpsichord 7 121 2 Synth Clavi 8 121 1 Celesta 9 121 0 Glockenspiel 10 121 0 Music Box 11 121 0 Wide Vibraphone 12 121 1 Wide Marimba 13 121 1 Xylophone 14 121 0 Tubular Bells 15 121 0 Church Bells 15 121 1 Carillon 15 121 2 Dulcimer 16 121 0 Drawbar Organ 5 17 121 1 60 s Organ 17 121 2 Perc Organ 18 121 1 Rock Organ 19 121 ...

Page 155: ...driveGuitar 30 121 0 Dynmic Ov drive 30 121 1 Distortion 31 121 0 Dist Feedback 31 121 1 Dist Rhythm 31 121 2 E Gtr Harmonics 32 121 0 Guitar Feedback 32 121 1 FingerSlap Bass 34 121 1 Pick Bass 35 121 0 Slap Bass 37 121 0 Slap Bass 2 38 121 0 Synth Bass 39 121 0 Warm Synth Bass 39 121 1 Synth Bass 3 39 121 2 Clavi Bass 39 121 3 Hammer Bass 39 121 4 Synth Bass 2 40 121 0 Synth Bass 4 40 121 1 Rubb...

Page 156: ...t 57 121 0 Solo Trumpet 57 121 1 Trombone 58 121 0 Trombone 2 58 121 1 Bright Trombone 58 121 2 Tuba 59 121 0 Muted Trumpet 60 121 0 Muted Trumpet 2 60 121 1 French Horns 61 121 0 Warm FrenchHorn 61 121 1 Brass Section 62 121 0 Brass Section 2 62 121 1 Synth Brass 63 121 0 Synth Brass 3 63 121 1 Analog Brass 63 121 2 Jump Brass 63 121 3 Synth Brass 2 64 121 0 Synth Brass 4 64 121 1 Analog Brass 2 ...

Page 157: ...0 Chiff 84 121 0 Charang 85 121 0 Wire Lead 85 121 1 Voice 86 121 0 Fifth 87 121 0 Bass Lead 88 121 0 Soft Wire Lead 88 121 1 Warm Pad 90 121 0 Sine Pad 90 121 1 Polysynth 91 121 0 Choir Pad 92 121 0 Metallic Pad 94 121 0 Halo Pad 95 121 0 Sweep Pad 96 121 0 Rain Pad 97 121 0 Soundtrack 98 121 0 Crystal 99 121 0 Synth Mallet 99 121 1 Brightness 101 121 0 Goblin 102 121 0 Echoes 103 121 0 Echo Bell...

Page 158: ...121 1 Electric Drum 119 121 2 Reverse Cymbal 120 121 0 Gtr Fret Noise 121 121 0 GtrCuttingNoise 121 121 1 Ac Bass Slap 121 121 2 Breath Noise 122 121 0 Flute Key Click 122 121 1 Seashore 123 121 0 Rain 123 121 1 Thunder 123 121 2 Wind 123 121 3 Stream 123 121 4 Bubble 123 121 5 Bird Tweet 124 121 0 Dog Barking 124 121 1 Horse Gallop 124 121 2 Bird Tweet 2 124 121 3 Telephone 125 121 0 Telephone 2 ...

Page 159: ...121 9 Applause 127 121 0 Laughing 127 121 1 Screaming 127 121 2 Punch 127 121 3 Heartbeat 127 121 4 Foot Step 127 121 5 Gunshot 128 121 0 Machine Gun 128 121 1 Laser Gun 128 121 2 Explosion 128 121 3 Pop Set 1 120 0 Ballad Set 9 120 0 Power Set 17 120 0 Electronic Set 25 120 0 Analog Set 26 120 0 Jazz Set 33 120 0 Brush Set 41 120 0 Orchestra Set 49 120 0 SFX Set 57 120 0 ...

Page 160: ...llad 44 Triplet Ballad 1 45 Triplet Ballad 2 16 Beat Ballad 46 16 Ballad 1 47 Dance Ballad 1 48 Dance Ballad 2 49 Dance Ballad 3 50 Electro Pop 51 16 Ballad 2 52 Mod Pop Ballad No Rhythm Name 16 Beat Dance 53 Dance 1 54 Dance 2 55 Dance 3 56 Disco 57 Techno 1 58 Techno 2 16 Beat Swing 59 16 Shuffle 1 60 16 Shuffle 2 61 16 Shuffle 3 62 Acid Jazz 2 63 Acid Jazz 3 64 New Jack Swing 65 Modern Dance 66...

Page 161: ...ck MP3 WAV SMF KSO internal song file Record MP3 WAV Save as SMF KSO Line In Bluetooth Audio Recording Metronome 1 4 2 4 3 4 4 4 5 4 3 8 6 8 7 8 9 8 12 8 100 drum rhythms Internal Songs Demo Songs 39 songs Piano Music 29 or 42 songs Concert Magic 88 songs Lesson Books 584 Songs from Alfred Burgmüller Czerny Beyer Bach and Chopin lesson books 140 Finger Exercises Favorites 16 memories 4 x 4 pages T...

Page 162: ...data 2 data 3 Function 00 00 Multi timbre Off 01 00 Multi timbre On 1 02 00 Multi timbre On 2 0F 00 7F Split Point 14 00 7F Dual Split balance 16 1F 60 Tune 40 440 Hz 17 00 7F 00 Program Change Off 7F Program Chage On 18 00 07 00 Light 01 Normal 02 Heavy 03 Off 04 Light 05 Heavy 06 User1 07 User2 19 00 03 Lower Octave Shift 20 00 4F 00 4F Dual data 2 Main sound 3 Layer sound 21 00 4F 00 4F Split d...

Page 163: ... 66 67 O X X X O Right pedal O Middle pedal O Left pedal O O O O O O O Bank Select Volume Pan Pot Expression Pedal Sustain Pedal Sostenuto Pedal Soft Pedal Program Change O 0 127 O 0 127 Refer to the Program Change Number List on p 152 True 0 127 System Exclusive O O On Off Selectable Common Song Position X X Song Select X X Tune X X System Real Time Clock X X Commands O X Others Local ON OFF X O ...

Page 164: ......

Page 165: ......

Page 166: ...AnyTimeX3 ATX3 Owner s Manual A64747 OW019E S1807 Printed in Japan Copyright 2018 Kawai Musical Instruments Mfg Co Ltd All Rights Reserved ...

Reviews: