


The Joy of Quilting with Your Long-Arm Machine
40
KathyQuilts.com
5. Mark the center of the borders from top to bottom. Mark the center of the quilt from
top to bottom. Line up the center of the border and quilt and pin them together. Pin
the ends of the border to the ends of the quilt.
6. Sew and ease the border to the quilt making sure the ends and center each stay
lined up while sewing (a walking foot is very helpful in this process).
7. Press
8. Follow these same steps to attach the top and bottom borders to the quilt.
KATHY SAYS:
The measurements on each end of your quilt should all be equal.
If you find that you have a quilt that does have flared borders (it will
look like an hour glass shape), it is much easier to unpick the borders
and attach them correctly, saving yourself a lot of frustration
and time when you begin to quilt.
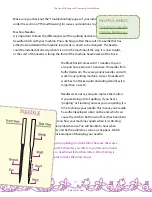
4. Cut the right size of backing and batting for your quilt.
The quilt back needs to be at least three inches wider on each side of the quilt
and four to six inches longer than the quilt. This will be helpful for when your quilt
top stretches differently than the back, thus making sure you will have enough quilt
back to cover the entire quilt by the time you have reached the end.
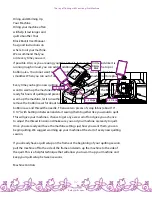
Loading a quilt on the frame
After you have set up your frame and machine, it is time to quilt! The following are two
ways you can load your quilt on the frame. We prefer floating your quilt top (instructions
below) because it is a fast, simple way to set up your quilt on the frame. However, the
alternate way (pinning all the layers) does not take much more time. It is personal
preference. We recommend that you try loading a couple practice quilts on the frame
both ways to see which method you prefer. Watch