background image

Password 

 42 

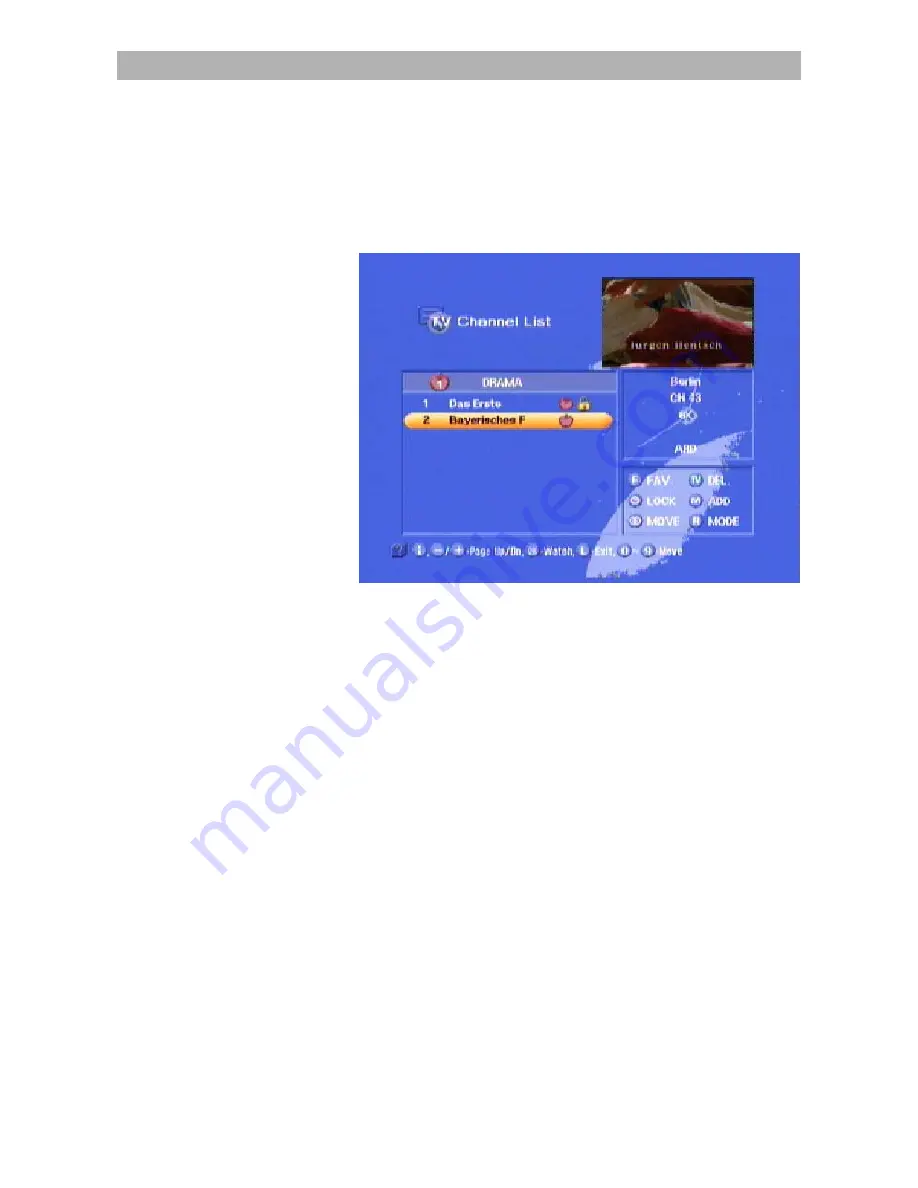
Parental control 

In a similar way to identifying your favourite channels with the "apple" 
symbol, you can set the parental control to prevent unauthorized 
access for children. Locked channels are identified by the "padlock" 
symbol in the "TV" or "radio" channel lists. 

Press 

 to access the channel list. 

Use the 



 and 



 buttons to select the channel in the on-

screen display you wish to lock. 

With the 



 and 



 buttons you can move the bar page-by-

page or line-by-line. 

The selected channel is identified by a coloured bar.  

Confirm your selection by pressing the 

 button and the padlock 

symbol will appear in the bar.  

You will move automatically to the display of the next channel in the 
channel list.  

By pressing 

 you can now lock another channel or cancel the 

channel lock by pressing the 

 again. The padlock symbol now 

disappears.  

After pressing 

, the changed settings are confirmed and the next 

channel in the channel list appears together with the information 
banner for several seconds.  

Summary of Contents for UFD 570/S

Page 1: ...User s Guide DVB T Receiver UFD 570 S Order No 20210035...

Page 2: ...2...

Page 3: ...We have designed the power switch specifically with the environment in mind Therefore in order to save electricity disconnect your receiver from the mains if you will not be watching TV for a longer...

Page 4: ...of number buttons on the remote control 13 Language selection OSD 13 Connection and Startup 14 To connect the receiver 14 Antenna connection 14 Presetting of reception antenna 14 TV connection 14 Aud...

Page 5: ...Front Panel 44 Operation in exceptional cases 44 Installation 45 Network configuration 45 To enter network names 46 To remove a network 46 Antenna set up 47 Automatic network search 48 Manual search 4...

Page 6: ...ver operate the device with a defective mains lead Cleaning Disconnect the mains power plug before you clean the receiver Use a soft dry cloth for this purpose Only clean the surface of the casing Nev...

Page 7: ...ase Ventilation The heat generated in this receiver is adequately dissipated Nevertheless never install the receiver in a cabinet or on a shelf with insufficient ventilation Never cover or close off t...

Page 8: ...Controls and connections at the rear 1 ON OFF switch with mains disconnection 2 Channel down 3 Channel up 4 LEDs red standby green confirmation of remote control commands Green Operation Green flashin...

Page 9: ...exit Locks a channel Radio OFF Deletes a channel Volume menu items Confirms submenus and menu items Radio ON OFF Selects channel list mode Sound selection menu Language selection Moves channel to diff...

Page 10: ...d the button Enter 902 with the number buttons To adopt the code press the button to switch receiver 2 to standby and then back into operation Now switch on receiver 1 again Press and hold the button...

Page 11: ...ect the submenus Press to access the submenus The items in the submenus are selected by pressing the buttons The settings allocated to specific menu items are executed either by pressing the buttons o...

Page 12: ...tion change button Press once again to change function Alphanumeric entries Use the number buttons to enter the channel and network names They produce numbers and letters in the name fields of the cor...

Page 13: ...x 4 x 5x 1 1 2 A B C 2 3 D E F 3 4 G H I 4 5 J K L 5 6 M N O 6 7 P R S 7 8 T U V 8 9 W X Y Z 0 BLANK 0 BLANK 0 Language selection OSD To select the language for the on screen menus press menu language...

Page 14: ...antenna i e an antenna with preamplifier it is possible to supply power to this antenna via the antenna input in the receiver The default is set to OFF to ensure no damage can occur Make sure you use...

Page 15: ...transmitted The number of the channel memory appears in the LED display The red standby indicator goes out You can now receive the TV and radio channels preset at the factory and select them by pressi...

Page 16: ...following steps with the receiver remote control Press the button to reach the main menu When you are in the main menu please select the Installation sub menu with the buttons and confirm with the bu...

Page 17: ...creen displays Help function You can call up help information for each menu and menu item This help function provides you with a short description of the most important functions of the selected menu...

Page 18: ...u will see the apple symbol at this point This is followed by the programme title as well as the start and end times of the current programme provided these data are transmitted with the signal Radio...

Page 19: ...tion network and its channel The required channel can be selected with the bar cursor and confirmed by pressing the button The channel settings menu is located in the bottom right corner The channel d...

Page 20: ...ext also in connection with scrambled signals for your TV set Teletext is selected and shown immediately by pressing the 0 button The individual pages can be selected with the number buttons A star ap...

Page 21: ...press the button an on screen display shows you the selected channel together with the time the programme start and end times as well as the channel title in the information box provided this data is...

Page 22: ...ring the channel location number Use the number buttons to for the purpose of entering the channel location number Example You wish to select the TV channel DSF This channel is stored under the channe...

Page 23: ...blanked out after several seconds Reception status radio After switching over the receiver simply press the buttons to select other radio channels in their ascending or descending order in the channel...

Page 24: ...adio channel by number entry You can select a different radio channel during a current radio channel by entering the channel location number Use the number buttons to for the purpose of entering the c...

Page 25: ...download the channel location with channel name the start time day months year hour minute the stop time the timer status inactive once daily weekly for 14 timers You must enter leading zeros for the...

Page 26: ...o right or stereo can be set The digit indicates the number of transmitted sound channels The channel title is shown in the box on the right Press the button to call up the audio menu for sound and la...

Page 27: ...eo to 1 of 2 or 2 of 2 2 Ch The corresponding transmission 5 1 Ch 5 channels 1 subwoofer channel is then indicated at Dig output Not many broadcasters transmit the AC3 format If AC3 format is not tran...

Page 28: ...annel can then be selected by pressing these buttons Select this function to call up the on screen display shown above Favourite channels You can arrange and sort your favourite TV and radio channels...

Page 29: ...rotected against unauthorized access by entering a password see Section Password The selected list is highlighted by a coloured bar The selected channel can be seen in the top left corner of the scree...

Page 30: ...f the buttons The selected channel is highlighted by a coloured bar You can access write mode by pressing the button The first letter is now marked You can now rename the favourite channel as you wish...

Page 31: ...ed and the information banner of the currently received channel appears for a few seconds on the screen To select a favourite channel press the and the button to access the favourite list Using the bu...

Page 32: ...l a marked channel select the favourite list in which the channel is stored with the aid of the buttons and the button and delete the apple symbol by pressing the and button To return to the channel l...

Page 33: ...nnel list Press the button to access the channel list You can select the sorting criteria by pressing the button Use the buttons to select the alphabet bar You can select the required letter with the...

Page 34: ...ter confirming with the button To sort the channels You can sort channels as required The channels are sorted by shifting the entries in the channel lists Select the channel list by pressing You now s...

Page 35: ...ition of the channel you wish to delete Now press the button to confirm deletion of the channel The control programme now asks Confirm you required selection by pressing the corresponding button The p...

Page 36: ...nce Access the channel list again by pressing Confirmation is given that your changes have been saved and the information display of the channel currently received appears for several seconds on the s...

Page 37: ...d data is transmitted together with the Electronic Programme Guide EPG e g ARD and ZDF An abbreviation of the channel title is indicated in the column on the right In the column on the left you can us...

Page 38: ...length of the channel list depends on the prospective broadcaster and can extend over several days EPG timer programming You can now move the coloured bar in the list using the buttons and select a p...

Page 39: ...39 Press to confirm your selection Confirmation appears on the screen for several seconds The programme will then be recorded at the set time You can exit this menu without timer setting by pressing t...

Page 40: ...various channels Keep your password in a safe place so that you always have access to your channels should you ever forget it Factory setting The factory setting is password 0000 witch is inactive En...

Page 41: ...aid of the number buttons Confirm password Here you enter your new password once again with the number buttons to serve as a confirmation Personal Here enter the receiver identification which the rec...

Page 42: ...k With the and buttons you can move the bar page by page or line by line The selected channel is identified by a coloured bar Confirm your selection by pressing the button and the padlock symbol will...

Page 43: ...channel with the number buttons channel is locked appears and the channel cannot be viewed After pressing the button and selecting the locked channel via the channel list you will be asked to enter yo...

Page 44: ...er from the front panel Operation in exceptional cases There are three buttons on the front panel The ON OFF button and the UP DOWN buttons Use the ON OFF button to switch your receiver on and off You...

Page 45: ...nna settings in the installation menu can be used as an aid to align the antenna Use the and buttons plus password if activated to access the Network configuration via the main menu and the submenu In...

Page 46: ...Operation enter whether your active antenna is to receive its power supply from the receiver Under Standby enter whether the power supply is to be switched off in receiver standby To enter network na...

Page 47: ...d for service purposes only The entries with the network name and reception channel are of importance to you Here Berlin and CH 43 If you are already receiving a signal you will see two bars in the le...

Page 48: ...d Channel list search Channel list Searches for existing channels based on the channel list stored in the receiver Network Searches for all channels in the current network Press to start the automatic...

Page 49: ...s received Figure above Correct network wrong channel wrong frequency Figure below Correct network right channel right frequency signal indicator good You must enter the network channel and frequency...

Page 50: ...re only required when changes are made to the reception system The selected menus submenus and menu items as well as the parameters to be set are highlighted by a colour bar The menus are to a large e...

Page 51: ...elect the menu items Parental control The basic settings that can be implemented here are described in the section Password under Setting parental control System information Under the menu item System...

Page 52: ...er each entry the cursor moves forward by one position Press twice to end the entry The receiver saves the new setting After this setting do not switch off the receiver with the power switch but rathe...

Page 53: ...hout good reason as they represent factory settings or operational settings that are adapted to your receiving system New settings are only required when changes or expansions are made to the receptio...

Page 54: ...s to be switched on or off in standby mode Factory setting In this position you can reset all settings to the factory settings by pressing The factory settings need not necessarily correspond to the s...

Page 55: ...nformation on the transmitted software and channel list Yes is set automatically under the positions Show info Operating software Channel list if new information and contents are available The left ha...

Page 56: ...ff the receiver during the update procedure otherwise the entire software will be lost The software will then have to be reinstalled in a workshop or PC and zero modem cable The message Please wait fl...

Page 57: ...y and RCU reception Compact design Teletext generation TV and in receiver presentation 4 3 and 16 9 format recognition optional output FBAS YC S VHS and RGB signal output programmable via SCART socket...

Page 58: ...decoding MPEG 1 2 compatible Bit rate 1 5 15 MB s Output voltage 1 Vss 75 S N 53 dB typ Audio Audio decoding MPEG 1 2 Layers 1 and 2 Bit rate 32 44 1 48 kb s Frequency range 40 Hz to 20 kHz Output vo...

Page 59: ...ge 8 X Green earth 9 X Data signal 10 Green signal 11 X Data signal 12 Red earth 13 X Data earth 14 Red signal C 15 X Blanking signal 16 X Video earth 17 X Blanking signal earth 18 X Video output FBAS...

Page 60: ...nnections of a DVB T receiver together with the complete TV and HiFi systems The digital sound output can be connected to a Dolby Digital system The Kathrein indoor antenna BZD 30 is used in this exam...

Page 61: ...on PID PCR is the identification number for the synchronisation signal PID PCR is the identification number for the synchronisation signal PID PCR is normally identical to PID video In the case of mul...

Page 62: ...it OSD On screen display PAL Analogue television standard Pay TV Pay TV e g Premiere PIN Personal identification number Receiver Receiver RGB Video signals made up of 3 individual colour signals red g...

Page 63: ...Service 63 Service OSD language Picture format Antenna supply German 4 3 Operation Standby ON 16 9 OFF Other settings...

Page 64: ...rnet http www kathrein de KATHREIN Werke KG x Phone 49 80 31 18 40 x Fax 49 80 31 18 43 06 Anton Kathrein Stra e 1 3 x P O B 10 04 44 x D 83004 Rosenheim 936 2536 0204 ZWT Technical data subject to ch...

Reviews: