background image

1-7. Modifications 

 
Marking any unauthorized modifications or using parts not supplied by 

(Karman Healthcare Inc.) 

may change the wheelchair structure and create an unsafe condition voiding the warranty. 


This product has been supplied from an environmentally aware manufacturer that 
complies with the Waste Electrical Equipment (WEEE) Directive 2002/96/CE. 
Please be environmentally responsible and recycle this product at the end of its life 
through your local recycling facility. 
This product may contain substances that could be harmful to the  
environment if disposed of into a landfill. 


Summary of Contents for XO-202 Series

Page 1: ...INSTRUCTION MANUAL POWER STAND UP WHEELCHAIR KARMAN HEALTHCARE INC...

Page 2: ...wheelchair Chapter 3 ADJUSTMENT 3 1 Adjusting the seat depth 3 2 Adjusting the backrest height 3 3 Adjusting the Footrest height 3 4 Adjusting the Footrest Angle 3 5 The knee support and safety belt...

Page 3: ...04 05 06 07 08 09 10 11 12 01 Backrest 07 Armrest 02 Chest belt 08 Controller Chest belt 03 Side Panel 09 Seat Rest 04 Rear Wheel 10 Knee Support Set 05 Motor Differential Gear 11 Footrest 06 Front Wh...

Page 4: ...that adding accessories or components or modifying the Powerchair may make it more susceptible to EMI 1 1 Standing Attention Standing up stresses your body in ways you may not be used to You should co...

Page 5: ...Driving and Freewheel Mode Danger of injury if the wheelchair tips over Only ever negotiate gradients up to the maximum tilt resistant gradient and only with the backrest and seat tilt in an upright...

Page 6: ...LINES AND RAMPS Always practice with your Healthcare professional or attendant before attempting to negotiate curbs inclines or ramps alone It is important for you to develop a safe technique that is...

Page 7: ...arranty This product has been supplied from an environmentally aware manufacturer that complies with the Waste Electrical Equipment WEEE Directive 2002 96 CE Please be environmentally responsible and...

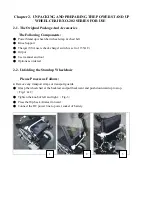
Page 8: ...rs check charger switch is set to 115VAC Oil pot User manual and tool Options as ordered 2 2 Unfolding the Stand up Wheelchair Please Process as Follows Remove any transport straps or transport guards...

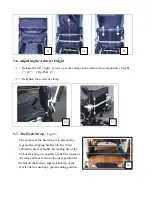
Page 9: ...r let the wheelchair frame rise over the rear wheel 2 After loosening the left right both side screws the seat depth can be adjusted using the different holes at 1 distance Fig 4 6 3 Retighten the lef...

Page 10: ...ht The height of the footrest is adjustable and should be altered in line with your body proportions to guarantee the best standing position possible Footrest adjustment should also take account of yo...

Page 11: ...screws the footplate angle can be adjusted using the different hole at 10 incline angle Fig 17 18 Retighten the screws Fig 19 3 5 The Knee Support and Safety Belt and Chest Belt The most important saf...

Page 12: ...t below not right on the knee cap and not too tight Fig 21 20 21 3 5 2 The safety belt Fig 22 The safety belt holds the waist in place Make sure that the safety belt is secure on the backrest of velou...

Page 13: ...3 7 The Heels Strap Fig 28 The purpose of the heel strap is to prevent the legs and feet slipping backwards It is fitted behind the heels or higher By making use of the Velour fastening it is possibl...

Page 14: ...puncture apply heat or fire 3 9 The Seat Cushion The Velcro fasteners prevent the cushion from slipping out of place even when you are standing up The height of the footrest should be adjusted to tak...

Page 15: ...rior to this 4 3 Driving up and down gradients Your electric wheelchair has a maximum tilt resistant climbing ability of 17 6 WARNING Only ever drive downhill at a maximum of 1 2 of the top speed Avoi...

Page 16: ...the motors are designed to engage the electromagnetic brakes when the vehicle is not in use or when the power is OFF There is also a manual feature that allows them to free wheel Free wheeling is acc...

Page 17: ...frame Fig 30 31 30 31 2 Fixed the safety belt Fig 32 3 Fixed the chest belt Fig 33 32 33 4 Pull upward push forward the handle of controller the wheelchair is operated for standing up 5 Push downward...

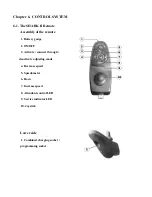
Page 18: ...the remote 1 Battery gauge 2 ON OFF 3 Activate connect through deactivate adjusting mode 4 Decrease speed 5 Speedometer 6 Horn 7 Increase speed 8 Attendant control LED 9 Service indicator LED 10 Joyst...

Page 19: ...tery charge line connects to the battery DC power socket and make sure the line is right connect 2 Connect the AC power line to the AC socket 110 220V 3 The light of battery charger from yellow color...

Page 20: ...ion 6 4 Main Circuit Breaker The mean circuit breaker reset button is located on the battery box Fig 35 The main circuit breaker monitors the electric current drawn form the battery It is a safety fea...

Page 21: ...ate of the tread on the tires every one to six months If a tire is heavily or unevenly worn it should be replaced Every one to six months check that the brakes still work cleanly Having applied the br...

Page 22: ...Fault Check the left park brake connections and cabling 6 Right Park Brake Fault Check the right park brake connections and cabling 7 SHARK Remote Fault Check the SHARK Communications Bus connections...

Page 23: ...bility for any warranties beyond the expressed terms contained in the warranty Customer releases and holds distributor harmless from any claims stemming from any unauthorized representations 8 This wa...

Reviews: