


56
RLM 4
GB
9.3
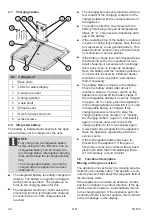
Replacing the cutting blades
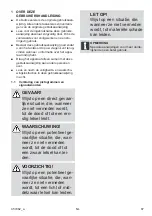
CAUTION!
Danger of injury due to
the cutting blade
The cutting blades are
very sharp and can cause
cutting injuries.
■ Wear protective gloves.
■ Make sure that parts of
the body do not get into
the cutting blade.
IMPORTANT!
Damage to the appliance
due to incorrect repair
The blade plate can be
damaged by the alignment
of a bent, built-in cutting
blade.
■ Do not align bent cutting
blades.
■ Replace bent cutting
blades by original spare
parts from Kärcher.
Worn or bent cutting blades must be replaced.
1.
Switch off the appliance with
ON
OFF
.
2.
Put down the appliance with the cutting
blades pointing upwards.
3.
Unscrew the fastening screws.
4.
Take the cutting blade out of the blade seat.
5.
Clean the blade seat with a soft brush.
NOTE
The cutting blades are sharpened along
the entire length and can therefore also
be mounted rotated by 180°, which dou-
bles their runtime.
6. Replacing the cutting blades:
■
If cutting blades have not been rotated
since the initial mounting: Rotate the cut-
ting blades by 180° and insert into the
blade seat again with the sharpened side
pointing towards the appliance, and tight-
en the fastening screws again by hand.
■
If the cutting blades have already been
rotated once since the initial mounting:
Insert new cutting blades into the blade
seat again with the sharpened side point-
ing towards the appliance, and tighten
the new fastening screws by hand.
Note:
Only original spare parts from
Kärcher are allowed.
As a rule, the clearer blades do not need to be
replaced.
In case of stubborn dirt that cannot be removed
with a brush, the blade plate must be replaced
because an imbalance can lead to increased
noise levels, greater wear and malfunctions.
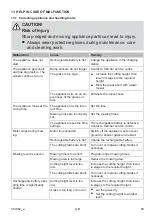
10 TRANSPORT
For transporting the appliance, e.g. from the main
area to the secondary area, proceed as follows:
1. Stop the appliance with
START
STOP
or the stop but-
ton.
2.
Switch off the appliance with
ON
OFF
.
3.
Lift the appliance with both hands on the
housing:
■
Do not touch the cutting blades.
■
The cutting blades must always point
away from the body.
11 STORAGE
11.1 Storing the automatic lawnmower
The appliance must be stored over winter or
when it is to be taken out of service for an ex-
pected duration of longer than 30 days.
1.
Fully charge the rechargeable battery (see
chapter 5.1 "Charging the rechargeable bat-
tery (08)", page 50
).
2.
Thoroughly clean the appliance (see
chapter
).
3.
Store the appliance:
■
upright on all wheels
■
at a dry, lockable location protected from
frost
■
out of the reach of children
Summary of Contents for RLM 4
Page 427: ...457462_a 427 RU 1 1 1...
Page 433: ...457462_a 433 RU 2 9 0 3 3 1 CE 500 2 45 24 45 24 0 45 C 0 55 C 3 2...
Page 434: ...434 RLM 4 RU 3 3 3 3 1 PIN PUK PIN PIN PIN 3 PUK 24 PIN PUK PIN PUK 3 3 2...
Page 435: ...457462_a 435 RU 24 45 EGMF 3 4 3 4 1 16 3 4 2...
Page 436: ...436 RLM 4 RU 3 4 3 3 4 4...
Page 448: ...448 RLM 4 RU 9 3 K rcher 1 ON OFF 2 3 4 5 180 6 180 K rcher 10 1 START STOP 2 ON OFF 3...
Page 449: ...457462_a 449 RU 11 11 1 30 1 5 1 08 441 2 9 1 447 3 11 2 1 2 3 4 1 2 3 4 08 4 5 11 3 1 12...
Page 450: ...450 RLM 4 RU 2012 19 EC Hg Cd Pb Hg 0 0005 Cd 0 002 Pb 0 004 2006 66 EC 1 2 3 1 1 2 2 3 3 4...
Page 451: ...457462_a 451 RU 13 13 1 K rcher K rcher...
Page 452: ...452 RLM 4 RU K rcher K rcher K rcher K rcher 13 2 CN001 Tilt sensor CN002 Lift sensor...
Page 459: ...457462_a 459 UA 1 1 1...
Page 466: ...466 RLM 4 UA 24 PIN PUK PIN PUK 3 3 2 24 45 EGMF...
Page 467: ...457462_a 467 UA 3 4 3 4 1 16 3 4 2 3 4 3 3 4 4...
Page 468: ...468 RLM 4 UA 3 4 5 4 4 1 1 2 K rcher 3 p 2 1 460 4 2 01 01 1 01 01 h n 01 01 HF 01 NF...
Page 480: ...480 RLM 4 UA 11 2 1 2 3 4 1 2 3 4 08 4 5 11 3 1 12 ElektroG 2012 19 C...
Page 481: ...457462_a 481 UA BattG Hg Cd Pb Hg 0 0005 Cd 0 002 Pb 0 004 2006 66 C 1 2 3 1 1 2 2 3 3 4...


