


-
5
6 Display sweeping programme
"HEAVY"
– for heavily soiled and uneven floors
7 Display
8 KM 105/110 R: Lift waste container and
direction key "upwards"
KM 105/100 R: Direction key "upwards"
9 KM 105/110 R: Tip waste container and
direction key "to the right"
KM 105/100 R: Direction key "to the
right"
10 Confirmation key "OK"
11 KM 105/110 R: Swivel in waste contain-
er and direction key "to the left"
KM 105/100 R: Direction key "to the
left"
12 KM 105/110 R: Lower waste container
and direction key "downward"
KM 105/100 R: Direction key "down-
ward"
13 Blinker switch
14 Horn
15 Program selection switch
The default language on the display is Eng-
lish.
Select the desired language on the control
panel prior to working with the machine.
How the language is set for the yellow and
grey key (Intelligent Key) is shown in the il-
lustrated brief instructions on Page 2 of
these operating instructions or in the follow-
ing Chapter "Intelligent Key yellow/grey".
The parameters for the various cleaning
programmes are preset. The indication
takes place on the display.
The texts on the display are plain texts and
therefore self-explanatory. The selection of
the desired sweeping program is made by
means of the direction key "to the right".
Shown display texts are:
>
Battery charge indicator
<
>
Operating hours and sweeping pro-
gramme
<
>
Usability of the roller brush: .. %
<
>
Day counter .. h .. min
<
Extra with upgrade kits:
>
Switch on beacon light
<
>
Switch on working light
<
If you wish to permanently change the pa-
rameters, you must use a grey intelligent
key to make the settings. The procedure is
described in section "Grey intelligent key".
With the grey intelligent key the authorisa-
tions for the yellow intelligent key are ena-
bled.
Parameters that are adjusted with the grey
Intelligent Key, are kept until another set-
ting is selected.
Insert the grey intelligent key.
Turn the programme selector switch to
"ON".
Push the direction key "upwards" or
"downwards" until the >
key manager
<
menu appears.
Note
: In this menu item the authorisa-
tions for the yellow intelligent key are
enabled.
Confirm the message with the "OK"
key.
Remove the grey intelligent key and
within the seconds being counted down
insert the yellow intelligent key that is to
be personalised.
Push the direction keys "upwards" or
"downwards" and select menu items.
To transfer the settings to the yellow in-
telligent key:
While the seconds are counted down,
select >
YES
< with the direction key "to
the right" and confirm with the "OK" key.
Note
: Thereby the settings made are
transferred to the yellow intelligent key
and are enabled.
Note
The functions are only activated with the
main switch being switched on and the key
(Intelligent Key) inserted.
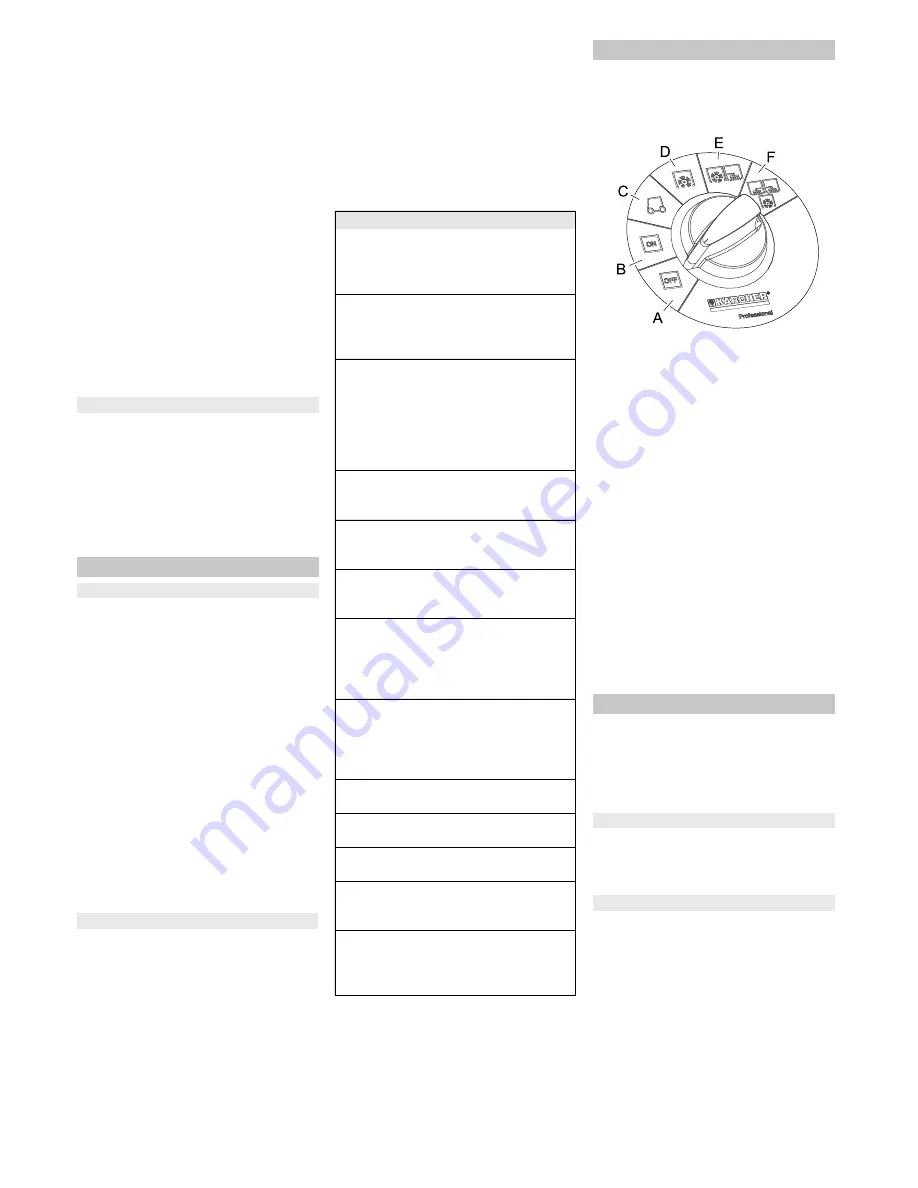
A OFF
Device is switched off
B ON
The appliance is now ready for opera-
tion.
C Drive the machine
Drive to the operating location; in order
to do so, push the accelerator pedal.
Note
Roller brush and side brushes are
raised and switched off.
D Sweeping with sweep roller
Roller brush is lowered.
E Sweeping with roller brush and right
side brush
Roller brush and right side brush are
lowered, the sickle brush (optional) is
ready for operation.
F Sweeping with roller brush and right
and left side brush
Roller brush and right side brush are
lowered, the sickle brush (optional) is
ready for operation.
몇
WARNING
This appliance is equipped with a variety of
safety installations. The proper function of
every safety installation must be checked
prior to operation and must NOT be over-
ridden!
The main switch serves the immediate
shutdown of the electrical drives in case of
emergencies and may only be used for this
purpose.
The left cover is equipped with a safety in-
stallation that switches off the running de-
vice when it is opened and issues a warn-
ing message on the display.
Language setting on the control panel
Intelligent key yellow/grey
Yellow intelligent key
Grey Intelligent Key
Available menu items are:
>
Language selection
<
18 languages are available in the language
selection, among others German, English,
French, Spanish, Greek and Russian.
>
Device operation locked/enabled
<
The yellow key (Intelligent Key) can be
locked for the operation of this machine
here.
>
Sweeping track locked/enabled
<
With a locked sweeping track the sweeping
programme ECO, MEDIUM or HEAVY is to
be set and cannot be changed by the oper-
ator. With an enabled sweeping track you
can change between the 3 sweeping pro-
grammes during operation.
>
Dust level locked/enabled
<
Adaption of the automatic filter cleaning
(TACT) to the environment.
>
Light on/off
<
The operator can switch on the light (op-
tional).
>
Light locked/enabled
<
Continuous operation with light is activated
or locked.
>
Flashing beacon locked/enabled
<
The operator can choose whether he or
she wants to drive with or without the flash-
ing beacon; when starting the device, the
flashing beacon is on automatically.
>
Flashing beacon mode locked/ena-
bled
<
It can be selected whether the flashing
beacon is necessarily on (even if it has
been switched off by the operator) or not.
>
Speed locked/enabled
<
Without function
>
Sweeping speed locked/enabled
<
Without function
>
Blower/pump locked/enabled
<
Without function
>
Enable delete day counter
<
It can be selected whether the operator is
able to reset the day counter.
>
Programming yes/no
<
As the last menu item the >
Program-
ming
< display with the seconds counted
down appears.
Program selection switch
Safety Devices
Main switch
Cover on the left
9
EN


