background image

English

 7

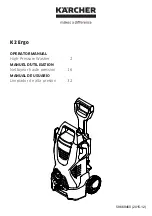
Illustrations on Page 2

1 High pressure connection
2 Appliance switch "0/OFF“/ „I/ON“
3 Storage hook for high pressure 

hose and mains connection cable

4 Carrying handle
5 Storage for spray lances
6 Storage for trigger gun
7 Water connection with integrated 

sieve

8 Detergent suction hose (with sieve)
9 Coupling element for water connec-

tion

10 Mains cable with mains plug
11 Trigger gun
12 Lock trigger gun
13 Clamp for high pressure hose
14 High pressure hose
15 Spray lance with high pressure noz-

zle
For normal cleaning tasks.

16 Spray lance with Dirtblaster

For strong contaminations

Not included in the scope of 
delivery.

17 Water supply hose

Use a fabric reinforced water hose 
with a commercially available cou-
pling. Minimum diameter 13 mm (1/
2 inch); minimum length 7.5 m. 

Mount loose parts delivered with appli-
ance prior to start-up.
Illustration 

Attach the carrying handle.

Illustration 

Screw the coupling element to the 
water connection on the appliance.

Illustration 

Pull out the clamp for the high-pres-
sure hose from the hand spray gun 
(e.g. a Philips screwdriver).

Illustration 

Connect high pressure hose to trig-
ger gun.

Push the clamp in until it locks. 
Check the secure connection by 
pulling on the high-pressure hose.

For connection values, see type plate/
technical data.
Observe regulations of water supplier.

Warning

According to applicable regula-

tions, the appliance must never 

be used on the drinking water 

net without a system separator. 

A suitable system separator by 

KÄRCHER or alternatively a 

system separator according to 

EN 12729 type BA must be 

used.

Water that has flown through a 

system separator is no longer 

classified as drinking water.

Caution

Always connect the system sep-

arator to the water supply, never 

directly to the appliance!

Description of the 

Appliance

Before Startup

Attaching the Accessories

Water supply

Summary of Contents for K 2.122

Page 1: ...English 59651570 10 13 K 2 122 ...

Page 2: ...2 ...

Page 3: ...ging material can be recycled Please do not place the packaging into the ordinary re fuse for disposal but arrange for the proper recycling Old appliances contain valuable materials that can be recycled Please arrange for the proper re cycling of old appliances Please dispose your old appliances using appropriate collection systems Work with detergents must only be performed on liquid tight work s...

Page 4: ... water The mains plug and the cou pling of an extension cable must be watertight and must never lie in water Moreover the coupling may never lie on the ground The use of cable reels that ensure that the sock ets are at least 60 mm above the ground is recommended Make sure that the power cord or extension cable is not damaged by running over pinching dragging or the like Protect the power cords fro...

Page 5: ... not been in structed accordingly This appliance is not intended for use by persons with limit ed physical sensory or men tal capacities or lacking expe rience and or skills unless such persons are accompa nied and supervised by a per son in charge of their safety or they have received precise instructions on the use of this appliance and have under stood the resulting risks Children must not play...

Page 6: ... corresponding safety regulations must be observed Wear protective clothing and safety goggles to protect against splash back containing water or dirt 몇 Caution Create stability for the appliance prior to any work on or with the appliance to prevent accidents or damage The stability of the appliance is war ranted when it is placed onto an even surface 몇 Caution Safety installations serve the prote...

Page 7: ...ance prior to start up Illustration Attach the carrying handle Illustration Screw the coupling element to the water connection on the appliance Illustration Pull out the clamp for the high pres sure hose from the hand spray gun e g a Philips screwdriver Illustration Connect high pressure hose to trig ger gun Push the clamp in until it locks Check the secure connection by pulling on the high pressu...

Page 8: ...ation Connect the high pressure hose to the high pressure connection of the appliance Attach the water supply hose to the coupling on the water connection Note The supply hose is not in cluded Connect the water supply hose to the water supply Completely open the water tap Insert the mains plug into the sock et Turn on the appliance I ON Illustration Unlock the lever on the trigger gun Pull on the ...

Page 9: ...ctive cleaning task as these were specifically developed for your appliance The use of other de tergents and care products may lead to premature wear and can invalidate your warranty claims Please obtain information at your local dealer or request in formation directly from KÄRCH ER Danger The improper use of detergents can cause severe injuries or tox ication When using detergents the ma terial d...

Page 10: ...ress the lever on the trigger gun to release any remaining pressure in the system Lock the lever on the trigger gun Detach the appliance from the wa ter supply Disconnect the mains plug from the socket 몇 Caution In order to prevent accidents or injuries mind the weight of the appliance during transport see technical data Lift appliance by the carrying han dle and carry it Secure the appliance agai...

Page 11: ...m against frost To avoid damage Completely drain all water from the appliance Switch the appliance on with detached high pressure hose and detached water supply max 1 minute and wait until no more wa ter exits at the high pressure con nection Turn off the appliance Store the appliance and the entire accessories in a frost free room Danger Risk of electric shock Turn off the appliance and remove th...

Page 12: ... nection using flat nose pliers and clean under running water Remove air from appliance before operation Switch on the appliance without connection the HP hose max 2 minutes and run it until the water discharging from the HP outlet is free of bubbles Switch off appli ance and reconnect HP hose Clean high pressure nozzle Re move dirt and debris from the noz zle bore using a needle and rinse through...

Page 13: ...ase contact your dealer or the nearest au thorized Customer Service centre Please submit the proof of purchase Addresses can be found under www kaercher com dealersearch Accessories and Spare Parts Special accessories Spare parts Warranty Technical specifications Electrical connection Voltage 110 120 1 60 V Hz Connected load 1 4 kW Protection class IP X5 Protective class II Mains fuse slow blow 10...

Page 14: ......

Page 15: ......

Page 16: ...http www kaercher com dealersearch ...

Reviews: