background image

FO
RD
-SYNC3

-T

D

C2

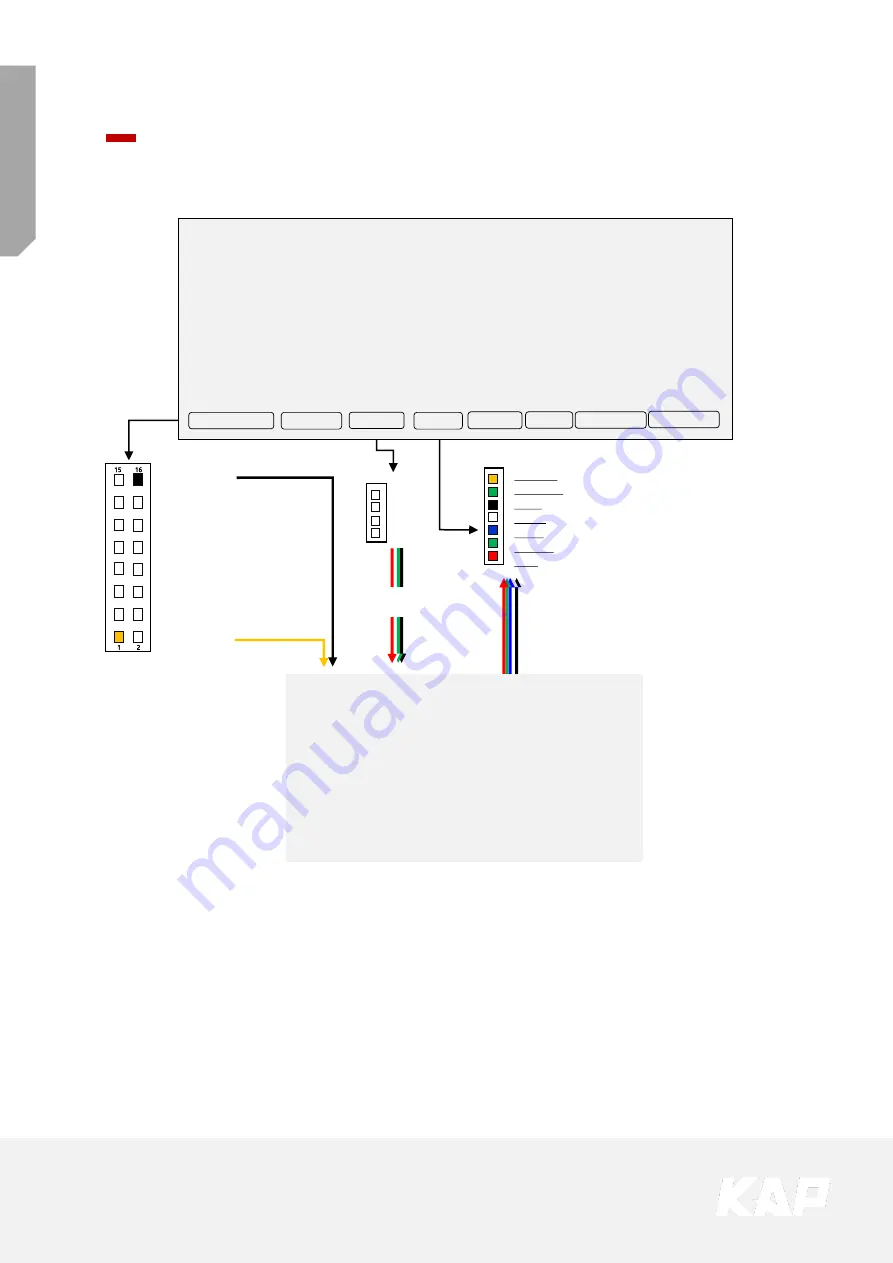
16. GND (Black)

15. GND (Black)

14. Mode (Green)

13. Front-VCC (Red)

12. Rear-VCC (Red)

11. N.C

10. N.C

9. N.C

8. N.C

7. N.C

6. CAN-H (Orange) 

5. CAN-L (Green)

4. Front-Camera Detect (Blue)

3. Rear-Camera Detect (Brown)

2. N.C

1. ACC (Yellow) 

FORD-SYNC3-TDC2

VIDEO INTERFACE

POWER/CAN

FRONT

TOUCH

LVDS-OUT

DIGITAL

NAVI

REAR

Install Manual

Installation Navigation Connection

DVD-IR

DVBT-IR

GND

SYNC

BLUE

GREEN

RED

X+

Y+

X-

Y-

Analog RGB

Resistive Touch

LVDS-IN

Navigation

(Other products except for ROiK)

Summary of Contents for FORD-SYNC3-TDC2

Page 1: ...www kaptrade com Korea Auto Parts Instruction Manual D A T E MODEL FORD SYNC3 TDC2 VIDEO INTERFACE Ford Video Interface 2019 07 26 FS PAS 170830 ...

Page 2: ...FRONT CAMERA Input Front camera source 1 x LVDS Input Car Command System 2 Output Spec 1 x LCD Output LCD Operation 1 x Virtual Analog Touch Navigation System source 1 x UART Digital Touch Navigation System source 3 Power Spec Input Power 8VDC 24VDC Consumption Power 12Watt Max 4 Switch Input Mode Possible to select CAR model while switching mode by DIP S W By button on the Commander in the car vi...

Page 3: ...FORD SYNC3 TDC2 External Appearance IMAGE DIP S W PROGRAM LED Power CAN Touch Digital RGB NAVI FRONT REAR LCD OUT LCD IN ...

Page 4: ...olor Connect 1 2 3 4 2 NAVI TOUCH Connect 4Pin 1 2 3 4 RED GREEN BLUE WHITE Y X Y X No Color Connect 1 2 3 4 5 6 7 3 NAVI Connect 7Pin 1 2 3 4 5 6 7 RED GREEN BLUE WHITE BLACK GREEN ORANGE R DATA G DATA B DATA SYNC GND DVB T IR DVD IR No Color Connect 2 4 6 8 10 12 14 16 BLUE ORANGE RED GREEN BLACK N C FRONT DET CAN H N C N C REAR VCC MODE GND No Color Connect 1 3 5 7 9 11 13 15 ...

Page 5: ...FORD SYNC3 TDC2 Product Composition Interface RGB NAVI Cable Power Cable Mode S W OSD Board LVDS IN Cable LVDS OUT Cable ...

Page 6: ... Not Used OFF Used 2 DVB T AV1 ON Not Used OFF Used 3 DVD AV2 ON Not Used OFF Used 4 N C 5 N C 6 CAR type SEL Bottom Picture 7 8 OFF UP ON DOWN FORD F150 2015 FORD F150 Special Model Vehicles that do not function as basic DIP SW among F150 models FORD Mustang 2017 Ranger 2018 Lincoln MKX 2018 ...

Page 7: ...nds Short press to switch OEM VOICE Switch mode by pressing for 3 seconds Short press to switch OEM Steering Wheel Button Control F150 Specific vehicle 1 In this case set DIP SW as shown in the figure on the left Mode Change Button LEFT Switch mode by pressing for 1 5 seconds Short press to switch OEM VOICE Switch mode by pressing for 3 seconds Short press to switch OEM 1 same as F150 but not dist...

Page 8: ...tton in the OSD menu Select OFF when the button is not used Mode Change Button LEFT Switch mode by pressing for 1 5 seconds Short press to switch OEM VOICE Switch mode by pressing for 3 seconds Short press to switch OEM 1 2 1 2 1 2 Steering Wheel Button Control Ranger Mode Change Sequence NAVI OEM NAVI AV1 DVBT AV2 DVD OEM ...

Page 9: ...f the LEFT or VOICE button in the OSD menu Select OFF when the button is not used Mode Change Button LEFT Switch mode by pressing for 1 5 seconds Short press to switch OEM VOICE Switch mode by pressing for 3 seconds Short press to switch OEM 1 2 1 2 Mode Change Sequence NAVI OEM NAVI AV1 DVBT AV2 DVD OEM ...

Page 10: ...Control Touch Calibration DVBT DVD Control Press Touch Anywhere Press Icon Touch the screen for 11 seconds Method 1 Method 2 OR Touch according to the shape coordinates Touch Calibration OSD menu Utility Calibration DVBT DVD ...

Page 11: ...n can be switched ON OFF Return to previous menu SEL Select the currently active item If the OSD screen is off mode changes can be made UP Move up from the menu Increase the selected item value DOWN Move down from the menu Decrease the selected item value First Menu Second Menu Third Menu Mode State ...

Page 12: ...ond Menu Third Menu Description Config NAVI RGB DIGTAL INAVI Setting the Connected NAVI Model DVB T DMB ELT_DVBT20 Setting the Connected DVB T Model DVD ELT_980XU Slim Setting the Connected DVD Model Reset Execute Reset to default value of Config menu ...

Page 13: ...N 12V continuous supply AUTO 12V supply only in Rear camera mode OFF 12V off RearCam Det CAN Detected by CAN WIRE Detected by Rear Det Wire AV Mode On Video CVBS Input If RearCam Type is OEM Off Disable feature FrontCam Type OEM Original Camera ExtDevice Equipped with external camera FrontCam Power ON 12V continuous supply AUTO 12V supply only in Front camera mode OFF 12V off ...

Page 14: ...r RearCam shows FrontCam and returns to the previous state OFF Disable feature Steering Wheel Btn LEFT Use the Left button on the right side of the handle VOICE Use the Voice button on the right side of the handle OFF Disable feature UI DVB T DMB ON DVB T device control UI output function OFF Disable feature UI DVD ON DVD device control UI output function OFF Disable feature ...

Page 15: ...te ON When there is a change of air conditioning it switches to OEM screen for 2 seconds and then returns to original state OFF Disable feature ScrChg Audio Vol ON When there is a change in audio volume it switches to OEM screen for 2 seconds and returns to original state OFF Disable feature NAVI COM HMS FINE Set up a manufacturer of woodworking device for UART Touch use OFF Disable feature Reset ...

Page 16: ...y 0 30 second 0 second FrontCam RcvOpt Menu OFF OEM NAVI AV1 DVB T AV2 DVD OEM NAVI AV1 DVB T AV2 DVD Option SrcChg Call Setup for switching from external screen to OEM phone mode screen automatically when phone rings OEM NAVI AV1 DVB T AV2 DVD NAVI AV1 DVB T AV2 DVD Phone Connect Phone Disconnect If you touch an arbitrary area of the OEM screen it keeps the OEM screen ...

Page 17: ... to OEM mode screen automatically when changing climate value Setup for switching from external screen to OEM mode screen automatically when changing audio volume level OEM NAVI AV1 DVB T AV2 DVD NAVI AV1 DVB T AV2 DVD Display for 2 Sec If you touch an arbitrary area of the OEM screen it keeps the OEM screen ...

Page 18: ...olor GREEN Adjust the value of GREEN Color BLUE Adjust the value of BLUE Reset Execute Option Menu all Reset NAVI RGB Menu First Menu Second Menu Third Menu Description Image Brightness Adjust the value of brightness Contrast Adjust the value of contrast Saturation Adjust the value of Saturation Hue Adjust the value of Hue Sharpness Adjust the value of Sharpness Reset Execute Option Menu all Reset...

Page 19: ...ird Menu Description Screen Horizontal Output screen horizontal movement Vertical Output screen vertical movement Scale X Up Reduce increase output screen width Scale X Down Scale Y Up Reduce Increase Output Screen Height Scale Y Down Reset Screen menu all reset ...

Page 20: ...o not show OPS Line Display ON Show parking line OFF Do not show parking lines Warnings Lang Set warning text language Horizontal Moving a parking line horizontally Vertical Moving a parking line vertically Transparency Parking line transparency Reset Parking menu all reset Parking Line ON Screen Parking Line OFF Screen ...

Page 21: ...FORD SYNC3 TDC2 OSD Control Parking Change warning message language ...

Page 22: ...his Horizontal Vertical menu The OSD screen automatically disappears Possible to adjust the position of parking guide line by Keypad in Horizontal Vertical menu Please adjust from the parking line Screen MENU SEL UP DOWN Press UP Button Press MENU Button Press SEL Button Press DOWN Button ...

Page 23: ...u Description OSD Horizontal value OSD Menu Horizontal Shift Vertical value OSD menu vertical Shift Display Time value OSD Menu Display Time in seconds Transparency value OSD menu transparency Language OSD menu display language Reset Execute Initialize OSD settings ...

Page 24: ...on Execute Run Calibration mode Version FDS302KRX 171004 Check for future upgrades Last Source FDS302KRX 171004 Motor Model FD FORD BM BMW BE BENZ MA MASERATI LX LEXUS PIP Model S3 Sync3 PP PIP V LVDS Hardware Version National CN CHINA KR KOREA JP JAPAN US U S A Special Version FD S3 02 KR X 17 10 04 Software Year Software Month Software Version ...

Page 25: ...een Select the product name of the connected navigation If NV 17 is not available you can select any of DGT menu OSD Control Installation Navigation Digital Connection OSD setting must be done before Navigation can be used Screen Settings Digital 1 2 Option NAVI COM Product Name Config NAVI RGB DGT 0000 DGT 0000 UART Touch Settings ...

Page 26: ...13 Front VCC Red 12 Rear VCC Red 11 N C 10 N C 9 N C 8 N C 7 N C 6 CAN H Orange 5 CAN L Green 4 Front Camera Detect Blue 3 Rear Camera Detect Brown 2 N C 1 ACC Yellow GND ROIK 10 Battery ROIK 10 ACC 12V ROIK 10 CAR No Button 1 Use DIGITAL LVDS 2 Use ROiK GPS Antenna ROiK 10 Dip Switch No Button 1 Use UART Touch 2 3 4 After completing the cable connection OSD and device setting must be completed Se...

Page 27: ...es you need to set the OSD to use the UART touch Since it is not touch yet Interface controls OSD board ROiK with Mouse Control INTERFACE Settings Control with OSD board 1 2 Option NAVI COM GU Config NAVI RGB DIGITAL ROIK NAVIGATION Settings Control with Mouse Device Setting Select Interface GU 3 ...

Page 28: ...CAN L Green 4 Front Camera Detect Blue 3 Rear Camera Detect Brown 2 N C 1 ACC Yellow FORD SYNC3 TDC2 VIDEO INTERFACE POWER CAN FRONT TOUCH LVDS OUT DIGITAL NAVI REAR Install Manual Installation Navigation Connection DVD IR DVBT IR GND SYNC BLUE GREEN RED X Y X Y Analog RGB Resistive Touch LVDS IN Navigation Other products except for ROiK ...

Page 29: ...DC2 VIDEO INTERFACE POWER CAN FRONT TOUCH LVDS OUT DIGITAL NAVI REAR DVD IR DVBT IR GND SYNC BLUE GREEN RED LVDS IN 16 GND Black 15 GND Black 14 Mode Green 13 Front VCC Red 12 Rear VCC Red 11 N C 10 N C 9 N C 8 N C 7 N C 6 CAN H Orange 5 CAN L Green 4 Front Camera Detect Blue 3 Rear Camera Detect Brown 2 N C 1 ACC Yellow ...

Page 30: ...D DVD IR DHA S690 FORD SYNC3 TDC2 VIDEO INTERFACE POWER CAN FRONT TOUCH LVDS OUT DIGITAL NAVI REAR LVDS IN 16 GND Black 15 GND Black 14 Mode Green 13 Front VCC Red 12 Rear VCC Red 11 N C 10 N C 9 N C 8 N C 7 N C 6 CAN H Orange 5 CAN L Green 4 Front Camera Detect Blue 3 Rear Camera Detect Brown 2 N C 1 ACC Yellow ...

Page 31: ...ack 14 Mode Green 13 Front VCC Red 12 Rear VCC Red 11 N C 10 N C 9 N C 8 N C 7 N C 6 CAN H Orange 5 CAN L Green 4 Front Camera Detect Blue 3 Rear Camera Detect Brown 2 N C 1 ACC Yellow REAR POWER Red 12V FORD SYNC3 TDC2 VIDEO INTERFACE POWER CAN FRONT TOUCH LVDS OUT DIGITAL NAVI REAR REAR GND Black LVDS IN ...

Page 32: ...ode Green 13 Front VCC Red 12 Rear VCC Red 11 N C 10 N C 9 N C 8 N C 7 N C 6 CAN H Orange 5 CAN L Green 4 Front Camera Detect Blue 3 Rear Camera Detect Brown 2 N C 1 ACC Yellow FRONT POWER Red 12V ON OFF FRONT GND Black FORD SYNC3 TDC2 VIDEO INTERFACE POWER CAN FRONT TOUCH LVDS OUT DIGITAL NAVI REAR LVDS IN ...

Page 33: ...FORD SYNC3 TDC2 Install Manual Installation LVDS connection FORD SYNC3 TDC2 VIDEO INTERFACE POWER CAN FRONT TOUCH LVDS OUT DIGITAL NAVI REAR Navigation LVDS IN ...

Page 34: ... flashes for 1 second there is no If the red LED is on continuously the interface itself is bad If nothing turns on check that the power and CAN signals are properly connected 2 When the screen turns black LVDS cable itself is bad or bad contact 3 How to distinguish between FORD SYNC and SYNC3 SYNC SYNC3 4 If you find any symptoms with these symptoms please contact your distributor ...

Page 35: ...A 912 RM Tera Tower2 201 Songpa Daero Songpa gu Seoul Korea F 82 6204 0913 E kap kaptrader com ...

Reviews: