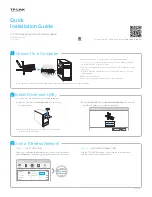
CONNECT RADIOS
12
Pin 4 – Blue lead –
KAM
same as pin 5
KPC-4
, both ports, same as pin 5
KPC-2
same as pin 6
KPC-2400
has no connection
Pin 5 – Audio Signal – 2 conductor audio cable, center conductor and 9-wire cable, purple conduc-
tor
This line is prewired for your use as the audio input from your transceiver external speaker jack.
Do not use a headphone output from the transceiver. If you use an accessory or phone patch out-
put, it may be necessary to provide a padding network to reduce amplitude of the signal being fed
to the TNC. High level fixed outputs may have a tendency to "swamp" the TNC input circuits. Fixed
output signals in excess of 50 mV should be padded.
For the
KAM
and
KPC-4
you can plug this lead into one leg of the Y-connector cable provided in
the TNC accessory bag. Plug the Y-connector cable into the external speaker jack of the trans-
ceiver. The remaining female connector on the Y-connector cable may be used for an external
speaker. For the
KPC-2
and
KPC-2400
the audio jack on the back panel remains available for at-
tachment of an external speaker.
Pin 6 – Ground/Shield – shield of 9-wire cable and shield of audio cable
Connect the push-to-talk ground and AFSK shield to this line. With some transceivers which do not
reference PTT and audio shielding to a common ground, it may be necessary to leave the AFSK
shield (braided wire) disconnected. NOTE: All TNC grounds are common.
Pin 7 –
KPC-4
Radio Port 1 External Reset – red lead
An external reset line is provided on this pin. Applying a ground, either from a local or remote
source is the same as turning on the TNC. This is only on the
KPC-4
Radio Port 1.
Pin 8 – Green lead –
KAM
same as pin 6
KPC-4
, both ports, same as pin 6
KPC-2
no connection
KPC-2400
no connection
Pin 9 – Ground – Black lead – same as pin 5
8-Pin DIN Radio Connector (
KAM
HF)
Female (Looking at Holes)
Pins 1, 2, 3 and 6 must be connected to your radio.
Pin 1 – AFSK Out – white lead
This lines carries the AFSK tones generated by the
KAM
to the Audio Input (microphone) line of
your transceiver.
Summary of Contents for KAM
Page 7: ...BACK PANELS 3 Back Panels KAM KPC 4 KPC 2 KPC 2400 KPC 1...
Page 43: ...39 KAM COMPONENT PLACEMENT DIAGRAM...
Page 44: ...40 KAM SCHEMATIC...
Page 45: ...41...
Page 47: ...43 KPC 4 COMPONENT PLACEMENT DIAGRAM...
Page 48: ...44 KPC 4 SCHEMATIC...
Page 50: ...46 KPC 2 COMPONENT PLACEMENT DIAGRAM...
Page 51: ...47 KPC 2 SCHEMATIC...
Page 53: ...49 KPC 2400 COMPONENT PLACEMENT DIAGRAM...
Page 54: ...50 KPC 2400 SCHEMATIC...