Push the power button and the power indicator light will light up. When the microphone is working, the CHA or CHB
light on the receiver will also light up. The receiver output volume can be controlled by adjusting the volume knob.
Attention:
When you install the receiver it should be more than 1m away from the floor and walls. Antennas should
be vertical to the receiver for the best results.
NOTE:
Solid objects such as walls may reduce or interfere with the range or signal strength.
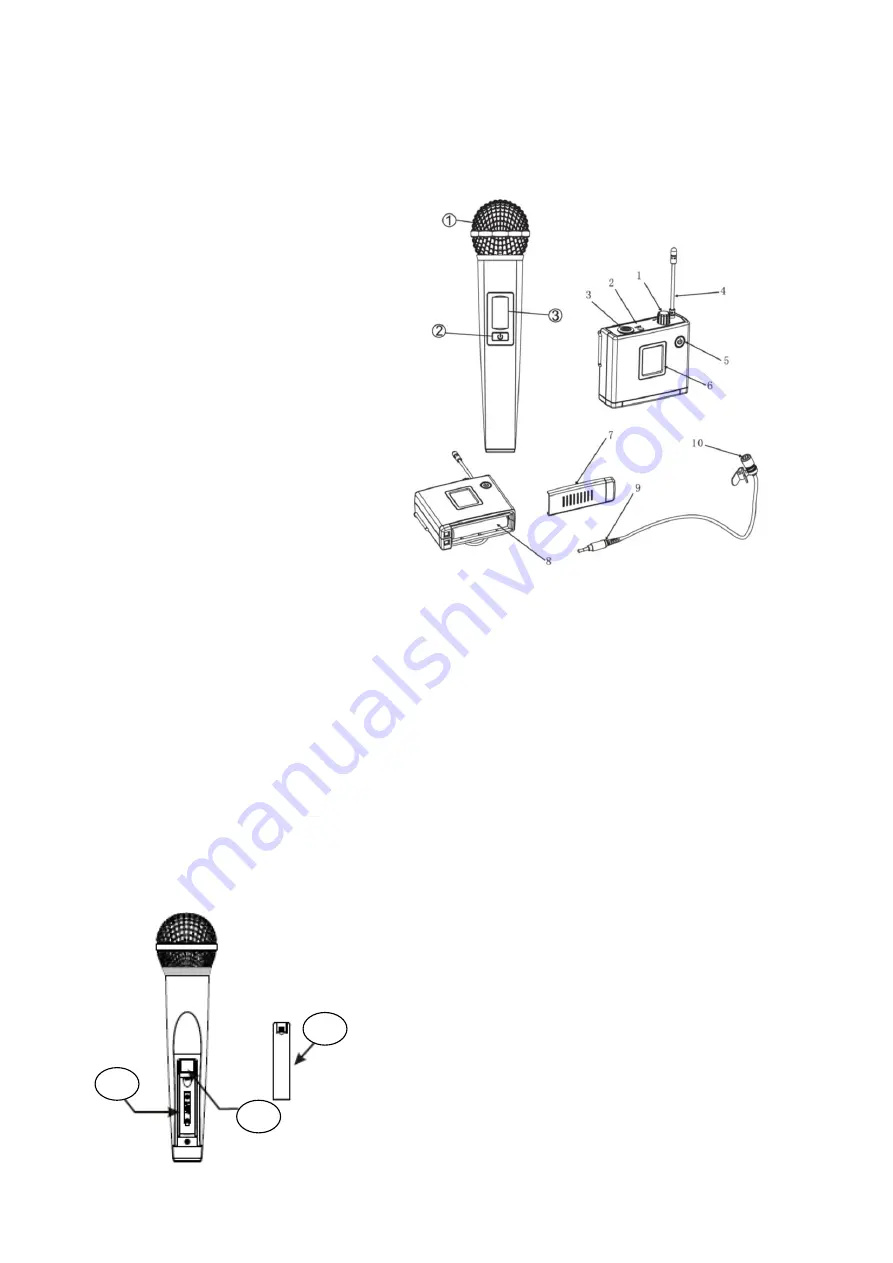
Control and function list (Handheld)
1.
Grille
2.
On/off switch
3.
LCD display
Control and function list (Bodypack)
1.
Volume
2.
ACT
3.
Input jack
4.
Antenna
5.
Power ON/OFF
6.
LCD Display
7.
Battery cover
8.
1.5V battery shell
9.
Audio jack input
10.
Cartridge
Operation of the microphone/body pack
Open the battery cover and insert 1x1.5v AA battery. Pay attention to Polarity (high quality batteries should be used
for best results).
Turn on the microphone and the LCD display will light up. The LCD display will show the frequency of the
microphone, please ensure this matches the frequency on either CHA or CHB on the receiver (please note CHA and
CHB frequencies must not be set the same and a sufficient spacing of frequencies must be selected so as not to
cause interference or channel bleed over.
Mute
Pressing the button again will select the mic mute mode and the audio will cease output. The mute icon will appear on
the mic. Press the button again to remove mute. Press and hold the on/off button to turn the mic off.
Note
If the transmitter is not being used for long periods of time, removal of the battery from the unit is advised, this will
prevent damage to the transmitter from the possibility of the battery leaking etc.
1. Battery
2. IR receiver
3. Battery cover
When using IR make sure this is in line with the IR transmitter eye
on the front of the receiver (2 -ACT).
Note:
the IR sync takes approx 30 seconds.
Handheld microphone LCD display
2
m
u
si
c
pl
a
c
el
1
m
u
si
c
pl
a
c
el
td
@
3
m
u
si
c
pl
a
c
el
td
@
a
ol
.c


