background image

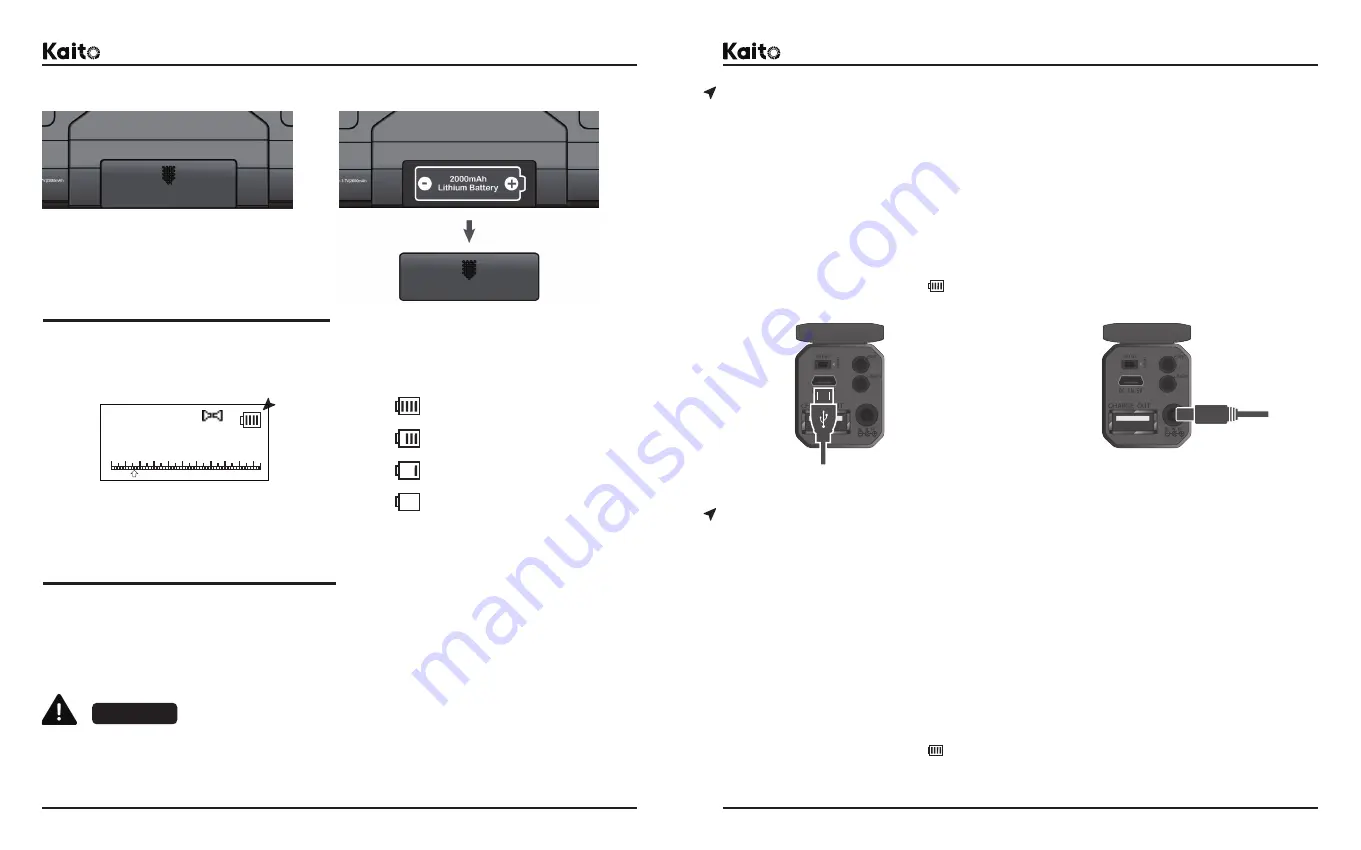
Use a matched external USB power adapter(DC 5V|1000mA, USB port) to charge the radio.
1. Please correct configuration and installation of the rechargeable lithium battery.
2. Use the attached the Micro-USB charge cable to properly connect the USB power adapter, 
and then properly connect the Micro-USB plug to the Micro-USB charging input port on the rear
of the radio. 
3. While charging, the battery strength symbol on the LCD will flow from right to left, and the 
red LED charging indicator will flash regularly, indicating that charging is in progress. When the 
battery is fully charged, the LED charge indicator will turn off and the battery strength symbol 
will stop flowing and its such as        . Then disconnect the radio and USB adapter. 

KA900 Voyager MAX Emergency Radio 

®

User’s Manual

KA900 Voyager MAX Emergency Radio 

®

User’s Manual

Battery Strength Status 

Charging the Rechargeable Lithium Battery

7

8  

WARNING!

Use a specified external AC power adapter(DC 6V, DC-in Plug) to charge the radio.
1. Please correct configuration and installation of the rechargeable lithium battery.
2. You can also charge the radio such as the Kaito AD500 with a specified type of AC adapter. 
Correct insert the DC-in connector for the AC adapter into the DC-in jack on the rear of the 
radio.
For more information please contact us or visit our website about the kaito AD500 AC power
adapter in the www.kaito.us.
3. While charging, the battery strength symbol on the LCD will flow from right to left, and the 
red LED charging indicator will flash regularly, indicating that charging is in progress. When the 
battery is fully charged, the LED charge indicator will turn off and the battery strength symbol 
will stop flowing and its such as        . Then disconnect the radio and AC power adapter. 

Full of state

Medium of state

Low of state

Exhausted of state

The built-in rechargeable lithium battery's strength symbol is in the upper right corner of the 
LCD, and you can see the current battery capacity by looking at the strength symbol.

MHz

FM

M002

89.8

When charge the radio, please charge it by selecting one of Kaito approved external power 
adapters, such as the DC 5V|1000mA USB adapter or 6V DC-in AC adapter.
External power adapters are purchased from Kaito Electronics, Inc. or other approved DC 5V 
universal mobile power adapters are also available.

Improper use or use of an unqualified external power adapter will result in the radio not 
working or damaged and may cause a fire or explosion hazard.

Charging by External USB Power Adapter (Not Included)

Charging by External AC Power Adapter (Not Included)

Micro-USB Plug

DC-in Plug

Before

After

Summary of Contents for Voyager MAX KA900

Page 1: ...ir CA 91763 U S 2018 Kaito Kaito and other Kaito marks are owned by Kaito Electronics Inc and may be registered All other trademarks are the property of their respective owners Kaito Electronics Inc F...

Page 2: ...the Shortwave Band Operation in the NOAA Weather Band Use the ALERT in the NOAA Weather Band Volume Control How to Tuning in Station Use the Antenna Storing the Radio Station Manually Delete the Sing...

Page 3: ...e up to 9999 music tracks and more functions It is built in a microphone and the recorder function support internal radio and external voice recording immediate recording time scheduled recording or m...

Page 4: ...P3 Player Backward Progress Button Forward Progress Button Charging LED Indicator Built in Right Speaker AM or NOAA Weather Band and A B Repeat Loop Mode Dynamo Crank Handle Numeric Keypad Buttons fro...

Page 5: ...on to unlock the lock symbol on the LCD disappears indicating that the button lock has been unlocked Other buttons and knobs return to normal working condition Use the button to turn on or off this ra...

Page 6: ...he AC adapter into the DC in jack on the rear of the radio For more information please contact us or visit our website about the kaito AD500 AC power adapter in the www kaito us 3 While charging the b...

Page 7: ...display the current time and turn off after a certain period of time The display time is related to the backlight timer setting of the LCD For details refer to the date and the backlight timer chapte...

Page 8: ...ht up Solar Panel Tilt Angle Up to150 Adjust the Solar Panel Using the Flashlight Using the Reading Lamp On top of the radio toggle this slide button to the FLASHLIGHT position to turn on the bright L...

Page 9: ...gency powering Step 1 Power off the radio and then set the power input and output switch to the OUT position in rear of the radio Step 2 Take the attached Micro USB charge cable and connect the USB en...

Page 10: ...he MENU button to listen to the radio station the radio station s frequency point will shows on the LCD You can also press the FM AM WB or SW buttons to select the radio band to listen to different br...

Page 11: ...Weather band repeat press the AM WB button to select this Weather band When the radio is working in the FM band press the MENU button to enter the below sub menu Save Delete Delete All Auto Search FM...

Page 12: ...ory list of the AM band Step Switch Delete Delete All Save Auto Search Manual Delete a Radio Station In the sub menu move the pointer to the Delete position the submenu bar will be highlight and then...

Page 13: ...ory list of the AM band Delete Delete All Save Auto Search Manual Delete a Radio Station In the sub menu move the pointer to the Delete position the submenu bar will be highlight and then press the ME...

Page 14: ...NOAA Weather band is a service broadcast of the U S Govemment and available in all 50 states Puerto Rico and the U S Virgin Islands NOAA Alert allows you to set the radio so it is in a standby mode an...

Page 15: ...ob to tuning the radio stations Adjust the radio s volume to an appropriate level Rotate the tuning dial knob and notice the frequency changing in the display stop rotating when the radio receives a s...

Page 16: ...ng function Save Auto Search Delete Delete All Forward Progress Button Backward Progress button MHz SW12 M122 22 995 Memory locations The radio s memory location capacity is as follows FM band M001 M4...

Page 17: ...Ferrite Rod Antenna When listening to the AM band stations the built in internal ferrite rod antenna works for the AM band only Rotate the radio position to get the best reception The radio location a...

Page 18: ...and Tune into the radio station you want to record long press the button to start recording the file will be save as MP3 format In the recording you can press the button to pause and press again this...

Page 19: ...the MENU button into the submenu interface System Time Language Backlight System Time Contrast Touch Tone Off Alarm Recording Sleep Timer Exit Alarm Time Alarm Cycle Alarm Off Alarm Mode Radio Play R...

Page 20: ...When the music tracks is played press the button will pause the music playback press the button again to resume the music playback Fast Forward and Backward Functions When playing the music tracks pre...

Page 21: ...playback mode and go on playing the music tracks files as normal KA900 Voyager MAX Emergency Radio User s Manual KA900 Voyager MAX Emergency Radio User s Manual 37 38 Music Loop Playback Mode When pla...

Page 22: ...ormation that you can use it to help you respond to an emergency when some possible emergency situations occur Select the icon in the main menu press the MENU button to shows the date time and day of...

Page 23: ...exit the system time setting submenu If you do nothing during the setup process it will automatically return to the previous menu after about 8 seconds You can into the Calendar function to confirm th...

Page 24: ...s to set up the sleep timer s time of the radio between 0 to 180 minutes And then press the MENU to confirm and exit For example When your sleep timer setting value is 100 its indication the radio wil...

Page 25: ...alarm clock to run only in a day you want In the settings press the MENU button to select the years month or days respectively and use the tuning dial knob or the and buttons to set up a day you want...

Page 26: ...ils please refer to chapter Schedule Time Recording When select the MP3 files function as the alarm clock mode press the MENU button to enter the music list and the use the tuning dial knob or the and...

Page 27: ...put Jack Connect to the Audio Devices The radio is equipped with a 3 5mm earphone jack on the rear of the machine which supports headphones to listen to radio stations or play music in private Do not...

Page 28: ...s those used in amplifier television set speaker boxes etc as these may cause the frequency to drift Do not drop or give the radio a strong shock because the product is composed of precise parts When...

Page 29: ...to reset the radio Some misuse may lead to errors in the radio remove the built in rechargeable battery for a few minutes and reload But your personal setup will lost Memories Supports Micro SD Card...

Reviews: