background image

19

19

18

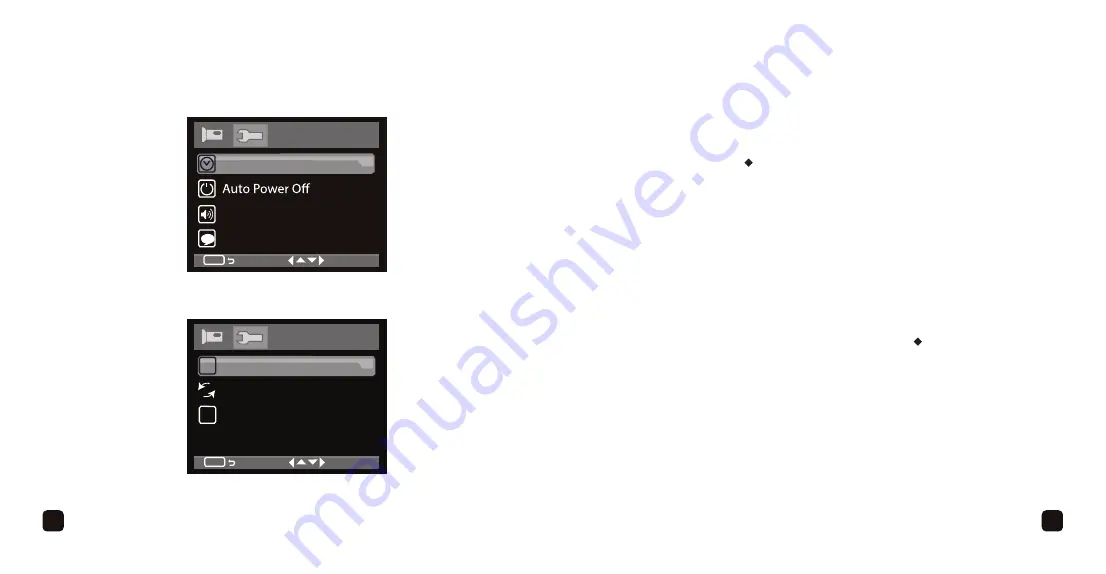
SETUP MENU

Setup

Frequency

Hz

Default Setting

Version

D

1.00

2/2

MENU

Setup

Date/Time

Beep Sound
Language

1/2

MENU

ABC

SETUP MENU

Date/Time:

 After selecting Date/Time, select the date (Month/Day/Year) or time 

(hours/minutes/seconds) using the 

Menu button

, then adjust the highlighted option 

using the 

4

 or 

3

 button

. To change the date orientation, i.e. DD/MM/YY, simply 

select it and then press the 

• /OK button

 to cycle through the available orientations.

Auto Power Off: 

Set the length of the time the unit stays on before automatically 

shutting off due to no activity (Off, 2 Minutes,  5 Minutes, 10 Minutes). Select Off to 
deactivate Auto Power Off.

Beep Sound: 

Set the beep sound (when pressing a button) On or Off.

Language:

 Set the desired language. There are ten languages so use the 

4


button


to scroll to the next screen.

Frequency:

 Set the desired frequency (50Hz or 60Hz).

Default Setting:

 To select this option, choose OK, then press 

• /OK button

 to return 

the unit to its factory default settings.

Version:

 Select to view the current version.

Summary of Contents for R1

Page 1: ...Car Camera User Guide ...

Page 2: ...g a micro SD card Installation Car operation Hand held operation Operation notes Setting the menus Video menu Setup menu Viewing recordings pictures Connecting to a computer Connecting to a TV Frequently Asked Questions Specifications Contact us 2 3 4 8 9 10 13 14 15 16 17 18 20 22 23 24 25 26 ...

Page 3: ...l water dust or temperatures over 400 Keep your R1 Car Camera away from heated sources such as heaters or prolonged direct sunlight Do not touch the power cable with wet hands or use defective power cables as it may cause electric shocks or fire Do not drop the Kaiser Baas Car Camera as it may cause serious damage and may void the warranty Do not dispose of the unit via conventional domestic waste...

Page 4: ...ck DC 5V In Jack LED Note USB Jack is for data transfer only NOT for power PRODUCT DIAGRAM PRODUCT DIAGRAM 5 Microphone Infrared LEDs Lens Light Sensor T Flash Micro SD Card Slot under battery cover Li ion battery 5 5 5 9 9 6 6 10 10 7 7 11 11 8 8 12 12 6 Rear 6 Front Right Front Left ...

Page 5: ...tion Base Holders Supports Release button Suction cup Suction control 5 5 PRODUCT DIAGRAM 00 35 34 720P 1 2 3 4 5 6 7 5 Recording Display Segment Time Mode Record Icon Recording time Resolution SD Card Battery indicator 1 2 3 4 5 6 7 ...

Page 6: ...exact type BL 4C Li Ion battery Slide the battery cover back on You can purchase a spare battery from www kaiserbaas com or from a battery supplier INSERTING A MICRO SD CARD 1 Open the compartment by sliding the cover off 2 Insert the Micro SD card into the Micro SD card slot as illustrated below 3 Slide the battery cover back on Note To remove the Micro SD card press inward and it will eject the ...

Page 7: ...osition before mounting c Place the sunction cup firmly on the windshield and rotate the suction control clockwise to get a secure fit Note Where the camera is placed on the windshield is a matter of preference INSTALLATION 3 Open out the Supports and then press the Release button to open the Holders 4 a Insert the Car Camera as shown for best results b Press in on the Holders for a secure fit c R...

Page 8: ...fore first use This unit uses an internal ball to determine the positioning and will rattle when it is moved This is normal CAR OPERATION 1 When the unit is connected as previously instructed and the car ignition is turned on it will power up and start recording automatically in approximately 5 seconds the red Record icon will blink in the display The unit s recordings will be separated into segme...

Page 9: ... the Mode button once while in the Stop mode the icon will appear in the display Then press the OK button to take a picture 6 Press the Power button again to turn the unit off OPERATION NOTES When the Micro SD card reaches capacity it will automatically start to rerecord over the oldest footage therefore saving the latest footage To view the videos pictures see page 20 See page 18 to change menu o...

Page 10: ...er the Setup menu there are seven options but only the first four are visible in the display initially You can view and select the next three options by scrolling down using the 4 button 4 While in the main menus press the Menu button to exit the menus Resolution Set the desired resolution of the video recording 1080P 720P WVGA Loop Recording Set the length of the recording segments Off 5 Minutes ...

Page 11: ... cycle through the available orientations Auto Power Off Set the length of the time the unit stays on before automatically shutting off due to no activity Off 2 Minutes 5 Minutes 10 Minutes Select Off to deactivate Auto Power Off Beep Sound Set the beep sound when pressing a button On or Off Language Set the desired language There are ten languages so use the 4 button to scroll to the next screen ...

Page 12: ...tons 5 To delete ONE video or photo or ALL videos photos perform the following steps While the picture or video appears press the Menu button then scroll down to Delete using the 4 or 3 button Press the OK button then select Delete Current to delete the selected video photo or Delete All to delete all videos photos VIEWING RECORDINGS PICTURES 6 Thumbnails To view the thumbnails press the Mode butt...

Page 13: ...ive Open it then open the DCIM folder to access the recordings separated into folders by date Move or delete files the same way you would with other files 3 Safely eject from your computer as with other drives Note When connected to a computer the battery will charge and the LED will light yellow MODE MENU CONNECTING TO A TV 1 Connect an HDMI cable not included to the HDMI jack on this Car Camera ...

Page 14: ... On a full charge you will get around 2 to 3 hours of use depending on the settings that you have selected Q What are the recording times to a micro SD card A Recording times to SD are TF Card WVGA 720P 1080P 32G 1000min 560min 451min 16G 500min 280min 225min 8G 250min 140min 113min 4G 125min 70min 56min 2G 62min 35min 28min SPECIFICATIONS Display Flash Card Images USB Interface Operating Temperat...

Page 15: ...26 CONTACT US Need further assistance Please visit www kaiserbaas com Or email helpdesk kaiserbaas com ...

Page 16: ......

Reviews: