background image

16

17

1 EYECUPS

1.1 Binoculars 

KAHLES binoculars are equipped with 
individual twist-in eye cups. Persons without 
glasses can choose four different positions 
(depending on the model). Eye 

glasses 

wearers, who wear eye glasses when 
looking trough the binoculars, turn both eye 
cups clockwise until they stop.

1.2 Rangefinder (RF-M)

The same applies to the monocular rangefinder. Adjustment 
according to whether you wear glasses or not. Eyeglass 
wearers flip the rubber eyecup over. For observers without 
glasses or with contact lenses the rubber eyecup has to be 
folded-up.

2  ADJUSTMENT OF INTERPUPILLARY 

DISTANCE

To see a single circular image, you have to adjust the 
halves of the binoculars to your interpupillary distance: 
•  Look through the binoculars eyepieces with both eyes.
•  Turn the binocular halves around the central axis until 

you don’t see any disturbing shadows and a single 
circular field of view is visible. 

3  DIOPTRIC CORRECTION

3.1 HELIA

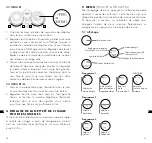
Close the right eye and observe a chosen object with the 
left eye only. Turn the focus knob until the object gets sharp. 
Now close the left eye or cover the left objective of the 
binocular and observe the same object with the right eye 
only. If necessary turn the diopter wheel until the object gets 
sharp. Now your personal diopter adjustment is set.

3.2 HELIA S

Close the right eye and observe a chosen 
object with the left eye only. Turn the focus 
knob until the object gets sharp. Now close 
the left eye or cover the left objective of the 
binocular and observe the same with the 
right eye only. If necessary pull out the focus 
knob in order to activate the diopter adjust-
ment. Turn the focus knob until the object 
gets sharp and push it back in. Now your 
personal diopter adjustment is set. 

E

E

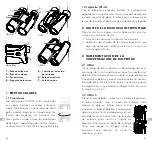
– Dioptric correction wheel

– Focusing wheel

– Twist-in eye cups

– Carrying strap holder

– Tripod connection covering

– Measurement button

– Mode button

2

3

1

4

1

6

7

5

1

4

6

7

HELIA RF

HELIA RF-M

1

2

3

5

4

HELIA

1

2

5

4

HELIA S

3

Summary of Contents for HELIA

Page 1: ...BEDIENUNGSANLEITUNG USER MANUAL MODE D EMPLOI MANUAL DE INSTRUCCIONES HELIA HELIA S HELIA RF HELIA RF M...

Page 2: ...ahrung 8 3 Entsorgung 8 4 Entsorgung Altbatterie 9 SICHERHEITSINFORMATIONEN 11 10 ZUBEH R 12 10 1 HELIA 42 10 2 HELIA S 42 HELIA 42 RF 11 STATIVADAPTER Ferngl ser 12 12 KONFORMIT T 12 D D DEUTSCH SEHR...

Page 3: ...Sie ein aus gew hltes Ziel nur mit dem linken Auge Drehen Sie nun das Fokussierrad solange bis Sie das Ziel scharf sehen Schlie en Sie jetzt das linke Auge oder decken Sie die linke Fernglash lfte vo...

Page 4: ...Display und drehen Sie das Dioptrienrad die Augenmuschel langsam im Uhr zei ger sinn bis das Display scharf dargestellt ist 4 EINSTELLUNG DER BILDSCH RFE BEI FERNGL SERN Durch Drehen des Fokussierrad...

Page 5: ...ion HELIA RF Zus tzlich zur Standard Einzelmessung kann im Men die LR Funktion aktiviert werden Diese erm glicht eine Messung von einfachen Zielen auf sehr weite Distanzen bis 4 500 Meter Ist die LR F...

Page 6: ...ung WEEE ElektroG Dieses Symbol weist darauf hin dass dieses Produkt gem WEEE Richt linie Richtlinie ber Elektro und Elektronik Alt ger te und nationalen Gesetzen nicht ber den Hausm ll entsorgt werde...

Page 7: ...die Abdeckung des Stativanschlussgewin des durch Drehen nach links gegen den Uhrzeigersinn heraus Zur Montage des Fernglases auf ein Stativ ben ti gen Sie einen im Handel erh ltlichen Stativadapter 12...

Page 8: ...RF M 21 8 MAINTENANCE AND CARE 21 8 1 Replacing the battery HELIA RF HELIA RF M 8 2 Storage 8 3 Waste removal 8 4 Disposal of used batteries 9 SAFETY INSTRUCTIONS 23 10 ACCESSORY 24 10 1 HELIA 42 10 2...

Page 9: ...field of view is visible 3 DIOPTRIC CORRECTION 3 1 HELIA Close the right eye and observe a chosen object with the left eye only Turn the focus knob until the object gets sharp Now close the left eye...

Page 10: ...e eyepiece onto the display and turn the diopter wheel eyecup slowly clockwise until the display is in focus 4 FOCUSING ON BINOCULARS By turning the focusing wheel you can focus from mini mum range se...

Page 11: ...splay is activated a short pressing of the mode button changes the display intensity 8 MAINTENANCE AND CARE We have designed all optical elements and surfaces to be easy to care for To guarantee the o...

Page 12: ...d heat If the product is wet it must be dried prior to storage 8 3 Waste removal WEEE ElektroG This symbol indicates that this product must not be disposed of as household waste under the WEEE Directi...

Page 13: ...ripod connection thread by turning it counter clockwise For mounting the binos at a tripod you need an adapter which is commercially available 12 CONFORMITY The devices comply with EU directives 2011...

Page 14: ...la pile HELIA RF HELIA RF M 8 2 Entreposage 8 3 Mise au rebut 8 4 Mise au rebut de la pile usag e 9 CONSIGNES DE S CURIT 35 10 ACCESSOIRES 36 10 1 HELIA 42 10 2 HELIA S 42 HELIA 42 RF 11 ADAPTATEUR TR...

Page 15: ...ette Maintenant fermez votre il gauche ou couvrez la moiti gauche des jumelles l avant et observez la m me cible seulement avec votre il droit Si n cessaire tournez la molette dioptrique jusqu ce que...

Page 16: ...urnez la molette dioptrique bonnette lentement dans le sens des aiguilles d une montre jusqu ce que l cran soit parfaitement net 4 R GLAGE DE LA NETTET DE L IMAGE POUR LES JUMELLES En tournant la mole...

Page 17: ...onction longue distance HELIA RF En plus de la mesure unique standard la fonction LR peut tre activ e dans le menu Cela permet de mesurer des cibles simples sur de tr s longues distances jusqu 4500 m...

Page 18: ...u rebut WEEE Loi sur les appareils lectroniques ElektroG Ce symbole vous informe que le pr sent produit doit tre mis au rebut con form ment la directive WEEE Directive relative aux quipements lectriqu...

Page 19: ...z le cache de connexion du tr pied en le tournant vers la gauche dans le sens inverse des aiguilles d une montre Pour monter les jumelles sur un tr pied vous avez besoin d un adaptateur de tr pied dis...

Page 20: ...45 8 MANTENIMIENTO Y CUIDADOS 46 8 1 La Pila HELIA RF y HELIA RF M 8 2 Almacenamiento 8 3 Eliminaci n de desechos 8 4 Eliminaci n de la pila vieja 9 INFORMACI N DE SEGURIDAD 47 10 ACCESORIOS 48 10 1 H...

Page 21: ...EMENTACI N DE LA COMPENSACI N DE DIOPTR AS 3 1 HELIA Cierre el ojo derecho y observe un objeto elegido con el ojo izquierdo Gire la rueda de enfoque hasta enfocar el objetivo Ahora cierre el ojo izqui...

Page 22: ...a la pantalla y gire lentamente la rueda de dioptr as ocular en sentido horario hasta que la pantalla est enfocada 4 AJUSTE DE LA NITIDEZ DE LA IMAGEN PARA BINOCULARES Al girar la rueda de enfoque pue...

Page 23: ...EAC va m s all y le permite contar con una base mucho m s relevante para la realizaci n de mediciones Para m s informaci n vis tenos en www kahles at 6 6 Funci n a Largas Distancias HELIA RF Adem s d...

Page 24: ...izarla de la radiaci n solar intensa y gu rdela en un lugar seco Las reparaciones nicamente ser n realizadas por KAHLES en caso contrario se extinguir n todos los derechos de garant a 8 MANTENIMIENTO...

Page 25: ...ia la izquierda en sentido contrario a las agujas del reloj Para sujetar el prism tico al tr pode necesita un adaptador disponible en el comercio 12 DECLARACI N DE CONFORMIDAD Los dispositivos cumplen...

Page 26: ...50 51 NOTIZEN NOTES NOTES NOTAS...

Page 27: ...d delivery scope and printing errors Toutes les donn es sont des valeurs typiques Sous r serve de modi fication de l ex cution et de la livraison et d erreurs d impression Todos los datos est n indica...

Reviews: