background image

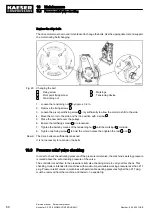
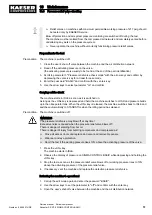
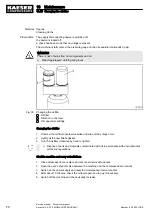
➤ Dispose of parts and materials contaminated with oil in accordance with environmental

protection regulations.

Start the machine and carry out a trial run

1. Close all access doors, replace and secure all removable panels.
2. Open the user's shut-off valve between the machine and the compressed air network.
3. Switch on the power supply and reset the maintenance interval counter.
4. Stop the machine after 10 minutes and visually check for leaks.

10.17  Refrigeration dryer maintenance

The refrigeration circuit is permanently sealed and needs no maintenance. Repairs may only be

carried out by certified personnel.

Material Compressed air for blowing out

Cleaning cloths

Vacuum cleaner

Spares as required

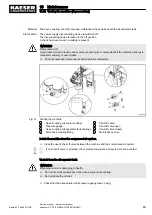
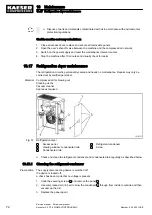
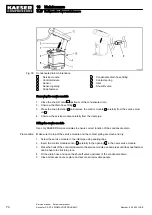
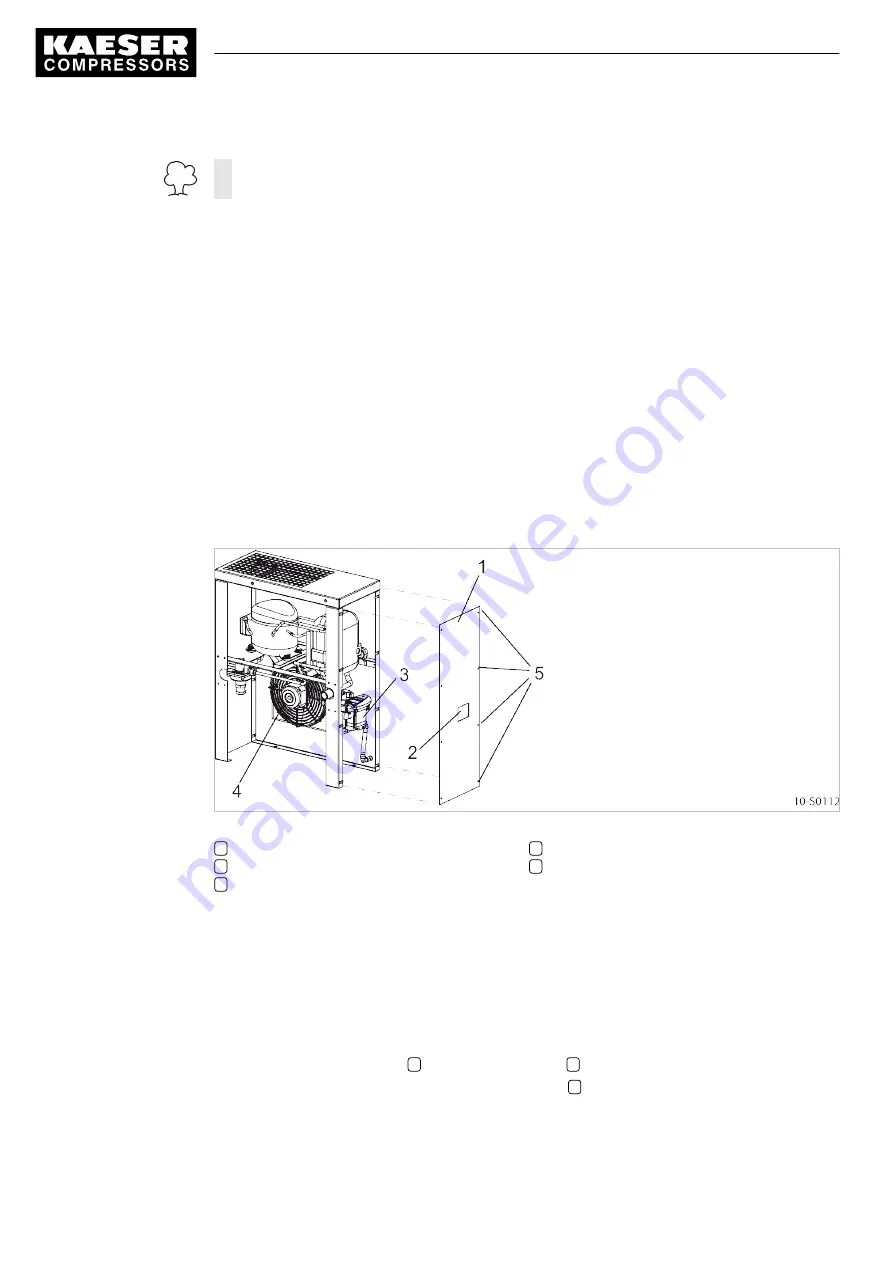
Fig. 37 Refrigeration dryer

1

Access panel

2

Viewing window: condensate drain

3

Condensate drain

4

Refrigerant condenser

5

Screw

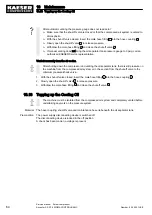
➤ Check and clean the refrigerant condenser and condensate drain regularly as described below.

10.17.1  Cleaning the refrigerant condenser

Precondition The supply disconnecting device is switched off,

the device is locked off,

a check has been made that no voltage is present.

1. Undo the securing screws 

5

 and remove the panel 

1

.

2. Use compressed air (<5 bar) to blow the condenser 

4

 through from inside to outside and then

vacuum up the dirt.

3. Replace the panel again.

10 Maintenance

10.17 Refrigeration dryer maintenance

72

Service manual    Screw compressor  
Aircenter SX 3/7.5 SIGMA CONTROL BASIC

Number: 9_6945 01USE

Summary of Contents for Aircenter SX 3

Page 1: ...Service manual Screw compressor Aircenter SX 3 7 5 SIGMA CONTROL BASIC Number 9_6945 01USE manroland document no 80 95A0S C338...
Page 2: ...Original instructions KKW SSX 1 01 en 01 IBA SCHRAUBEN AC MAN SCB...

Page 3: ...ibility 3 1 Basic Information 11 3 2 Specified Use 11 3 3 Improper Use 11 3 4 User s Responsibilities 11 3 4 1 Observe statutory and universally accepted regulations 11 3 4 2 Qualified personnel 12 3...

Page 4: ...Connection 34 6 4 Making the Power Supply Connection 35 6 4 1 Refrigeration dryer Connecting the transformer according to the power supply 36 6 5 Connecting the condensate drain 36 6 6 Options 37 6 6...

Page 5: ...hine depressurizing 65 10 13 2 Top up with cooling oil and test run 66 10 14 Changing the cooling oil 67 10 15 Changing the oil filter 69 10 16 Changing the oil separator cartridge 71 10 17 Refrigerat...

Page 6: ...and Instrument Flow Diagram P I diagram MODULATING control mode 90 13 3 Dimensional drawing 96 13 4 Electrical Diagram 98 13 5 Service Manual for Compressed Air Filter 115 Contents iv Service manual...

Page 7: ...and off 46 Fig 23 Switching off in an emergency 47 Fig 24 Acknowledging messages 48 Fig 25 Filter mat for the air and oil cooler 56 Fig 26 Control cabinet ventilation grill 57 Fig 27 Filter mat for a...

Page 8: ...List of Illustrations vi Service manual Screw compressor Aircenter SX 3 7 5 SIGMA CONTROL BASIC Number 9_6945 01USE...

Page 9: ...Danger Areas 16 Tab 21 Safety Signs 17 Tab 22 Operating states under MODULATING control 26 Tab 23 Refrigeration dryer control modes 26 Tab 24 Keys 27 Tab 25 Indicators 28 Tab 26 Display 28 Tab 27 Par...

Page 10: ...List of Tables viii Service manual Screw compressor Aircenter SX 3 7 5 SIGMA CONTROL BASIC Number 9_6945 01USE...

Page 11: ...opyright This service manual is copyright protected Queries regarding use or duplication of the documentation should be referred to KAESER Correct use of information will be fully supported 1 4 Symbol...

Page 12: ...ns comprising one stage of a task In lists of actions with several stages the sequence of actions is numbered Information that refers to only one option is marked with an indicator e g H1 means that t...

Page 13: ...e Hz RPM Package FLA Phase HP Wiring Diagram FOR SERVICE REFER TO EQUIPMENT NUMBER Tab 2 Nameplate 2 2 Options The table contains a list of possible options Enter options here as a reference Option Op...

Page 14: ...m airend dis charge temperature auto matic safety shut down F 230 230 Tab 5 Temperature 2 5 Ambient Conditions SX 3 SX 7 5 Maximum elevation ft 10 000 10 000 Permissible ambient tem perature F 40 115...

Page 15: ...ed ventilation Flow rate cfm at 100 Pa 883 1530 Tab 7 Ventilation 2 7 Pressure Maximum working pressure see nameplate SX 3 SX 7 5 Safety relief valve activat ing pressure psig 230 230 Tab 8 Safety rel...

Page 16: ...3 280 ft 7 70 23 48 FAD at 160 psig cfm Altitude 6 560 ft 7 63 23 27 FAD at 160 psig cfm Altitude 9 840 ft 7 59 23 10 Tab 11 Free air delivery 2 10 Sound pressure level Operational state Nominal flow...

Page 17: ...in a protected location to prevent contamination Do not re use drums flush and send to reconditioner Although the KAESER synthetic is not highly flammable it will burn While KAESER synthetic com pres...

Page 18: ...t and poultry processing and other applications where incidental food contact may occur 2 13 Cooling oil Volume The charge of cooling oil for machines with heat recovery is increased by the volume of...

Page 19: ...Table 310 16 430 6 430 22 430 24 and other local codes Dual element time delay fuses are selected according to 2008 NEC 240 6 430 52 and tables 430 52 430 248 and 430 250 We strongly suggest using a...

Page 20: ...ryer contains a refrigerant that is classified by the Kyoto Protocol as a fluoridised global warming gas ABT 4 ABT 8 Refrigerant R 134a R 134a Global warming potential GWP 1300 1300 Charge quantity lb...

Page 21: ...ate the machine only within its performance limits and under the permitted ambient condi tions Do not use compressed air for breathing purposes unless it is specifically treated for such Do not use co...

Page 22: ...s of electrical and compressed air devices and take appropriate measures to safeguard persons and property have received adequate training and authorization for the safe installation and maintenance o...

Page 23: ...lves or otherwise isolate the machine from the compressed air system to ensure that no compressed air can flow back into the machine Vent all pressurized components and chambers completely Do not carr...

Page 24: ...chemical substances Avoid contact with skin and eyes Do not inhale oil mist or vapor Do not eat or drink while handling cooling and lubricating fluids Keep suitable fire extinguishing agents ready fo...

Page 25: ...lean inlet air with no damaging contaminants inlet air free of explosive or chemically unstable gases or vapors inlet air free of acid alkaline forming substances particularly ammonia chlorine or hydr...

Page 26: ...eas 3 6 Safety Devices Various safety devices ensure safe working with the machine Do not change bypass or disable safety devices Check safety devices for correct function regularly Do not remove or o...

Page 27: ...e machine cool down Wear long sleeved garments not synthetics such as polyester and protective gloves 16 max min Wrong cooling oil level can cause machine defects or rising oil consumption oil con ten...

Page 28: ...sconnect device if possible 4 Move to safety warn any persons in danger help incapacitated persons close the doors 5 Try and extinguish the fire if you have the knowledge to do so 3 8 2 Remove any com...

Page 29: ...n we accept no warranty obligation for the use of unsuitable parts or operating materials unauthorized modifications incorrect maintenance incorrect repair Correct maintenance and repair includes the...

Page 30: ...n closed serves various functions Sound insulation Protection against contact with components Cooling air flow control Safe and reliable operation is only assured with the enclosure closed Access door...

Page 31: ...he compressed air in the oil separator tank 7 and separator car tridge 10 gives up its heat in the oil cooler 9 The oil then flows through the oil filter 4 and back to the point of injection Pressure...

Page 32: ...te can be drained by a manually operated drain valve 4 5 Floating relay contacts Floating relay contacts are provided for the transfer of signals messages Information on location loading capacity and...

Page 33: ...on The connections in the controller are wire bridged With the bridge in place the compressor controller toggles the machine between LOAD and IDLE The switching point is the system pressure setpoint R...

Page 34: ...ter 1 Microfilter 2 Ball valve The microfilter removes aerosols and solid particles from the compressed air Condensate is drained off by a ball valve 4 6 4 Option F2 Activated carbon filter Fig 11 Act...

Page 35: ...distribution network The load and power consumption of the drive motor rises and falls with the air demand The regulating valve is factory set The setting should not be changed without consultation w...

Page 36: ...tes Rises MODULATING LOAD Falls MODULATING IDLE STANDSTILL Tab 22 Operating states under MODULATING control 4 8 Refrigeration Dryer Control Modes The controller can operate in the following modes CONT...

Page 37: ...ry set Door interlock switches The machine will stop automatically if a safety interlocked door or panel is opened or removed Enclosures and covers for moving parts and electrical connections These pr...

Page 38: ...power Lights green when the power supply to the controller is switched on 19 Machine ON Lights green when the machine switched on Tab 25 Indicators 4 11 SIGMA CONTROL BASIC function 4 11 1 Display la...

Page 39: ...tenance work has been carried out The interval starts anew A password is required to change these parameters 3 Relief valve test mode This function switches the activating pressure check mode for the...

Page 40: ...system and the cut out pressure of the machine Range of adjustment psig 80 maximum working pressure E Maximum working pressure The machine can deliver air up to this working pressure see nameplate KA...

Page 41: ...s particularly ammonia chlorine or hydrogen sulfide Ensure sufficient and suitable lighting such that the display can be read and work carried out comfortably and safely Keep suitable fire extinguishi...

Page 42: ...ion is insufficient a partial vacuum can be created in the room Ensure that the volume of air flowing into the machine room is at least equivalent to that being removed from it by the machine and exha...

Page 43: ...chapter 13 3 5 3 Using the Compressor to Supply A Compressed Air System When the machine is connected to a compressed air system the system operating pressure must not exceed 232 psig Initial filling...

Page 44: ...m to ensure that no compressed air can flow back into the machine 2 Vent all pressurized components and chambers completely 3 Check all machine hose connectors with a handheld pressure gauge to ensure...

Page 45: ...ust be observed 3 Test the overload protection cut out to ensure that the time it takes to disconnect in response to a fault is within the permitted limit 4 Use supply conductors and fuses in accordan...

Page 46: ...connect the drain hose to the condensate drain outlet Condensate must drain freely The illustration shows typical installations Condensate flows into the collecting line from above thereby preventing...

Page 47: ...o SIGMA CONTROL BASIC 1 Input I4 pin 7 2 Supply 24 V DC pin 9 1 Lay the cable so that it does not come under tension when the control cabinet door is opened 2 Strip 0 5 in of insulation from the ends...

Page 48: ...Working on pressure systems 1 Close shut off valves or otherwise isolate the machine from the compressed air system to ensure that no compressed air can flow back into the machine 2 Vent all pressuriz...

Page 49: ...evice installed 6 4 Does the power supply conform to the specifications on the name plate 2 1 Are the power supply cable conductor cross sections and fuse ratings adequate 2 15 Drive motor overload pr...

Page 50: ...cut out This phase current is 0 58 times the rated motor current see nameplate in the control cabinet To prevent voltage fluctuations temperature influences or component tolerances operating the overl...

Page 51: ...ng 1 Set the hot gas bypass valve according to the following illustrations and table Fig 19 Adjustment angle Take the adjustment angle from the table Altitude ft Adjustment angle 7 Initial Start up 7...

Page 52: ...uantity of cooling oil into the airend A label showing the type of oil used is found near the oil separator tank filling port Use the same type of oil Material 0 26qtCooling oil Precondition The suppl...

Page 53: ...alve to the air network 2 Switch on the power supply disconnecting device After the controller has carried out a self test the green controller ON LED lights continuously 3 Press the ON key The green...

Page 54: ...and acknowledge the alarm The machine does not switch off automatically Have the interlock switch checked by an authorized KAESER Service representative agent 7 10 Setting the setpoint pressure The se...

Page 55: ...tial This switching differential is factory set Adjust this parameter if the motor starting frequency is too high 1 Scroll with the arrow keys until the parameter C setpoint pressure switching differe...

Page 56: ...carried out a self test the green controller ON LED lights continuously 2 Press the ON key The green Machine ON LED lights continuously If a power failure occurs the machine is not prevented from re...

Page 57: ...8 2 Switching Off in an Emergency and Switching On again The EMERGENCY STOP pushbutton is located below the control panel Fig 23 Switching off in an emergency 9 EMERGENCY STOP pushbutton Shutdown Pre...

Page 58: ...ault and acknowledge the message with the acknowledge key alarm LED extinguishes The machine is now ready to start again Warning message Message coming LED flashes Message gone LED extinguished Rectif...

Page 59: ...otected Precondition The current parameter setting flashes Use the UP DOWN keys to change the value of the parameter and confirm with enter Changing a password protected parameter Some parameters can...

Page 60: ...Interlocked access door open or panel removed Unlatch the EMERGENCY STOP pushbutton Close the access door or fit the panel 2 Motor alarm Overload protection of drive or fan mo tor if fitted Frequency...

Page 61: ...ceeded Ensure adequate ventilation Ensure that the permissible room temperature is not exceeded 8 Spare Tab 32 Alarm messages 9 3 Warning messages The error code appears in the 4th line of the display...

Page 62: ...IDLE more than twice per minute Air receiver too small Increase size of air receiver Airflow into the compressed air network restricted Increase air pipe diameters Check filter elements The differenti...

Page 63: ...no com pressed air can flow back into the machine 2 Vent all pressurized components and chambers completely 3 Check all machine hose connectors with a handheld pressure gauge to ensure that all read z...

Page 64: ...ntenance tasks The table below lists maintenance tasks required Take note of the controller s service messages and carry out tasks punctually taking ambient and operating conditions into account Inter...

Page 65: ...criteria for the number and length of the change intervals Authorized KAESER Service representative will support you in determining appropriate inter vals and provide information on the possibilities...

Page 66: ...mats are clogged adequate cooling of the components is no longer ensured Material Filter mats Warm water and household detergent Spare parts as required Precondition The machine is switched off Fig 25...

Page 67: ...remove loose dirt If necessary wash with lukewarm water and household detergent 3 Change the filter mat if cleaning is not possible or if the change interval has expired 4 Lay the filter mat in the f...

Page 68: ...epresentative Check the cooler for leaks Visual check Is cooling oil dripping from the cooler Is the cooler leaking Have the cooler repaired immediately by an authorized KAESER Service representative...

Page 69: ...ts Material Spare parts if required Precondition The supply disconnecting device is switched off the device is locked off a check has been made that no voltage is present The machine has cooled down W...

Page 70: ...ncide 8 Tighten one fixing screw 1 to hold the motor in place then tighten the rest 1 and 2 Result The drive belts are sufficiently tensioned It is not necessary to re tension the belts 10 9 Pressure...

Page 71: ...ON key is released the machine switches back to IDLE and switches automatically to STANDSTILLwhen the idling period has elapsed Precondition The machine is switched off WARNING The pressure relief val...

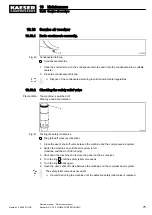
Page 72: ...LOAD Precondition The machine has been running at least 5 minutes under LOAD Fig 30 Checking the cooling oil level 1 Minimum oil level 2 Maximum oil level 3 Optimum level Check the oil level with mac...

Page 73: ...Hose coupling oil separator tank venting 6 Male hose coupling fitting 7 Shut off valve A Shut off valve open B Shut off valve closed 8 Maintenance hose Isolate the machine from the compressed air syst...

Page 74: ...r system or in the section from the shut off valve to the minimum pressure check valve 1 With the shut off valve closed insert the male hose fitting 6 into the hose coupling 1 2 Slowly open the shut o...

Page 75: ...kes place in three stages Isolate the compressor from the compressed air system Vent air from the oil separator tank Vent air manually from the air cooler WARNING Compressed air Compressed air and dev...

Page 76: ...to the minimum pressure check valve 1 With the shut off valve closed insert the male hose fitting 6 into the hose coupling 1 2 Slowly open the shut off valve 7 to release pressure 3 Withdraw the male...

Page 77: ...period of standstill Material Cooling oil Cooling oil receptacle The maintenance hose with hose coupling and shut off valve is stowed beneath the oil separator tank WARNING There is risk of burns from...

Page 78: ...nsert the male hose fitting 6 into the hose coupling 3 3 Connect the maintenance hose to the exter nal air supply 4 Open the shut off valve 7 until the pressure gauge on the oil separator tank reads 4...

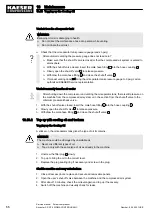
Page 79: ...Fill with cooling oil 3 Check the filler plug and ring seal for damage and screw the plug back in again Start the machine and carry out a trial run 1 Close all access doors replace and secure all rem...

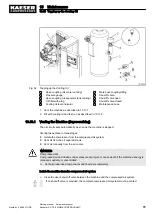
Page 80: ...oil 2 Lightly oil the new filter s gasket 3 Turn the oil filter clockwise by hand to tighten Dispose of parts and materials contaminated with oil in accordance with environmental protection regulatio...

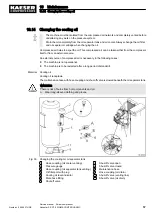
Page 81: ...ting device is switched off the device is locked off a check has been made that no voltage is present The machine is fully vented the pressure gauge on the oil separator tank reads 0 psig WARNING Ther...

Page 82: ...Compressed air for blowing out Cleaning cloths Vacuum cleaner Spares as required Fig 37 Refrigeration dryer 1 Access panel 2 Viewing window condensate drain 3 Condensate drain 4 Refrigerant condenser...

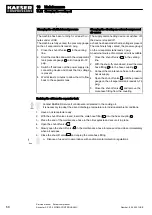
Page 83: ...not flow The condensate drain hose or the drain itself is blocked Switch off the machine and clean the drain pipe Condensate drain manual check Press and hold the TEST button for at least 2 seconds C...

Page 84: ...to ensure correct function of the condensate drain Precondition Make sure the top of the service module and the contact spring are clean and dry 1 Screw the service module to the inlet pipe using seal...

Page 85: ...ff pressure reduction 1 Close the user s shut off valve between the machine and the compressed air system 2 Switch the machine on until the air receiver is full machine switches to IDLE running 3 Shut...

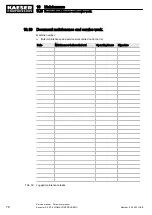
Page 86: ...service work carried out in the list Date Maintenance task carried out Operating hours Signature Tab 39 Logged maintenance tasks 10 Maintenance 10 19 Document maintenance and service work 76 Service m...

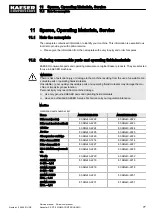
Page 87: ...hine damage Use only genuine KAESER parts and operating fluids materials Have an authorized KAESER Service Technician carry out regular maintenance Machine manroland parts number list Name AIRCENTER S...

Page 88: ...to Why not sign a KAESER AIR SERVICE maintenance agreement Result Your advantage lower costs and higher compressed air availability 11 4 Service Addresses Addresses of KAESER representatives are give...

Page 89: ...11 Spares Operating Materials Service 11 5 Spare Parts for Service and Repair Number 9_6945 01USE Service manual Screw compressor Aircenter SX 3 7 5 SIGMA CONTROL BASIC 79...
Page 90: ...11 Spares Operating Materials Service 11 5 Spare Parts for Service and Repair 80 Service manual Screw compressor Aircenter SX 3 7 5 SIGMA CONTROL BASIC Number 9_6945 01USE...

Page 91: ...y vented no pressure 1 Allow the machine to cool down completely 2 Disconnect all air and electrical connections 12 2 Packing A wooden crate is required for ground transport to protect the machine fro...

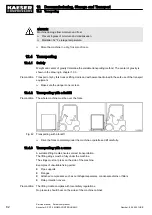
Page 92: ...t be over the forks Fig 42 Transporting with a forklift Drive the forks completely under the machine or palette and lift carefully 12 4 3 Transporting with a crane A suitable lifting cradle ensures co...

Page 93: ...achine is decommissioned 1 Completely drain the cooling oil from the machine 2 Remove used filters and the oil separator cartridge 3 Hand the machine over to an authorized disposal expert Parts contam...

Page 94: ...3 1 Pipeline and instrument flow diagram P I diagram 13 Annex 13 1 Pipeline and instrument flow diagram P I diagram 84 Service manual Screw compressor Aircenter SX 3 7 5 SIGMA CONTROL BASIC Number 9_6...

Page 95: ...13 Annex 13 1 Pipeline and instrument flow diagram P I diagram Number 9_6945 01USE Service manual Screw compressor Aircenter SX 3 7 5 SIGMA CONTROL BASIC 85...
Page 96: ...13 Annex 13 1 Pipeline and instrument flow diagram P I diagram 86 Service manual Screw compressor Aircenter SX 3 7 5 SIGMA CONTROL BASIC Number 9_6945 01USE...

Page 97: ...13 Annex 13 1 Pipeline and instrument flow diagram P I diagram Number 9_6945 01USE Service manual Screw compressor Aircenter SX 3 7 5 SIGMA CONTROL BASIC 87...
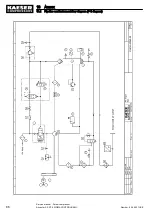
Page 98: ...13 Annex 13 1 Pipeline and instrument flow diagram P I diagram 88 Service manual Screw compressor Aircenter SX 3 7 5 SIGMA CONTROL BASIC Number 9_6945 01USE...

Page 99: ...13 Annex 13 1 Pipeline and instrument flow diagram P I diagram Number 9_6945 01USE Service manual Screw compressor Aircenter SX 3 7 5 SIGMA CONTROL BASIC 89...
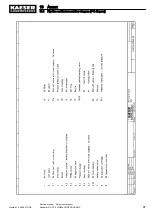
Page 100: ...ment Flow Diagram P I diagram MODULATING control mode 13 Annex 13 2 Pipe and Instrument Flow Diagram P I diagram MODULATING control mode 90 Service manual Screw compressor Aircenter SX 3 7 5 SIGMA CON...

Page 101: ...13 Annex 13 2 Pipe and Instrument Flow Diagram P I diagram MODULATING control mode Number 9_6945 01USE Service manual Screw compressor Aircenter SX 3 7 5 SIGMA CONTROL BASIC 91...

Page 102: ...13 Annex 13 2 Pipe and Instrument Flow Diagram P I diagram MODULATING control mode 92 Service manual Screw compressor Aircenter SX 3 7 5 SIGMA CONTROL BASIC Number 9_6945 01USE...

Page 103: ...13 Annex 13 2 Pipe and Instrument Flow Diagram P I diagram MODULATING control mode Number 9_6945 01USE Service manual Screw compressor Aircenter SX 3 7 5 SIGMA CONTROL BASIC 93...

Page 104: ...13 Annex 13 2 Pipe and Instrument Flow Diagram P I diagram MODULATING control mode 94 Service manual Screw compressor Aircenter SX 3 7 5 SIGMA CONTROL BASIC Number 9_6945 01USE...

Page 105: ...13 Annex 13 2 Pipe and Instrument Flow Diagram P I diagram MODULATING control mode Number 9_6945 01USE Service manual Screw compressor Aircenter SX 3 7 5 SIGMA CONTROL BASIC 95...

Page 106: ...13 3 Dimensional drawing 13 Annex 13 3 Dimensional drawing 96 Service manual Screw compressor Aircenter SX 3 7 5 SIGMA CONTROL BASIC Number 9_6945 01USE...

Page 107: ...13 Annex 13 3 Dimensional drawing Number 9_6945 01USE Service manual Screw compressor Aircenter SX 3 7 5 SIGMA CONTROL BASIC 97...

Page 108: ...13 4 Electrical Diagram 13 Annex 13 4 Electrical Diagram 98 Service manual Screw compressor Aircenter SX 3 7 5 SIGMA CONTROL BASIC Number 9_6945 01USE...

Page 109: ...13 Annex 13 4 Electrical Diagram Number 9_6945 01USE Service manual Screw compressor Aircenter SX 3 7 5 SIGMA CONTROL BASIC 99...

Page 110: ...13 Annex 13 4 Electrical Diagram 100 Service manual Screw compressor Aircenter SX 3 7 5 SIGMA CONTROL BASIC Number 9_6945 01USE...

Page 111: ...13 Annex 13 4 Electrical Diagram Number 9_6945 01USE Service manual Screw compressor Aircenter SX 3 7 5 SIGMA CONTROL BASIC 101...

Page 112: ...13 Annex 13 4 Electrical Diagram 102 Service manual Screw compressor Aircenter SX 3 7 5 SIGMA CONTROL BASIC Number 9_6945 01USE...

Page 113: ...13 Annex 13 4 Electrical Diagram Number 9_6945 01USE Service manual Screw compressor Aircenter SX 3 7 5 SIGMA CONTROL BASIC 103...

Page 114: ...13 Annex 13 4 Electrical Diagram 104 Service manual Screw compressor Aircenter SX 3 7 5 SIGMA CONTROL BASIC Number 9_6945 01USE...

Page 115: ...13 Annex 13 4 Electrical Diagram Number 9_6945 01USE Service manual Screw compressor Aircenter SX 3 7 5 SIGMA CONTROL BASIC 105...

Page 116: ...13 Annex 13 4 Electrical Diagram 106 Service manual Screw compressor Aircenter SX 3 7 5 SIGMA CONTROL BASIC Number 9_6945 01USE...

Page 117: ...13 Annex 13 4 Electrical Diagram Number 9_6945 01USE Service manual Screw compressor Aircenter SX 3 7 5 SIGMA CONTROL BASIC 107...

Page 118: ...13 Annex 13 4 Electrical Diagram 108 Service manual Screw compressor Aircenter SX 3 7 5 SIGMA CONTROL BASIC Number 9_6945 01USE...

Page 119: ...13 Annex 13 4 Electrical Diagram Number 9_6945 01USE Service manual Screw compressor Aircenter SX 3 7 5 SIGMA CONTROL BASIC 109...

Page 120: ...13 Annex 13 4 Electrical Diagram 110 Service manual Screw compressor Aircenter SX 3 7 5 SIGMA CONTROL BASIC Number 9_6945 01USE...

Page 121: ...13 Annex 13 4 Electrical Diagram Number 9_6945 01USE Service manual Screw compressor Aircenter SX 3 7 5 SIGMA CONTROL BASIC 111...

Page 122: ...13 Annex 13 4 Electrical Diagram 112 Service manual Screw compressor Aircenter SX 3 7 5 SIGMA CONTROL BASIC Number 9_6945 01USE...

Page 123: ...13 Annex 13 4 Electrical Diagram Number 9_6945 01USE Service manual Screw compressor Aircenter SX 3 7 5 SIGMA CONTROL BASIC 113...

Page 124: ...13 Annex 13 4 Electrical Diagram 114 Service manual Screw compressor Aircenter SX 3 7 5 SIGMA CONTROL BASIC Number 9_6945 01USE...

Page 125: ...13 5 Service Manual for Compressed Air Filter 13 Annex 13 5 Service Manual for Compressed Air Filter Number 9_6945 01USE Service manual Screw compressor Aircenter SX 3 7 5 SIGMA CONTROL BASIC 115...

Page 126: ...13 Annex 13 5 Service Manual for Compressed Air Filter 116 Service manual Screw compressor Aircenter SX 3 7 5 SIGMA CONTROL BASIC Number 9_6945 01USE...

Page 127: ...13 Annex 13 5 Service Manual for Compressed Air Filter Number 9_6945 01USE Service manual Screw compressor Aircenter SX 3 7 5 SIGMA CONTROL BASIC 117...

Page 128: ...13 Annex 13 5 Service Manual for Compressed Air Filter 118 Service manual Screw compressor Aircenter SX 3 7 5 SIGMA CONTROL BASIC Number 9_6945 01USE...

Page 129: ...13 Annex 13 5 Service Manual for Compressed Air Filter Number 9_6945 01USE Service manual Screw compressor Aircenter SX 3 7 5 SIGMA CONTROL BASIC 119...

Page 130: ...13 Annex 13 5 Service Manual for Compressed Air Filter 120 Service manual Screw compressor Aircenter SX 3 7 5 SIGMA CONTROL BASIC Number 9_6945 01USE...

Page 131: ...13 Annex 13 5 Service Manual for Compressed Air Filter Number 9_6945 01USE Service manual Screw compressor Aircenter SX 3 7 5 SIGMA CONTROL BASIC 121...

Page 132: ...13 Annex 13 5 Service Manual for Compressed Air Filter 122 Service manual Screw compressor Aircenter SX 3 7 5 SIGMA CONTROL BASIC Number 9_6945 01USE...

Page 133: ...13 Annex 13 5 Service Manual for Compressed Air Filter Number 9_6945 01USE Service manual Screw compressor Aircenter SX 3 7 5 SIGMA CONTROL BASIC 123...

Page 134: ...13 Annex 13 5 Service Manual for Compressed Air Filter 124 Service manual Screw compressor Aircenter SX 3 7 5 SIGMA CONTROL BASIC Number 9_6945 01USE...

Page 135: ...13 Annex 13 5 Service Manual for Compressed Air Filter Number 9_6945 01USE Service manual Screw compressor Aircenter SX 3 7 5 SIGMA CONTROL BASIC 125...

Page 136: ...13 Annex 13 5 Service Manual for Compressed Air Filter 126 Service manual Screw compressor Aircenter SX 3 7 5 SIGMA CONTROL BASIC Number 9_6945 01USE...

Page 137: ...13 Annex 13 5 Service Manual for Compressed Air Filter Number 9_6945 01USE Service manual Screw compressor Aircenter SX 3 7 5 SIGMA CONTROL BASIC 127...

Page 138: ...13 Annex 13 5 Service Manual for Compressed Air Filter 128 Service manual Screw compressor Aircenter SX 3 7 5 SIGMA CONTROL BASIC Number 9_6945 01USE...

Page 139: ...13 Annex 13 5 Service Manual for Compressed Air Filter Number 9_6945 01USE Service manual Screw compressor Aircenter SX 3 7 5 SIGMA CONTROL BASIC 129...

Page 140: ...13 Annex 13 5 Service Manual for Compressed Air Filter 130 Service manual Screw compressor Aircenter SX 3 7 5 SIGMA CONTROL BASIC Number 9_6945 01USE...

Page 141: ...13 Annex 13 5 Service Manual for Compressed Air Filter Number 9_6945 01USE Service manual Screw compressor Aircenter SX 3 7 5 SIGMA CONTROL BASIC 131...

Page 142: ...13 Annex 13 5 Service Manual for Compressed Air Filter 132 Service manual Screw compressor Aircenter SX 3 7 5 SIGMA CONTROL BASIC Number 9_6945 01USE...

Page 143: ...13 Annex 13 5 Service Manual for Compressed Air Filter Number 9_6945 01USE Service manual Screw compressor Aircenter SX 3 7 5 SIGMA CONTROL BASIC 133...

Page 144: ...13 Annex 13 5 Service Manual for Compressed Air Filter 134 Service manual Screw compressor Aircenter SX 3 7 5 SIGMA CONTROL BASIC Number 9_6945 01USE...

Page 145: ...13 Annex 13 5 Service Manual for Compressed Air Filter Number 9_6945 01USE Service manual Screw compressor Aircenter SX 3 7 5 SIGMA CONTROL BASIC 135...

Page 146: ...13 Annex 13 5 Service Manual for Compressed Air Filter 136 Service manual Screw compressor Aircenter SX 3 7 5 SIGMA CONTROL BASIC Number 9_6945 01USE...

Page 147: ...13 Annex 13 5 Service Manual for Compressed Air Filter Number 9_6945 01USE Service manual Screw compressor Aircenter SX 3 7 5 SIGMA CONTROL BASIC 137...

Page 148: ...13 Annex 13 5 Service Manual for Compressed Air Filter 138 Service manual Screw compressor Aircenter SX 3 7 5 SIGMA CONTROL BASIC Number 9_6945 01USE...

Page 149: ...13 Annex 13 5 Service Manual for Compressed Air Filter Number 9_6945 01USE Service manual Screw compressor Aircenter SX 3 7 5 SIGMA CONTROL BASIC 139...

Page 150: ...13 Annex 13 5 Service Manual for Compressed Air Filter 140 Service manual Screw compressor Aircenter SX 3 7 5 SIGMA CONTROL BASIC Number 9_6945 01USE...

Page 151: ...13 Annex 13 5 Service Manual for Compressed Air Filter Number 9_6945 01USE Service manual Screw compressor Aircenter SX 3 7 5 SIGMA CONTROL BASIC 141...

Page 152: ...13 Annex 13 5 Service Manual for Compressed Air Filter 142 Service manual Screw compressor Aircenter SX 3 7 5 SIGMA CONTROL BASIC Number 9_6945 01USE...

Page 153: ...13 Annex 13 5 Service Manual for Compressed Air Filter Number 9_6945 01USE Service manual Screw compressor Aircenter SX 3 7 5 SIGMA CONTROL BASIC 143...

Page 154: ...13 Annex 13 5 Service Manual for Compressed Air Filter 144 Service manual Screw compressor Aircenter SX 3 7 5 SIGMA CONTROL BASIC Number 9_6945 01USE...

Page 155: ...13 Annex 13 5 Service Manual for Compressed Air Filter Number 9_6945 01USE Service manual Screw compressor Aircenter SX 3 7 5 SIGMA CONTROL BASIC 145...

Page 156: ...13 Annex 13 5 Service Manual for Compressed Air Filter 146 Service manual Screw compressor Aircenter SX 3 7 5 SIGMA CONTROL BASIC Number 9_6945 01USE...

Reviews: