20
| Kaden Installation Manual
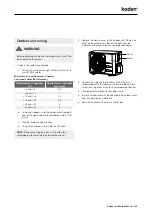
Piping extension beyond flare form
Pipe
gauge
Tightening torque
Flare dimension (A)
(Unit: mm)
Min.
Max.
Ø
6.35
18 – 20 N.m
(183 – 204 kgf.cm)
8.4
8.7
Ø
9.52
25 – 26 N.m
(255 – 265 kgf.cm)
13.2
13.5
Ø
12.7
35 – 36 N.m
(357 – 367 kgf.cm)
16.2
16.5
Ø
15.88
45 – 47 N.m
(459 – 480 kgf.cm)
19.2
19.7
Ø
19
65 – 67 N.m
(663 – 683 kgf.cm)
23.2
23.7
Ø
22
75 – 85 N.m
(765 – 867 kgf.cm)
26.4
26.9
Flare shape
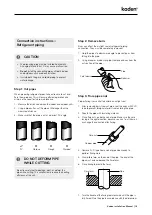
8. Remove the flaring tool and flare form, then inspect the end
of the pipe for cracks and even flaring.
Step 4: Connect pipes
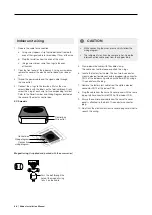
Connect the copper pipes to the indoor unit first, then connect
it to the outdoor unit. You should first connect the low-pressure
pipe, then the high-pressure pipe.
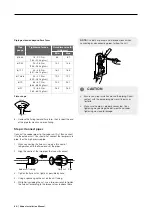
1. When connecting the flare nuts, apply a thin coat of
refrigeration oil to the flared ends of the pipes.
2. Align the centre of the two pipes that you will connect.
3. Tighten the flare nut as tightly as possible by hand.
4. Using a spanner, grip the nut on the unit tubing.
5. While firmly gripping the nut, use a torque wrench to tighten
the flare nut according to the torque values in above table.
NOTE:
Use both a spanner and a torque wrench when
connecting or disconnecting pipes to/from the unit.
CAUTION
• Ensure you wrap insulation around the piping. Direct
contact with the bare piping may result in burns or
frostbite.
• Make sure the pipe is properly connected. Over-
tightening may damage the bell mouth and under-
tightening may lead to leakage.
Flare nut
Pipe
Indoor unit tubing


