


V I I
TEST THE OPERATION OF THE LOCK
V I I I
USING THE DRILL POINT ON ELECTRICAL OVERRIDE MODELS
7 1 0 - I I / 7 4 0 S E R I E S I N S TA L L AT I O N G U I D E • P K 2 7 1 0 / 0 8 / 0 2
P a g e 1 1
5
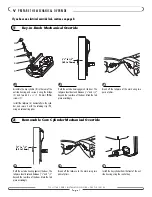
Deadbolt Deactivation
6
Electrical Override
B
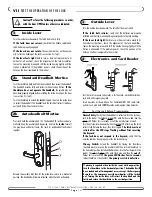
Lock Programming
Program the lock with its room number (see Reference Manual).
Verify that the deadbolt is retracted, and use the Grand Master keycard in
the reader. The
green
LED flashes. Turn the outside lever downward while
the
green
LED is flashing. The latch retracts fully and the LED stops flash-
ing after 6 seconds. Release the lever, then turn it again.
The latch
must not retract again without first inserting the keycard.
C
Deadbolt Function (Lockout of Keycards)
Turn the thumbturn (or press the auxiliary latch on autodeadbolt models)
to extend the deadbolt, then turn the thumbturn to the horizontal.
Use the Grand Master keycard in the reader. The
red
LED flashes once.
Then, turn the outside lever downward.
The latch does not retract.
D
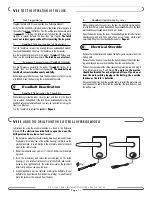
Emergency Keycard Access (Deadbolt Override)
Use the Emergency keycard in the reader. The
red
LED flashes for 6
seconds. Then, turn the outside lever downward.
The deadbolt and
latch bolt retract simultaneously and fully.
While standing outside the room, close the door and ensure that it is prop-
erly latched. Open the door using the Grand Master keycard.
A
Deadbolt Deactivation by Thumbturn
While standing inside the room, close the door, and then turn the thumb-
turn to extend the deadbolt. If the lock has an autodeadbolt mortise, the
deadbolt extends automatically and can only be retracted by turning the
lever (see B below).
Turn the thumbturn to retract the deadbolt.
Repeat.
B.
Deadbolt Deactivation by Lever
While standing inside the room, close the door. On standard mortise models,
turn the thumbturn to extend the deadbolt. On autodeadbolt models, the dead-
bolt should have extended when the door was closed.
Open the door by turning the lever. The deadbolt and the latch bolt retract
simultaneously and fully. Take note of any excess friction, which might
necessitate filing the strike (deadbolt area only).
Repeat.
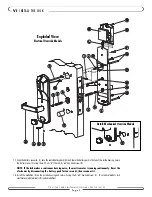
Remove the lock batteries and unsnap the battery wire connector from the
battery pack.
Remove the hex-head set screw from the bottom edge of the outside hous-
ing assembly and remove the medallion from the outside housing.
Pull out the exposed override cable, remove the protective cap, and plug it
into a battery pack or a 9 volt battery.
The motor in the mortise
should be activated for a short period of time. If you do not
hear the motor while plugging in the battery, the override
function or the lock is defective.
Disconnect the battery from the override cable, re-install the protective cap
and reposition the cable. Re-install the medallion, the lock batteries, and
the battery cover.
Instructions for using the electrical override are found in the Reference
Manual.
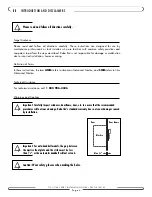
If the electrical override fails to open the door, the
drill point can be used as a last resort.
1. The decorative medallion should already have been removed (loosen
hex head setscrew in bottom of the outside housing) in order to use the
electrical override. A small dimple in the drill plate indicates the drill
point, to the right of center.
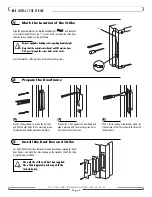
2. Drill at the indicated point with a
3
/
8
" (10mm) drill bit, until the plate
is pierced.
3. Insert the screwdriver, and rotate the override cam on the inside
housing
2
/
3
of a rotation (clockwise for a left-hand lock, and counter-
clockwise for a right-hand lock). The inside lever rotates, the latch bolt
retracts fully and you can open the door.
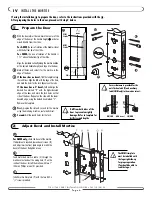
4. Any damaged parts must be replaced, including the drill plate. A new
drill plate can be purchased from Kaba (see catalog). To install the drill
plate, the lock must be removed from the door.
3


