background image

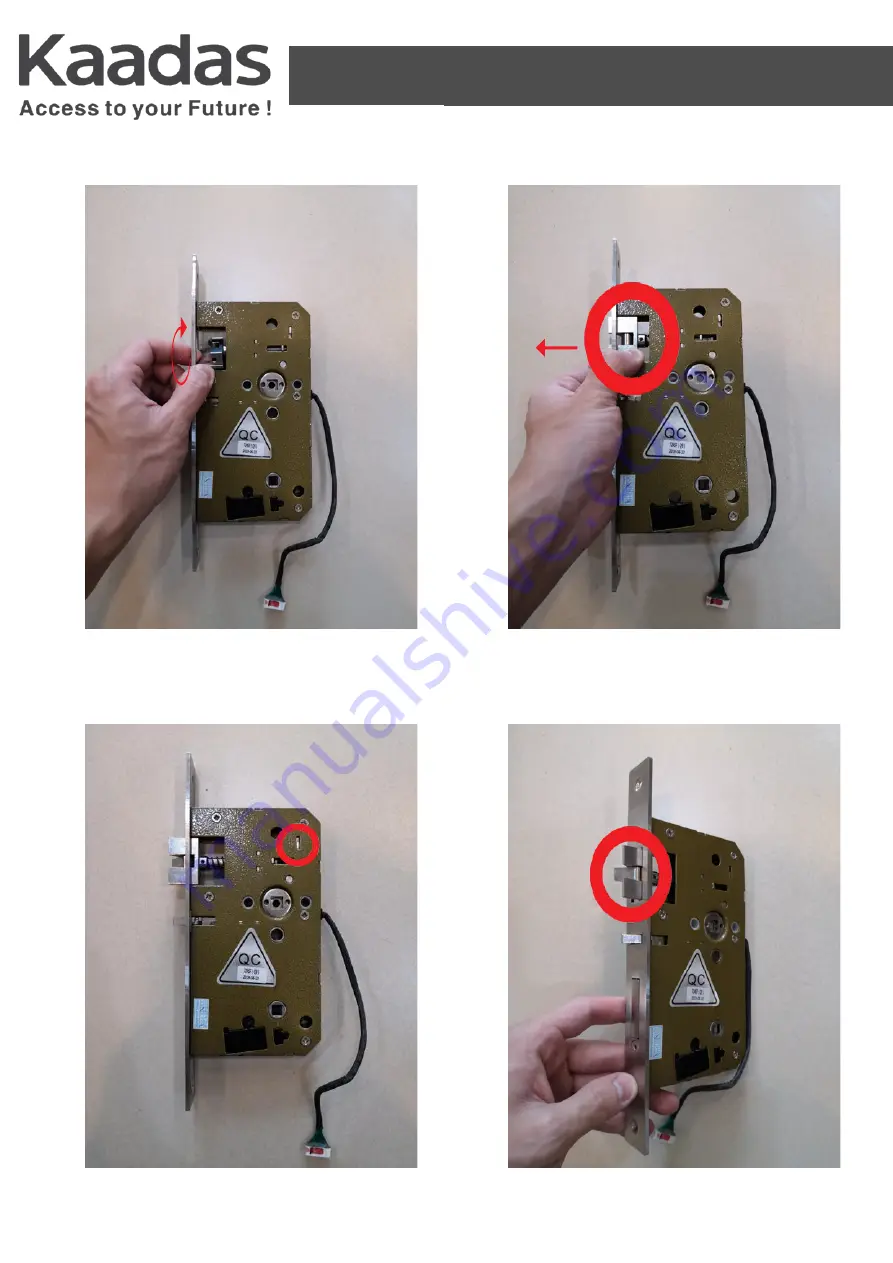
5.

7. 

Mor�se Latch Direc�on Adjustment

INSTALLATION GUIDE

L7

6.

8.

Turn over latch bolt 180 degree 

to the opposite direc�on

Eject it a�er adjust to the right 

direc�on of the latch bolt

Push down the mor�se latch 

bolt switcher

Latch bolt change to the final 

facing direc�on

TURN OVER

EJECT OUT

Summary of Contents for K7

Page 1: ...oor Open Pull Out PULL OUT Outside Door Inside Door Arrow always show UP direc on Screw on marked area Adjust the turn piece to VERTICAL posi on INSTALLATION GUIDE K7 FRONT DOOR BACK DOOR Screw at face inside door ...

Page 2: ...tside Door Inside Door Arrow always show UP direc on Screw on marked area Adjust the turn piece to VERTICAL posi on INSTALLATION GUIDE K7 Le Handle Door Open Push In FRONT DOOR BACK DOOR Screw at face inside door ...

Page 3: ...ide Door Inside Door Arrow always show UP direc on Screw on marked area Adjust the turn piece to VERTICAL posi on INSTALLATION GUIDE K7 Right Handle Door Open Pull Out FRONT DOOR BACK DOOR Screw at face inside door ...

Page 4: ...ide Door Inside Door Arrow always show UP direc on Screw on marked area Adjust the turn piece to VERTICAL posi on INSTALLATION GUIDE K7 Right Handle Door Open Push In FRONT DOOR BACK DOOR Screw at face inside door ...

Page 5: ...oor Open Pull Out PULL OUT Outside Door Inside Door Arrow always show UP direc on Screw on marked area Adjust the turn piece to VERTICAL posi on INSTALLATION GUIDE K8 FRONT DOOR BACK DOOR Screw at face inside door ...

Page 6: ...tside Door Inside Door Arrow always show UP direc on Screw on marked area Adjust the turn piece to VERTICAL posi on INSTALLATION GUIDE K8 Le Handle Door Open Push In FRONT DOOR BACK DOOR Screw at face inside door ...

Page 7: ...CK DOOR Screw at face inside door PULL OUT Outside Door Inside Door Arrow always show UP direc on Screw on marked area Adjust the turn piece to VERTICAL posi on INSTALLATION GUIDE K8 Right Handle Door Open Pull Out ...

Page 8: ...ACK DOOR Screw at face inside door PUSH IN Outside Door Inside Door Arrow always show UP direc on Screw on marked area Adjust the turn piece to VERTICAL posi on INSTALLATION GUIDE K8 Right Handle Door Open Push In ...

Page 9: ...BACK DOOR Le Handle Door Open Pull Out PULL OUT Outside Door Inside Door Arrow always show UP direc on Arrow point to UP direc on RIGHT direc on Screw on marked area INSTALLATION GUIDE K9 Screw at face inside door ...

Page 10: ... BACK DOOR PUSH IN INSTALLATION GUIDE K9 Le Handle Door Open Push In Outside Door Inside Door Arrow always show UP direc on Arrow point to UP direc on RIGHT direc on Screw on marked area Screw at face inside door ...

Page 11: ...ow always show UP direc on Screw on marked area INSTALLATION GUIDE K9 Right Handle Door Open Pull Out Outside Door Inside Door Arrow point to UP direc on LEFT direc on FRONT DOOR BACK DOOR Screw at face inside door ...

Page 12: ...side Door Inside Door Screw on marked area INSTALLATION GUIDE K9 Right Handle Door Open Push In Arrow always show UP direc on Arrow point to UP direc on LEFT direc on FRONT DOOR BACK DOOR Screw at face inside door ...

Page 13: ...oor Open Pull Out PULL OUT INSTALLATION GUIDE KX Outside Door Inside Door Arrow always show UP direc on Arrow point to UP direc on RIGHT direc on Screw on marked area FRONT DOOR BACK DOOR Screw at face inside door ...

Page 14: ...or Inside Door PUSH IN INSTALLATION GUIDE KX Le Handle Door Open Push In Arrow always show UP direc on Arrow point to UP direc on RIGHT direc on Screw on marked area FRONT DOOR BACK DOOR Screw at face inside door ...

Page 15: ... Inside Door PULL OUT INSTALLATION GUIDE KX Right Handle Door Open Pull Out Arrow always show UP direc on Screw on marked area Arrow point to UP direc on LEFT direc on FRONT DOOR BACK DOOR Screw at face inside door ...

Page 16: ...r Inside Door PUSH IN INSTALLATION GUIDE KX Right Handle Door Open Push In Screw on marked area Arrow always show UP direc on Arrow point to UP direc on LEFT direc on FRONT DOOR BACK DOOR Screw at face inside door ...

Page 17: ...FRONT DOOR BACK DOOR Screw at face inside door Le Handle Door Open Pull Out PULL OUT INSTALLATION GUIDE Outside Door Inside Door Arrow always show UP direc on LAMBO ...

Page 18: ...FRONT DOOR BACK DOOR Screw at face inside door Outside Door Inside Door Arrow always show UP direc on PUSH IN INSTALLATION GUIDE Le Handle Door Open Push In LAMBO ...

Page 19: ...FRONT DOOR BACK DOOR Screw at face inside door Outside Door Inside Door Arrow always show UP direc on PULL OUT INSTALLATION GUIDE Right Handle Door Open Pull Out LAMBO ...

Page 20: ...FRONT DOOR BACK DOOR Screw at face inside door Outside Door Inside Door Arrow always show UP direc on PUSH IN INSTALLATION GUIDE LAMBO Right Handle Door Open Push In ...

Page 21: ...Inside Door Insert the square bar with spring Adjust the correct posi on of the lever handle before the installa on Adjust the turn piece to VERTICAL posi on FRONT DOOR BACK DOOR Screw at face inside door Adjust the correct posi on of the mor se latch before the installa on ...

Page 22: ...K DOOR Screw at face inside door Adjust the correct posi on of the mor se latch before the installa on Outside Door Inside Door Insert the square bar with spring Adjust the correct posi on of the lever handle before the installa on Adjust the turn piece to VERTICAL posi on ...

Page 23: ...correct posi on of the lever handle before the installa on Adjust the turn piece to VERTICAL posi on INSTALLATION GUIDE L7 Right Handle Door Open Pull Out FRONT DOOR BACK DOOR Screw at face inside door Adjust the posi on of the mor se latch before the installa on PULL OUT ...

Page 24: ...oor Open Push In FRONT DOOR BACK DOOR Screw at face inside door Adjust the posi on of the mor se latch before the installa on Insert the square bar with spring Adjust the correct posi on of the lever handle before the installa on Adjust the turn piece to VERTICAL posi on ...

Page 25: ...er Handle Direc on Adjustment INSTALLATION GUIDE L7 2 4 Take out the square sha Remove the screws from the posi onal component Remove the posi onal component Take out the shield sleeve from the middle 1 3 ...

Page 26: ...her end Put back the shield sleeve into the middle hole and the cable need to pull to the side Make sure to put the cable stay in one side of the cable hole Place the posi onal component onto the bo om round component and the gap must be located at cable side PULL THE WIRE TO THE OTHER SIDE GAP GAP ...

Page 27: ...INSTALLATION GUIDE L7 9 10 11 The posi onal component has already si ng on the bo om round component Put back the square sha and adjust the mechanical key pick to VERTICAL posi on GAP Fasten the screws onto the posi onal component GAP ...

Page 28: ...LLATION GUIDE L7 2 4 Check the mor se latch bolt direc on first before doing any adjustment Take note on the red highlighted which is the latch bolt switcher Push up the mor se latch bolt switcher Push in latch bolt un l the end PUSH UP PUSH IN ...

Page 29: ...LATION GUIDE L7 6 8 Turn over latch bolt 180 degree to the opposite direc on Eject it a er adjust to the right direc on of the latch bolt Push down the mor se latch bolt switcher Latch bolt change to the final facing direc on TURN OVER EJECT OUT ...

Reviews: