background image

02

02

39

Portable DVD Player

Portable DVD Player

02

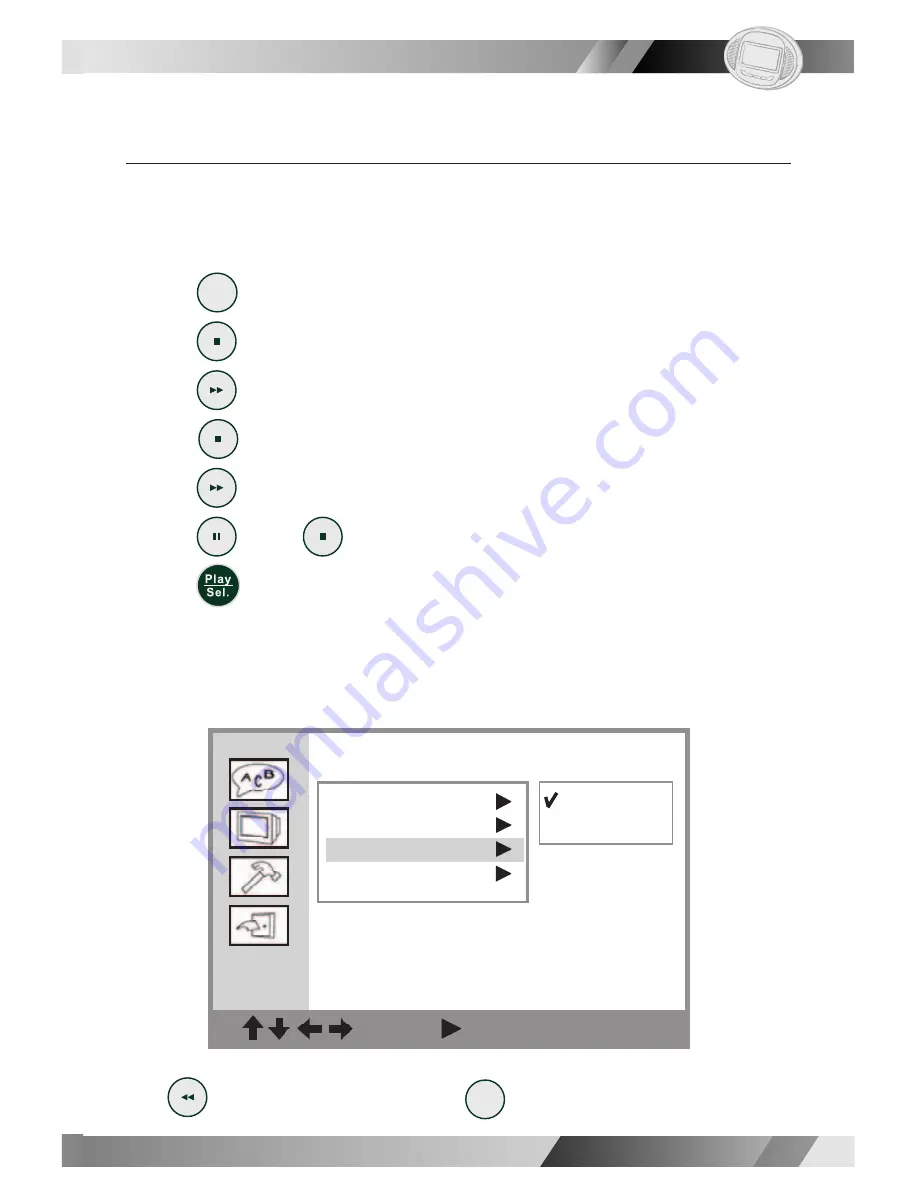
Screen Saver Setting

If you have set the screen saver ON by the following method, then you may 

see it functioning in the stop mode. This function will ONLY function in the stop 

mode.

1.  Press 

Setup

 <

Setup

> in the stop mode.

2.  Press 

 <

Down

> to select "Screen Setup" window. 

3.  Press 

 <

Right

> to enter "Screen Setup" window and 

  press 

 <

Down

> to highlight "Screen Saver".

4.  Press 

 <

Right

> to enter "Screen Saver" window. 

5.  Press 

 <

Up

>/ 

 <

Down

> to select “On” or “Off”, and 

  press 

 <

Play/Sel.

>.

<<

NOTE

>>:

  The screen saver is set to 

appear

 in 10 minutes. In other words, when 

you are in the stop mode and have not operated the portable DVD player 

for more than


10 minutes; then the screen saver will appear automatically on the 

screen.

Screen Setup

: Move       : Select   SETUP: Quit

TV Type 


TV System 


Screen Saver 


Video Output

On
Off      

4-2 Screen Setup-

continued

 I

To return to the SET UP MENU screen

Press 

  <

LEFT

>.

To fi nish the setup operation

Press 

Setup


<

SETUP

> to exit  SETUP MENU screen.

Summary of Contents for JD-VD736

Page 1: ...Playable Disk Format DVD VCD Audio CD CD R CD RW Kodak Picture CD JPEG Picture CD Portable DVD Player User Guide JD VD736 ENGLISH JDVD736V10M10EN02222005 ...

Page 2: ...0 ...

Page 3: ...ging Audio Soundtrack Language 13 Clearing Displaying Subtitles A 14 Changing Subtitle Language B 14 Viewing From Another Angle 15 Muting the DVD Player 15 Using a DVD Menu 16 Using the Menu Function 16 Chapter 2 Audio CD 2 1 Audio CD Playback 17 Basic Playback 17 Stopping Playback 17 Fast Reverse Fast Forward 17 Skipping Tracks Going Forward or Reverse 18 Pausing Playback 18 2 2 Audio CD Informat...

Page 4: ...track Language Selection DVD 34 Subtitle Language Selection DVD 35 4 2 Screen Setup 36 TV Type Setting 36 TV System Setting 38 Screen Saver Setting 39 Video Out Setting 40 4 3 Custom Setup 42 MMC SD Setting 42 Angle Mark Setting DVD 43 Default Setting 44 4 4 LCD Setup 45 Color Setting 45 Brightness Setting 46 LCD On Off Setting 46 Mode Setting 47 Chapter 5 For Your Reference 5 1 Troubleshooting 48...

Page 5: ...the inter ference by one or more of the following measures Reorient or relocate the receiving antenna Increase the separation between the equipment and receiver Connect the equipment into an outlet on a circuit different from that to which the receiver is connected Consult the dealer or an experienced radio TV technician for help This product incorporates copyright protection technology that is pr...

Page 6: ... 6 regions also called locals Each DVD player and disc can be played in one region ONLY among those listed below 1 Canada U S U S Territories 2 Japan Europe South Africa Middle East including Egypt 3 Southeast Asia East Asia including Hong Kong 4 Australia New Zealand Pacific Islands Central America Mexico South America Caribbean 5 Former Soviet Union Indian Subcontinent Africa also North Korea Mo...

Page 7: ...t of the obsolete outlet 10 Protect the power cord from being walked on or pinched particularly at the plug convenience receptacles and the point where they exit the apparatus 11 Only use attachments accessories specified by the manufacturer 12 Use only with a cart stand tripod bracket or table specified by the manufacturer or sold with the apparatus When a cart is used use caution when moving the...

Page 8: ...sk of fire or electric shock do not expose this apparatus to rain or moisture A Class II APPARATUS shall be permanently marked with the words DOUBLE INSULATION or Double insulated and When servicing use only identical replacement parts WARNING To reduce the risk of fire or electric shock do not expose this ap paratus to rain or moisture The apparatus shall not be exposed to dripping or splashing a...

Page 9: ... this unit is dangerous and may cause seri ous damage to the unit Do not attempt to disassemble the unit l Do not put any foreign object on the disc tray n Keep away from water magnet l Keep the unit away from flower vases tubs sinks etc If liquids are spilled into the unit serious damage could occur l Never bring a magnet or magnetized object near the unit n Stacking place the unit in a horizonta...

Page 10: ...f disc for the type of TV connectedI DVD discs have the material recorded in the PAL and NTSC systems Refer to the table below to select the correct disc type for the type of connected TV n Connecting to a multi system TV n Connecting to an NTSC TV n Connecting to a PAL TV ...

Page 11: ...on the player 2 Slide Open to open the disc cover 3 Place a disc in the center with its label side up 4 Close the disc cover l If the disc does not have any menus on it it starts playback l If the disc has one or more titles recorded on it a menu will appear on the screen NOTE Proceed with steps 5 6 when a menu is available on the disc 5 Press or number buttons to select the preferred title 6 Pres...

Page 12: ...even after the player has finished playing a particular disc When no further selections are to be played be sure to press STOP to clear the menu screen l If the disc is placed in upside down and it is a single sided disc NO DISC will appear in the player s display For your reference l When appears while a button is being operated it means that the corresponding operation is prohibited by the playe...

Page 13: ...ers You can skip a specific chapter or track during playback l Skipping Ahead Press Next during playback Skips a chapter each time you press the button l Skipping Back Press Previous during playback to return to previous chapters When you press this button once midway through a chapter the portable DVD player returns to the beginning of the chapter to playback Each additional press of the button c...

Page 14: ...R Repeat chapter Press twice TITLE Repeat title Press three times DISC Repeat the entire disc Press four times off Repeat operation cancelled OR to return to normal playback Press 1 ALL several times until Off appears on the screen NOTE l Repeat playback works only with discs for which the elapsed playing time appears on the player s display during playback l Repeat playback may not work correctly...

Page 15: ...ent language if available This operation functions only with discs on which multiple audio soundtrack languages are recorded 1 Press Audio during playback 2 Press Audio a number of times until the preferred language is selected For your reference l When the preferred language is not selected even after pressing the but ton several times it may indicate that language is not available on the disc l ...

Page 16: ...c l When you turn on or remove the disc the portable DVD player will play back the subtitle language which is selected in the initial settings If you select a subtitle language which is not recorded on the disc the portable DVD player will playback a prior subtitle language programmed on the disc Clearing Displaying Subtitles A If a disc provides subtitles you can choose to hide or display them Th...

Page 17: ... selected 3 Press Angle a number of times to change the viewing angle NOTE l ANGLE will only function on discs where different angles have been record ed l The viewing angles are shown on the player s display and you can select one of them for viewing To Mute the DVD Player In some cases you may need to mute the portable DVD player temporarily The portable DVD player provides a MUTE function for y...

Page 18: ...tle in stop mode The DVD menu available from the disc now appears 2 Press to select the preferred item 3 Press Play Sel You have now enter to the selected item l To enter another menu screen repeat steps 2 and 3 l To return to the previous menu screen press Title Title Using the MENU Function 1 Press Play Sel 2 Press Menu Menu A DVD chapter menu with a brief summary of each entry now appears You m...

Page 19: ...e player 2 Slide Open to open the disc cover 3 Place a disc in the center with label side up 4 Close the disc cover l For audio CDs without playback control the player starts to playback l For audio CDs with playback control a menu appears after a few seconds Stopping Playback 1 Press STOP to prestop While playing CDs prestop is equivalent to PAUSE 2 Press STOP again to stop the player completely ...

Page 20: ...iple presses of Next skips a track each time the button is pressed l Skipping Back Press Previous during playback When Previous is pressed once midway through a track the portable DVD player returns to the beginning of the CD track and will replay it Additional presses of the Previous button will skip back one track for each press Pause Playback Press Pause during playback The player will pause pl...

Page 21: ...e Information of the Playing Track Press Info Info during playback Press Info Info a number of times The elapsed time track number and other information will show on the screen Stop Displaying the Information of the Playing Track Press Info Info a number of times until the information disappears ...

Page 22: ...r of the pic ture then press Play Sel Press Info Info the information on the picture CD will be shown on the screen And press the number buttons corresponding to the order of the pic ture then Press Play Sel The portable DVD player will begin the slide show from the selected picture l To pause slide show press Pause and the slide show will pause l To stop slide show press Stop then enters the Thum...

Page 23: ... the selected mode Slide Show 1 Press Next to view the next picture or Previous to view the previous picture 2 Press Right or Left to rotate the picture as follows Press Right to rotate right by 90 degrees Press Left to rotate left by 90 degrees l To pause slide show press Pause and the slide show will pause l To stop slide show press Stop which enters the Thumbnail mode NOTE Press Title Title to ...

Page 24: ...you press Play Sel the picture is rotated right by 90 degrees l To stop Rotate mode press Stop l To reset the rotated pictures press Stop to stop Rotate mode and select Reset by pressing Right or Left then press Play Sel to reset all rotated pictures l To exit Rotate mode press Stop and select Return by pressing Right or Left then press Play Sel to exit Rotate mode I 3 1 Playing Kodak Picture CDs ...

Page 25: ...to select Program list and press Play Sel 4 Press Stop to back to menu bar and press Right to select and press Play Sel to play the programmed files l To delete the file from the program list press Right or Left to select the file then press Play Sel to delete the file from the program list l To delete all files from the program list select CLEAR ALL then press Play Sel to delete all files from th...

Page 26: ...nail If you want to view the chosen picture in original size press Play Sel When you view the picture in original size you can press Stop to view the pictures in thumbnail 2 Press Next or Previous to view the next or previous thumbnail page l To exit Thumbnail mode press Stop once to stop and then press Stop as required to exit I 3 1 Playing Kodak Picture CDs continued I ...

Page 27: ... press the number buttons corresponding to the order of the pic ture then Press Play Sel The portable DVD player will begin the slide show from the selected picture l To pause slide show press Pause l To stop slide show press Stop then enter the File Manager l To resume slide show press Play Sel again Mode switch There are four modes to play JPEG picture CDs File Manager Playing Mode Program Mode ...

Page 28: ... exit File Manager press Left as required to exit the File Manager Menu Playing Mode 1 Press Next to view the next picture or Previous to view the previous picture 2 Press Right or Left to rotate the picture Press Right to rotate right by 90 degrees Press Left to rotate left by 90 degrees l To pause playback press Pause l To stop playback press Stop then enter to the File Manager l To resume playb...

Page 29: ...s Play Sel 4 Press Left to back to menu bar and press Right to select and press Play Sel to play the programmed files l To delete the file from the program list under program list press Up or Down to select the file then press Play Sel to delete the file from the program list l To delete all files from the program list select CLEAR ALL then press Play Sel to delete all files from the program list ...

Page 30: ... If you want to view the selected picture in original size press Play Sel When you view the picture in original size you can press Stop to view the pictures in thumbnail mode 2 Press Next or Previous to view the next or previous thumbnail page l To exit Thumbnail mode press Stop once to stop and then press Stop a number of times to exit I 3 2 Playing JPEG Picture CDs continued I ...

Page 31: ...l automatically start to play back the JPEG files in order To PAUSE playback press To RESUME playback press To STOP playback press Doing so enters the File Manager Mode Switch 1 Press Stop to stop the present mode and press Left as required to exit the present mode Then press Right or Left to select the preferred mode 2 Press to enter the selected mode Play Sel Play Sel 29 ...

Page 32: ...ayback Press Stop it will enter File Manager l To exit Playing mode press Stop and press Left Thumbnail Mode While in Thumbnail mode there are 15 files per page for your review You can enter Thumbnail Mode only when you select the folder with JPEG files 1 Press to select the picture in thumbnail If you want to view the selected picture in original size press Play Sel When you view the picture in o...

Page 33: ... to select Program list and press Play Sel 4 Press Left to back to menu bar and press Right to select and press Play Sel to play the programmed files l To delete the file from the program list press Up or Down to select the file then press Play Sel to delete the file l To delete all files from the program list select CLEAR ALL then press Play Sel to delete all fi les from the program list l To exi...

Page 34: ...ing Allows you to set various languages for the on screen display OSD 1 Press Setup Setup in the stop mode 2 Press Right to highlight OSD 3 Press Right to enter OSD window 4 Press Up Down to select the preferred language and then press Play Sel To return to the SETUP MENU screen Press LEFT To finish the setup operation Press Setup SETUP to exit SETUP MENU screen I 4 1 Language Setup I ...

Page 35: ...t has been recorded on discs for the disc menu messages display 1 Press Setup Setup in the stop mode 2 Press Right to enter Language Setup window and and press Down to highlight Menu 3 Press Right to enter Menu window 4 Press Up Down to select the preferred language and then press Play Sel I 4 1 Language Setup continued I To return to the SETUP MENU screen Press LEFT To finish the setup operation ...

Page 36: ... 2 Press Right to enter Language Setup window and press Down to highlight Audio 3 Press Right to enter Audio window 4 Press Up Down to select the preferred language and then press Play Sel NOTE The top priority language of each disc will always playback first If the selected language is not recorded on the disc the portable DVD player will play the top priority language of the disc I 4 1 Language ...

Page 37: ...t to enter Language Setup window and press Down to highlight Subtitle 3 Press Right to enter Subtitle window 4 Press Up Down to select the preferred language and then press Play Sel NOTE The top priority language of each disc will always playback first If the selected language is not recorded on the disc the portable DVD playerl will play the top priority language of the disc I 4 1 Language Setup ...

Page 38: ...V with a 4 3 screen ratio 1 Press Setup Setup in the stop mode 2 Press Down to select Screen Setup window 3 Press Right to highlight TV Type 4 Press Right to enter TV Type window and then press Up Down to select the preferred TV display and press Play Sel NOTE If the selected language is not recorded on the disc the portable DVD player will play the top priority language of the disc I 4 2 Screen S...

Page 39: ... Letter Box Select 4 3 LB for a conventional size TV set Black bands appear at top and bottom of screen letter box style l Video material not formatted in the pan scan style is played in the letter box style 16 9 Wide Select 16 9 for a wide screen TV set Played in FULL size l Setting the wide screen TV to FULL mode is also necessary l Each screen shows an example when the video material for a wide...

Page 40: ... is a multi TV system that supports both PAL and NTSC 1 Press Setup Setup while the DVD player is in stop mode 2 Press Down to select Screen Setup window 3 Press Right to enter Screen Setup window and press Down to highlight TV System 4 Press Right to enter TV System window 5 Press Up Down to select the appropriate TV system and press Play Sel Screen Setup Move Select SETUP Quit TV Type TV System ...

Page 41: ... Screen Saver 4 Press Right to enter Screen Saver window 5 Press Up Down to select On or Off and press Play Sel NOTE The screen saver is set to appear in 10 minutes In other words when you are in the stop mode and have not operated the portable DVD player for more than 10 minutes then the screen saver will appear automatically on the screen Screen Setup Move Select SETUP Quit TV Type TV System Scr...

Page 42: ... enter Screen Setup window and press Down to highlight Video Output 4 Press Right to enter the Video Output window 5 Press Up Down to select the preferred video output set ting and press Play Sel Screen Setup Move Select SETUP Quit TV Type TV System Screen Saver Video Output S Video P SCAN I 4 2 Screen Setup continued I To return to the SETUP MENU screen Press LEFT To finish the setup operation Pr...

Page 43: ...can feature press Play Sel NOTE If you choose P Scan as the video output setting make sure your TV set supports the P Scan input feature and that the YUV cable is properly connected to your TV and the portable DVD player If your TV doesn t support P Scan feature press Stop Troubleshooting What if the screen turns black while operating Solution Press Mode Mode to switch to P Scan mode I 4 2 Screen ...

Page 44: ...Mode Mode to switch to MMC SD mode 1 Press Setup Setup in the stop mode 2 Press Down to select Custom Setup window 3 Press Right to highlight MMC SD 4 Press Up Down to select On or Off and then press Play Sel I 4 3 Custom Setup I Custom Setup Move Select SETUP Quit On Off MMC SD Angle Mark Default To return to the SETUP MENU screen Press LEFT To finish the setup operation Press Setup SETUP to exit...

Page 45: ... Right to enter Custom Setup window and press Down to highlight Angle Mask 4 Press Right to enter Angle Mark window 5 Press Up Down to select On or OFF and press Play Sel NOTE Whether the ANGLE MARK is set to On or Off with this setting when you press Angle the portable DVD player will still play back multi angles that are available on the DVD discs MMC SD Angle Mark Default To return to the SETUP...

Page 46: ...nd press Down to highlight Default 4 Press Right to enter the Default window 5 Press Right to select Read and press Play Sel NOTE The viewer rating and the password setting will NOT be changed even though you reset the unit to the default setting Custom Setup Move Select SETUP Quit Read I 4 3 Custom Setup continued I MMC SD Angle Mark Default To return to the SETUP MENU screen Press LEFT To finish...

Page 47: ...isfying effect 1 Press LCD LCD Color ß 0 à will show on the screen 2 Press Left or Right to choose the preferred color setting and then the panel will change to the selected setting 3 After finishing the setup wait for few seconds for the player to return to normal playback Color 3 Color 2 Color 1 Color 0 Color 1 Color 2 Color 3 I 4 4 LCD Setup I ...

Page 48: ...the selected setting 3 After finishing the setup wait a few seconds until the player returns to normal playback Bright 3 Bright 2 Bright 1 Bright Bright Bright Bright 3 2 1 0 I 4 4 LCD Setup continued I LCD On Off Setting In some cases you may want to turn off the LCD screen 1 Press LCD LCD three times Close ß Off à will show on the screen 2 Press Left or Right to switch On or Off Note If On is se...

Page 49: ...e the portable DVD player is still operating but the images will be displayed by the external video equipment example TV 2 Press Mode Mode again the portable DVD player will enter CARD S Video mode If no card is inserted NO CARD will be shown on the LCD screen 3 Press Mode Mode again the portable DVD player will enter CARD P SCAN mode After 2 seconds the LCD screen turns black At this time the por...

Page 50: ... another sound source Check the Audio Output Setting menu to make sure that Analog Output is selected Distorted sound Ensure that the input settings for the TV and stereo system are correct Remember no sound is heard during still picture pause or slow motion playback No audio at Digital Output Check the digital connections Check the settings menu to make sure the digital output is set to on Check ...

Page 51: ...tively turn off the unit disconnect the AC power cord and then reconnect it The player may not be operating properly due to lightning static electricity or some other external factors which may have frozen its operation PLAY does not start play back even when title is selected This may be the result of the parental lock function that has been set Confirm the PARENTAL setup Audio soundtrack and or ...

Page 52: ...ion liquids or any other solvent l Be careful not to drop or bend the disc l Do not install more than 1 disc on the disc tray l Do not try to close the disc cover when the disc is not installed properly l Be sure to store the disc in its exclusive case when not in use If the surface is soiled B on next page Wipe gently with a soft damp water only cloth When wiping discs always move the cloth from ...

Page 53: ...his player l CD ROM PC Software Application Programs l CVD l CD G l DVD with a Locale No other than that shown on the DVD unit s Region Code Label on the rear panel Maintenance l Be sure to turn the unit off and disconnect the AC power cord before performing maintenance on the unit l Wipe the unit with a dry soft cloth If the surfaces are extremely dirty wipe clean with a cloth which has been dipp...

Page 54: ...whole movie can be recorded A DVD has a structure consisting of two 0 6 mm thin discs which are adhered to each other Since the thinner the disc the higher the density at which the information can be recorded two 0 6 mm discs have a greater capacity than a single1 2 mm thick disc Since the two thin discs are adhered to each other double sided play is not only possible for longer duration play but ...

Reviews: