background image

14

ENGLISH

Data Size: 

B6L (182 mm x 128 mm)

Book Size: 

B6L (182 mm x 128 mm)

BLUETOOTH — Connection

Supported Bluetooth profiles

– Hands-Free Profile (HFP)
– Advanced Audio Distribution Profile (A2DP)
– Audio/Video Remote Control Profile (AVRCP)
– Serial Port Profile (SPP)
– Phonebook Access Profile (PBAP)

Supported Bluetooth codecs

– Sub Band Codec (SBC)
– Advanced Audio Coding (AAC)

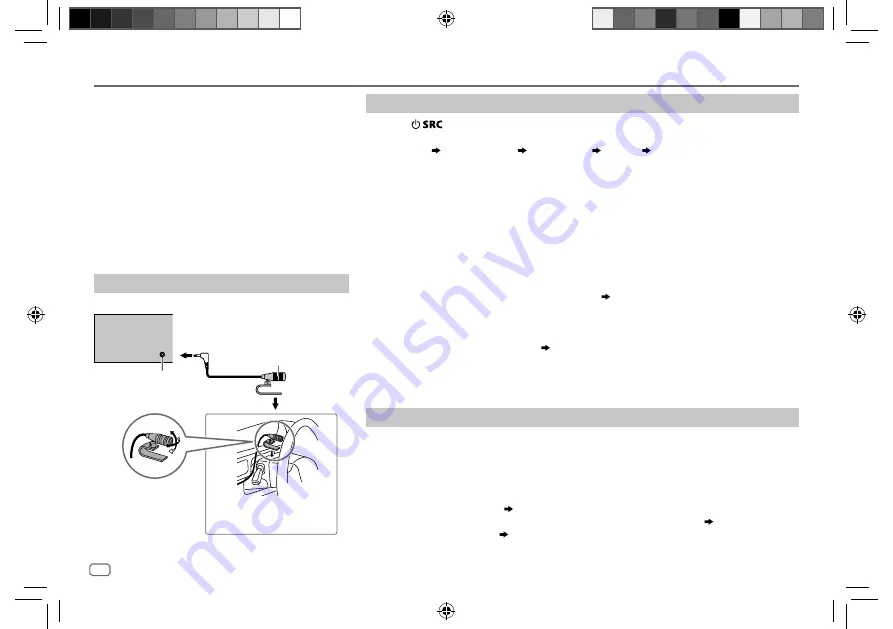
 Connect the microphone

BLUETOOTH®

Microphone 
(supplied)

Rear panel

Microphone input jack

Secure using cord clamps 
(not supplied) if necessary.

Adjust the 
microphone angle

 Pair and connect a Bluetooth device for the first time

Press 

 to turn on the unit.

Search and select this unit model name (KDC-BT7

**

DAB) on the Bluetooth device.

 “PAIRING”   “PASS XXXXXX”   Device name   “PRESS”   “VOLUME KNOB” appears on 

the display.


•  For some Bluetooth devices, you may need to enter the Personal Identification Number 

(PIN) code immediately after searching.

Press the volume knob to start pairing.


“PAIRING OK” appears when pairing is completed. 

Once pairing is completed, Bluetooth connection is established automatically.
“BT1” and/or “BT2” indicator on the faceplate lights up.

•  This unit supports Secure Simple Pairing (SSP).
•  Up to five devices can be registered (paired) in total.
•  Once the pairing is completed, the Bluetooth device will remain registered in the unit even 

if you reset the unit. To delete the paired device, 

 18, [DEVICE DELETE]

.

•  A maximum of two Bluetooth phones and one Bluetooth audio device can be connected 

at any time.
However, while in BT AUDIO source, you can connect to five Bluetooth audio devices and 
switch between these five devices. 

(  19)

•  Some Bluetooth devices may not automatically connect to the unit after pairing. Connect 

the device to the unit manually.

•  Refer to the instruction manual of the Bluetooth device for more information.

Auto Pairing

When you connect iPhone/iPod touch/Android device to the USB input terminal, pairing 
request (via Bluetooth) is automatically activated.

Press the volume knob to pair once you have confirmed the device name.

Automatic pairing request is activated only if:
– Bluetooth function of the connected device is turned on.
– 

[AUTO PAIRING]

 is set to 

[ON]

(  18)

– KENWOOD MUSIC PLAY application is installed on the Android device 

(  10)

 and 

[BROWSE MODE]

 is selected. 

(  11)

JS_KWD_KDC_BT720DAB_XN_EN_5.indd   14

JS_KWD_KDC_BT720DAB_XN_EN_5.indd   14

8/25/2017   3:22:17 PM

8/25/2017   3:22:17 PM

Autogoods “130”

130.com.ua

Summary of Contents for KENWOOD KDC-BT720DAB

Page 1: ...ories SECURITY SYSTEMS Car alarms Bike alarms Mechanical blockers Immobilizers Sensors Accessories OPTIC AND LIGHT Xenon Bixenon Lamps LED Stroboscopes Optic and Headlights Washers Light rain sensors Accessories PARKTRONICS AND MIRRORS Rear parktronics Front parktronics Combined parktronics Rear view mirrors Accessories HEATING AND COOLING Seat heaters Mirrors heaters Screen wipers heaters Engine ...

Page 2: ... 182 mm x 128 mm KDC BT720DAB CD RECEIVER INSTRUCTION MANUAL B5A 2101 00 XN 2017 JVC KENWOOD Corporation JS_KWD_KDC_BT720DAB_XN_C_4 indd 1 JS_KWD_KDC_BT720DAB_XN_C_4 indd 1 8 25 2017 3 09 58 PM 8 25 2017 3 09 58 PM Autogoods 130 1 3 0 c o m u a ...

Page 3: ... to prevent a short circuit If a disc error occurs due to condensation on the laser lens eject the disc and wait for the moisture to evaporate USB rating is indicated on the main unit To view detach the faceplate 3 Depending on the types of cars the antenna will automatically extend when you turn on the unit with the antenna control wire connected 35 Turn off the unit or change the source to STAND...

Page 4: ...EL DEMO PRESS VOLUME KNOB 1 Press the volume knob YES is selected for the initial setup 2 Press the volume knob again DEMO OFF appears Then the display shows the selected crossover type 2 WAY X OVER or 3 WAY X OVER To change the crossover type see Change the crossover type 5 GETTING STARTED 1 Volume knob Detach button Display window Lights up when Bluetooth connection is established 14 Flashes whe...

Page 5: ... to exit To return to the previous setting item press Default XX AUDIO CONTROL SWITCH PREOUT REAR SUBWOOFER Selects whether rear speakers or a subwoofer are connected to the line out terminals on the rear through an external amplifier 35 DISPLAY EASY MENU When entering FUNCTION ON ZONE 1 illumination changes to white color OFF ZONE 1 illumination remains as COLOR SELECT color 25 ZONE 2 illuminatio...

Page 6: ... except the stored station NO Cancels CLOCK CLOCK DISPLAY ON The clock time is shown on the display even when the unit is turned off OFF Cancels Change the crossover type 1 Press repeatedly to enter STANDBY 2 Press and hold number buttons 4 and 5 to enter crossover select The current crossover type appears 3 Turn the volume knob to select 2WAY or 3WAY then press the knob 4 Turn the volume knob to ...

Page 7: ...IGITAL RADIO About DAB Digital Audio Broadcasting DAB is one of the digital radio broadcasting systems available today It can deliver digital quality sound without any annoying interference or signal distortion Furthermore it can carry text pictures and data In contrast to FM broadcast where each program is transmitted on its own frequency DAB combines several programs called services to form one ...

Page 8: ...the PTY language ENGLISH FRENCH GERMAN then press the knob 3 Press S T to start searching ASW SELECT TRAVEL WARNINGS NEWS WEATHER EVENT SPECIAL RAD INFO SPORTS FINANCE Turn the volume knob to make a selection then press the knob appears in front of the activated announcement type Automatically switch from any source to Digital radio ensembles broadcasting an activated announcement type Multiple an...

Page 9: ...e traffic information announcement alarm or news bulletin is turned on Search for a station 1 Press repeatedly to select RADIO 2 Press repeatedly to select FM1 FM2 FM3 AM SW1 SW2 3 Press S T to search for a station To change the searching method for S T Press repeatedly AUTO1 Automatically search for a station AUTO2 Search for a preset station MANUAL Manually search for a station To store a statio...

Page 10: ... OFF Cancels TI in AM SW1 SW2 band is for enabling traffic interruption to DIGITAL AUDIO source only PTY SEARCH 1 Turn the volume knob to select the available Program Type see the following then press the knob 2 Turn the volume knob to select the PTY language ENGLISH FRENCH GERMAN then press the knob 3 Press S T to start searching ANALOG RADIO Available Program Type for PTY SEARCH SPEECH NEWS AFFA...

Page 11: ... select ALL RANDOM 7 3 When connecting an Android device Press VIEW to install KENWOOD MUSIC PLAY APP is shown Follow the instructions to install the application You can also install the latest version of KENWOOD MUSIC PLAY application on your Android device before connecting For more information visit www kenwood com cs ce 4 For ANDROID Applicable only when BROWSE MODE is selected 11 5 For CD Onl...

Page 12: ...ume knob to select a folder list then press the knob 3 Turn the volume knob to select a file then press the knob Quick Search applicable only for CD USB and ANDROID source If you have many files you can search through them quickly Turn the volume knob quickly to browse through the list quickly Skip Search applicable only for iPod USB and ANDROID source Press S T to search at a preset skip search r...

Page 13: ...k starts Repeat steps 1 to 3 to select the following drives SKIP SEARCH 0 5 1 5 10 While listening to iPod USB or ANDROID source selects the skip search ratio over the total files Preparation Select ON for BUILT IN AUX for SOURCE SELECT 5 Start listening 1 Connect a portable audio player commercially available 2 Press repeatedly to select AUX 3 Turn on the portable audio player and start playback ...

Page 14: ...he car when not using 3 This feature is available for tracks in Radio only If thumbs down is selected the current track is skipped 4 Available for premium account users only 5 Available for tracks in Playlists only Save favorite song information While listening to the Radio on Spotify Press and hold the volume knob SAVED appears and the information is stored to Your Music or Your Library on your S...

Page 15: ...ate lights up This unit supports Secure Simple Pairing SSP Up to five devices can be registered paired in total Once the pairing is completed the Bluetooth device will remain registered in the unit even if you reset the unit To delete the paired device 18 DEVICE DELETE A maximum of two Bluetooth phones and one Bluetooth audio device can be connected at any time However while in BT AUDIO source you...

Page 16: ...ming call Answer a call Press or the volume knob or one of the number buttons 1 to 6 Reject a call Press End a call Press While talking on the first incoming call Answer another incoming call and hold the current call Press Reject another incoming call Press While having two active calls End current call and activate held call Press Swap between the current call and held call Press Adjust the phon...

Page 17: ...omatically in the selected time in seconds OFF Cancels BATT SIGNAL AUTO Shows the strength of the battery and signal when the unit detects a Bluetooth device and the Bluetooth device is connected OFF Cancels Functionality depends on the type of the phone used Make a call You can make a call from the call history phonebook or dialing the number Call by voice is also possible if your mobile phone ha...

Page 18: ...gth of the battery NO SIGNAL LOW MID MAX Shows the strength of the current received signal Functionality depends on the type of the phone used Make a call using voice recognition 1 Press and hold to activate the voice recognition of the connected phone 2 Speak the name of the contact you want to call or the voice command to control the phone functions Supported Voice Recognition features vary for ...

Page 19: ...nfirm RECONNECT ON The unit automatically reconnect when the last connected Bluetooth device is within range OFF Cancels AUTO PAIRING ON The unit automatically pair supported Bluetooth device iPhone iPod touch Android device when it is connected through USB input terminal Depending on the operating system of the connected device this function may not work OFF Cancels INITIALIZE YES Initializes all...

Page 20: ...Pressing the Play key on the connected device itself also causes switching of sound output from the device Operations and display indications may differ according to their availability on the connected device Settings to use KENWOOD Remote application KENWOOD Remote application is designed to control the KENWOOD car receiver s operations from the iPhone iPod via Bluetooth or via USB input terminal...

Page 21: ...onnected via Bluetooth ANDROID NOT CONNECTED No Android device is connected to use the application Displayed only when ANDROID of SELECT is set to YES Listen to iPhone iPod via Bluetooth You can listen to the songs on the iPhone iPod via Bluetooth on this unit Press repeatedly to select iPod BT You can operate the iPod iPhone in the same way as iPod iPhone via USB input terminal 10 If you plug in ...

Page 22: ... be shown 22 23 By default 2 way crossover type is selected X OVER DTA SETTINGS For settings 23 24 Digital Time Alignment settings CAR SETTINGS For 2 way crossover SUB W LEVEL SUBWOOFER SET is selectable only if SWITCH PREOUT is set to SUBWOOFER 4 SUB W LEVEL is selectable only if SUBWOOFER SET is set to ON While listening to any source 1 Press the volume knob to enter FUNCTION 2 Turn the volume k...

Page 23: ... PHASE PHASE Selects the phase of the speaker output to be in line with the other speaker output GAIN LEFT GAIN RIGHT F HPF GAIN R HPF GAIN SW LPF GAIN GAIN Adjusts the output volume of the selected speaker 2 way crossover setting items SPEAKER SIZE FRONT SIZE 8CM 10CM 12CM 13CM 16CM 17CM 18CM 4 6 5 7 6 8 6 9 7 10 TWEETER SMALL MIDDLE LARGE NONE not connected REAR 8CM 10CM 12CM 13CM 16CM 17CM 18CM...

Page 24: ...cle OFF Not compensating R SP LOCATION Selects the location of the rear speakers in your vehicle to calculate the furthest distance from the listening position selected reference point DOOR REAR DECK Selectable only when CAR TYPE is selected as OFF COMPACT FULL SIZE CAR WAGON or SUV 2ND ROW 3RD ROW Selectable only when CAR TYPE is selected as MINIVAN or MINIVAN LONG 3 way crossover setting items S...

Page 25: ...l be automatically computed and set 1 Determine the center of the currently set listening position as the reference point 2 Measure the distances from the reference point to the speakers 3 Calculate the differences between the distance of the furthest speaker rear speaker and other speakers 4 Set the DISTANCE calculated in step 3 for individual speakers 5 Adjust GAIN for individual speakers Exampl...

Page 26: ...F Cancels Preset colors RED1 RED2 RED3 PURPLE1 PURPLE2 PURPLE3 PURPLE4 BLUE1 BLUE2 BLUE3 SKYBLUE1 SKYBLUE2 LIGHTBLUE AQUA1 AQUA2 GREEN1 GREEN2 GREEN3 YELLOWGREEN1 YELLOWGREEN2 YELLOW ORANGE1 ORANGE2 ORANGERED TROUBLESHOOTING Symptom Remedy General Sound cannot be heard Adjust the volume to the optimum level Check the cords and connections MISWIRING CHECK WIRING THEN PWR ON appears Turn the power o...

Page 27: ...rotected file is played Symptom Remedy CD USB iPod UNSUPPORTED DEVICE Check whether the connected device is compatible with this unit and ensure the file systems are in supported formats 29 Reattach the device UNRESPONSIVE DEVICE Make sure the device is not malfunction and reattach the device USB HUB IS NOT SUPPORTED This unit cannot support a USB device connected via a USB hub The source does not...

Page 28: ...Bluetooth No Bluetooth device is detected Search from the Bluetooth device again Reset the unit 3 Bluetooth pairing cannot be made Make sure you have entered the same PIN code to both the unit and Bluetooth device Delete pairing information from both the unit and the Bluetooth device then perform pairing again 14 Echo or noise is heard during a phone conversation Adjust the microphone unit s posit...

Page 29: ...the following CDs For detailed information and notes about the playable audio files visit www kenwood com cs ce audiofile Connector on the reverse side of the faceplate Symptom Remedy Bluetooth DEVICE FULL The number of registered devices has reached its limit Retry after deleting an unnecessary device 18 DEVICE DELETE N A VOICE TAG Make sure the same voice as the registered voice tag is used NOT ...

Page 30: ...e for iPod touch 5th and 6th generation iPhone 4S 5 5S 5C 6 6 Plus 6S 6S Plus SE 7 7 Plus You cannot operate iPod if KENWOOD or is displayed on iPod Depending on the version of the operating system of the iPod iPhone some functions may not operate on this unit REFERENCES About Android device This unit supports Android OS 4 1 and above Some Android devices with OS 4 1 and above may not fully suppor...

Page 31: ...e Artist Track title Disc name Track title Date Clock Playing time Date Clock back to the beginning For MP3 WMA AAC WAV FLAC files Song title Artist Song title Album title Song title Date Clock File name Folder name File name Date Clock Playing time Date Clock back to the beginning iPod USB iPod BT or ANDROID When MODE OFF BROWSE MODE is selected 11 Song title Artist Song title Album name Song tit...

Page 32: ...to 96 kHz 24 bit SPECIFICATIONS Digital radio DAB Frequency Range Band III 174 928 MHz 239 200 MHz Sensitivity 100 dBm Signal to Noise Ratio 90 dB Antenna Connector Type SMB Antenna Output Voltage 14 4 V 11 V 16 V Antenna Maximum Current 100 mA Analog radio FM Frequency Range 87 5 MHz 108 0 MHz 50 kHz space Usable Sensitivity S N 30 dB Dev 22 5 kHz 6 2 dBf 0 56 μV 75 Ω Quieting Sensitivity S N 46 ...

Page 33: ... ft Profile HFP 1 6 Hands Free Profile A2DP Advanced Audio Distribution Profile AVRCP 1 5 Audio Video Remote Control Profile SPP Serial Port Profile PBAP Phonebook Access Profile Audio Maximum Output Power 50 W 4 Full Bandwidth Power 22 W 4 at less than 1 THD Speaker Impedance 4 Ω 8 Ω Tone Action Band 1 62 5 Hz 9 dB Band 2 100 Hz 9 dB Band 3 160 Hz 9 dB Band 4 250 Hz 9 dB Band 5 400 Hz 9 dB Band 6...

Page 34: ...el Mount the unit at an angle of less than 30º If your vehicle wiring harness does not have the ignition terminal connect Ignition wire red to the terminal on the vehicle s fuse box which provides 12 V DC power supply and is turned on and off by the ignition key Keep all cables away from heat dissipate metal parts After the unit is installed check whether the brake lamps blinkers wipers etc on the...

Page 35: ...he holes on both sides of the trim plate then pull it out 3 Insert the extraction keys deeply into the slots on each side then follow the arrows as shown on the illustration When installing without the mounting sleeve 1 Remove the mounting sleeve and trim plate from the unit 2 Align the holes in the unit on both sides with the vehicle mounting bracket and secure the unit with screws commercially a...

Page 36: ...or chassis of the car To the power control terminal when using the optional power amplifier or to the antenna control terminal in the vehicle Brown Mute control wire White Gray Green Purple White Black Gray Black Green Black Purple Black To connect the Kenwood navigation system refer your navigation manual If no connections are made do not let the wire come out from the tab To the steering wheel r...

Page 37: ...hly wipe oil and dirt from the pasting surface with the supplied cleaner I Do not bend or damage the film antenna F It may not be possible to install on certain vehicles Check the cable routing of the film antenna F and amplifier unit G before pasting Do not apply any glass cleaner after pasting the film antenna F Determine the antenna installation position The direction of the film antenna F chan...

Page 38: ... unit G above the air bag so that it does not obstruct the operation of the air bag G Antenna installation 1 Remove the front pillar cover of your car Front pillar 2 Clean the windscreen with the supplied cleaner I I Wait until the glass surface is completely dry before proceeding Warm the surface of the windscreen with defroster if it is cold during winter 3 Remove the separator tag 1 of film ant...

Page 39: ...Lead terminal of the film antenna F Earth sheet 7 Remove the film covering the earth sheet and paste the earth sheet on the metal part of the vehicle Provide sufficient leeway for the earth sheet so that it does not interfere with the interior parts front pillar cover Also take care that the interior parts do not interfere with the amplifier unit G G 8 Wire the antenna cables Use cable clamper H t...

Page 40: ...JS_KWD_KDC_BT720DAB_XN_EN_5 indd 39 JS_KWD_KDC_BT720DAB_XN_EN_5 indd 39 8 25 2017 3 22 22 PM 8 25 2017 3 22 22 PM Autogoods 130 1 3 0 c o m u a ...

Page 41: ...t retain the above copyright notice this list of conditions and the following disclaimer Redistributions in binary form must reproduce the above copyright notice this list of conditions and the following disclaimer in the documentation and or other materials provided with the distribution Neither the name of the Xiph org Foundation nor the names of its contributors may be used to endorse or promot...

Reviews: