background image

XV-S56BK/S57SL[B/E/EN]

ERRATA / ERRATUM / RÄTTELSE / KORJAUS / RETTELSE

Page 56

Error

Correction

Seite 56

Fehler

Berichtigung

Page 56

Erreur

Correction

Biz. 56

Fout

Correrctie

Pàgina 56

Error

Corrección

Pag. 56

Errore

Correzione

Sidan 56

Fel

Rättelse

Sivu 56

Virhe

Korjaus

Side 56

Fejl

Rettelse

English

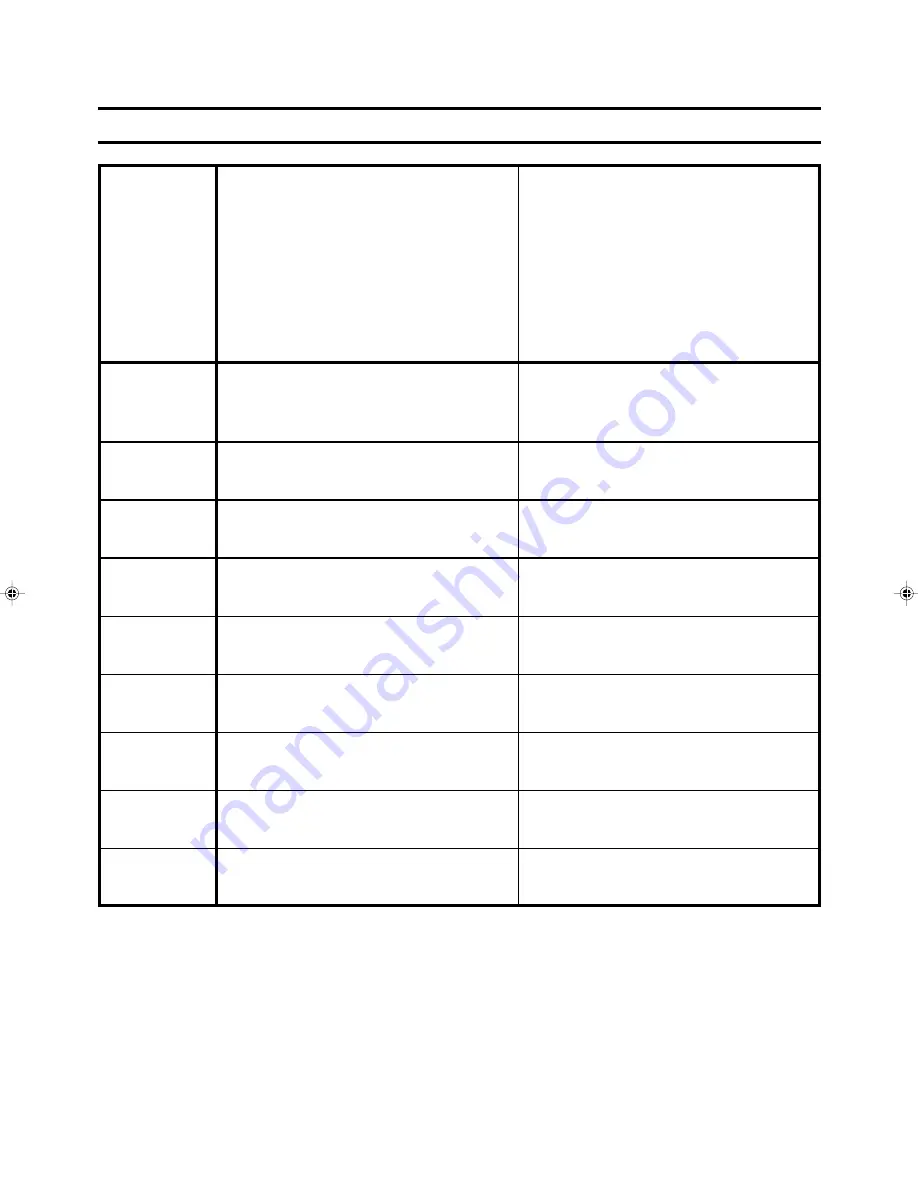
Dimensions (W x H x D):

Dimensions (W x H x D):

435 mm x 127 mm x 329 mm

435 mm x 68 mm x 267.5 mm

(17-3/16 inch x 5 inch x13inch)

(17-3/16 inch x 2-11/16 inch x 10-9/16 inch)

Deutsch

Abmessungen (B x H x T):

Abmessungen (B x H x T):

435 mm x 127 mm x 329 mm

435 mm x 68 mm x 267,5 mm

Française

Ecombrement (L x H x P):

Ecombrement (L x H x P):

435 mm x 127 mm x 329 mm

435 mm x 68 mm x 267,5 mm

Nederlands

Afmetingen (B x H x D):

Afmetingen (B x H x D):

435 mm x 127 mm x 329 mm

435 mm x 68 mm x 267,5 mm

Español

Dimensiones (A x A x F):

Dimensiones (A x A x F):

435 mm x 127 mm x 329 mm

435 mm x 68 mm x 267,5 mm

Italiano

Dimensioni (L x A x P):

Dimensioni (L x A x P):

435 mm x 127 mm x 329 mm

435 mm x 68 mm x 267,5 mm

Svenska

Mått (B x H x D):

Mått (B x H x D):

435 mm x 127 mm x 329 mm

435 mm x 68 mm x 267,5 mm

Suomi

Mitat (L x K x S):

Mitat (L x K x S):

435 mm x 127 mm x 329 mm

435 mm x 68 mm x 267,5 mm

Dansk

Dimensioner (B x H x D):

Dimensioner (B x H x D):

435 mm x 127 mm x 329 mm

435 mm x 68 mm x 267,5 mm

 LE40861-001A

XV-S56BK/S57GD

00.7.3, 10:01 PM

1

Summary of Contents for XV-S56BK

Page 1: ...mm 435 mm x 68 mm x 267 5 mm Française Ecombrement L x H x P Ecombrement L x H x P 435 mm x 127 mm x 329 mm 435 mm x 68 mm x 267 5 mm Nederlands Afmetingen B x H x D Afmetingen B x H x D 435 mm x 127 mm x 329 mm 435 mm x 68 mm x 267 5 mm Español Dimensiones A x A x F Dimensiones A x A x F 435 mm x 127 mm x 329 mm 435 mm x 68 mm x 267 5 mm Italiano Dimensioni L x A x P Dimensioni L x A x P 435 mm x...

Page 2: ...OBE SLOW SLOW TITLE MEN U CH OICE ENTER REMOTE CONTROL CH SELECT CH VOL VOL DISP LAY ZOOM RETURN 4 1 5 5 5 7 8 3 TV DVD STANDBY ON STANDBY STANDBY ON DVD VIDEO CD CD PAUSE PLAY STOP SKIP OPEN CLOSE 3 8 7 0 4 DVD CD PLAYER DOLBY D I G I T A L Introduction 2 Preliminary knowledge 5 Getting started 14 Basic operations 23 Advanced operations 27 Initial settings 42 Additional information 54 16758 7 216...

Page 3: ... or holes If the ventilation openings or holes are blocked by a newspaper or cloth etc the heat may not be able to get out Do not place any naked flame sources such as lighted candles on the apparatus When discarding batteries environmental problems must be con sidered and local rules or laws governing the disposal of these bat teries must be followed strictly Do not use this apparatus in a bathro...

Page 4: ... the chapter number CHAP SEARCH 29 To locate a desired position in the current title or track TIME SEARCH 29 To locate a desired scene from the display DIGEST 30 Special picture playback 31 To advance a still picture frame by frame 31 To display continuous still pictures STROBE 31 To playback in slow motion SLOW 32 To zoom a scene ZOOM 32 Changing the playback order 33 To playback in the desired o...

Page 5: ...y virtual surround sound with your 2 channel system 7 7 7 7Multi language subtitles and sound You can select a subtitle or sound language from those recorded on the DVD VIDEO disc 7 7 7 7Multi disc playback You can enjoy Audio CD discs and Video CD discs as well as DVD VIDEO discs 7 7 7 7Operation from the on screen display User friendly on screen displays allow you to operate the unit easily Func...

Page 6: ... RANDOM indicator in the display window turns off To playback in random order RANDOM NOTE Some DVD VIDEO discs may not be played back correctly in the random mode 1 3 2 REPEAT PROGRAM RANDOM These symbols indicate the types of discs which the operation can be used for The number indicates the following procedural step s in which the button s is are used You may also use the corresponding buttons o...

Page 7: ...light or place it near a heating device When you re away When away on travel or otherwise for an extended period of time remove the plug from the wall outlet Do not insert foreign objects into the unit Do not insert wires hairpins coins etc into the unit Do not block the vents Blocking the vents may damage the unit Care of the cabinet When cleaning the unit use a soft cloth and follow the relevant...

Page 8: ...of the unit 7 4 SKIP buttons 25 Used to skip a chapter title or track Also used for the page selection of a menu screen for Video CD Holding down 4 or during playback reverses or advances playback rapidly 8 7 STOP button 25 Stops playback Also used to change the video output setting See page 15 9 3 PLAY button 24 Starts playback Also used as a SELECT button for PBC of Video CDs 0 8 PAUSE button 25...

Page 9: ... 5 7 8 3 TV DVD STANDBY ON 1 OPEN CLOSE button 2 PLAY MODE button 3 3D PHONIC button 4 Numeric buttons 5 ANGLE button 6 SUBTITLE button 7 DIGEST button 8 4 PREVIOUS button 9 7 CLEAR button 0 1 SLOW button TITLE button CURSOR 5 Up Down CH buttons CHOICE button Infrared signal emitting window TV STANDBY ON button TV DVD switch DVD STANDBY ON button RETURN button TV VIDEO CANCEL button THEATER POSITI...

Page 10: ...V screen Infrared signal emitting window Point this window toward the remote sensor on the front panel when pressing buttons TV STANDBY ON button 21 Turns the television on or off standby TV DVD switch 11 21 27 When setting this switch to TV the numeric cursor and TV VIDEO CANCEL buttons are used to control your TV When setting it to DVD these buttons are used to control the unit DVD STANDBY ON bu...

Page 11: ...the VIDEO OUT S VIDEO jack or Y C signal port in the VIDEO OUT AV connector set it to Y C 4 VIDEO OUT AV connector 15 This standard 21 pin SCART connector outputs video and audio signals It handles the composite Y C S video and RGB video signals The Y C COMP switch must be set correctly according to the video signal used Note that to make this connector feed RGB signals you must change the unit s ...

Page 12: ...age that can be accessed from the AUDIO page in a certain condition See page 42 for detailed information PARENTAL LOCK display When no disc is inserted or a DVD VIDEO disc is stopped pressing the ENTER button while holding down the 7 button brings up the PARENTAL LOCK display in which you can set the level for limiting playback See page 51 for detailed information On screen displays AUTO STANDBY O...

Page 13: ...ure such as an on screen display or menu is displayed for over 5 minutes Pressing any button on the unit or the remote control unit will release the screen saver function and return to the previous display You can select one of several screen saver modes available see page 45 The screen saver function is not activated during Audio CD playback or after stopping Audio CD playback REPEAT PROGRAM RAND...

Page 14: ... allow rapid advance reverse or slow motion playback How to use numeric buttons The function of the numeric buttons differs depending on the setting of the TV DVD switch When setting it to TV the buttons are used to select a TV channel see page 21 When setting it to DVD the buttons are used to select a track title or enter a disc time or chapter number To select a track title number To select a nu...

Page 15: ...ying back discs listed as Non playable discs above may generate noise and damage speakers This unit can play back audio recorded in CD G CD EXTRA and CD TEXT discs A DVD VIDEO disc is comprised of titles while an Audio CD Video CD is comprised of tracks Each title may be divided into some chapters For example if a DVD VIDEO disc contains some movies each movie may have its own title number and eac...

Page 16: ...back a disc Note that with some formats and or depending on the unit s DIGITAL AUDIO OUTPUT setting digital audio signals are not always output from the unit s DIGITAL output jacks as are recorded on the disc See DIGITAL AUDIO OUTPUT on page 43 for details Audio formats Indicator Audio format LPCM Linear PCM MPEG MPEG Multichannel DOLBY DIGITAL Dolby Digital DTS DTS Digital Theater Systems ...

Page 17: ...cture quality by connecting it with the S VIDEO output of the unit using the S video cable in addition to the standard video connection Note that to use the VIDEO jacks the Y C COMP switch must be set to COMP and to use the S VIDEO jacks the Y C COMP switch must be set to Y C Before making any connections To connect to a TV NOTES Connect VIDEO OUT jacks of the unit directly to the video input of y...

Page 18: ... Y C signals from the S VIDEO jack simultaneously In the initial factory preset condition the S VIDEO jack is active while the RGB signals cannot be output To make the unit feed the RGB signals follow the procedure below Note that the S VIDEO jack does not feed correct signals when the unit is set to output the RGB signals When the unit is turned on 1 Set the Y C COMP switch to COMP 2 Press and ho...

Page 19: ...to an NTSC TV When making the audio connection using the AV connector set DOWN MIX on the AUDIO page of the preference display to Lo Ro and the SPEAKER SETTING to 2 CHANNEL see pages 44 and 45 To connect to an audio amplifier or receiver NOTE When making the audio connection using the FRONT LEFT and RIGHT jacks for stereo use set DOWN MIX on the AUDIO page of the preference display to Lo Ro and th...

Page 20: ...uipped with 5 1 channel inputs NOTES The DTS surround signals are output only from the DIGITAL OUT jacks When using the 5 1 channel outputs of the unit set DOWN MIX to OFF and SPEAKER SETTING to 5 1 CHANNEL or EXPERT on the AUDIO page of the PREFERENCE display If EXPERT is selected you can adjust the audio output balance of the speakers using the EXPERT SPEAKER SETTING display see page 47 VIDEO OU...

Page 21: ...eference display correctly according to the connected audio equipment If the DIGITAL AUDIO OUTPUT is not set correctly loud noise may be generated from speakers causing damage to your speakers See DIGITAL AUDIO OUTPUT on page 43 When you connect the unit s DIGITAL OUT to a Dolby Digital or DTS decoder or the amplifier with a built in decoder the unit s COMPRESSION setting and SPEAKER SETTING on th...

Page 22: ...ents or damages caused by an unsuitable AC power cord only use the supplied power cord If the cord is damaged contact a dealer and get the new power cord Do not put anything heavy or the unit on the power cord as this may cause fire electric shock or other accidents Using the remote control unit Using the remote control you can operate not only all the functions of the unit but also basic function...

Page 23: ...roperly Never leave dead batteries lying around take them apart mix them with other refuse or throw them into an incinerator Never touch liquid that has leaked out of a battery Do not mix new and old batteries or batteries of different types when replacing them Remote sensor NOTE If the remote sensor on the unit is exposed to the sunshine or strong light you may not be able to control the unit fro...

Page 24: ... 4 3D PHONIC TV VIDEO CANCEL SUBTITLE ANGLE TV1 TV2 TV3 TV4 TV5 TV6 TV7 TV8 TV9 TV TV0 MUTING AUDIO THEATER POSITION DIGEST PREVIOUS NEXT CLEAR STROBE SLOW SLOW TITLE MENU CHOICE ENTER REMOTE CONTROL CH SELECT CH VOL VOL DISPLAY ZOOM RETURN 4 1 5 5 5 7 8 3 TV DVD STANDBY ON TV STANDBY ON TV VIDEO CANCEL TV DVD switch DVD STANDBY ON Numeric buttons 7 button No Manufacturer No Manufacturer No Manufa...

Page 25: ...nels directly For some TVs pressing 10 functions as the 100 while 10 functions as the ENTER button if your TV requires pressing the ENTER button after selecting a channel number Mutes the TV sound Changes the TV channels Adjusts the TV volume NOTES The remote control unit is initially set operating a JVC TV If there is more than one code listed for the manufacturer of your TV try them one by one u...

Page 26: ...c tray If you press 0 OPEN CLOSE during playback the unit stops playback and opens the tray OPEN CLOSE TV DVD PLAY MODE 1 2 3 5 6 8 9 0 10 10 7 4 3D PHONIC TV VIDEO CANCEL TV1 TV2 TV3 TV4 TV5 TV6 TV7 TV8 TV9 TV TV0 MUTING RETURN TV DVD STANDBY ON DVD STANDBY ON STANDBY STANDBY ON DVD VIDEO CD CD PAUSE PLAY STOP SKIP OPEN CLOSE 3 8 7 0 4 DOLBY D I G I T A L DVD CD PLAYER STANDBY ON NOTE Even if you...

Page 27: ...ay For details about the region code see page 12 To start playback NOTES When the resume point is memorized pressing 3 starts playback from that point instead of the beginning See page 26 and 46 During playback the display window shows the disc number or the title chapter or track number being played With Video CD discs with PBC control or some DVD discs the menu display may appear on the TV scree...

Page 28: ...ding down 4 reverses playback rapidly The speed will change from 5x to 20x the normal speed if you keep holding down the button for a certain period of time Releasing the button returns the unit to normal playback During playback Press 4 or Press 4 to locate the beginning of the current chapter title or track and press to locate the beginning of the next chapter title or track To stop playback com...

Page 29: ...c you interrupt playback last time is still in the disc tray Press 3 The unit starts playback from the position where you interrupted playback last time To clear the resume position memory Carry out one of the followings Take out the disc from the tray Press 7 while stopped Turn on the unit by pressing DVD STANDBY ON on the remote control or STANDBY ON on the front panel To memorize the interrupte...

Page 30: ... may cause the unit to automatically start playback Some Video CD discs supports the PBC function PBC is an abbreviation of PlayBack Control A Video CD disc recorded with PBC has its own menus such as a list of the songs of the disc You can locate a specific scene by using the menu When a Video CD disc with PBC is stopped 1 Press 3 A disc menu appears on the TV screen The PBC function is activated...

Page 31: ...isc or track of an Audio CD Video CD by using 4 or For DVD VIDEO During playback For Audio CD During playback For Video CD During playback without PBC function 1 Press 4 or With an Audio CD or Video CD pressing the button skips a track With a DVD VIDEO disc pressing the button skips a chapter or title depending on the disc configuration The selection number appears in the display window on the fro...

Page 32: ... press ENTER GO TO appears under the menu To locate a desired scene by specifying the chapter number CHAP SEARCH 1 3 2 2 4 2 1 TV DVD PLAY MODE 1 2 3 5 6 8 9 0 10 10 7 4 3D PHONIC TV VIDEO CANCEL SUBTITLE ANGLE TV1 TV2 TV3 TV4 TV5 TV6 TV7 TV8 TV9 TV TV0 MUTING AUDIO THEATER POSITION DIGEST PREVIOUS NEXT CLEAR STROBE SLOW SLOW TITLE MENU CHOICE ENTER REMOTE CONTROL CH SELECT CH VOL VOL DISPLAY ZOOM...

Page 33: ... The opening scene of each title appears on the TV screen During DVD VIDEO disc playback The opening scene of each chapter in the current title appears on the TV screen When a Video CD disc is loaded The opening scene of each track appears on the TV screen GO TO 2 3 4 0 0 DVD CONTROL REPEAT A B REPEAT TIME SEARCH CHAP SEARCH Selected time for DVD VIDEO CD CONTROL REPEAT A B REPEAT TIME SEARCH GO T...

Page 34: ...w motion and Zoom While paused still 1 Press 8 Each time you press 8 the still picture advances to the next frame Pressing 3 returns to normal playback During playback 1 At the point you want to view as continuous Still pictures press 8 The unit pauses playback 2 Press and hold 8 for more than 1 second Nine continuous still pictures appear on the TV screen NOTE With some discs depending on the con...

Page 35: ...ack Press ZOOM NOTE If you press and hold 8 8 8 8 for more than 1 second during playback nine still pictures also appear but they advance in normal playback speed To playback in slow motion SLOW NOTES The sound is muted during slow motion playback Reverse slow motion playback is not possible for a Video CD 1 OPEN CLOSE TV DVD PLAY MODE 1 2 3 5 6 8 9 0 10 10 7 4 3D PHONIC TV VIDEO CANCEL SUBTITLE A...

Page 36: ... off Note that the program remains To clear the program press 7 while the program table is shown on the TV screen While stopped and the play mode menu is displayed on the TV screen by moving to PROGRAM and pressing ENTER the program mode quits Note that the program remains To playback in the desired order PROGRAM 3 4 2 2 1 2 1 TV DVD PLAY MODE 1 2 3 5 6 8 9 0 10 10 7 4 3D PHONIC TV VIDEO CANCEL SU...

Page 37: ...pears on the TV screen 2 Use CURSOR 2 3 to move to REPEAT then press ENTER Each time you press ENTER the repeat mode changes as follows depending on the disc type and unit s status During DVD VIDEO playback To playback in random order RANDOM NOTE Some DVD VIDEO discs may not be played back correctly in the random mode 1 2 3 TV DVD PLAY MODE 1 2 3 5 6 8 9 0 10 10 7 4 3D PHONIC TV VIDEO CANCEL SUBTI...

Page 38: ...LE REPEAT CHAPTER Audio CD Video CD REPEAT ALL REPEAT 1 REPEAT ALL all track repeat REPEAT 1 current track repeat No indication off REPEAT ALL CD CONTROL REPEAT A B REPEAT TIME SEARCH Selected repeat mode for Audio CD REPEAT ALL VCD CONTROL REPEAT A B REPEAT TIME SEARCH PBC CALL Selected repeat mode for Video CD REPEAT ALL all track repeat No indication off 1 1 1 VCD VCDVD VD TITLE TRACK CHAP A B ...

Page 39: ...mode menu Press PLAY MODE If appears when pressing ENTER in step 2 during DVD playback You cannot repeat the selected portion because of the disc contents The A B REPEAT function cannot be used during program playback DVD CONTROL REPEAT A B REPEAT TIME SEARCH CHAP SEARCH A 0 00 16 B 0 01 16 Point A Point B for DVD VIDEO CD CONTROL REPEAT A B REPEAT TIME SEARCH A 0 00 16 B 0 01 31 Point A Point B f...

Page 40: ...select a scene angle from the angle list display ANGLE NOTES When appears on the TV screen in step 1 The current scene is not recorded from multiple angles During the operation above audio is muted 1 3 2 TV DVD PLAY MODE 1 2 3 5 6 8 9 0 10 10 7 4 3D PHONIC TV VIDEO CANCEL SUBTITLE ANGLE TV1 TV2 TV3 TV4 TV5 TV6 TV7 TV8 TV9 TV TV0 MUTING AUDIO THEATER POSITION DIGEST PREVIOUS NEXT CLEAR STROBE SLOW ...

Page 41: ...on display manually press ENTER When appears on the TV screen You cannot select the subtitle To change the audio language or sound AUDIO 1 2 2 TV DVD PLAY MODE 1 2 3 5 6 8 9 0 10 10 7 4 3D PHONIC TV VIDEO CANCEL SUBTITLE ANGLE TV1 TV2 TV3 TV4 TV5 TV6 TV7 TV8 TV9 TV TV0 MUTING AUDIO THEATER POSITION DIGEST PREVIOUS NEXT CLEAR STROBE SLOW SLOW TITLE MENU CHOICE ENTER REMOTE CONTROL CH SELECT CH VOL ...

Page 42: ...ER POSITION NOTES The theater position display will automatically disappear if you do not change the theater position for 5 seconds To turn off the theater position display manually press ENTER 1 2 TV DVD PLAY MODE 1 2 3 5 6 8 9 0 10 10 7 4 3D PHONIC TV VIDEO CANCEL SUBTITLE ANGLE TV1 TV2 TV3 TV4 TV5 TV6 TV7 TV8 TV9 TV TV0 MUTING AUDIO THEATER POSITION DIGEST PREVIOUS NEXT CLEAR STROBE SLOW SLOW T...

Page 43: ...5 1 CH format It also works when playing back discs other than those above but does not provide the correct effect The 3D PHONIC function does not affect the DTS or Dolby Digital bitstream signal from the DIGITAL OUT jack The sound effect will not be set or operate even if 3D PHONIC is pressed for the sound of DVD VIDEO discs recorded in Linear PCM When you set the 3D PHONIC function to on the DOW...

Page 44: ...e holding down ANGLE To view the DVD function status 1 TV DVD PLAY MODE 1 2 3 5 6 8 9 0 10 10 7 4 3D PHONIC TV VIDEO CANCEL SUBTITLE ANGLE TV1 TV2 TV3 TV4 TV5 TV6 TV7 TV8 TV9 TV TV0 MUTING AUDIO THEATER POSITION DIGEST PREVIOUS NEXT CLEAR STROBE SLOW SLOW TITLE MENU CHOICE ENTER REMOTE CONTROL CH SELECT CH VOL VOL DISPLAY ZOOM RETURN 4 1 5 5 5 7 8 3 TV DVD STANDBY ON OPEN CLOSE ENGLISH ENGLISH 1 2...

Page 45: ...DVD PLAY MODE 1 2 3 5 6 8 9 0 10 10 7 4 3D PHONIC TV VIDEO CANCEL SUBTITLE ANGLE TV1 TV2 TV3 TV4 TV5 TV6 TV7 TV8 TV9 TV TV0 MUTING AUDIO THEATER POSITION DIGEST PREVIOUS NEXT CLEAR STROBE SLOW SLOW TITLE MENU CHOICE ENTER REMOTE CONTROL CH SELECT CH VOL VOL DISPLAY ZOOM RETURN 4 1 5 5 5 7 8 3 TV DVD STANDBY ON OPEN CLOSE 2 3 1 MENU LANGUAGE ENGLISH ENGLISH ENGLISH ENGLISH EXIT AUDIO LANGUAGE SUBTI...

Page 46: ...isplay language to be displayed Each time you press CURSOR 3 the language setting changes as follows Pressing CURSOR 2 changes the language setting in the reverse order of the above DIGITAL AUDIO OUTPUT To connect the unit s digital output to an external device equipped with a digital input this item must be set correctly PCM ONLY When you connect the DIGITAL OUT jack of the unit to the linear PCM...

Page 47: ...D with 96 kHz linear PCM No output DVD with DTS DTS bitstream No ouput DVD with Dolby Digital Dolby Digital bitstream 48 kHz 16 bit stereo linear PCM DVD with MPEG multichannel MPEG bitstream 48 kHz 16 bit stereo linear PCM Video CD 44 1 kHz 16 bit stereo linear PCM Audio CD 48 kHz 16 bit stereo linear PCM Audio CD with DTS DTS bitstream NOTES The unit does not provide the DTS decoding function Wh...

Page 48: ...y not be possible to playback in this mode In that case the picture is played back as in 4 3 LB mode 16 9 WIDE Wide Television screen Select this option when you connect a wide screen TV to the unit SCREEN SAVER A television monitor screen may be burned out if a static picture is displayed for a long time To prevent this the unit automatically activates the screen saver function if a static pictur...

Page 49: ...e resume point if it is memorized OFF Pressing 3 while stopped or on standby starts playback from the beginning of the disc AV COMPULINK MODE This item is provided for use in the future Leave it as the default setting DVD1 NOTES The monitor screen of a projector or projection TV is easily burned out if the screen saver mode is set to OFF and a static picture is displayed for a long time The screen...

Page 50: ...ings SIZE Selects the center speaker size among Large Small and None If your center speaker fully reproduces the low frequency range select Large If it does not fully reproduce the low frequency range select Small If you do not use a center speaker select None LEVEL Cuts or boosts audio signals from the center speaker between 6 dB and 6 dB in 1 dB steps DELAY Adjusts the delay time of the center s...

Page 51: ...left and right allows are highlighted If any item is selected press ENTER 2 Select TEST TONE using CURSOR 5 then press ENTER The color of TEST TONE changes 3 Select the desired speaker s by moving using CURSOR 5 2 3 then press ENTER The test tone is output from the selected speaker s While the test tone is being output the indication shown above TEST TONE tells you the speaker from which the test ...

Page 52: ...e CURSOR 5 and press ENTER 8 Use CURSOR 2 3 to show S woofer in the BASS field and press ENTER The destination of the LFE low frequency effect signal is set to a sub woofer allowing enhancing the low frequency range of a sub woofer TV DVD PLAY MODE 1 2 3 5 6 8 9 0 10 10 7 4 3D PHONIC TV VIDEO CANCEL SUBTITLE ANGLE TV1 TV2 TV3 TV4 TV5 TV6 TV7 TV8 TV9 TV TV0 MUTING AUDIO THEATER POSITION DIGEST PREV...

Page 53: ...ers is set 7 Repeat the steps 1 through 6 until you are satisfied Tuning the sub woofer 1 Move to LEVEL of SUB WOOFER using CURSOR 5 2 3 and press ENTER 2 Adjust the output level of the sub woofer using CURSOR 2 3 You can adjust the level between 6 dB and 6 dB in 1 dB steps 3 Press ENTER The output level of the sub woofer is set 4 Repeat the steps 1 through 3 until you are satisfied Fine tuning of...

Page 54: ...l Each time you press CURSOR 2 3 the parental level changes as follows 1 is the strictest level means no restriction Discs rated higher than the selected level are restricted 5 Press ENTER moves to PASSWORD 6 Enter your 4 digit password using the numeric buttons 0 to 9 7 Press ENTER The parental level and password are set moves to EXIT Pressing ENTER again returns to the opening display If you ent...

Page 55: ...moves to EXIT The password entered in the above step becomes the new password If you do not change the password enter the same password as in the step 2 Even if you want to change only the country code and or parental level do not forget to enter the password after changing the country code and or parental level Otherwise the new country code and or parental level will not become effective Pressin...

Page 56: ...g password WRONG RETRY appears on the TV screen Enter the correct password The Parental lock is released and the unit starts playback To temporarily release the Parental Lock PARENTAL LOCK NOTE When you enter the wrong password more than 3 times in step 2 above moves to NO automatically and CURSOR 5 do not work TV DVD PLAY MODE 1 2 3 5 6 8 9 0 10 10 7 4 3D PHONIC TV VIDEO CANCEL SUBTITLE ANGLE TV1...

Page 57: ...d on top of one another without their protective cases they can be damaged Do not put discs in a location where they may be exposed to direct sunlight or in a place where the humidity or temperature is high Avoid leaving discs in your car Maintenance of discs If there are fingerprints or other dirt adhering to a disc wipe with a soft dry cloth moving from the center outwards If a disc is difficult...

Page 58: ...t feed the S video signals see page 15 Picture is not normal when using the VIDEO or S VIDEO jack The Y C COMP switch is not set correectly Set the Y C COMP switch correctly See page 14 Picture is noisy The unit is connected to a VCR directly and the copyguard function is activated Connect the unit so that the picture signal flows directly to the TV No audio is reproduced Connection is incorrect C...

Page 59: ...ian AF Afrikaans AM Ameharic AR Arabic AS Assamese AY Aymara AZ Azerbaijani BA Bashkir BE Byelorussian BG Bulgarian BH Bihari BI Bislama BN Bengali Bangla BO Tibetan BR Breton CA Catalan CO Corsican CS Czech CY Welsh DA Danish DZ Bhutani EL Greek EO Esperanto ET Estonian EU Basque FA Persian FI Finnish FJ Fiji FO Faroese FY Frisian GA Irish GD Scots Gaelic GL Galician GN Guarani GU Gujarati HA Hau...

Page 60: ...an KH Cambodia KI Kiribati KM Comoros KN Saint Kitts and Nevis KP Korea Democratic People s Republic of KR Korea Republic of KW Kuwait KY Cayman Islands KZ Kazakhstan LA Lao People s Democratic Republic LB Lebanon LC Saint Lucia LI Liechtenstein LK Sri Lanka LR Liberia LS Lesotho LT Lithuania LU Luxembourg LV Latvia LY Libyan Arab MA Morocco MC Monaco MD Moldova Republic of MG Madagascar MH Marsha...

Page 61: ... is unattended unless it is specifically stated that it is designed for unattended operation or has a standby mode Switch off using the switch on the equipment and make sure that your family know how to do this Special arrangements may need to be made for infirm or handicapped people DON T use equipment such as personal stereos or radios so that you are distracted from the requirements of traffic ...

Reviews: