background image

JPEG disc playback

JPEG disc 

pl

ayback

52

XV-NA7SL/LET0212-004A/English

Basic operations

Available : 

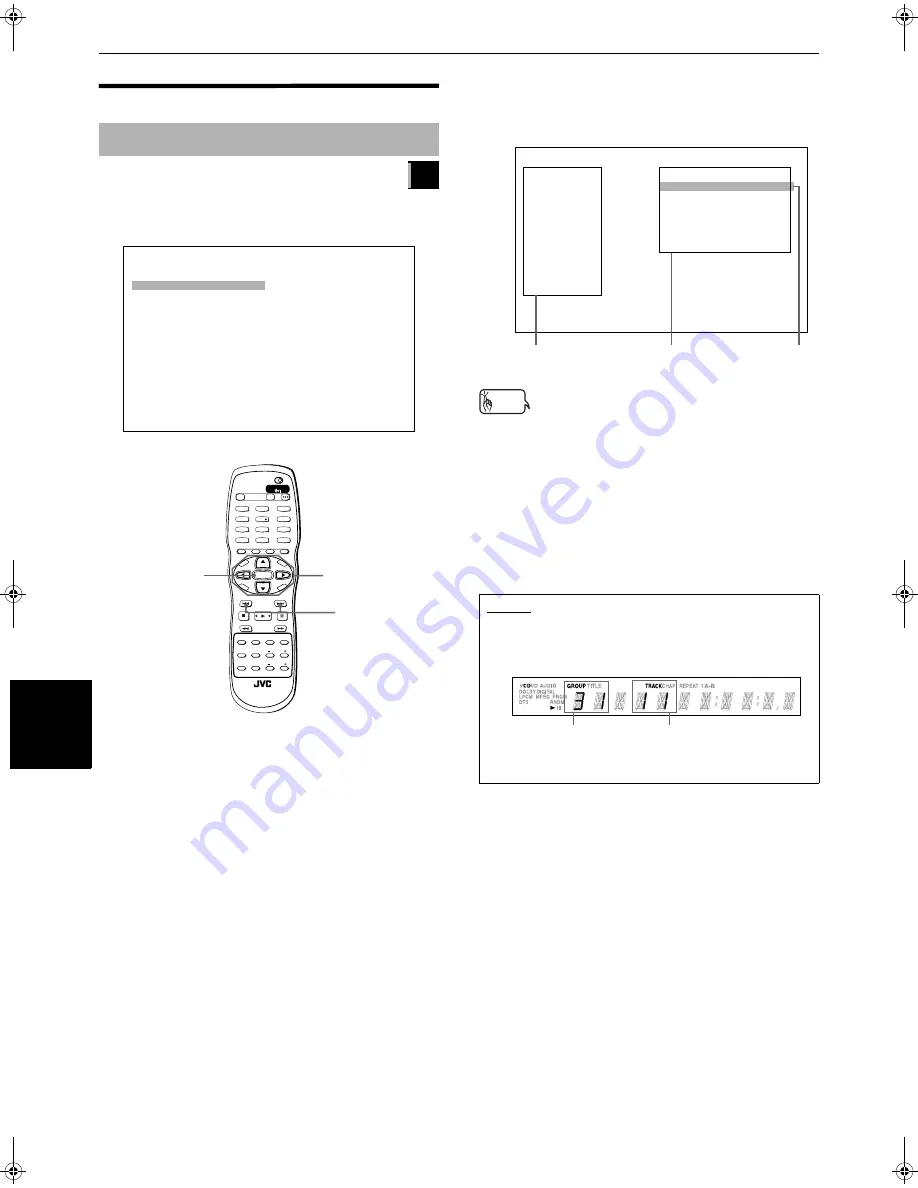
When loading a JPEG disc, after the disc contents are 
read, the JPEG CONTROL display automatically appears 
on the TV screen.

You can select a desired file for playback via this display.

When the JPEG CONTROL display is shown

1

Make sure that the black (cursor) bar is in the 
left (Group) column.

If it is in the right column, press 

2

 to move it to the 

left column.

2

Move the bar to a desired Group using 

5

/

.

On the right column, files in the selected Group are 
shown.
When selecting a Group, File 1 is initially selected 
(highlighted).

3

Select a desired file using 

4

/

¢

.

4

Press ENTER.

The selected file (still picture) is shown on the TV.
In the display window, you can see the current 
Group and File numbers.

Hints

• You can also select a desired file by pressing 

3

 to move the 

black bar to the right (File) column then using 

5

/

.

• To return the black bar to the Group column, press 

2

.

• To display another picture:

Use 

4

/

¢

 or 

5

/

 to select the desired picture. You 

can select a picture in another Group.

• To dismiss the picture:

Press 

7

 or MENU.

The TV screen returns to showing the JPEG CONTROL 
display.

To see a desired picture

JPEG

JPEG CONTROL


Group : 01 / 10


spring

sumer
fall
winter
sea
mountain
camp
picnic
skiing
flower


File : 01 / 06 (Total 28)


begonia.jpg

german chamomile.jpg
kiwi fruit.jpg
orchard grass.jpg
petunia.jpg
north pole.jpg

TV2

2

TV1

1

TV3

3

TV5

5

TV4

4

TV6

6

TV8

8

TV7

7

TV9

9

TV0

0

TV-/--

10

MUTING

+10

TV/VIDEO

CANCEL

TITLE/

GROUP

RETURN

VFP

AUDIO

SUB TITLE

REPEAT

ANGLE

DIGEST

3D

PHONIC

PAL/

NTSC

ZOOM

AMP VOL

PROGRESSIVE

SCAN

fs/Rate

RM-SXV012E

REMOTE CONTROL

OPEN/

CLOSE

TV

DVD

NEXT

PREVIOUS

SELECT

STROBE

CLEAR

SLOW-

SLOW+

VOL-

VOL+

CH

+

CH

-

TO

P

ME

NU

ME

NU

ON

SC

RE

EN

CH

OIC

E

ENTER

STANDBY/ON

TV

DVD

PAGE

4

/

¢

5

/

/

2

/

3

ENTER

NOTES

• Up to 32 character s are displayed as a group or file 

name on the JPEG CONTROL display.

• The current Group and File number are also shown on 

the display window in the following manner.

• Only JPEG files are shown on the display window.

JPEG CONTROL


Group : 01 / 10


spring

sumer
fall
winter
sea
mountain
camp
picnic
skiing
flower


File : 01 / 06 (Total 28)


begonia.jpg

german chamomile.jpg
kiwi fruit.jpg
orchard grass.jpg
petunia.jpg
north pole.jpg

Group 
column

File column of the 
current Group

Selected 
File

Current Group 
number

Current File 
number

XV-NA7SL(B).book  Page 52  Wednesday, July 31, 2002  1:00 PM

Summary of Contents for XV-NA7SL

Page 1: ... ZOOM AMP VOL PROGRESSIVE SCAN fs Rate RM SXV012E REMOTE CONTROL OPEN CLOSE TV DVD NEXT PREVIOUS SELECT STROBE CLEAR SLOW SLOW VOL VOL CH CH T OP MENU MENU ON SCREEN CHOICE ENTER STANDBY ON TV DVD PAGE Introduction 2 Getting started 6 Basic operations 15 Advanced operations 27 MP3 disc playback 47 JPEG disc playback 51 Changing the initial settings 57 Additional information 69 LET0212 004A B INSTR...

Page 2: ...ntical approved type as originally fitted If nonetheless the mains plug is cut off ensure to remove the fuse and dispose of the plug immediately to avoid a possible shock hazard by inadvertent connection to the mains supply If this product is not supplied fitted with a mains plug then follow the instructions given below IMPORTANT DO NOT make any connection to the terminal which is marked with the ...

Page 3: ...IO disc PAGE 31 To play back a bonus group of a DVD AUDIO disc 31 Changing the playback order 32 To playback in a specific order Program play 32 To playback in random order Random play 34 Repeat playback 34 To repeat the current selection or all tracks Repeat playback 34 To repeat a desired part A B repeat playback 35 Changing the language sound and scene angle 36 To select the subtitle language S...

Page 4: ...nu T V 2 T V 1 T V 3 T V 5 T V 4 T V 6 O P E M C L O S E T V 8 T V 7 T V 9 T V T V D V D S T A N D B Y O N T V D V D T V 0 M U T IN G T V V ID E O C A N C E L T IT L E G R O U P A N G L E P A G E TOP MENU M E N U N E X T ON SCREEN P R E V IO U S C H O I C E S E L E C T S T R O B E C L E A R S L O W S L O W V F P A U D IO S U B T I T L E R E P E A T A N G L E D IG E S T 3 D P H O N I C P A L N T S ...

Page 5: ...e away on travel or otherwise for an extended period of time remove the plug from the wall outlet Do not insert foreign objects into the unit Do not insert wires hairpins coins etc into the unit Do not block the vents Blocking the vents may damage the unit Care of the cabinet When cleaning the unit use a soft cloth and follow the relevant instructions on the use of chemically coated cloths Do not ...

Page 6: ...ion of 16 20 24 bits Audio CD Video CD limited to two channels 44 1 kHz at 16 bits MPEG Multichannel A surround audio format which can handle the augmentative 7 1 channel format rare for home use as well as 5 1 channel Dolby Digital A surround audio format configured with six channels Because the LFE Low Frequency Effect for sub woofer etc channel one of the six channels is an auxiliary channel th...

Page 7: ...using the menu display to select and play an entry See illustration below about basic feature of menu driven playback See page 27 for more information about PBC Playback Control How to handle discs When handling a disc do not touch the surface of the disc Since discs are made of plastic they are easily damaged If a disc gets dirty dusty scratched or warped the images and sound will not be picked u...

Page 8: ...ollowing description TV may be substituted with monitor or projector Terminal names used for other components may be different from those used in the following description To connect to a TV NOTE When you connect the unit to a TV with the VIDEO OUT VIDEO or S VIDEO jacks or SCART connector the unit outputs PAL signal only If you connect the unit to a TV with these ways make sure that the NTSC REMO...

Page 9: ...control unit see page 9 NOTES Connect the unit to a PAL TV or multi scan TV Even if cables are connected to both the VIDEO OUT jack and S VIDEO jack video signal will only be transmitted from the port selected by the settings You must change the switch position while the unit power is off Otherwise the changed setting is not effective AV COMPU LINK AV OUT PCM STREAM COAXIAL SUBWOOFER CENTER LEFT R...

Page 10: ...tting is not effective NOTES You must change the switch position on the rear panel while unit power is off Otherwise the changed setting is not effective In this connection make sure that the NTSC REMOTE PAL switch set to NTSC or REMOTE When the component video input jacks on the TV is of the BNC type use an adapter to convert a pin jack to a BNC jack optional Set ANALOG OUT in the AUDIO preferenc...

Page 11: ... REMOTE or NTSC the unit output the signals from the COMPONENT VIDEO OUT jacks only When you set the NTSC REMOTE PAL switch on the rear panel is set to REMOTE the VIDEO SIGNAL SELECTOR on the rear panel is not effective About SCANNING MODE To display video on the television monitor screen the conventional scanning method is called Interlaced scanning With this method only half of the horizontal li...

Page 12: ...ng mode is canceled automatically There are some progressive TV and High Definition TV sets that are not fully compatible with the unit resulting in the unnatural picture when playing back a DVD VIDEO disc in the Progressive scanning mode In such a case use the Interlaced scanning mode To check the compatibility of your TV set contact your local JVC customer service center All JVC progressive TV a...

Page 13: ...n amplifier receiver equipped with 5 1 channel inputs NOTE When using the 5 1 channel outputs of the unit set the ANALOG OUT in the AUDIO preference display to MULTI CHANNEL see page 60 If you select EXPERT in the SPK SETTING preference display you can control the audio output balance of the speakers see page 61 AUDIO IN RIGHT FRONT LEFT REAR RIGHT LEFT CENTER SUBWOOFER AV COMPU LINK AV OUT PCM ST...

Page 14: ...nnecting it as this may damage the cord and cause fire electric shock or other accidents Caution Do not alter twist or pull the power cord or put anything heavy on it which may cause fire electric shock or other accidents If the cord is damaged consult a dealer and have the power cord replaced with a new one To connect to a digital audio device NOTES When you make digital connection we recommend a...

Page 15: ... on the unit The remote control unit can be used within a range of about 5 meters from the remote sensor If you operate the remote control unit from a diagonal position range may be shorter To install batteries in the remote control unit Precautions Remove the batteries from the remote control if it is not going to be used for a long period of time Remove dead batteries and dispose of them properl...

Page 16: ...OBLEX 22 CHANGHONG 34 NOKIA 31 DAEWOO 17 37 PANASONIC 04 11 FERGUSON 27 PEONY 34 38 39 FINLUX 30 PHILCO 10 17 21 FUNAI 32 PHILIPS 02 GRADIENTE 15 20 RCA 05 GRUNDIG 19 SAMSUNG 12 33 34 35 HITACHI 10 ITT 28 SANYO 13 16 JINXING 38 SEARS 13 JVC 01 23 24 25 SHARP 06 SONY 07 KONKA 40 TCL 41 LG GOLDSTAR 18 THOMSON 26 MAGNAVOX 02 TOSHIBA 08 14 MITSUBISHI 03 ZENITH 09 TV2 2 TV1 1 TV3 3 TV5 5 TV4 4 TV6 6 TV...

Page 17: ...e disc cannot be played back OPEN The disc tray is opening CLOSE The disc tray is closing NO DISC No disc is loaded RESUME STOP The unit stops and memorizes the interrupted position NOTE Make sure that the TV DVD switch on the remote control unit is set to DVD when using the 5 2 3 and numeric buttons for controlling the unit Turning on off the unit NOTE Even if you press the DVD STANDBY ON on the ...

Page 18: ...en connecting with a surround decoder select 2 CH DOLBY SURROUND When connecting with a stereo amplifier receiver or television set select 2 CH STEREO When connecting the unit s 5 1 channel input select MULTI CHANNEL 7 Press ENTER The pull down menu of the DIGITAL AUDIO OUTPUT appears Initial setup before using the unit TV2 2 TV1 1 TV3 3 TV5 5 TV4 4 TV6 6 TV8 8 TV7 7 TV9 9 TV0 0 TV 10 MUTING 10 TV...

Page 19: ...item When connecting with a Dolby Digital decoder select DOLBY DIGITAL PCM When connecting with a DTS or MPEG Multichannel decoder select STREAM PCM When connecting with other digital devices select PCM ONLY 9 Press ENTER The TV screen returns to show the opening display NOTES This setting may not be necessary except when turning on the power after purchasing the unit You can also set these items ...

Page 20: ...out playable and non playable disc types see page 4 When loading a disc on the disc tray be sure to position the disc inside the recess Otherwise the disc may be damaged when the disc tray is closed or you may not be able to remove the disc from the unit Do not use any stabilizer when playing back a disc With some DVD VIDEO discs the unit starts playback automatically after inserting the disc If y...

Page 21: ...s not displayed Note that some operations may not be accepted For example some discs may not allow rapid advance reverse or slow motion playback Available Press 7 The unit stops playback Hint If you press 0 during playback the unit stops playback and opens the disc tray To start playback Icon Status Appears at the beginning of playback mode Appears at the beginning of pause mode Appears at the beg...

Page 22: ...ANDBY ON on the remote control unit In this case RESUME STOP is not shown on the display window To clear the memory press 7 while the disc stopped The unit memorizes interrupt positions for the last 30 discs played If you interrupt the playback of a disc for which an interrupt position has already been stored the memory will be updated with the new interrupt position After the unit has stored inte...

Page 23: ...yback last time is still on the disc tray by pressing 7 or by turning off the power Press 3 The unit resumes playback from the position where playback was interrupted If you press 3 then 7 the unit starts playback after the display window shows RESUME PLAY Note that you cannot resume playback if you interrupted playback last time by opening the disc tray To play back a disc from the beginning inst...

Page 24: ... press 8 the still picture advances to the next frame Pressing 3 returns to normal playback To advance or reverse playback rapidly while monitoring NOTES During rapid playback the sound will be muted except when playing an Audio CD When using rapid playback with an Audio CD the sound will be played discontinuously This function does not work for an MP3 disc To advance a still picture frame by fram...

Page 25: ...e depending on the disc configuration With an SVCD Video CD or Audio CD pressing the button skips a track The selection number appears in the display window on the front panel To skip forward titles chapters groups tracks press as many times as required To skip to the beginning of the current titles chapters groups tracks press 4 once To skip back titles chapters groups tracks press 4 as many time...

Page 26: ...select a number higher than 10 Use the 10 button Examples To select 13 10 3 To select 34 10 10 10 4 To select 40 10 10 10 10 The unit starts playback from the beginning of the selection The selected title chapter group or track number appears in the display window on the front panel To locate a desired selection using the numeric buttons Unit status Disc type What is specified While stopped DVD AU...

Page 27: ... To check the playback status TV2 2 TV1 1 TV3 3 TV5 5 TV4 4 TV6 6 TV8 8 TV7 7 TV9 9 TV0 0 TV 10 MUTING 10 TV VIDEO CANCEL TITLE GROUP RETURN VFP AUDIO SUB TITLE REPEAT ANGLE DIGEST 3D PHONIC PAL NTSC ZOOM AMP VOL PROGRESSIVE SCAN fs Rate RM SXV012E REMOTE CONTROL OPEN CLOSE TV DVD NEXT PREVIOUS SELECT STROBE CLEAR SLOW SLOW VOL VOL CH CH T OP MENU MENU ON SCREEN CHOICE ENTER STANDBY ON TV DVD PAGE...

Page 28: ...onds from the beginning of a title playback starts from the beginning of the title You can adjust the brightness of the display window Press 5 or while holding down ANGLE You can select the display window brightness from four levels or off If the brightness is set to off nothing will be shown on the display Icon Status Playback mode Stop mode Pause mode Fast forward backward playback mode Slow mot...

Page 29: ...responding number using the numeric buttons which may cause the unit to automatically start playback Available Some SVCD Video CD discs support the PBC function PBC is an abbreviation of PlayBack Control A SVCD Video CD disc recorded with PBC has its own menus such as a list of the songs of the disc You can locate a specific scene by using the PBC menu NOTE Make sure that the TV DVD switch on the ...

Page 30: ...thout the PBC function do any of the following Press TOP MENU or MENU Press 7 to stop playback then press 3 Available While playing back a DVD AUDIO DVD VIDEO disc with more than one title or one group you can specify a desired title to or group be played using the numeric buttons During playback 1 Press TITLE GROUP is shown in the title display area of the display window Display window example fo...

Page 31: ...ss ENTER The unit starts playback from the specified time Example for DVD AUDIO DVD VIDEO To playback from 2 H 34 M 00 S Example for SVCD Video CD Audio CD To playback from 23 M 40 S You do not have to press 0 to enter the trailing zeros for the last two digits in the example above To correct a mistake Use 2 repeatedly to move back to the digit where you entered a undesired numeral the leftmost di...

Page 32: ...appear 3 Press ENTER The unit starts playback from the selected scene NOTES When a DVD AUDIO disc is stopped you can specify the elapsed time from the beginning of group 1 When appears on the TV screen The time you have selected is not contained on the disc or the time search function does not work on the disc Also note that the time search function does not work during SVCD Video CD playback with...

Page 33: ...ng a bonus group is stopped 1 Use the numeric buttons to select the bonus group number the last group The display window and on screen display prompt you to enter the key number as shown below 2 Use the numeric buttons 0 to 9 to enter the key number If you enter the key number correctly the unit starts playback of the bonus group If you enter a wrong key number the unit does not start playback and...

Page 34: ...e above display for inquiring the key number In the random playback mode tracks in the bonus group are not played back To turn off the key number entry display operate any one of the following Press 7 Open the disc tray Turn the power off Opening the disc tray or turning the power off also erases the memory of the key number while pressing 7 does not erase the memory To playback in a specific orde...

Page 35: ...am table appears again Note that the program remains To check the program contents During playback press 7 Playback stops and the program table is shown When the unit is playing back an Audio CD and the program table is not shown you can bring up the table by carrying out steps 1 to 3 During DVD AUDIO SVCD Video CD playback you cannot see the program table during playback To quit program playback ...

Page 36: ...EAT the repeat mode cycles among All repeat Repeat 1 and off The selected mode is reflected in icons displayed in the front panel display window as shown below If you press REPEAT while stopped you need to press 3 to start repeat playback REPEAT Repeats the current group for DVD AUDIO current title for DVD VIDEO or all tracks for SVCD Video CD Audio CD REPEAT 1 Repeats the current chapter for DVD ...

Page 37: ...yback in the title chapter group track repeat mode if you skip the title chapter group track using 4 etc the destination title chapter group track is repeated If appears when pressing REPEAT during DVD VIDEO playback The disc content does not allow title or chapter repeat Repeat playback function cannot be used during SVCD Video CD playback with PBC function To repeat a desired part A B repeat pla...

Page 38: ...itle channel of an SVCD disc Available Some DVD AUDIO DVD VIDEO and SVCD discs for movies guides etc contain more than one subtitle language You can choose a desired one from them Hint At the beginning of the part where the subtitles are recorded appears on the TV screen except when the ON SCREEN GUIDE preference is set to OFF See page 62 for details about ON SCREEN GUIDE preference During DVD AUD...

Page 39: ...en 2 Use AUDIO fs Rate or 5 to select the desired audio Each time you press 5 or AUDIO fs Rate the audio changes See the following examples for audio selection For DVD AUDIO DVD VIDEO Each time you press 5 or AUDIO fs Rate the audio language or sound changes Example 1 3 ENGLISH 2 3 FRENCH 3 3 SPANISH 3 OFF 4 OFF 1 4 2 4 3 4 4 4 NOTES For DVD VIDEO the selected language may be abbreviated on the TV...

Page 40: ...e 3 Press ENTER You can see the picture from the selected angle The angle selection window is dismissed ST1 ST stereo ST2 L L 1 R R 1 L 2 R 2 NOTES For DVD VIDEO the selected language may be abbreviated on the TV screen See Table of languages and their abbreviations on page 58 The Audio selection window will automatically disappear if you do not change the audio for several seconds When appears on...

Page 41: ...on the upper left Each press of 8 advances the video by one frames Pressing 3 instead of 8 advances each frame at normal playback speed with a time delay over the whole nine pictures while the sound is muted To return to the normal screen Press and hold 8 for more than 1 second NOTES The Angle selection window will automatically disappear if you do not change the angle for several seconds When app...

Page 42: ...r watching a movie software in a room with suppressed light They are factory presets and you cannot change parameters for them If you select USER 1 or USER 2 you can adjust parameters that affect the picture character and store the settings as a user preset See the next step To zoom in or out pictures ZOOM TV2 2 TV1 1 TV3 3 TV5 5 TV4 4 TV6 6 TV8 8 TV7 7 TV9 9 TV0 0 TV 10 MUTING 10 TV VIDEO CANCEL ...

Page 43: ...n Repeat steps 3 to 6 if you want to set other parameters Available Using the 3D PHONIC function you can get a simulated surround effect from your stereo system During playback 1 Press 3D PHONIC The 3D PHONIC window appears on the TV screen 2 Select the desired mode by using 2 3 Each time you press the button the 3D PHONIC mode changes as follows ACTION Suitable for action movies and sports progra...

Page 44: ... PHONIC function works correctly only when playing back a DVD VIDEO disc recorded with Dolby Digital Pressing the 3D PHONIC button will have no effect with other content When playing back a DVD VIDEO disc recorded with Dolby Digital that does not contain the rear signal you can change the 3D PHONIC setting but you will not be able to achieve a correct 3D effect The 3D PHONIC function does not affe...

Page 45: ...ss ON SCREEN TV2 2 TV1 1 TV3 3 TV5 5 TV4 4 TV6 6 TV8 8 TV7 7 TV9 9 TV0 0 TV 10 MUTING 10 TV VIDEO CANCEL TITLE GROUP RETURN VFP AUDIO SUB TITLE REPEAT ANGLE DIGEST 3D PHONIC PAL NTSC ZOOM AMP VOL PROGRESSIVE SCAN fs Rate RM SXV012E REMOTE CONTROL CLOSE NEXT PREVIOUS SELECT STROBE CLEAR SLOW SLOW VOL VOL CH CH T OP MENU MENU ON SCREEN CHOICE ENTER PAGE ON SCREEN 8 5Mbps TITLE 33 TOTAL 1 25 58 CHAP ...

Page 46: ... the specified time See page 29 for details about time search function 4 Track search During playback only Specifies a desired track to be played back from 1 Press ENTER to open the pull down window 2 Use numeric buttons to enter a desired track number For example of entering 12 press 1 then 2 3 Press ENTER to play back from the specified track When the track number is incorrect Overwrite the inco...

Page 47: ... the time search 4 Chapter search During playback only Specifies a desired chapter to be playedback from 1 Press ENTER to open the pull down window 2 Use numeric buttons to enter a desired chapter number For example to enter 12 press 1 then 2 3 Press ENTER to begin playback from the specified chapter When the chapter number is incorrect Overwrite the incorrect number with the correct number The 10...

Page 48: ...A B repeat see page 35 3 Time search Except during SVCD Video CD playback with PBC Specifies a time from the beginning of the current disc as the point from which to begin playback 1 Press ENTER to open the pull down window 2 Use numeric buttons to enter a desired time 3 Press ENTER to begin playback from the specified time See page 29 for details about the time search This function cannot be used...

Page 49: ... A CD can store up to around 10 hours of MP3 audio which is nearly 10 times as much as an Audio CD NOTE Make sure that the TV DVD switch on the remote control unit is set to DVD when using the 5 2 3 and numeric buttons for controlling the unit NOTES for making your own MP3 disc using a CD R CD RW disc Select ISO 9660 as the disc format Finalize the disc after completing recording We recommend you ...

Page 50: ...annot advance or reverse playback of an MP3 disc rapidly You cannot see any other time information but the current track elapsed time Selecting the desired Group and Track Current Group number Current Track number Current track elapsed time MP3 CONTROL Group 01 10 spring sumer fall winter sea mountain camp picnic skiing flower Track 01 06 Total 28 begonia mp3 german chamomile mp3 kiwi fruit mp3 or...

Page 51: ...ress REPEAT while stopped you need to press ENTER or 3 to start repeat playback TV screen Display window Direct selection TV2 2 TV1 1 TV3 3 TV5 5 TV4 4 TV6 6 TV8 8 TV7 7 TV9 9 TV0 0 TV 10 MUTING 10 TV VIDEO CANCEL TITLE GROUP RETURN VFP AUDIO SUB TITLE REPEAT ANGLE DIGEST 3D PHONIC PAL NTSC ZOOM AMP VOL PROGRESSIVE SCAN fs Rate RM SXV012E REMOTE CONTROL OPEN CLOSE TV DVD NEXT PREVIOUS SELECT STROB...

Page 52: ...of the current digital audio are shown in the display window temporarily Example Note that any figure below the first decimal place is omitted in the display window Checking the sampling frequency and bit rate NOTE With some discs NO INFO may appear instead of the sampling frequency and bit rate TV2 2 TV1 1 TV3 3 TV5 5 TV4 4 TV6 6 TV8 8 TV7 7 TV9 9 TV0 0 TV 10 MUTING 10 TV VIDEO CANCEL TITLE GROUP...

Page 53: ...ling the unit TV DVD Group 1 File 1 Group 2 Group 1 up to 150 files per directory up to 99 Groups per disc NOTES for making your own JPEG disc using a CD R CD RW disc Select ISO 9660 as the disc format Finalize the disc after completing recording We recommend you record your material at a 640 x 480 pixel resolution This unit supports only the baseline JPEG format Therefore it cannot display pictur...

Page 54: ...the picture Press 7 or MENU The TV screen returns to showing the JPEG CONTROL display To see a desired picture JPEG JPEG CONTROL Group 01 10 spring sumer fall winter sea mountain camp picnic skiing flower File 01 06 Total 28 begonia jpg german chamomile jpg kiwi fruit jpg orchard grass jpg petunia jpg north pole jpg TV2 2 TV1 1 TV3 3 TV5 5 TV4 4 TV6 6 TV8 8 TV7 7 TV9 9 TV0 0 TV 10 MUTING 10 TV VID...

Page 55: ...onds the information for the current magnification disappears To display the information press ZOOM or 5 2 3 again To zoom in or out the pictures ZOOM JPEG TV2 2 TV1 1 TV3 3 TV5 5 TV4 4 TV6 6 TV8 8 TV7 7 TV9 9 TV0 0 TV 10 MUTING 10 TV VIDEO CANCEL TITLE GROUP RETURN VFP AUDIO SUB TITLE REPEAT ANGLE DIGEST 3D PHONIC PAL NTSC ZOOM AMP VOL PROGRESSIVE SCAN fs Rate RM SXV012E REMOTE CONTROL OPEN CLOSE...

Page 56: ... the next picture Pressing 3 resumes the slide show playback from the next picture If a black screen appears continuously in the slide show playback The File currently displayed may be non baseline JPEG file In this case select a playable File a baseline JPEG file again e g pressing 7 or MENU to open the JPEG CONTROL display etc Note that it may take a long time to select another File JPEG TV2 2 T...

Page 57: ... starts slide show playback from the specified File If you do not specify a file number the unit starts slide show playback from the first File in the Group Hints You can skip a File in the slide show by using 4 or 5 You can select a File in the current Group by using the numeric buttons Group display area Current File number NOTES To stop slide show playback to dismiss the picture in the middle o...

Page 58: ...k Press 7 or MENU while the JPEG CONTROL display is shown press REPEAT until the repeat mode indication on the JPEG CONTROL display goes off Repeat function JPEG CONTROL display Display Window Function REPEAT ALL REPEAT All Files on the disc are repeated REPEAT GROUP All Files in the current Group are repeated No indication The repeat mode is off JPEG VFP AUDIO SUB TITLE REPEAT ANGLE DIGEST 3D PHO...

Page 59: ... LANGUAGE ENGLISH SUBTITLE ENGLISH ON SCREEN LANGUAGE ENGLISH LANGUAGE SELECT ENTER USE 5 23 TO SELECT USE ENTER TO CONFIRM TO EXIT PRESS CHOICE MONITOR TYPE 4 3 LB STILL MODE AUTO SCREEN SAVER ON MP3 JPEG MP3 PICTURE SELECT ENTER USE 5 23 TO SELECT USE ENTER TO CONFIRM TO EXIT PRESS CHOICE DIGITAL AUDIO OUTPUT STREAM PCM ANALOG OUT MULTI CHANNEL D RANGE COMPRESSION AUTO AUDIO SELECT ENTER USE 5 2...

Page 60: ... Sundanese AB Abkhazian FI Finnish KN Kannada OR Oriya SV Swedish AF Afrikaans FJ Fiji KO Korean KOR PA Panjabi SW Swahili AM Ameharic FO Faroese KS Kashmiri PL Polish TA Tamil AR Arabic FY Frisian KU Kurdish PS Pashto Pushto TE Telugu AS Assamese GA Irish KY Kirghiz PT Portuguese TG Tajik AY Aymara GD Scots Gaelic LA Latin QU Quechua TH Thai AZ Azerbaijani GL Galician LN Lingala RM Rhaeto Romance...

Page 61: ...STILL MODE This mode selects whether the content on the disc is processed by field or by frame If set to AUTO the decision of how to process the content is made automatically based on data and flags recorded on the disc AUTO The unit recognizes the picture type film or video source of the current disc Normally set to AUTO When Progressive scanning mode is active the PROGRESSIVE indicator is lit No...

Page 62: ...th 192 176 4 96 88 2 kHz 16 22 24 bit linear PCM No output DVD with DTS 48 kHz 16 bit stereo linear PCM DTS bitstream DVD with Dolby Digital 48 kHz 16 bit stereo linear PCM Dolby Digital bitstream DVD with MPEG Multichannel 48 kHz 16 bit stereo linear PCM MPEG bitstream Audio CD Video CD SVCD 44 1 kHz 16 bit stereo linear PCM Audio CD with DTS 44 1 kHz 16 bit stereo linear PCM DTS bitstream CD R R...

Page 63: ...the rear panel of the unit when SUBWOOFER is selected If you connect the unit s digital output to an external Dolby Digital or DTS decoder and set DIGITAL AUDIO OUTPUT to STREAM PCM in the AUDIO preference display the speaker settings shown left is not effective Make the speaker settings of the external decoder properly EXPERT When you want to make fine tuning to match your speakers The SIZE DELAY...

Page 64: ...ge 19 for information about on screen guide icons Examples of on screen guide icons or characters OFF On screen guide icons will not be displayed AUTO STANDBY When the unit is stopped for more than 30 minutes or 60 minutes the unit enters standby mode automatically 60 j 30 j OFF AV COMPULINK MODE This item is provided for use in the future Leave it as the default setting DVD 1 PARENTAL LOCK When t...

Page 65: ... 2 Use 5 to select SUB WOOFER or FRONT L R and press ENTER SUB WOOFER The low frequency signal fed from the subwoofer output is boosted up FRONT L R The low frequency signals fed from the front speaker outputs are boosted up However no audios output from the subwoofer when setting to this option The BASS REDIRECT setting is effective only when at least any one of the speaker sizes is set to SMALL ...

Page 66: ...nnot be selected The level is fixed to 0dB CENTER SPEAKER Center speaker REAR SPEAKER Rear speakers SUB WOOFER Subwoofer speaker 3 Use 5 to set the level and press ENTER When you select CENTER SPEAKER REAR SPEAKER or SUB WOOFER you can select the level from 6 to 6dB in 1dB units 4 Repeat steps 2 and 3 if you set other speakers To return to the SPK SETTING page Use 5 to move to RETURN and press ENT...

Page 67: ...ent scenes supports the parental lock feature such scenes which you do not want to let children view can be cut or replaced with other scenes When PARENTAL LOCK is set in the OTHERS menu of the Preference display see page 62 pressing ENTER on the remote control unit brings up the PARENTAL LOCK display shown following This allows you to set limits on DVD VIDEO playback SELECT ENTER USE 5 23 TO SELE...

Page 68: ...RD 7 Enter a 4 digit password using the numeric buttons 0 to 9 8 Press ENTER The parental lock feature is set moves to EXIT Pressing ENTER again returns to the OTHERS menu of the preference display Hint If you want to change the password in step 7 do it before pressing ENTER To set Parental Lock for the first time PARENTAL LOCK TV2 2 TV1 1 TV3 3 TV5 5 TV4 4 TV6 6 TV8 8 TV7 7 TV9 9 TV0 0 TV 10 MUTI...

Page 69: ...ric buttons 0 to 9 The password entered in this step becomes the new password If you want to keep the same password as before enter the same password you did in step 2 Do not forget to enter a password after changing the country code and or parental level Otherwise the new country code and or parental level will not take effect 6 Press ENTER moves to EXIT Pressing ENTER again returns to the OTHERS...

Page 70: ...starts playback If you enter the wrong password WRONG RETRY appears on the TV screen Enter the correct password To temporarily release the Parental Lock PARENTAL LOCK NOTE When you enter the wrong password more than 3 times in step 2 above moves to NOT RELEASE automatically and 5 do not work TV2 2 TV1 1 TV3 3 TV5 5 TV4 4 TV6 6 TV8 8 TV7 7 TV9 9 TV0 0 TV 10 MUTING 10 TV VIDEO CANCEL TITLE GROUP RET...

Page 71: ...ndicator 6 3 play 8 pause indicator 7 PROGRAM RANDOM indicator 8 Multi information window Rear panel 1 AUDIO OUT jacks 6 7 8 10 11 12 2 DIGITAL OUT jacks OPTICAL COAXIAL 12 3 VIDEO OUT VIDEO jack 6 VIDEO OUT S VIDEO jack 7 4 VIDEO OUT COMPONENT VIDEO OUT jacks 8 5 VIDEO SIGNAL SELECTOR 6 AV COMPU LINK jacks 7 AV OUT connector 7 8 Region code label 4 9 AC Power cord 12 XV NA7 DVD AUDIO DVD VIDEO SU...

Page 72: ...witch 14 15 27 47 51 57 TV STANDBY ON button 14 DVD STANDBY ON button 15 TV VIDEO CANCEL button 14 _ TITLE GROUP button 28 49 55 MENU button 27 ENTER button ON SCREEN button 25 43 NEXT button 22 23 47 52 8 STROBE button 20 22 23 39 47 SLOW button 22 AUDIO fs Rate button 37 42 50 VFP PROGRESSIVE SCAN button 10 40 ZOOM buttons 40 53 AMP VOL buttons 14 TV2 2 TV1 1 TV3 3 TV5 5 TV4 4 TV6 6 TV8 8 TV7 7 ...

Page 73: ... not correctly set Set the NTSC REMOTE PAL switch on the rear panel to REMOTE while the unit is turned off see page 9 The TV VIDEO CANCEL 5 2 3 or numeric buttons do not work The TV DVD switch is not correctly set To control the unit set the TV DVD switch to DVD To control your TV set the TV DVD switch to TV see page 14 Operation is not possible Microcomputer malfunction due to lightning or static...

Page 74: ...Set the VIDEO SIGNAL SELECTOR on the rear panel to NTSC while the unit is turned off see page 8 The picture does not fit the television screen MONITOR TYPE is not set correctly Select monitor type correctly see page 59 TV settings are incorrect Set the television correctly The upper and lower parts of the preference display are cut off when using wide aspect TV It depends on the setting on the TV ...

Page 75: ... THX What does THX mean Yes you can THX is the name of a standard for high quality picture and audio recording established by Lucasfilm Ltd The THX label on a disc certifies that it meets this standard When files of the MP3 and Audio CD formats are recorded on a same disc can the unit play files of both formats Discs like this are of the data CD format not the Audio CD format The unit can play onl...

Page 76: ...5 Ω PB PR Output 0 7 Vp p 75 Ω VIDEO OUT pin jack 1 0 Vp p 75 Ω S VIDEO OUT S jack Y Output 1 0 Vp p 75 Ω C Output 286 mVp p 75 Ω RGB Output 700mVp p 75 Ω Horizontal resolution 500 Lines or more Audio outputs ANALOG OUT pin jack 2 0 Vrms 10 kΩ DIGITAL OUT COAXIAL 0 5 Vp p 75 Ω termination OPTICAL 21 dBm to 15 dBm peak Audio characteristics Frequency response CD sampling frequency 44 1 kHz 2 Hz to ...

Page 77: ...Kyrgyzstan KH Cambodia KI Kiribati KM Comoros KN Saint Kitts and Nevis KP Korea Democratic People s Republic of KR Korea Republic of KW Kuwait KY Cayman Islands KZ Kazakhstan LA Lao People s Democratic Republic LB Lebanon LC Saint Lucia LI Liechtenstein LK Sri Lanka LR Liberia LS Lesotho LT Lithuania LU Luxembourg LV Latvia LY Libyan Arab Jamahiriya MA Morocco MC Monaco MD Moldova Republic of MG M...

Page 78: ...from stereo output connectors DTS A Digital Surround audio encoding format configured with six 5 1 channels similar to Dolby Digital It requires a decoder either in the player or in an external receiver DTS stands for Digital Theater Systems Not all DTS discs contain six 5 1 channels of information Dynamic range The difference between the loudest and softest sounds Dynamic range compression The dy...

Page 79: ...of video display for normal 4 3 TV screens The image is zoomed to fill the screen vertically and the field of view may be panned while the left and or right sides of the picture are cut off Parental lock A DVD function that prevents undesired viewing by children depending on disc content Ordinarily a password is required to play back a locked disc Otherwise undesirable scenes are automatically ski...

Page 80: ...ess it is specifically stated that it is designed for unattended operation or has a standby mode Switch off using the switch on the equipment and make sure that your family know how to do this Special arrangements may need to be made for infirm or handicapped people DON T use equipment such as personal stereos or radios so that you are distracted from the requirements of traffic safety It is illeg...

Page 81: ...t moet u de VIDEO SIGNAL SELECTOR schakelaars op het achterpaneel correct instellen overeenkomstig het soort aansluiting dat u maakt Verzet de schakelaars terwijl het apparaat is uitgeschakeld De onderstaande tabel toont de voorgeschreven instellingen Als de VIDEO SIGNAL SELECTOR schakelaars niet correct zijn ingesteld zal het beeld niet juist worden weergegeven Schakel het apparaat altijd uit als...

Page 82: ...ssa taulukossa Jos VIDEO SIGNAL SELECTOR kytkimiä ei aseteta oikein laite ei pysty näyttämään videota oikealla tavalla Katkaise aina virta laitteesta jos muutat säätöä liitäntöjen suorittamisen jälkeen Katso tarkemmat tiedot laitteen käyttöohjeesta 1 Kun DVD soitin liitetään käyttämällä VIDEO S VIDEO tai AV OUT SCART liittimiä NTSC REMOTE PAL kytkin on asetettava asentoon PAL 2 NTSC formaatin sign...

Reviews: